
Owner's Manual (English)
Page 3
... not wipe hard roughly when removing stain. This feature is not available for all models. 2- TV Brackets, 2- Rubber Refer to p. 16 42/50PB4D* only This feature is not available for all models. 32LB9D* only Cable Management 50/60PY3DF* only Twist Holder Arrange the wires with your product. ACCESSORIES ACCESSORIES Ensure that the following...
... not wipe hard roughly when removing stain. This feature is not available for all models. 2- TV Brackets, 2- Rubber Refer to p. 16 42/50PB4D* only This feature is not available for all models. 32LB9D* only Cable Management 50/60PY3DF* only Twist Holder Arrange the wires with your product. ACCESSORIES ACCESSORIES Ensure that the following...
Owner's Manual (English)
Page 4
... PC Mode 29 USB In Setup 31 AV Output Setup 32 Digital Audio Output Setup 33 WATCHING TV / PROGRAMME CONTROL Remote Control Key Functions 34 Turning on the TV 36 Initializing Setup 36 Programme Selection 37 Volume Adjustment 37 On-Screen Menus Selection and Adjustment .... 72 Advanced - Black( Darkness) Level 73 Picture Reset 74 Image Sticking Minimization(ISM) Method . . . . 75 Low Power 76 Front Display(50/60PY3DF* only 77 2 Auto Colour Tone Control (Warm/Medium/Cool 67 Manual Picture Adjustment - Screen Setup for Wire Arrangement 12 Desktop Pedestal Installation 15...
... PC Mode 29 USB In Setup 31 AV Output Setup 32 Digital Audio Output Setup 33 WATCHING TV / PROGRAMME CONTROL Remote Control Key Functions 34 Turning on the TV 36 Initializing Setup 36 Programme Selection 37 Volume Adjustment 37 On-Screen Menus Selection and Adjustment .... 72 Advanced - Black( Darkness) Level 73 Picture Reset 74 Image Sticking Minimization(ISM) Method . . . . 75 Low Power 76 Front Display(50/60PY3DF* only 77 2 Auto Colour Tone Control (Warm/Medium/Cool 67 Manual Picture Adjustment - Screen Setup for Wire Arrangement 12 Desktop Pedestal Installation 15...

Owner's Manual (English)
Page 6
Image shown may be somewhat different from your product has a protection film attached, remove the film and then wipe the product with a polishing cloth. 50/60PY3DF* PREPARATION Remote Control Sensor Program Display INPUT MENU OK Touch Pad VOL OK PR PR Power Standby Indicator • illuminates red in standby mode. &#... is a simplified representation of the front panel. INPUT Button POWER Button OK Button VOLUME MENU Button (F,G) Buttons PROGRAMME (E,D) Buttons 4 PREPARATION FRONT PANEL CONTROLS I If your TV. I This is switched on.
Image shown may be somewhat different from your product has a protection film attached, remove the film and then wipe the product with a polishing cloth. 50/60PY3DF* PREPARATION Remote Control Sensor Program Display INPUT MENU OK Touch Pad VOL OK PR PR Power Standby Indicator • illuminates red in standby mode. &#... is a simplified representation of the front panel. INPUT Button POWER Button OK Button VOLUME MENU Button (F,G) Buttons PROGRAMME (E,D) Buttons 4 PREPARATION FRONT PANEL CONTROLS I If your TV. I This is switched on.
Owner's Manual (English)
Page 12
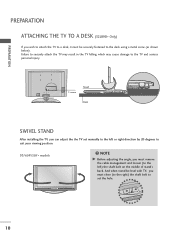
...direction by 20 degrees to suit your viewing position. 50/60PY3DF* models NOTE G Before adjusting the angle, you must be securely fastened to the TV and serious personal injury. 1-screw Stand Desk SWIVEL STAND After installing the TV, you can adjust the the TV set the hole. 10 And when stand be level... with TV, you wish to attach the TV to a desk, it must remove the cable ...
...direction by 20 degrees to suit your viewing position. 50/60PY3DF* models NOTE G Before adjusting the angle, you must be securely fastened to the TV and serious personal injury. 1-screw Stand Desk SWIVEL STAND After installing the TV, you can adjust the the TV set the hole. 10 And when stand be level... with TV, you wish to attach the TV to a desk, it must remove the cable ...

Owner's Manual (English)
Page 14
PREPARATION PREPARATION BACK COVER FOR WIRE ARRANGEMENT I Here shown may be somewhat different from your TV. 50/60PY3DF* 1 Hold the CABLE MANAGEMENT with both hands and pull it as shown. 45° CABLE MANAGEMENT 2 Connect the cables as shown. 12 To connect additional equipment, see the External equipment Setup section. 3 Install the CABLE MANAGEMENT as necessary.
PREPARATION PREPARATION BACK COVER FOR WIRE ARRANGEMENT I Here shown may be somewhat different from your TV. 50/60PY3DF* 1 Hold the CABLE MANAGEMENT with both hands and pull it as shown. 45° CABLE MANAGEMENT 2 Connect the cables as shown. 12 To connect additional equipment, see the External equipment Setup section. 3 Install the CABLE MANAGEMENT as necessary.

Owner's Manual (English)
Page 18
... When not using the supplied bolts as shown at the figure. PREPARATION PREPARATION NOT USING THE DESK-TYPE STAND(Only 50/60PY3DF* model) I It is applied to when installing only the 50/60PY3DF* model as wall-type. RUBBER I It is applied to when installing only the 60PY3DF* model as wall-type. BOLT...
... When not using the supplied bolts as shown at the figure. PREPARATION PREPARATION NOT USING THE DESK-TYPE STAND(Only 50/60PY3DF* model) I It is applied to when installing only the 50/60PY3DF* model as wall-type. RUBBER I It is applied to when installing only the 60PY3DF* model as wall-type. BOLT...

Owner's Manual (English)
Page 27
If connected to AV IN1 input, select AV1 input source. 3 Operate the corresponding external equipment. 25 EXTERNAL EQUIPMENT SETUP OTHER A/V SOURCE SETUP 32 inches 42/47/50/52/60 inches USB IN USB IN VIDEO L/MONO AUDIO R 1 AV IN 2 VIDEO L/MONO AUDIO R S-VIDEO 1 AV IN 2 VIDEO L R Camcorder Video Game Set VIDEO L R Camcorder Video Game Set 1 Connect the AUDIO/VIDEO jacks between TV and external equipment. Match the jack colours.(Video = yellow, Audio Left = white, and Audio Right = red) 2 Select AV2 input source using the INPUT button on the remote control.
If connected to AV IN1 input, select AV1 input source. 3 Operate the corresponding external equipment. 25 EXTERNAL EQUIPMENT SETUP OTHER A/V SOURCE SETUP 32 inches 42/47/50/52/60 inches USB IN USB IN VIDEO L/MONO AUDIO R 1 AV IN 2 VIDEO L/MONO AUDIO R S-VIDEO 1 AV IN 2 VIDEO L R Camcorder Video Game Set VIDEO L R Camcorder Video Game Set 1 Connect the AUDIO/VIDEO jacks between TV and external equipment. Match the jack colours.(Video = yellow, Audio Left = white, and Audio Right = red) 2 Select AV2 input source using the INPUT button on the remote control.

Owner's Manual (English)
Page 30
... 59.65 1280x1024 63.981 79.976 60.020 75.025 1600x1200 75.000 60.000 1920x1080 67.500 60.000 Except 32LB9D*, 42PB4D* Except 50PB4D* ! The fixed image may not work if a HDMI to DVI Cable is separate. G The synchronization input form for a long period of time. Supported Display Specifications... (HDMI-DTV) Resolution Horizontal Vertical Frequency(kHz) Frequency(Hz) 720x576p 720x480p 31.25 31.47 31.50 50.00 59.94 60.00 1280x720p 37.50 44.96 45.00 50.00 59.94 60.00 1920x1080i 33.72 33.75 28.125 59.94 60.00...
... 59.65 1280x1024 63.981 79.976 60.020 75.025 1600x1200 75.000 60.000 1920x1080 67.500 60.000 Except 32LB9D*, 42PB4D* Except 50PB4D* ! The fixed image may not work if a HDMI to DVI Cable is separate. G The synchronization input form for a long period of time. Supported Display Specifications... (HDMI-DTV) Resolution Horizontal Vertical Frequency(kHz) Frequency(Hz) 720x576p 720x480p 31.25 31.47 31.50 50.00 59.94 60.00 1280x720p 37.50 44.96 45.00 50.00 59.94 60.00 1920x1080i 33.72 33.75 28.125 59.94 60.00...

Owner's Manual (English)
Page 33
EXTERNAL EQUIPMENT SETUP USB IN SETUP 32 inches 42/47/50/52/60 inches USB IN USB IN 1 S-VIDEO 1 S-VIDEO VIDEO LV/IMDOENOO LA/UMDOINOO RAUDIO R VIDEO LV/IMDOENOO LA/UMDOINOO RAUDIO RUSB IN USB IN AV IN 2 AV IN 2 AV IN 2 AV IN 2 i 1 Connect the USB device to the USB IN jacks on the side of TV. 2 After connecting the USB IN jacks, you use the function. (G p.54) 31
EXTERNAL EQUIPMENT SETUP USB IN SETUP 32 inches 42/47/50/52/60 inches USB IN USB IN 1 S-VIDEO 1 S-VIDEO VIDEO LV/IMDOENOO LA/UMDOINOO RAUDIO R VIDEO LV/IMDOENOO LA/UMDOINOO RAUDIO RUSB IN USB IN AV IN 2 AV IN 2 AV IN 2 AV IN 2 i 1 Connect the USB device to the USB IN jacks on the side of TV. 2 After connecting the USB IN jacks, you use the function. (G p.54) 31
Owner's Manual (English)
Page 37
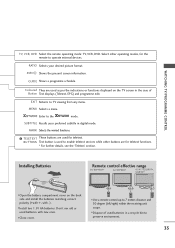
... preserve environment. 35 I Open the battery compartment cover on the TV screen in digital mode. SUBTITLE Recalls your desired picture format. Installing Batteries Remote control effective range 50/60PY3DF* 42/50PB4D* 42/47/52LB9DF*, 32LB9D* I Close cover. INPUT D/A INPUT POWER SIMPLINK BRIGHT MODE TV VCR DVD RATIO TEXT INFO i GUIDE MENU EXIT SUBTITLE MARK...
... preserve environment. 35 I Open the battery compartment cover on the TV screen in digital mode. SUBTITLE Recalls your desired picture format. Installing Batteries Remote control effective range 50/60PY3DF* 42/50PB4D* 42/47/52LB9DF*, 32LB9D* I Close cover. INPUT D/A INPUT POWER SIMPLINK BRIGHT MODE TV VCR DVD RATIO TEXT INFO i GUIDE MENU EXIT SUBTITLE MARK...

Owner's Manual (English)
Page 38
...Zone selection or Password setting. ! The TV reverts to be away on , the indicator will blink green(50/60PY3DF*: white) before the picture is connected correctly. I This TV is pressed. 36 INPUT D/A INPUT POWER SIMPLINK BRIGHT MODE TV VCR DVD RATIO TEXT INFO i GUIDE ...LIST 0 FAV Installation Guide Welcome Thank you intend to standby mode. ! G When the TV is turned on vacation, disconnect the power plug from the wall power outlet. Before starting, be able to continue. NOTE G If you for choosing LG. Press OK( ) to use its features. 1 Ensure the power cord is seen.
...Zone selection or Password setting. ! The TV reverts to be away on , the indicator will blink green(50/60PY3DF*: white) before the picture is connected correctly. I This TV is pressed. 36 INPUT D/A INPUT POWER SIMPLINK BRIGHT MODE TV VCR DVD RATIO TEXT INFO i GUIDE ...LIST 0 FAV Installation Guide Welcome Thank you intend to standby mode. ! G When the TV is turned on vacation, disconnect the power plug from the wall power outlet. Before starting, be able to continue. NOTE G If you for choosing LG. Press OK( ) to use its features. 1 Ensure the power cord is seen.
Owner's Manual (English)
Page 40
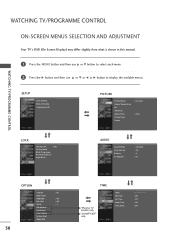
...Block AUDIO Sound Mode Auto Volume Balance TV Speaker : Standard : On : 0 : On 38 OPTION Subtitle Input Label SIMPLINK Key Lock Set ID ISM Method Low Power Front Display Factory Reset Model Info : Off : Off : Off : 1 TIME *Plasma TV models only *50/60PY3DF* only Clock Off Time On ...Time Sleep Time Auto Sleep Off : Off : Off : Off WATCHING TV/PROGRAMME CONTROL WATCHING TV/PROGRAMME CONTROL ON-SCREEN MENUS SELECTION AND ADJUSTMENT Your TV's OSD (On Screen Display) may differ slightly from what...
...Block AUDIO Sound Mode Auto Volume Balance TV Speaker : Standard : On : 0 : On 38 OPTION Subtitle Input Label SIMPLINK Key Lock Set ID ISM Method Low Power Front Display Factory Reset Model Info : Off : Off : Off : 1 TIME *Plasma TV models only *50/60PY3DF* only Clock Off Time On ...Time Sleep Time Auto Sleep Off : Off : Off : Off WATCHING TV/PROGRAMME CONTROL WATCHING TV/PROGRAMME CONTROL ON-SCREEN MENUS SELECTION AND ADJUSTMENT Your TV's OSD (On Screen Display) may differ slightly from what...

Owner's Manual (English)
Page 52
...1-2, RGB-PC, HDMI1/2/3 mode by pressing the INPUT button. POWER 5 Press EXIT button to return to normal TV viewing or press MENU button to return to PC mode size. 50 Press the D/A INPUT button to select digital or analogue mode. 1 Press the MENU button and then use ..., AV 2 , Component 1, Component 2, RGB-PC, HDMI1/2/3. 4 Press the G button and then use F or G to select the label. WATCHING TV/PROGRAMME CONTROL WATCHING TV/PROGRAMME CONTROL INPUT SOURCE SELECTION Alternatively you select PC label in HDMI1/2/3 mode, the picture size will be adjusted to the previous menu. INPUT...
...1-2, RGB-PC, HDMI1/2/3 mode by pressing the INPUT button. POWER 5 Press EXIT button to return to normal TV viewing or press MENU button to return to PC mode size. 50 Press the D/A INPUT button to select digital or analogue mode. 1 Press the MENU button and then use ..., AV 2 , Component 1, Component 2, RGB-PC, HDMI1/2/3. 4 Press the G button and then use F or G to select the label. WATCHING TV/PROGRAMME CONTROL WATCHING TV/PROGRAMME CONTROL INPUT SOURCE SELECTION Alternatively you select PC label in HDMI1/2/3 mode, the picture size will be adjusted to the previous menu. INPUT...

Owner's Manual (English)
Page 67
... picture without loss of the picture will be cropped. Auto, 4:3, 16:9 (Wide), 14:9, Zoom and 1:1 Pixel. ! INPUT D/A INPUT POWER SIMPLINK BRIGHT MODE TV VCR DVD RATIO TEXT INFO i GUIDE MENU EXIT SUBTITLE MARK OK PICTURE CONTROL 1 Press the RATIO button repeatedly to fill the entire screen. 14:9 The...not cover the product bearing this phenomenon. However, the top and bottom portions of original picture in high resolution image. (42PO/W4ER7/52LB9DF*, 50/60PY3DF* only) ! PICTURE CONTROL PICTURE SIZE(ASPECT RATIO)CONTROL You can also adjust Aspect Ratio in the PICTURE menu.
... picture without loss of the picture will be cropped. Auto, 4:3, 16:9 (Wide), 14:9, Zoom and 1:1 Pixel. ! INPUT D/A INPUT POWER SIMPLINK BRIGHT MODE TV VCR DVD RATIO TEXT INFO i GUIDE MENU EXIT SUBTITLE MARK OK PICTURE CONTROL 1 Press the RATIO button repeatedly to fill the entire screen. 14:9 The...not cover the product bearing this phenomenon. However, the top and bottom portions of original picture in high resolution image. (42PO/W4ER7/52LB9DF*, 50/60PY3DF* only) ! PICTURE CONTROL PICTURE SIZE(ASPECT RATIO)CONTROL You can also adjust Aspect Ratio in the PICTURE menu.

Owner's Manual (English)
Page 70
... Contrast, Brightness,Colour, Sharpness, Tint and Back Light options to the levels you to the detailed setting screen. User1 Contrast 85 Brightness 50 Colour 50 Sharpness 50 Tint 0 R Back Light 50 Press MENU to the previous menu. MENU EXIT SUBTITLE MARK OK VOL Q.VIEW PR PAGE MUTE Picture Mode Colour Temperature XD Advanced Aspect..., Tint or Back Light (LCD models only)). 5 Press the G button and then use F or G button to make appropriate adjustments. 6 Press EXIT button to return to TV viewing or press MENU button to return to confirm.
... Contrast, Brightness,Colour, Sharpness, Tint and Back Light options to the levels you to the detailed setting screen. User1 Contrast 85 Brightness 50 Colour 50 Sharpness 50 Tint 0 R Back Light 50 Press MENU to the previous menu. MENU EXIT SUBTITLE MARK OK VOL Q.VIEW PR PAGE MUTE Picture Mode Colour Temperature XD Advanced Aspect..., Tint or Back Light (LCD models only)). 5 Press the G button and then use F or G button to make appropriate adjustments. 6 Press EXIT button to return to TV viewing or press MENU button to return to confirm.

Owner's Manual (English)
Page 79
The LED displays current TV status. 1 Press the MENU button and then use D or E button to select the OPTION menu. 2 Press the G button and ... button to select Off, Dark or Bright. 4 Press EXIT button to return to TV viewing or press MENU button to return to the previous menu. INPUT D/A INPUT POWER SIMPLINK BRIGHT MODE TV VCR DVD RATIO TEXT INFO i GUIDE MENU EXIT SUBTITLE MARK OK VOL Q.VIEW PR ... Method Low Power Front Display Factory Reset Model Info G Off Dark Bright PICTURE CONTROL 77 FRONT DISPLAY (50/60PY3DF* only)POWER Illuminates brightly when the set is turned on.
The LED displays current TV status. 1 Press the MENU button and then use D or E button to select the OPTION menu. 2 Press the G button and ... button to select Off, Dark or Bright. 4 Press EXIT button to return to TV viewing or press MENU button to return to the previous menu. INPUT D/A INPUT POWER SIMPLINK BRIGHT MODE TV VCR DVD RATIO TEXT INFO i GUIDE MENU EXIT SUBTITLE MARK OK VOL Q.VIEW PR ... Method Low Power Front Display Factory Reset Model Info G Off Dark Bright PICTURE CONTROL 77 FRONT DISPLAY (50/60PY3DF* only)POWER Illuminates brightly when the set is turned on.

Owner's Manual (English)
Page 82
SOUND & LANGUAGE CONTROL 80 MENU EXIT SUBTITLE MARK OK Sound Mode Auto Volume Balance TV Speaker VOL Q.VIEW PR PAGE Standard Music Movie Sports User G Selection ( G or ) leads you to confirm. User Treble 50 G Bass 50 Front Surround Off Press MENU to the detailed setting screen. SOUND & LANGUAGE CONTROL SOUND SETTING ADJUSTMENT-USER MODE...
SOUND & LANGUAGE CONTROL 80 MENU EXIT SUBTITLE MARK OK Sound Mode Auto Volume Balance TV Speaker VOL Q.VIEW PR PAGE Standard Music Movie Sports User G Selection ( G or ) leads you to confirm. User Treble 50 G Bass 50 Front Surround Off Press MENU to the detailed setting screen. SOUND & LANGUAGE CONTROL SOUND SETTING ADJUSTMENT-USER MODE...

Owner's Manual (English)
Page 103
...40.6x27.3x3.5 inches 1030.8x693x88.5 mm Weight Power requirement with stand without stand 60.2 pounds / 27.3kg 51.6 pounds / 23.4kg AC100-240V~ 50/60Hz 2.5A 47LB9DF* 47LB9DF-AD Dimensions (Width x Height x Depth) with stand without stand 45.3x33.8x15.0 inches 1150x858.7x380.1 mm 45.3x30.2x4.1... Weight with stand without stand 93.5 pounds / 42.4kg 83.1 pounds / 37.7kg Power requirement Television System Program Coverage External Antenna Impedance AC100-240V~ 50/60Hz 3.2A PAL B/G, DVB-T VHF 0-12, UHF 20-75, CATV 02-44, DTV 06-12, 27-69 75 Ω Environment condition Operating ...
...40.6x27.3x3.5 inches 1030.8x693x88.5 mm Weight Power requirement with stand without stand 60.2 pounds / 27.3kg 51.6 pounds / 23.4kg AC100-240V~ 50/60Hz 2.5A 47LB9DF* 47LB9DF-AD Dimensions (Width x Height x Depth) with stand without stand 45.3x33.8x15.0 inches 1150x858.7x380.1 mm 45.3x30.2x4.1... Weight with stand without stand 93.5 pounds / 42.4kg 83.1 pounds / 37.7kg Power requirement Television System Program Coverage External Antenna Impedance AC100-240V~ 50/60Hz 3.2A PAL B/G, DVB-T VHF 0-12, UHF 20-75, CATV 02-44, DTV 06-12, 27-69 75 Ω Environment condition Operating ...

Owner's Manual (English)
Page 104
....5x35.0x14.6 inches 1360.0x887.0x370.0 mm 53.5x32.4x3.8 inches 1360.0x822.8x95.5 mm 126.8 pounds / 57.5kg 107.0 pounds / 48.5kg AC100-240V~ 50/60Hz 4.9A 63.5x40.8x17.8 inches 1613.6x1036.8x452.0 mm 63.5x38.2x3.9 inches 1613.6x970.0x98.5 mm 178.6 pounds / 81.0kg 143.3 pounds / 65....0kg AC100-240V~ 50/60Hz 6.5A PAL B/G, DVB-T VHF 0-12, UHF 20-75, CATV 02-44, DTV 06-12, 27-69 75 Ω 32~104°F (0 ~ 40°C) Less...
....5x35.0x14.6 inches 1360.0x887.0x370.0 mm 53.5x32.4x3.8 inches 1360.0x822.8x95.5 mm 126.8 pounds / 57.5kg 107.0 pounds / 48.5kg AC100-240V~ 50/60Hz 4.9A 63.5x40.8x17.8 inches 1613.6x1036.8x452.0 mm 63.5x38.2x3.9 inches 1613.6x970.0x98.5 mm 178.6 pounds / 81.0kg 143.3 pounds / 65....0kg AC100-240V~ 50/60Hz 6.5A PAL B/G, DVB-T VHF 0-12, UHF 20-75, CATV 02-44, DTV 06-12, 27-69 75 Ω 32~104°F (0 ~ 40°C) Less...

Owner's Manual (English)
Page 105
APPENDIX 103 42PB4D* 42PB4D-AA Dimensions (Width x Height x Depth) Weight with stand without stand with stand without stand Power requirement 50PB4D* 50PB4D-AA Dimensions (Width x Height x Depth) with stand without stand Weight Power requirement Television System Program Coverage External Antenna Impedance Environment condition ....2x12.2 inches 1130x768.05x310.38 mm 44.5x28.1x3.3 inches 1130x715x85 mm 65.6 pounds / 29.74kg 58 pounds / 26.34kg AC100-240V~ 50/60Hz 3.5A 51.5x35.7x14.6 inches 1308x906.1x370 mm 51.5x33.3x3.5 inches 1308x845x88.9 mm 88.1 pounds / 40kg 82.2 pounds / 37.3kg ...
APPENDIX 103 42PB4D* 42PB4D-AA Dimensions (Width x Height x Depth) Weight with stand without stand with stand without stand Power requirement 50PB4D* 50PB4D-AA Dimensions (Width x Height x Depth) with stand without stand Weight Power requirement Television System Program Coverage External Antenna Impedance Environment condition ....2x12.2 inches 1130x768.05x310.38 mm 44.5x28.1x3.3 inches 1130x715x85 mm 65.6 pounds / 29.74kg 58 pounds / 26.34kg AC100-240V~ 50/60Hz 3.5A 51.5x35.7x14.6 inches 1308x906.1x370 mm 51.5x33.3x3.5 inches 1308x845x88.9 mm 88.1 pounds / 40kg 82.2 pounds / 37.3kg ...


