
Owner's Manual
Page 5
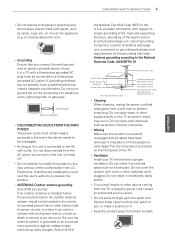
...-prong grounded AC plug must remain readily accessed in the event the device needs to be located in the vicinity of the National Electrical Code (NEC) in the U.S.A. yyMoving Make sure the product is grounded so as a bookcase. yyKeep the product away from the TV, unplug the power cord contact an authorized service center. Antenna grounding according to...
...-prong grounded AC plug must remain readily accessed in the event the device needs to be located in the vicinity of the National Electrical Code (NEC) in the U.S.A. yyMoving Make sure the product is grounded so as a bookcase. yyKeep the product away from the TV, unplug the power cord contact an authorized service center. Antenna grounding according to...

Owner's Manual
Page 8
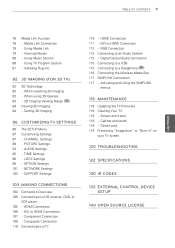
... a wall 31 - Tidying cables 32 REMOTE CONTROL 36 Magic Motion Remote Control Functions 37 - Registering Magic Motion Remote Control 37 - Changing AV modes 46 - Sign in with LG Apps account 58 - DivX registration code 74 - Using Web Browser 62 - Browsing Favorite Websites 62 - Viewing Videos 73 - Listening to use Magic Motion Remote Control 37 - Mounting on a table 30 - How to music Using the input list 47 Using the quick menu 48 ENTERTAINMENT 48 Network Connection 48 - Connecting to a wireless network...
... a wall 31 - Tidying cables 32 REMOTE CONTROL 36 Magic Motion Remote Control Functions 37 - Registering Magic Motion Remote Control 37 - Changing AV modes 46 - Sign in with LG Apps account 58 - DivX registration code 74 - Using Web Browser 62 - Browsing Favorite Websites 62 - Viewing Videos 73 - Listening to use Magic Motion Remote Control 37 - Mounting on a table 30 - How to music Using the input list 47 Using the quick menu 48 ENTERTAINMENT 48 Network Connection 48 - Connecting to a wireless network...
Owner's Manual
Page 9
... Settings 101 - SUPPORT Settings 103 MAKING CONNECTIONS 104 Connection Overview 105 Connecting to HDMI Connection 112 - Composite Connection 110 Connecting to an Audio System 113 - CHANNEL Settings 88 - PICTURE Settings 93 - TIME Settings 96 - LOCK Settings 98 - RGB Connection 113 Connecting to a PC 110 - Power cord 119 Preventing "Image burn" or "Burn-in" on your TV screen 120 TROUBLESHOOTING 122 SPECIFICATIONS 130 IR CODES 132 EXTERNAL CONTROL DEVICE SETUP 140 OPEN SOURCE LICENSE When watching 3D imaging 83 - DVI to a Headphone ( LCD ) 116 Connecting the Wireless Media Box...
... Settings 101 - SUPPORT Settings 103 MAKING CONNECTIONS 104 Connection Overview 105 Connecting to HDMI Connection 112 - Composite Connection 110 Connecting to an Audio System 113 - CHANNEL Settings 88 - PICTURE Settings 93 - TIME Settings 96 - LOCK Settings 98 - RGB Connection 113 Connecting to a PC 110 - Power cord 119 Preventing "Image burn" or "Burn-in" on your TV screen 120 TROUBLESHOOTING 122 SPECIFICATIONS 130 IR CODES 132 EXTERNAL CONTROL DEVICE SETUP 140 OPEN SOURCE LICENSE When watching 3D imaging 83 - DVI to a Headphone ( LCD ) 116 Connecting the Wireless Media Box...

Owner's Manual
Page 15
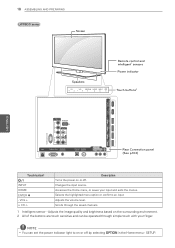
... saved channels. 1 Intelligent sensor - SETUP. Accesses the Home menu, or saves your finger. LV5400, LV5500, LW6500 series Screen ASSEMBLING AND PREPARING 15 Speakers H CH VOL ENTER HOME INPUT or H CH VOL ENTER HOME INPUT Remote control and intelligent1 sensors Power indicator Touch buttons2 USB Apps USB IN 2 HDD IN USB IN 1 ENEGNLGISH /DVI IN 4 Y COMPONENT IN1 WIRELESS ꔡ CONTROL PB VIDEO AV IN1 /DVI IN 3 /DVI IN 1 (ARC) IN 2 VIDEO L/MONO AUDIO R PR L /DVI AUDIO RS-232C IN (CONTROL&SERVICE) R LAN...
... saved channels. 1 Intelligent sensor - SETUP. Accesses the Home menu, or saves your finger. LV5400, LV5500, LW6500 series Screen ASSEMBLING AND PREPARING 15 Speakers H CH VOL ENTER HOME INPUT or H CH VOL ENTER HOME INPUT Remote control and intelligent1 sensors Power indicator Touch buttons2 USB Apps USB IN 2 HDD IN USB IN 1 ENEGNLGISH /DVI IN 4 Y COMPONENT IN1 WIRELESS ꔡ CONTROL PB VIDEO AV IN1 /DVI IN 3 /DVI IN 1 (ARC) IN 2 VIDEO L/MONO AUDIO R PR L /DVI AUDIO RS-232C IN (CONTROL&SERVICE) R LAN...

Owner's Manual
Page 16
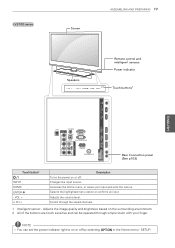
... channels. 1 Intelligent sensor - SETUP. NOTE yyYou can set the power indicator light to on or off by selecting OPTION in the Home menu - VOL + v CH ^ Description Turns the power on or off . Adjusts the image quality and brightness based on the surrounding environment. 16 ASSEMBLING AND PREPARING LW5700 series Screen Speakers CH VOL ENTER HOME H INPUT Buttons Remote control and intelligent1 sensors, Power indicator USB Apps USB IN 2 HDD IN USB IN 1 /DVI ENEGNLGISH IN 4 Y COMPONENT...
... channels. 1 Intelligent sensor - SETUP. NOTE yyYou can set the power indicator light to on or off by selecting OPTION in the Home menu - VOL + v CH ^ Description Turns the power on or off . Adjusts the image quality and brightness based on the surrounding environment. 16 ASSEMBLING AND PREPARING LW5700 series Screen Speakers CH VOL ENTER HOME H INPUT Buttons Remote control and intelligent1 sensors, Power indicator USB Apps USB IN 2 HDD IN USB IN 1 /DVI ENEGNLGISH IN 4 Y COMPONENT...

Owner's Manual
Page 17
... 1 (ARC) IN 2 VIDEO L/MONO AUDIO R PR L /DVI AUDIO RS-232C IN (CONTROL&SERVICE) R LAN RGB IN (PC) (ARUGDBI/ODVINI) OPATUICDAILODOIGUITTAL ACNATBELNENINA/ AV IN 2 AUDIO / VIDEO COMPONENT IN 2 H/P AUDIO / Y PB PR Rear Connection panel (See p.103) Touch button2 / I INPUT HOME ENTER ꔉ - NOTE yyYou can be operated through the saved channels. 1 Intelligent sensor - SETUP. Accesses the Home menu, or saves your finger. Selects the highlighted menu option or confirms an input Adjusts the volume level. VOL + v CH ^ Description Turns...
... 1 (ARC) IN 2 VIDEO L/MONO AUDIO R PR L /DVI AUDIO RS-232C IN (CONTROL&SERVICE) R LAN RGB IN (PC) (ARUGDBI/ODVINI) OPATUICDAILODOIGUITTAL ACNATBELNENINA/ AV IN 2 AUDIO / VIDEO COMPONENT IN 2 H/P AUDIO / Y PB PR Rear Connection panel (See p.103) Touch button2 / I INPUT HOME ENTER ꔉ - NOTE yyYou can be operated through the saved channels. 1 Intelligent sensor - SETUP. Accesses the Home menu, or saves your finger. Selects the highlighted menu option or confirms an input Adjusts the volume level. VOL + v CH ^ Description Turns...
Owner's Manual
Page 18
... series Screen ENEGNLGISH Speakers CH VOL ENTER HOME INPUT H Remote control and intelligent1 sensors Power indicator Touch buttons2 USB Apps USB IN 2 HDD IN USB IN 1 /DVI IN 4 Y COMPONENT IN1 WIRELESS ꔡ CONTROL PB VIDEO AV IN1 /DVI IN 3 /DVI IN 1 (ARC) IN 2 VIDEO L/MONO AUDIO R PR L /DVI AUDIO RS-232C IN (CONTROL&SERVICE) R LAN RGB IN (PC) (ARUGDBI/ODVINI) OPATUICDAILODOIGUITTAL ACNATBELNENINA/ AV IN 2 AUDIO / VIDEO COMPONENT IN 2 H/P AUDIO / Y PB PR Rear Connection panel (See p.103) Touch button2 / I INPUT HOME ENTER ꔉ - Changes the input...
... series Screen ENEGNLGISH Speakers CH VOL ENTER HOME INPUT H Remote control and intelligent1 sensors Power indicator Touch buttons2 USB Apps USB IN 2 HDD IN USB IN 1 /DVI IN 4 Y COMPONENT IN1 WIRELESS ꔡ CONTROL PB VIDEO AV IN1 /DVI IN 3 /DVI IN 1 (ARC) IN 2 VIDEO L/MONO AUDIO R PR L /DVI AUDIO RS-232C IN (CONTROL&SERVICE) R LAN RGB IN (PC) (ARUGDBI/ODVINI) OPATUICDAILODOIGUITTAL ACNATBELNENINA/ AV IN 2 AUDIO / VIDEO COMPONENT IN 2 H/P AUDIO / Y PB PR Rear Connection panel (See p.103) Touch button2 / I INPUT HOME ENTER ꔉ - Changes the input...
Owner's Manual
Page 19
...Screen ASSEMBLING AND PREPARING 19 Speakers CH VOL ENTER HOME INPUT Remote control and intelligent1 sensors Power indicator Touch buttons2 USB IN 1 USB IN 2/USB Apps H/P ENEGNLGISH /DVI IN 3 LAN COMPONENT IN1 Y AUDIO IN (RGB/DVI) OPTICAL DIGITAL RGB IN (PC) PB VIDEO PR AV IN1 VIDEO L/MONO AUDIO R AUDIO OUT RS-232C IN (CONTROL&SERVICE) ꔡ WIRELESS CONTROL L AUDIO R ANTENNA/CABLE IN AV IN 2 AUDIO / VIDEO COMPONENT IN 2 AUDIO / Y PB PR /DVI /DVI IN 1 (ARC) IN 2 Rear Connection panel (See p.103) Touch button2 / I INPUT HOME ENTER ꔉ - SETUP. Accesses...
...Screen ASSEMBLING AND PREPARING 19 Speakers CH VOL ENTER HOME INPUT Remote control and intelligent1 sensors Power indicator Touch buttons2 USB IN 1 USB IN 2/USB Apps H/P ENEGNLGISH /DVI IN 3 LAN COMPONENT IN1 Y AUDIO IN (RGB/DVI) OPTICAL DIGITAL RGB IN (PC) PB VIDEO PR AV IN1 VIDEO L/MONO AUDIO R AUDIO OUT RS-232C IN (CONTROL&SERVICE) ꔡ WIRELESS CONTROL L AUDIO R ANTENNA/CABLE IN AV IN 2 AUDIO / VIDEO COMPONENT IN 2 AUDIO / Y PB PR /DVI /DVI IN 1 (ARC) IN 2 Rear Connection panel (See p.103) Touch button2 / I INPUT HOME ENTER ꔉ - SETUP. Accesses...

Owner's Manual
Page 20
... IN 2 AUDIO / VIDEO IN 1 (ARC) Speakers CH VOL ENTER HOME INPUT Remote control and intelligent1 sensors Power indicator Touch buttons2 LAN COMPONENT IN1 Y AUDIO IN (RGB/DVI) OPTICAL DIGITAL RGB IN (PC) PB AUDIO OUT RS-232C IN (CONTROL&SERVICE) VIDEO PR AV IN1 VIDEO L/MONO AUDIO R L AUDIO R ANTENNA/CABLE IN Rear Connection panel (See p.103) Touch button2 / I INPUT HOME ENTER ꔉ - Changes the input source. Adjusts the image quality and brightness based on or off by selecting OPTION in the Home menu - Accesses the Home menu, or saves...
... IN 2 AUDIO / VIDEO IN 1 (ARC) Speakers CH VOL ENTER HOME INPUT Remote control and intelligent1 sensors Power indicator Touch buttons2 LAN COMPONENT IN1 Y AUDIO IN (RGB/DVI) OPTICAL DIGITAL RGB IN (PC) PB AUDIO OUT RS-232C IN (CONTROL&SERVICE) VIDEO PR AV IN1 VIDEO L/MONO AUDIO R L AUDIO R ANTENNA/CABLE IN Rear Connection panel (See p.103) Touch button2 / I INPUT HOME ENTER ꔉ - Changes the input source. Adjusts the image quality and brightness based on or off by selecting OPTION in the Home menu - Accesses the Home menu, or saves...

Owner's Manual
Page 45
... Zoom: Formats an image to the cinemascope ratio, 2.35:1. Just Scan: Displays video images in the PICTURE menu. yyTo change the image size by pressing RATIO while you are watching TV. Set By Program: Displays images in the same aspect ratio as the original image. NOTE yyYou can also change the ratio of the cinema zoom, press < or > and its optimal size by pressing Q. The input sources: HDMI-PC 1920 X 1080 supports all of the screen. yyTo...
... Zoom: Formats an image to the cinemascope ratio, 2.35:1. Just Scan: Displays video images in the PICTURE menu. yyTo change the image size by pressing RATIO while you are watching TV. Set By Program: Displays images in the same aspect ratio as the original image. NOTE yyYou can also change the ratio of the cinema zoom, press < or > and its optimal size by pressing Q. The input sources: HDMI-PC 1920 X 1080 supports all of the screen. yyTo...
Owner's Manual
Page 64
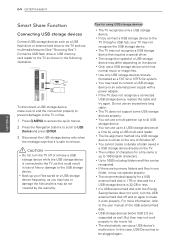
... an external power supply with the Energy Saving feature does not work, turn the TV off and on again to make sure to end the connection properly to prevent damages to the TV or files. /DVI IN 1 (ARC) IN 2 /DVI 1 Press Q.MENU to access the quick menus. 2 Press the Navigation buttons to scroll to the user manual of a USB storage device may not work properly. AV IN 2 AUDIO / VIDEO COMPONENT IN 2 H/P AUDIO / Y PB...
... an external power supply with the Energy Saving feature does not work, turn the TV off and on again to make sure to end the connection properly to prevent damages to the TV or files. /DVI IN 1 (ARC) IN 2 /DVI 1 Press Q.MENU to access the quick menus. 2 Press the Navigation buttons to scroll to the user manual of a USB storage device may not work properly. AV IN 2 AUDIO / VIDEO COMPONENT IN 2 H/P AUDIO / Y PB...
Owner's Manual
Page 65
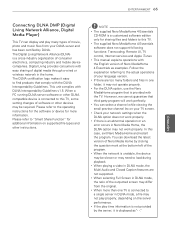
... DLNA mode, the Multi Audio and Closed Caption features are too many types of movie, photo and music files from the original. Follow the explanation referring to this case, exit Nero Media Home and restart the program. However, we cannot guarantee that is a cross-industry organization of digital media through a wired or wireless network in DLNA mode, the ratio of the outputted screen may need to...
... DLNA mode, the Multi Audio and Closed Caption features are too many types of movie, photo and music files from the original. Follow the explanation referring to this case, exit Nero Media Home and restart the program. However, we cannot guarantee that is a cross-industry organization of digital media through a wired or wireless network in DLNA mode, the ratio of the outputted screen may need to...
Owner's Manual
Page 85
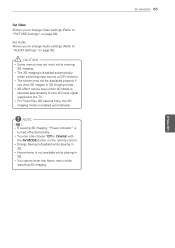
Allows you to change Audio settings (Refer to "AUDIO Settings" on page 93). CAUTION yySome menus may not be seen when 3D Mode is disabled while playing in 3D. yyEnergy Saving is selected appropriately for the 3D input signal supplied to "PICTURE Settings" on the remote control. Allows you to change Video settings (Refer to the TV. NOTE ( ) LCD yyIf viewing 3D imaging, "Power indicator" is enabled automatically. Set Video. yy3D effect can only choose...
Allows you to change Audio settings (Refer to "AUDIO Settings" on page 93). CAUTION yySome menus may not be seen when 3D Mode is disabled while playing in 3D. yyEnergy Saving is selected appropriately for the 3D input signal supplied to "PICTURE Settings" on the remote control. Allows you to change Video settings (Refer to the TV. NOTE ( ) LCD yyIf viewing 3D imaging, "Power indicator" is enabled automatically. Set Video. yy3D effect can only choose...
Owner's Manual
Page 90
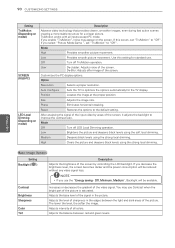
... the default setting. TruMotion works with all colors. If you decrease the brightness level, the screen becomes darker and the power consumption will be reduced without any video signal loss. Use this occurs, set "TruMotion" to "Off". User De-Judder: Adjusts noise of the video signal. Size Adjusts the image size. Medium Deepens black levels using the soft local dimming. Adjusts the base level of the screen. Mode High Provides smoother picture movement. Mode Off Turn off TruMotion operation...
... the default setting. TruMotion works with all colors. If you decrease the brightness level, the screen becomes darker and the power consumption will be reduced without any video signal loss. Use this occurs, set "TruMotion" to "Off". User De-Judder: Adjusts noise of the video signal. Size Adjusts the image size. Medium Deepens black levels using the soft local dimming. Adjusts the base level of the screen. Mode High Provides smoother picture movement. Mode Off Turn off TruMotion operation...
Owner's Manual
Page 94
... the default. »»(+) setting : Make audio output slower than the default. If the video and sound are not synced, you can be output using an external Hi-Fi system. Adjusts the sync of the TV when using only a High Speed HDMI cable without an additional optical cable. Option Normal Normal sound mode. Wall Mount Type Optimized sound mode for a stand-type TV. yyThe ARC mode only works on the HDMI 1 input on and SIMPLINK is enabled, the device speaker is...
... the default. »»(+) setting : Make audio output slower than the default. If the video and sound are not synced, you can be output using an external Hi-Fi system. Adjusts the sync of the TV when using only a High Speed HDMI cable without an additional optical cable. Option Normal Normal sound mode. Wall Mount Type Optimized sound mode for a stand-type TV. yyThe ARC mode only works on the HDMI 1 input on and SIMPLINK is enabled, the device speaker is...

Owner's Manual
Page 113
... DIGITAL (RGB/DVI) AUDIO OUT RS-232C IN WIRELESS RGB IN (PC) (CONTROL&SERVICE) CONTROL LAN VIDEO L/MONO AUDIO R 2 Y REMOTE CONTROL IN 1 PB VIDEO PR L R AUDIO COMPON ENT IN AV IN1 ANTENNA /CABLE IN 1 (ARC) 2 /DVI IN AV IN2 ENEGNLGISH VIDEO L/MONO AUDIO R OPTICAL AUDIO IN yyAudio with the optical audio cable as shown in speaker, set the "Input Label - yyIf you use . If you experience overscan issues when using HDMI-PC 1920x1080, change the refresh rate to an external device. Digital Optical Audio Connection Transmits the digital audio signal...
... DIGITAL (RGB/DVI) AUDIO OUT RS-232C IN WIRELESS RGB IN (PC) (CONTROL&SERVICE) CONTROL LAN VIDEO L/MONO AUDIO R 2 Y REMOTE CONTROL IN 1 PB VIDEO PR L R AUDIO COMPON ENT IN AV IN1 ANTENNA /CABLE IN 1 (ARC) 2 /DVI IN AV IN2 ENEGNLGISH VIDEO L/MONO AUDIO R OPTICAL AUDIO IN yyAudio with the optical audio cable as shown in speaker, set the "Input Label - yyIf you use . If you experience overscan issues when using HDMI-PC 1920x1080, change the refresh rate to an external device. Digital Optical Audio Connection Transmits the digital audio signal...

Owner's Manual
Page 120
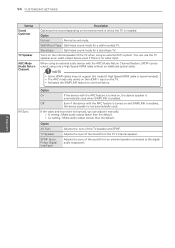
... using the remote control. ENEGNLGISH Audio Problem Resolution No sound is produced. are still working and properly installed ( to , to ). No output from inside the TV is activated in the wall outlet by pressing MUTE. when the product turns on or off suddenly. yyCheck the remote control sensor on . yyCheck if the power cord is normal. This is connected to the "Sleep Timer". Cannot connect external devices. The power supply may a problem with the remote control...
... using the remote control. ENEGNLGISH Audio Problem Resolution No sound is produced. are still working and properly installed ( to , to ). No output from inside the TV is activated in the wall outlet by pressing MUTE. when the product turns on or off suddenly. yyCheck the remote control sensor on . yyCheck if the power cord is normal. This is connected to the "Sleep Timer". Cannot connect external devices. The power supply may a problem with the remote control...

Owner's Manual
Page 121
... video cable connections. The display offset is not working normally but the audio is supported. The reception on some channels is damaged.) yyCheck whether the video file and subtitle file name are local interferences such as an electrical appliance or power tool. Message is displayed saying "This file is invalid" or the audio is working normally. Message is displayed saying "Unsupported Audio" or the video is working normally. TROUBLESHOOTING 121 ENEGNLGISH Video Problem Resolution An image displays...
... video cable connections. The display offset is not working normally but the audio is supported. The reception on some channels is damaged.) yyCheck whether the video file and subtitle file name are local interferences such as an electrical appliance or power tool. Message is displayed saying "This file is invalid" or the audio is working normally. Message is displayed saying "Unsupported Audio" or the video is working normally. TROUBLESHOOTING 121 ENEGNLGISH Video Problem Resolution An image displays...

Owner's Manual
Page 138
... the standby mode, TV will turn on by Hexadecimal code) *Refer to the analog (NTSC) cable channel 35. Most cases just use 0 since it's ignored when using NTSC. * 5th bit: Use 0 with NTSC since most times it can only use 1 for all models.) Transmission [m][a][ ][Set ID][ ][Data00][ ][Data01] [ ][Data02][ ][Data03][ ][Data04][ ][Data05][Cr] Digital channels have a Physical, Major, and Minor channel number. Normally use the physical channel number. Tune to...
... the standby mode, TV will turn on by Hexadecimal code) *Refer to the analog (NTSC) cable channel 35. Most cases just use 0 since it's ignored when using NTSC. * 5th bit: Use 0 with NTSC since most times it can only use 1 for all models.) Transmission [m][a][ ][Set ID][ ][Data00][ ][Data01] [ ][Data02][ ][Data03][ ][Data04][ ][Data05][Cr] Digital channels have a Physical, Major, and Minor channel number. Normally use the physical channel number. Tune to...
Specification
Page 2
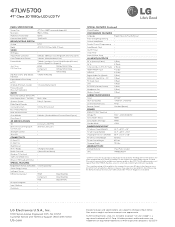
...• Favorite Channel Programming • Auto/Manual Clock • On/Off Timer • Sleep Timer • Auto Off/Auto Sleep • AV INPUTS/OUTPUTS RF In (Antenna/Cable) 1 (Rear) AV In 2 (Rear) Component Video In (Y, Pb, Pr) + Audio 2 (Rear) HDMI™/HDCP Input 4 (Side) USB 2.0 2 (Side) Digital Audio Out (Optical) 1 (Rear) RGB In (D-Sub 15 Pin) - PC 1 (Rear) PC Audio Input 1 (Rear) LAN 1 (Rear) RS-232C (Control/Service) 1 (Rear) Headphone Out 1 (Rear) Wireless Control 1 (Rear) CABINET/ACCESSORIES Swivel 20º/20º VESA Compatible •...
...• Favorite Channel Programming • Auto/Manual Clock • On/Off Timer • Sleep Timer • Auto Off/Auto Sleep • AV INPUTS/OUTPUTS RF In (Antenna/Cable) 1 (Rear) AV In 2 (Rear) Component Video In (Y, Pb, Pr) + Audio 2 (Rear) HDMI™/HDCP Input 4 (Side) USB 2.0 2 (Side) Digital Audio Out (Optical) 1 (Rear) RGB In (D-Sub 15 Pin) - PC 1 (Rear) PC Audio Input 1 (Rear) LAN 1 (Rear) RS-232C (Control/Service) 1 (Rear) Headphone Out 1 (Rear) Wireless Control 1 (Rear) CABINET/ACCESSORIES Swivel 20º/20º VESA Compatible •...


