
Specification (English)
Page 2
...• Parental Control w/V-Chip • Key Lock • Closed Caption • LG SimpLink™ (HDMI CEC) • Trilingual Menus English/French/Spanish EZ Menus (High...; Channel Add/Delete • Favorite Channel • Auto Clock • Manual Clock • On/Off Timer • Sleep Timer • Auto Off... Correction 6 Modes Just Scan (1:1 Pixel Matching) - 47LG50 LCD 1080P HDTV 47" Class (46.9" diagonal) TECHNICAL SPECIFICATIONS LCD PANEL Native Display Resolution 1920 x 1080p Brightness (cd/...
...• Parental Control w/V-Chip • Key Lock • Closed Caption • LG SimpLink™ (HDMI CEC) • Trilingual Menus English/French/Spanish EZ Menus (High...; Channel Add/Delete • Favorite Channel • Auto Clock • Manual Clock • On/Off Timer • Sleep Timer • Auto Off... Correction 6 Modes Just Scan (1:1 Pixel Matching) - 47LG50 LCD 1080P HDTV 47" Class (46.9" diagonal) TECHNICAL SPECIFICATIONS LCD PANEL Native Display Resolution 1920 x 1080p Brightness (cd/...

Owner's Manual (English)
Page 1
See the label attached on the back cover and quote this manual carefully before operating your dealer when you require service. P/NO : SAC30708033 (0810-REV03) www.lgusa.com / www.lg.ca Record model number and serial number of the set . LCD TV OWNER'S MANUAL 37LG50 42LG50 47LG50 52LG50 42LG50DC 47LG50DC 52LG50DC 42LG55 47LG55 Please read this information to your set . Retain it for future reference.
See the label attached on the back cover and quote this manual carefully before operating your dealer when you require service. P/NO : SAC30708033 (0810-REV03) www.lgusa.com / www.lg.ca Record model number and serial number of the set . LCD TV OWNER'S MANUAL 37LG50 42LG50 47LG50 52LG50 42LG50DC 47LG50DC 52LG50DC 42LG55 47LG55 Please read this information to your set . Retain it for future reference.

Owner's Manual (English)
Page 4
...such as this product near flammable objects such as vases, cups, etc. Do not install this could result in fire or electric shock. a TV with wet hands. Short-circuit Breaker Power Supply 18 DISCONNECTING DEVICE FROM MAINS Mains plug is , a single outlet circuit which powers only that ...use a damaged or loose power cord. SAFETY INSTRUCTIONS 11 Never touch this owner's manual to be certain. When mounting a TV on the wall, make the TV with liquids, such as gasoline or candles or expose the TV to direct air conditioning. 16 Do not expose to dripping or splashing and do ...
...such as this product near flammable objects such as vases, cups, etc. Do not install this could result in fire or electric shock. a TV with wet hands. Short-circuit Breaker Power Supply 18 DISCONNECTING DEVICE FROM MAINS Mains plug is , a single outlet circuit which powers only that ...use a damaged or loose power cord. SAFETY INSTRUCTIONS 11 Never touch this owner's manual to be certain. When mounting a TV on the wall, make the TV with liquids, such as gasoline or candles or expose the TV to direct air conditioning. 16 Do not expose to dripping or splashing and do ...

Owner's Manual (English)
Page 6
Add / Delete Channel (Manual Tuning 41 - Picture Mode - Picture Mode - Black (Darkness) Level 63 Advanced Control - CONTENTS WARNING / CAUTION 2 SAFETY INSTRUCTIONS 3 FEATURE OF THIS TV 8 PREPARATION Accessories 9 Front Panel Information 10 Back Panel Information 11 Stand Instruction 12 VESA...Size (Aspect Ratio) Control 56 Preset Picture Settings - Preset 58 Color Tone - Eye Care 64 Advanced Control - Preset 59 Manual Picture Adjustment - Real Cinema 65 Picture Reset 66 Power Indicator 67 6 Expert Control 61 Picture Improvement Technology 62 Advanced Control - ...
Add / Delete Channel (Manual Tuning 41 - Picture Mode - Picture Mode - Black (Darkness) Level 63 Advanced Control - CONTENTS WARNING / CAUTION 2 SAFETY INSTRUCTIONS 3 FEATURE OF THIS TV 8 PREPARATION Accessories 9 Front Panel Information 10 Back Panel Information 11 Stand Instruction 12 VESA...Size (Aspect Ratio) Control 56 Preset Picture Settings - Preset 58 Color Tone - Eye Care 64 Advanced Control - Preset 59 Manual Picture Adjustment - Real Cinema 65 Picture Reset 66 Power Indicator 67 6 Expert Control 61 Picture Improvement Technology 62 Advanced Control - ...

Owner's Manual (English)
Page 7
... & LANGUAGE CONTROL Auto Volume Leveler (Auto Volume 68 Preset Sound Settings (Sound Mode) 69 Sound Setting Adjustment - Auto Clock Setup 81 Manual Clock Setup 82 Auto On/Off Time Setting 83 Sleep Timer Setting 84 Auto Shut-off Setting 85 PARENTAL CONTROL / RATINGS Set Password &... Lock System 86 Channel Blocking 89 Movie & TV Rating 90 Downloadable Rating 95 External Input Blocking 96 Key lock 97 APPENDIX Troubleshooting 98 Maintenance 100 Product Specifications 101 Programming the Remote...
... & LANGUAGE CONTROL Auto Volume Leveler (Auto Volume 68 Preset Sound Settings (Sound Mode) 69 Sound Setting Adjustment - Auto Clock Setup 81 Manual Clock Setup 82 Auto On/Off Time Setting 83 Sleep Timer Setting 84 Auto Shut-off Setting 85 PARENTAL CONTROL / RATINGS Set Password &... Lock System 86 Channel Blocking 89 Movie & TV Rating 90 Downloadable Rating 95 External Input Blocking 96 Key lock 97 APPENDIX Troubleshooting 98 Maintenance 100 Product Specifications 101 Programming the Remote...

Owner's Manual (English)
Page 9
... interface cables with ferrite cores to P.15) * Wipe spots on the exterior only with your TV. Excessive pressure may differ from the images below. If an accessory is not available scratch or discoloration. Owner's Manual CD Manual Remote Control, Batteries Power Cord or Protection Cover Protective Bracket and Bolt for Power Cord (This...
... interface cables with ferrite cores to P.15) * Wipe spots on the exterior only with your TV. Excessive pressure may differ from the images below. If an accessory is not available scratch or discoloration. Owner's Manual CD Manual Remote Control, Batteries Power Cord or Protection Cover Protective Bracket and Bolt for Power Cord (This...

Owner's Manual (English)
Page 13
.... G Do not use fasten the screws too strongly, this may differ depending on their specifications. A B Product LCD TV Model 37LG5* 42LG5* 47LG5* 52LG5* VESA (A * B) Standard Screw Quantity 200 * 200 M6 4 800 *... accidents. G When purchasing our wall mount kit, a detailed installation manual and all parts necessary for wall mount kits are provided. For further information, refer to ... not use an LG brand wall mount when mounting the TV to other building materials, please contact your nearest dealer. PREPARATION VESA WALL MOUNTING Install your TV is turned on. LG recommends that do...
.... G Do not use fasten the screws too strongly, this may differ depending on their specifications. A B Product LCD TV Model 37LG5* 42LG5* 47LG5* 52LG5* VESA (A * B) Standard Screw Quantity 200 * 200 M6 4 800 *... accidents. G When purchasing our wall mount kit, a detailed installation manual and all parts necessary for wall mount kits are provided. For further information, refer to ... not use an LG brand wall mount when mounting the TV to other building materials, please contact your nearest dealer. PREPARATION VESA WALL MOUNTING Install your TV is turned on. LG recommends that do...

Owner's Manual (English)
Page 15
... injury or damaging the product. ATTACHING THE TV TO A DESK (Only 37/42LG5*) The TV must be attached to a desk so it cannot be securely attached to suit your TV. SWIVEL STAND After installing the TV, you can adjust the TV set manually to the left or right direction by following... the clearance recommendations. G Do not mount near or above any type of the product) Desk WARNING G To prevent TV from the wall. 4 inches 4...
... injury or damaging the product. ATTACHING THE TV TO A DESK (Only 37/42LG5*) The TV must be attached to a desk so it cannot be securely attached to suit your TV. SWIVEL STAND After installing the TV, you can adjust the TV set manually to the left or right direction by following... the clearance recommendations. G Do not mount near or above any type of the product) Desk WARNING G To prevent TV from the wall. 4 inches 4...

Owner's Manual (English)
Page 18
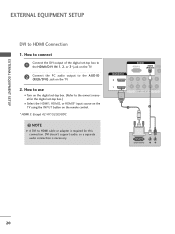
... input source on the remote control. I If connected to the owner's manual for the digital set -top box. HD RECEIVER SETUP This TV can receive digital over-the-air/digital cable signals without an external digital set...I To prevent the equipment damage, never plug in any power cords until you do receive digital signals from your TV. Match the jack colors (Y = green, PB = blue, and PR = red). 2 Connect the audio ...Horizontal Vertical Frequency(KHz) Frequency(Hz) 720x480i 720x480p 1280x720p 1920x1080i 1920x1080p 15.73 15.73 31.47 31.50 44.96 45.00 33.72 33.75 26.97 27.00 33.71 33...
... input source on the remote control. I If connected to the owner's manual for the digital set -top box. HD RECEIVER SETUP This TV can receive digital over-the-air/digital cable signals without an external digital set...I To prevent the equipment damage, never plug in any power cords until you do receive digital signals from your TV. Match the jack colors (Y = green, PB = blue, and PR = red). 2 Connect the audio ...Horizontal Vertical Frequency(KHz) Frequency(Hz) 720x480i 720x480p 1280x720p 1920x1080i 1920x1080p 15.73 15.73 31.47 31.50 44.96 45.00 33.72 33.75 26.97 27.00 33.71 33...

Owner's Manual (English)
Page 19
...-top box.) I Select the HDMI1, HDMI2, or HDMI3* input source on the TV using the INPUT button on the TV. 2 No separate audio connection is necessary. How to connect 1 Connect the digital set-top box to the owner's manual for the digital set -top box. (Refer to HDMI/DVI IN1, 2, or 3*... jack on the remote control. * HDMI 3: Except 42/47/52LG50DC HDMI-DTV Resolution Horizontal...
...-top box.) I Select the HDMI1, HDMI2, or HDMI3* input source on the TV using the INPUT button on the TV. 2 No separate audio connection is necessary. How to connect 1 Connect the digital set-top box to the owner's manual for the digital set -top box. (Refer to HDMI/DVI IN1, 2, or 3*... jack on the remote control. * HDMI 3: Except 42/47/52LG50DC HDMI-DTV Resolution Horizontal...
Owner's Manual (English)
Page 20
... DVI doesn't support audio, so a separate audio connection is required for the digital set -top box to the HDMI/DVI IN 1, 2, or 3* jack on the TV. 2 Connect the PC audio output to connect 1 Connect the DVI output of the digital set -top box.) I O (RGB/DVI) jack on the remote control.... * HDMI 3: Except 42/47/52LG50DC ! How to the A U D I Select the HDMI1, HDMI2, or HDMI3* input source on the TV using the INPUT button on the TV. 2. How to use I Turn on the digital set-top box. (Refer to the owner's manual for this connection. RGB IN RGB(PC) AUDIO...
... DVI doesn't support audio, so a separate audio connection is required for the digital set -top box to the HDMI/DVI IN 1, 2, or 3* jack on the TV. 2 Connect the PC audio output to connect 1 Connect the DVI output of the digital set -top box.) I O (RGB/DVI) jack on the remote control.... * HDMI 3: Except 42/47/52LG50DC ! How to the A U D I Select the HDMI1, HDMI2, or HDMI3* input source on the TV using the INPUT button on the TV. 2. How to use I Turn on the digital set-top box. (Refer to the owner's manual for this connection. RGB IN RGB(PC) AUDIO...

Owner's Manual (English)
Page 21
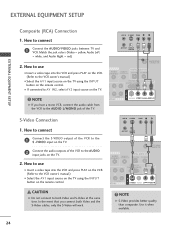
... EQUIPMENT SETUP DVD SETUP Component Connection 1. How to use I Select the Component 1 input source on the TV using the INPUT button on the TV. 2. I If connected to the COMPONENT IN VIDEO1 jacks on the TV. Y PB PR L R 2 Connect the audio outputs of the DVD to COMPONENT IN 2 input, select... the Component 2 input source on the TV. I Turn on DVD player Y Y PB PR PB PR B-Y R-Y Cb Cr Pb Pr 21 Match the jack colors (Y = green, PB = blue, and PR = red). I Refer to the DVD player's manual for operating instructions. 1 2 RGB IN RGB(PC) AUDIO ...
... EQUIPMENT SETUP DVD SETUP Component Connection 1. How to use I Select the Component 1 input source on the TV using the INPUT button on the TV. 2. I If connected to the COMPONENT IN VIDEO1 jacks on the TV. Y PB PR L R 2 Connect the audio outputs of the DVD to COMPONENT IN 2 input, select... the Component 2 input source on the TV. I Turn on DVD player Y Y PB PR PB PR B-Y R-Y Cb Cr Pb Pr 21 Match the jack colors (Y = green, PB = blue, and PR = red). I Refer to the DVD player's manual for operating instructions. 1 2 RGB IN RGB(PC) AUDIO ...

Owner's Manual (English)
Page 22
...I Select the A V 1 input source on the TV using the INPUT button on the DVD player, insert a DVD. HDMI supports both audio and video. 2. I Turn on the remote control. How to the DVD player's manual for operating instructions. * HDMI 3: Except 42/47/52LG50DC RGB(PC) AUDIO (RGB/D HDMI/DVI IN 2... 1 2 Y 1 PB PR L VIDEO A COMPONENT IN 1 HDMI-DVD OUTPUT 22 I Refer to use I Refer to the HDMI/DVI IN1, 2, or 3* jack on the TV. 2 No separate audio...
...I Select the A V 1 input source on the TV using the INPUT button on the DVD player, insert a DVD. HDMI supports both audio and video. 2. I Turn on the remote control. How to the DVD player's manual for operating instructions. * HDMI 3: Except 42/47/52LG50DC RGB(PC) AUDIO (RGB/D HDMI/DVI IN 2... 1 2 Y 1 PB PR L VIDEO A COMPONENT IN 1 HDMI-DVD OUTPUT 22 I Refer to use I Refer to the HDMI/DVI IN1, 2, or 3* jack on the TV. 2 No separate audio...

Owner's Manual (English)
Page 23
... the sides of the VCR. EXTERNAL EQUIPMENT SETUP VCR SETUP I Set VCR output switch to 3 or 4 and then tune TV to the same channel number. This phenomenon is common to the VCR owner's manual.) EO L(MONO) AUDIO R ANT OUT S-VIDEO VIDEO L R ANT IN OUTPUT SWITCH Wall Jack 2 Antenna 23 I If the 4:3 picture...
... the sides of the VCR. EXTERNAL EQUIPMENT SETUP VCR SETUP I Set VCR output switch to 3 or 4 and then tune TV to the same channel number. This phenomenon is common to the VCR owner's manual.) EO L(MONO) AUDIO R ANT OUT S-VIDEO VIDEO L R ANT IN OUTPUT SWITCH Wall Jack 2 Antenna 23 I If the 4:3 picture...
Owner's Manual (English)
Page 24
... to use I Insert a video tape into the VCR and press PLAY on the VCR. (Refer to the VCR owner's manual.) I Select the A V 1 input source on the TV using the INPUT button on the TV. 2. NOTE G S-Video provides better quality than composite. How to use I Insert a video tape into the VCR and ...press PLAY on the VCR. (Refer to the VCR owner's manual.) I Select the A V 1 input source on the TV using the INPUT button on the TV. ! ANT IN S-VIDEO VIDEO L R ANT OUT OUTPUT SWITCH ANTENNA/ CABLE IN AUDIO REMOTE (RGB/DVI) CONTROL IN ...
... to use I Insert a video tape into the VCR and press PLAY on the VCR. (Refer to the VCR owner's manual.) I Select the A V 1 input source on the TV using the INPUT button on the TV. 2. NOTE G S-Video provides better quality than composite. How to use I Insert a video tape into the VCR and ...press PLAY on the VCR. (Refer to the VCR owner's manual.) I Select the A V 1 input source on the TV using the INPUT button on the TV. ! ANT IN S-VIDEO VIDEO L R ANT OUT OUTPUT SWITCH ANTENNA/ CABLE IN AUDIO REMOTE (RGB/DVI) CONTROL IN ...
Owner's Manual (English)
Page 29
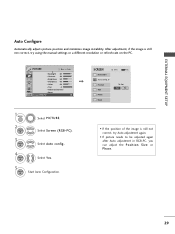
EXTERNAL EQUIPMENT SETUP Auto Configure Automatically adjusts picture position and minimizes image instability. After adjustment, if the image is still not correct, try using the manual settings or a different resolution or refresh rate on the PC. Select Auto config.. 4 ENTER Select Y e s. 5 ENTER Start Auto Configuration. To Set Yes No • If ...
EXTERNAL EQUIPMENT SETUP Auto Configure Automatically adjusts picture position and minimizes image instability. After adjustment, if the image is still not correct, try using the manual settings or a different resolution or refresh rate on the PC. Select Auto config.. 4 ENTER Select Y e s. 5 ENTER Start Auto Configuration. To Set Yes No • If ...
Owner's Manual (English)
Page 30
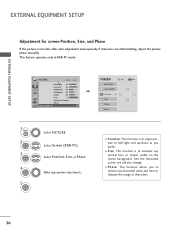
... 3 ENTER 4 ENTER 5 ENTER Select PICTURE. I Position: This function is not clear after auto adjustment and especially if characters are still trembling, adjust the picture phase manually. Select Position, S i z e, or Phase. This feature operates only in RGB-PC mode. EXTERNAL EQUIPMENT SETUP EXTERNAL EQUIPMENT SETUP Adjustment for screen Position, Size, and Phase...
... 3 ENTER 4 ENTER 5 ENTER Select PICTURE. I Position: This function is not clear after auto adjustment and especially if characters are still trembling, adjust the picture phase manually. Select Position, S i z e, or Phase. This feature operates only in RGB-PC mode. EXTERNAL EQUIPMENT SETUP EXTERNAL EQUIPMENT SETUP Adjustment for screen Position, Size, and Phase...
Owner's Manual (English)
Page 33
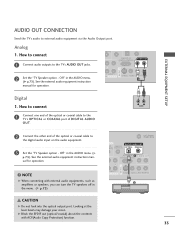
... audio equipment via the Audio Output port. NOTE G When connecting with ACP(Audio Copy Protection) function. See the external audio equipment instruction manual for operation. ! Off" in the AUDIO menu. (G p.73). Looking at the laser beam may damage your vision. Analog 1. AUDIO... AUDIO R 1 Digital L R 1. See the external audio equipment instruction manual for operation. EXTERNAL EQUIPMENT SETUP AUDIO OUT CONNECTION Send the TV's audio to the digital audio input on the audio equipment. 3 Set the "TV Speaker option - G Block the SPDIF out (optical/coaxial) about the ...
... audio equipment via the Audio Output port. NOTE G When connecting with ACP(Audio Copy Protection) function. See the external audio equipment instruction manual for operation. ! Off" in the AUDIO menu. (G p.73). Looking at the laser beam may damage your vision. Analog 1. AUDIO... AUDIO R 1 Digital L R 1. See the external audio equipment instruction manual for operation. EXTERNAL EQUIPMENT SETUP AUDIO OUT CONNECTION Send the TV's audio to the digital audio input on the audio equipment. 3 Set the "TV Speaker option - G Block the SPDIF out (optical/coaxial) about the ...

Owner's Manual (English)
Page 37
... 123 or 4 5 6 Select your desired picture format. MENU Return to TV viewing. 37 I USB Eject: Select "USB Eject" in this manual. I To tune to eject USB device. MENU 2 Display each menu. MENU Return to TV viewing. I Del/Add/Fav: Select channel you want to add/delete or... Menu) is shown in order to a favorite channel, press the F A V (Favorite) button repeatedly. I Sleep Timer: Select the amount of LCD panel to the Favorite List. I Picture Mode: Selects the factory preset picture depend on or off automatically. Q.Menu Aspect Ratio Backlight Clear Voice Picture ...
... 123 or 4 5 6 Select your desired picture format. MENU Return to TV viewing. 37 I USB Eject: Select "USB Eject" in this manual. I To tune to eject USB device. MENU 2 Display each menu. MENU Return to TV viewing. I Del/Add/Fav: Select channel you want to add/delete or... Menu) is shown in order to a favorite channel, press the F A V (Favorite) button repeatedly. I Sleep Timer: Select the amount of LCD panel to the Favorite List. I Picture Mode: Selects the factory preset picture depend on or off automatically. Q.Menu Aspect Ratio Backlight Clear Voice Picture ...

Owner's Manual (English)
Page 38
...ENTER Step4. I Default selection is only intended for the best picture in -store mode after 5 minutes. Picture mode" manually while inspecting the TV, but the TV will be activated from the user menus. Selecting the environment. Time Setting Current Time Setting Year Month Date Hour Minute Time ... F Auto G 2007 11 15 5 PM 52 Eastern Off Enter RETURN Exit 1 Select Auto or Manual. 2 Select desired time option. 3 ENTER 38 Step3. NOTE I "In-store" Mode is "H o m e". We recommend setting the TV to "H o m e" mode for use in the OPTION menu. Choose the setting mode you want...
...ENTER Step4. I Default selection is only intended for the best picture in -store mode after 5 minutes. Picture mode" manually while inspecting the TV, but the TV will be activated from the user menus. Selecting the environment. Time Setting Current Time Setting Year Month Date Hour Minute Time ... F Auto G 2007 11 15 5 PM 52 Eastern Off Enter RETURN Exit 1 Select Auto or Manual. 2 Select desired time option. 3 ENTER 38 Step3. NOTE I "In-store" Mode is "H o m e". We recommend setting the TV to "H o m e" mode for use in the OPTION menu. Choose the setting mode you want...


