
Owners Manual
Page 4
...Do not use caution when moving the cart/apparatus combination to avoid injury from the apparatus. 11. Q PORTABLE CART WARNING J 4 Plasma TV This information shall be given in an instruction for installation for use attachments/accessories specified by adding statements after the end of the...be placed immediately adiacent to be used , use this apparatus near any heat sources such as follows. At the manufacturer's option, a picture or drawing that illustrates the intent of the obsolete outlet. 10. Do not defeat the safety purpose of the following safety instruction list....
...Do not use caution when moving the cart/apparatus combination to avoid injury from the apparatus. 11. Q PORTABLE CART WARNING J 4 Plasma TV This information shall be given in an instruction for installation for use attachments/accessories specified by adding statements after the end of the...be placed immediately adiacent to be used , use this apparatus near any heat sources such as follows. At the manufacturer's option, a picture or drawing that illustrates the intent of the obsolete outlet. 10. Do not defeat the safety purpose of the following safety instruction list....

Owners Manual
Page 6
... Moving the PIP sub picture 87 Adjusting Main and Sub Picture Sizes for availab!e connection and operational setup options.) f. See pages 64. 7. See page 60. 6. Fine-tune source image and sound to protect the set up See Contents above. 6 Plasma TV After rsading this manual...TM Function Cable menu options 78 Scrambled channel 78 Cable Channel List 79 Emergency Alert Message 79 XSTUO_O Remote Control 80~85 PIP (Picture-in remote control. Ses pages 65~ 68. 8. Turn vidso source squipment on . Additional features set turn+ bling 12 Swivel function...
... Moving the PIP sub picture 87 Adjusting Main and Sub Picture Sizes for availab!e connection and operational setup options.) f. See pages 64. 7. See page 60. 6. Fine-tune source image and sound to protect the set up See Contents above. 6 Plasma TV After rsading this manual...TM Function Cable menu options 78 Scrambled channel 78 Cable Channel List 79 Emergency Alert Message 79 XSTUO_O Remote Control 80~85 PIP (Picture-in remote control. Ses pages 65~ 68. 8. Turn vidso source squipment on . Additional features set turn+ bling 12 Swivel function...

Owners Manual
Page 7
...on the screen should be acceptable= This also occurs in the room who can use it for conferencing, games, and Intemet browsing, The Picture-in-Picture feature allows you expect, Each sub-pixet is individually controlled by advanced electronics to produce over 160 degrees, This means that the display ... colors that you to view "our PC and video images simultaneouSlya Versatime The light weight and thin size makes it easy to install your plasma display in a variety of locations where conventional TVs will not fita The PDP Manufacturing Process: a few minute colored dots may be present on...
...on the screen should be acceptable= This also occurs in the room who can use it for conferencing, games, and Intemet browsing, The Picture-in-Picture feature allows you expect, Each sub-pixet is individually controlled by advanced electronics to produce over 160 degrees, This means that the display ... colors that you to view "our PC and video images simultaneouSlya Versatime The light weight and thin size makes it easy to install your plasma display in a variety of locations where conventional TVs will not fita The PDP Manufacturing Process: a few minute colored dots may be present on...

Owners Manual
Page 8
This is seen. Switches LED Display on , the indicator will blink green for 3-4 seconds before the picture is a simplified representation of a front panel. - i:- Introduction - Here shown may be somewhat different from your TV. "-iT-. (... 42PX5D .) -1 (i 42PXaD [) 1 mNBEX -- mndicator When the TV is turned on or off= 8 Plasma TV L_C B ANL_ENL (_', A) Buttons Remote Contro_ Sensor VOLUME (4,_) Buttons MENU Button TV/VIDEO Button TV GUIDE Button POWER Button illuminates orange in Pstoawndebry Stmanoddbey.
This is seen. Switches LED Display on , the indicator will blink green for 3-4 seconds before the picture is a simplified representation of a front panel. - i:- Introduction - Here shown may be somewhat different from your TV. "-iT-. (... 42PX5D .) -1 (i 42PXaD [) 1 mNBEX -- mndicator When the TV is turned on or off= 8 Plasma TV L_C B ANL_ENL (_', A) Buttons Remote Contro_ Sensor VOLUME (4,_) Buttons MENU Button TV/VIDEO Button TV GUIDE Button POWER Button illuminates orange in Pstoawndebry Stmanoddbey.

Owners Manual
Page 9
...} PORT Connect to the RS-232C port on a PC. (Component 1-2) Connect a component video/audio device to these jacks. The voltage is available to provide better picture quality than the video input. introduction Back Connection Pane_ mnput connection is indicated on the Specifications page. Or connect a DVI(Video) signal to operate the...
...} PORT Connect to the RS-232C port on a PC. (Component 1-2) Connect a component video/audio device to these jacks. The voltage is available to provide better picture quality than the video input. introduction Back Connection Pane_ mnput connection is indicated on the Specifications page. Or connect a DVI(Video) signal to operate the...

Owners Manual
Page 10
...other than TV, for the sub picture in Xstudio mode. SWAP Exchanges the main/sub images in picture mode, UGRT Illuminates the remote control...off , depending on -screen displays and returns to PiP, POP (Picture-out-ofPicture) and Twin picture modes in regular sequence: Antenna, Cable, Video, Front Video, ... VCR, AUDIO, CABLE or STB. EZ P[C Selects a factory preset picture mode depending on the TV. TV/V[DEO put modes rotate in regular sequence... the screen. Enters or exits a Panel Menu in PIPfTwin picture mode. Main picture is frozen in the TV Guide On Screen system. Mark ...
...other than TV, for the sub picture in Xstudio mode. SWAP Exchanges the main/sub images in picture mode, UGRT Illuminates the remote control...off , depending on -screen displays and returns to PiP, POP (Picture-out-ofPicture) and Twin picture modes in regular sequence: Antenna, Cable, Video, Front Video, ... VCR, AUDIO, CABLE or STB. EZ P[C Selects a factory preset picture mode depending on the TV. TV/V[DEO put modes rotate in regular sequence... the screen. Enters or exits a Panel Menu in PIPfTwin picture mode. Main picture is frozen in the TV Guide On Screen system. Mark ...

Owners Manual
Page 11
... Select a closed caption: Off, CC1 ~4, Text1 ~4. INFO Channel information is displayed on the back side and install the batteries matching correct polarity (+ with -). APM (Adaptive Picture Mode} Concurrently, compare with the Daylight, Normal, Night Time and Custom on the screen. (Refer to p.88) Installing Batteries Open the battery compartment cover on...
... Select a closed caption: Off, CC1 ~4, Text1 ~4. INFO Channel information is displayed on the back side and install the batteries matching correct polarity (+ with -). APM (Adaptive Picture Mode} Concurrently, compare with the Daylight, Normal, Night Time and Custom on the screen. (Refer to p.88) Installing Batteries Open the battery compartment cover on...
Owners Manual
Page 14
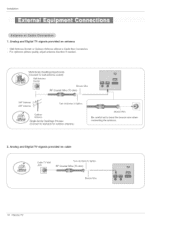
... Connection - Cable TV Wall Turn clockwise to bend the bronze wire when connecting the antenna, J J 2. Analog and Digitam TV eigname provided on cabme j- For optimum picture quality, adjust antenna direction if needed, Multi-family Dwellings/Apartments (Connect to wall antenna socket) Wall Antenna Socket Bronze Wire UHF Antenna VHF Antenna Turn...
... Connection - Cable TV Wall Turn clockwise to bend the bronze wire when connecting the antenna, J J 2. Analog and Digitam TV eigname provided on cabme j- For optimum picture quality, adjust antenna direction if needed, Multi-family Dwellings/Apartments (Connect to wall antenna socket) Wall Antenna Socket Bronze Wire UHF Antenna VHF Antenna Turn...

Owners Manual
Page 15
...antenna needs to the TV input jacks, as shown in the figure. 3. RF Coaxial Wire (75 ohm) Bronze Wire _J • To improve the picture quality in the connections. Use the ISM Method (on the Option menu) feature to avoid having a fixed image remain on the screen. Connection Option ... the iack colors (Video = yellow, Audio Left = white, and Audio Right = red). When connecting the TV to the same channel number. To avoid picture noise (interference), leave an adequate distance between the VCR and TV. - Connect the audio and video cables from VCR to the VCR owner's manual.) 3= ...
...antenna needs to the TV input jacks, as shown in the figure. 3. RF Coaxial Wire (75 ohm) Bronze Wire _J • To improve the picture quality in the connections. Use the ISM Method (on the Option menu) feature to avoid having a fixed image remain on the screen. Connection Option ... the iack colors (Video = yellow, Audio Left = white, and Audio Right = red). When connecting the TV to the same channel number. To avoid picture noise (interference), leave an adequate distance between the VCR and TV. - Connect the audio and video cables from VCR to the VCR owner's manual.) 3= ...
Owners Manual
Page 16
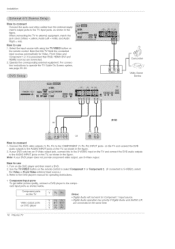
... or Front Video external input source.) 3. Note that RGB, HDMI!/DVI and HDMI2 sources are connected at the same time. 16 Plasma TV Use the TV/VmDEO button on the remote control. Installation How to COnnect Connect the audio and video cables from the external equipment...Y Notes: • Digital Audio will not work for operating instructions. 1 or Component 2. (if connected to S-VIDEO, select Component Input ports To get better picture quality, connect a DVD player to the component input ports as shown in the figure= When connecting the TV to external equipment, match the jack colors...
... or Front Video external input source.) 3. Note that RGB, HDMI!/DVI and HDMI2 sources are connected at the same time. 16 Plasma TV Use the TV/VmDEO button on the remote control. Installation How to COnnect Connect the audio and video cables from the external equipment...Y Notes: • Digital Audio will not work for operating instructions. 1 or Component 2. (if connected to S-VIDEO, select Component Input ports To get better picture quality, connect a DVD player to the component input ports as shown in the figure= When connecting the TV to external equipment, match the jack colors...

Owners Manual
Page 18
... to connect audio, HDMI2 port is also available for the DVl video connection. 2. To get the best picture quality, adiust the PC graphics card to -DVI cable(not supplied with this purpose. 3. HOW to the... the manufacturer of SETUP menu.(Refer to AUDIO INPUT port located on the VIDEO menu until the picture is also available for DVl INPUT. 3. If you select RGB-PC in main input option of...(or the sound card of RGB INPUT port. Check the image on the VIDEO menu until the picture is present, change the PC output to another resolution, change the PC graphic card or consult the...
... to connect audio, HDMI2 port is also available for the DVl video connection. 2. To get the best picture quality, adiust the PC graphics card to -DVI cable(not supplied with this purpose. 3. HOW to the... the manufacturer of SETUP menu.(Refer to AUDIO INPUT port located on the VIDEO menu until the picture is also available for DVl INPUT. 3. If you select RGB-PC in main input option of...(or the sound card of RGB INPUT port. Check the image on the VIDEO menu until the picture is present, change the PC output to another resolution, change the PC graphic card or consult the...

Owners Manual
Page 20
...) supporting Auto HDMI/DVl function, the output resolution of this TV with a HDMI-to connect audio. 2. To get the best picture quality, adiust the output resolution of the source device will be automatically - Select HDMI!/DVI or HDMI2 input source in main input ... device supports Auto DVl function, the output resolution of the source device to set the output resolution appropriately. To get the best picture quality, adjust the output resolution of RGB INPUT port. lnstaflation HIGH DEFINITION MULTIMEDIA INTERFACE - This TV supports HDCP(High-bandwidth Digital ...
...) supporting Auto HDMI/DVl function, the output resolution of this TV with a HDMI-to connect audio. 2. To get the best picture quality, adiust the output resolution of the source device will be automatically - Select HDMI!/DVI or HDMI2 input source in main input ... device supports Auto DVl function, the output resolution of the source device to set the output resolution appropriately. To get the best picture quality, adjust the output resolution of RGB INPUT port. lnstaflation HIGH DEFINITION MULTIMEDIA INTERFACE - This TV supports HDCP(High-bandwidth Digital ...

Owners Manual
Page 22
... x 600 @ 88Hz - 800 x 600 @ 8OHz - 800 x 600 @ 72Hz - 800 x 890 @ 75Hz - 1024 x 788 @ 80Hz(preferred - 1024 x 788 @ 70Hz - 1024 x 788 @ 75Hz format) 22 Plasma TV When Soume Devices connected with the resolution, vertical pattern, contrast or brightness in use 1= Connect the HDMI1/DVI Source Devices(DVD Player or Set... and contrast on the ISM Method menu. - Depending on the graphics card, DOS mode may not fit to Screen. As shown the picture below, press the ADJUST button to adjust the screen Position of HDMI1/DVI Source Devices or contact your TV SET= There may become permanently...
... x 600 @ 88Hz - 800 x 600 @ 8OHz - 800 x 600 @ 72Hz - 800 x 890 @ 75Hz - 1024 x 788 @ 80Hz(preferred - 1024 x 788 @ 70Hz - 1024 x 788 @ 75Hz format) 22 Plasma TV When Soume Devices connected with the resolution, vertical pattern, contrast or brightness in use 1= Connect the HDMI1/DVI Source Devices(DVD Player or Set... and contrast on the ISM Method menu. - Depending on the graphics card, DOS mode may not fit to Screen. As shown the picture below, press the ADJUST button to adjust the screen Position of HDMI1/DVI Source Devices or contact your TV SET= There may become permanently...

Owners Manual
Page 60
...'s because it is programmed to remember which mode it will blink green for the TV Guide On Screen system to a week for 3-4 seconds before the picture is seen. • When the TV is turned On, the TV Guide On Screen system is automatically displayed. The screen may be different from the... wall power outlet. ,After turning on the TV, it was unplugged and then powered On. 60 Plasma TV When the TV is turned on the remote control 2.
...'s because it is programmed to remember which mode it will blink green for the TV Guide On Screen system to a week for 3-4 seconds before the picture is seen. • When the TV is turned On, the TV Guide On Screen system is automatically displayed. The screen may be different from the... wall power outlet. ,After turning on the TV, it was unplugged and then powered On. 60 Plasma TV When the TV is turned on the remote control 2.

Owners Manual
Page 63
... the FAV button on the remote control when a channel is highlighted and then you can add or delete the channel by referring to experience picture degradation. - You will now see the quality of the screen.You can create your own Favorite List. The higher the signal strength, the...the $_ menu. 2. Press the _ button and then use _ / _" button to add or delete it. View the on or off with channel numbers and a preview picture. 4. Operation - Press the MENU button and then use _k / _ button to the Favorite List. 5. Press FAV button to add the channel to select Channel _dtt....
... the FAV button on the remote control when a channel is highlighted and then you can add or delete the channel by referring to experience picture degradation. - You will now see the quality of the screen.You can create your own Favorite List. The higher the signal strength, the...the $_ menu. 2. Press the _ button and then use _ / _" button to add or delete it. View the on or off with channel numbers and a preview picture. 4. Operation - Press the MENU button and then use _k / _ button to the Favorite List. 5. Press FAV button to add the channel to select Channel _dtt....

Owners Manual
Page 64
... then use A / _ button to select Channel Label. 3. Press the MENU button and then use _, / _' button to select the $E'I'UP menu. 2. Change the picture source so you didn't preset a label for a channel - Press the _ button and then use A / T button to select the source: Antenna, Cable, Video, Front...to return to TV viewing or press MENU button to return to select the label. 5. Press the _ / _ button to the previous menu. 64 Plasma TV Sets a label to select Input _[,_beL 3. Press the MENU button and then use A / T button to each input source or lets you ...
... then use A / _ button to select Channel Label. 3. Press the MENU button and then use _, / _' button to select the $E'I'UP menu. 2. Change the picture source so you didn't preset a label for a channel - Press the _ button and then use A / T button to select the source: Antenna, Cable, Video, Front...to return to TV viewing or press MENU button to return to select the label. 5. Press the _ / _ button to the previous menu. 64 Plasma TV Sets a label to select Input _[,_beL 3. Press the MENU button and then use A / T button to each input source or lets you ...

Owners Manual
Page 65
...button to select the _qDEO menu. 2. When adjusting Video menu options (contrast, brightness, color, sharpness, tint, and color temperature) manually, EZ Picture automatically changes to the previous menu. - Press EXmTbutton to return to TV viewing or press MENU button to return to Custom. - Set to warm...Medium or Warm. 4. Press the MENU button and then use _ / _ button to select the VIDEO menu. 2. Select the preset value in the EZ Picture menu based on the program category. - Press the _ button and then use _ / T button to make appropriate adjustments. 4. Choose one of three ...
...button to select the _qDEO menu. 2. When adjusting Video menu options (contrast, brightness, color, sharpness, tint, and color temperature) manually, EZ Picture automatically changes to the previous menu. - Press EXmTbutton to return to TV viewing or press MENU button to return to Custom. - Set to warm...Medium or Warm. 4. Press the MENU button and then use _ / _ button to select the VIDEO menu. 2. Select the preset value in the EZ Picture menu based on the program category. - Press the _ button and then use _ / T button to make appropriate adjustments. 4. Choose one of three ...

Owners Manual
Page 71
... He_ri_'en when you want to watch movies at both sides, to create a spectacular view. 7-oom 1 Choose Zeem 1 when you to view the picture without any alteration. This option lets the TV do 3:2 puIFdown operation for Component 1-2 (480p/720p/1080i)/RGB-DTV (480p/720p/1080i)/HDMWDVFDTV (720p/1080i... displayed on the screen and remain visi- Press EXIT button to return to TV viewing or press MENU button to return to select the desired picture format. However, the top and bottom portions of Cinema Zoom using A / _" button. Note; Note; Press the MENU button and then use A / ...
... He_ri_'en when you want to watch movies at both sides, to create a spectacular view. 7-oom 1 Choose Zeem 1 when you to view the picture without any alteration. This option lets the TV do 3:2 puIFdown operation for Component 1-2 (480p/720p/1080i)/RGB-DTV (480p/720p/1080i)/HDMWDVFDTV (720p/1080i... displayed on the screen and remain visi- Press EXIT button to return to TV viewing or press MENU button to return to select the desired picture format. However, the top and bottom portions of Cinema Zoom using A / _" button. Note; Note; Press the MENU button and then use A / ...

Owners Manual
Page 74
... button. ,, Oltbiter Orbiter may be impossible to clear entirely with White Wash. 7-0 return to remain on the screen for prolonged periods will automatically invert the plasma display panel color every 30 minutes. 4. Use our unique method to select the OPTION menu. 2. Press the MENU button and then use A ,,_' button to select... permanent image may help prevent ghost images. Press EXIT button to return to TV viewing or press MENU button to return to Normal. A frozen still picture from the screen. To avoid a permanent image on the screen. 1. set to the previous menu. 74...
... button. ,, Oltbiter Orbiter may be impossible to clear entirely with White Wash. 7-0 return to remain on the screen for prolonged periods will automatically invert the plasma display panel color every 30 minutes. 4. Use our unique method to select the OPTION menu. 2. Press the MENU button and then use A ,,_' button to select... permanent image may help prevent ghost images. Press EXIT button to return to TV viewing or press MENU button to return to Normal. A frozen still picture from the screen. To avoid a permanent image on the screen. 1. set to the previous menu. 74...

Owners Manual
Page 79
Operation 2, 1, If you enter the Cha_el as the picture 3 above, Edit after running the EZ Scan without Cab[eCARD TM, you can see the came TV service provider(s), - When receiving an emergency message, the ... 2-3 minutes to gather the cable channel list after inserting the CableCARD TM as shown below or the channel is displayed on the screen as the picture 4 above, (Occasionally more than that maintains the emergency message, The message will automatically disappear after some time and return to a channel that time...
Operation 2, 1, If you enter the Cha_el as the picture 3 above, Edit after running the EZ Scan without Cab[eCARD TM, you can see the came TV service provider(s), - When receiving an emergency message, the ... 2-3 minutes to gather the cable channel list after inserting the CableCARD TM as shown below or the channel is displayed on the screen as the picture 4 above, (Occasionally more than that maintains the emergency message, The message will automatically disappear after some time and return to a channel that time...


