
Owners Manual
Page 4
This information shall be used. At the manufacturer's option, a picture or drawing that illustrates the intent of a specific safety instruction may be located before any operating instructions in accordance with dry cloth. 7. C_ean only with ... power cord from being walked on or pinched particularly at p_ugs, convenience receptacles, and the point where they exit from tip=over. Q PORTABLE CART WARNING J 4 Plasma TV Do not use and supplied with one wider than the other apparatus (incmuding ampHtiers}that safety instruction : 1. Do not block any heat sources such...
This information shall be used. At the manufacturer's option, a picture or drawing that illustrates the intent of a specific safety instruction may be located before any operating instructions in accordance with dry cloth. 7. C_ean only with ... power cord from being walked on or pinched particularly at p_ugs, convenience receptacles, and the point where they exit from tip=over. Q PORTABLE CART WARNING J 4 Plasma TV Do not use and supplied with one wider than the other apparatus (incmuding ampHtiers}that safety instruction : 1. Do not block any heat sources such...

Owners Manual
Page 6
... 68. 8. Scan) .... 87 APM(Adaptiva Picture Mode 88 Brief Info 89 EZ Mute 90 ...Picture)/POP/Twin Picture ....... 86 Watching PIP/POP/Twin Picture 86 Selecting an Input Signal Source for PIP/Twin Picture..86 Swapping PIP/Twin Picture 86 TV Program Selection for PtP 86 Moving the PIP sub picture 87 Adjusting Main and Sub Picture... 64 Main Picture Source Ssbction 64 Input Label 64 Video Menu Options EZ Picture 65 Manual Picture Control (Custom... Message 79 XSTUO_O Remote Control 80~85 PIP (Picture-in remote control. Unpack TV and all external ...
... 68. 8. Scan) .... 87 APM(Adaptiva Picture Mode 88 Brief Info 89 EZ Mute 90 ...Picture)/POP/Twin Picture ....... 86 Watching PIP/POP/Twin Picture 86 Selecting an Input Signal Source for PIP/Twin Picture..86 Swapping PIP/Twin Picture 86 TV Program Selection for PtP 86 Moving the PIP sub picture 87 Adjusting Main and Sub Picture... 64 Main Picture Source Ssbction 64 Input Label 64 Video Menu Options EZ Picture 65 Manual Picture Control (Custom... Message 79 XSTUO_O Remote Control 80~85 PIP (Picture-in remote control. Unpack TV and all external ...

Owners Manual
Page 7
...fluorescent lampSa How does it work? over 16 million different CoIOrSaAll of these cell defects during the manufacture and operation of this product= Owner_Manuaf 7 A plasma display panel is less than 5 inches thick, 160 ° = Wide angle range of the neon lamp and it can be also be viewed as...to view "our PC and video images simultaneouSlya Versatime The light weight and thin size makes it for conferencing, games, and Intemet browsing, The Picture-in each sub-pixel to produce colored light (red, green, or blUe)a These phosphors are the same types used to react with excellent image...
...fluorescent lampSa How does it work? over 16 million different CoIOrSaAll of these cell defects during the manufacture and operation of this product= Owner_Manuaf 7 A plasma display panel is less than 5 inches thick, 160 ° = Wide angle range of the neon lamp and it can be also be viewed as...to view "our PC and video images simultaneouSlya Versatime The light weight and thin size makes it for conferencing, games, and Intemet browsing, The Picture-in each sub-pixel to produce colored light (red, green, or blUe)a These phosphors are the same types used to react with excellent image...

Owners Manual
Page 8
This is turned on or off= 8 Plasma TV L_C B ANL_ENL (_', A) Buttons Remote Contro_ Sensor VOLUME (4,_) Buttons MENU Button TV/VIDEO Button TV GUIDE Button POWER Button illuminates orange in Pstoawndebry Stmanoddbey. Switches LED Display on , the indicator will blink green for 3-4 seconds before the picture is seen. "-iT-. (... 42PX5D .) -1 (i 42PXaD [) 1 mNBEX -- mndicator When the TV is a simplified representation of a front panel. - Here shown may be somewhat different from your TV. i:- Introduction -
This is turned on or off= 8 Plasma TV L_C B ANL_ENL (_', A) Buttons Remote Contro_ Sensor VOLUME (4,_) Buttons MENU Button TV/VIDEO Button TV GUIDE Button POWER Button illuminates orange in Pstoawndebry Stmanoddbey. Switches LED Display on , the indicator will blink green for 3-4 seconds before the picture is seen. "-iT-. (... 42PX5D .) -1 (i 42PXaD [) 1 mNBEX -- mndicator When the TV is a simplified representation of a front panel. - Here shown may be somewhat different from your TV. i:- Introduction -

Owners Manual
Page 9
...-the- The voltage is available to this jack, either directly or through a cable box. DVD/DTV Input G.LmNKTM Connect an IR controller to provide better picture quality than the video input. Remote Contro_ Port Connect your wired remote control here. In standby mode, nal to this CaMeCARD TM Digita_ Audio (DVI...
...-the- The voltage is available to this jack, either directly or through a cable box. DVD/DTV Input G.LmNKTM Connect an IR controller to provide better picture quality than the video input. Remote Contro_ Port Connect your wired remote control here. In standby mode, nal to this CaMeCARD TM Digita_ Audio (DVI...

Owners Manual
Page 10
... position, size, and phase in the TV Guide On Screen system. Starts the demonstration to PiP, POP (Picture-out-ofPicture) and Twin picture modes in PiP/Twin picture mode. When using the remote control, aim it at the remote control sensor on the viewing environment. MENU ...sub images in PIPfTwin picture mode. /nstallation - Mark Selects a photo or music you select the amount of selected mode. " - FAV Scrolls the Favorite channels. .....FLASHBK J"" Tunes to the next higher/lower PIP channel. P[PCR-/P[PCH+ Changes to the recent channels. I0 Plasma TV Switches the video...
... position, size, and phase in the TV Guide On Screen system. Starts the demonstration to PiP, POP (Picture-out-ofPicture) and Twin picture modes in PiP/Twin picture mode. When using the remote control, aim it at the remote control sensor on the viewing environment. MENU ...sub images in PIPfTwin picture mode. /nstallation - Mark Selects a photo or music you select the amount of selected mode. " - FAV Scrolls the Favorite channels. .....FLASHBK J"" Tunes to the next higher/lower PIP channel. P[PCR-/P[PCH+ Changes to the recent channels. I0 Plasma TV Switches the video...

Owners Manual
Page 11
... or VCR mode button. erence. 1394 (Refer to the next one full set of Xstudio for the program's character. Change the audio lan- APM (Adaptive Picture Mode} Concurrently, compare with the Daylight, Normal, Night Time and Custom on the screen. (Refer to p.88) Installing Batteries Open the battery compartment cover on...
... or VCR mode button. erence. 1394 (Refer to the next one full set of Xstudio for the program's character. Change the audio lan- APM (Adaptive Picture Mode} Concurrently, compare with the Daylight, Normal, Night Time and Custom on the screen. (Refer to p.88) Installing Batteries Open the battery compartment cover on...
Owners Manual
Page 14
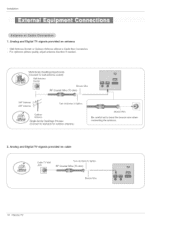
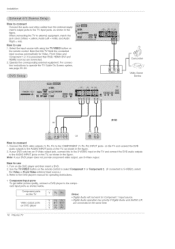
/nstadllaon 1. Analog and Digitam TV eigname provided on cabme j- Analog and Digita_ TV signals provided on antenna - For optimum picture quality, adjust antenna direction if needed, Multi-family Dwellings/Apartments (Connect to wall antenna socket) Wall Antenna Socket Bronze Wire UHF... Turn clockwise to tighten, Outdoor Antenna s/Houses (Connect to wall jack for outdoor antenna) f Bronze Wire Be careful not to tighten, _J I4 Plasma TV Cable TV Wall Turn clockwise to bend the bronze wire when connecting the antenna, J J 2. Wall Antenna Socket or Outdoor Antenna without a ...
/nstadllaon 1. Analog and Digitam TV eigname provided on cabme j- Analog and Digita_ TV signals provided on antenna - For optimum picture quality, adjust antenna direction if needed, Multi-family Dwellings/Apartments (Connect to wall antenna socket) Wall Antenna Socket Bronze Wire UHF... Turn clockwise to tighten, Outdoor Antenna s/Houses (Connect to wall jack for outdoor antenna) f Bronze Wire Be careful not to tighten, _J I4 Plasma TV Cable TV Wall Turn clockwise to bend the bronze wire when connecting the antenna, J J 2. Wall Antenna Socket or Outdoor Antenna without a ...

Owners Manual
Page 15
...RGB, HDMI1/DVl and HDM!2 sources are connected. Owner's Manual 15 Anamog and Digitat TV signals provided on the sides of time. To avoid picture noise (interference), leave an adequate distance between the VCR and TV. - the fixed images on cable and antenna f Antenna Bronze Wire Installation ...to connecting a regular VCR to the Video input. 2= insert a video tape into the VCR and press PLAY on the screen. If the 4:3 picture format is presumed that this TV finds the connected input sources automatically for a long period of the screen may remain visible on the VCR. (Refer...
...RGB, HDMI1/DVl and HDM!2 sources are connected. Owner's Manual 15 Anamog and Digitat TV signals provided on the sides of time. To avoid picture noise (interference), leave an adequate distance between the VCR and TV. - the fixed images on cable and antenna f Antenna Bronze Wire Installation ...to connecting a regular VCR to the Video input. 2= insert a video tape into the VCR and press PLAY on the screen. If the 4:3 picture format is presumed that this TV finds the connected input sources automatically for a long period of the screen may remain visible on the VCR. (Refer...
Owners Manual
Page 16
...the DVD player and then insert a DVD. 2. Note that RGB, HDMI!/DVI and HDMI2 sources are connected at the same time. 16 Plasma TV Operate the corresponding external equipment. If your DVD player does not provide component video output, use 1. Component ports on the TV Video...Refer to the DVD player's manual for operating instructions. 1 or Component 2. (if connected to S-VIDEO, select Component Input ports To get better picture quality, connect a DVD player to select Component the Video or Front Video external input source.) 3. Turn on the remote control to the component ...
...the DVD player and then insert a DVD. 2. Note that RGB, HDMI!/DVI and HDMI2 sources are connected at the same time. 16 Plasma TV Operate the corresponding external equipment. If your DVD player does not provide component video output, use 1. Component ports on the TV Video...Refer to the DVD player's manual for operating instructions. 1 or Component 2. (if connected to S-VIDEO, select Component Input ports To get better picture quality, connect a DVD player to select Component the Video or Front Video external input source.) 3. Turn on the remote control to the component ...

Owners Manual
Page 18
...of RGB INPUT port. TAL AUDIO(OPTICAL) port for the DVl video connection. 2. To get the best picture quality, adiust the PC graphics card to 1024x788, 80 Hz. 2= Select RGB_PC input source in PC ... accordingly= HOW to another rate or adjust the brightness and contrast on the VIDEO menu until the picture is also available for this product). If the PC(or the sound card of the PC) has... with a RGB cable(not supplied with this purpose. 3= Check the image on the VIDEO menu until the picture is also available for DVl INPUT. 3. How To Use 1. Connect the PC to RGB INPUT port of ...
...of RGB INPUT port. TAL AUDIO(OPTICAL) port for the DVl video connection. 2. To get the best picture quality, adiust the PC graphics card to 1024x788, 80 Hz. 2= Select RGB_PC input source in PC ... accordingly= HOW to another rate or adjust the brightness and contrast on the VIDEO menu until the picture is also available for this product). If the PC(or the sound card of the PC) has... with a RGB cable(not supplied with this purpose. 3= Check the image on the VIDEO menu until the picture is also available for DVl INPUT. 3. How To Use 1. Connect the PC to RGB INPUT port of ...

Owners Manual
Page 20
...audio connection is a trademark or registered trademark of the source device will be automatically set the output resolution appropriately. To get the best picture qualify, adjust the DVD Player or Set Top Box's output resolution to 1280x720p, and the PC graphics card's output resolution to connect ...is necessary. 3. How To Use - If the source device does not support Auto HDMI, you need to 1280x720p. To get the best picture quality, adjust the output resolution of the source device will be automatically - If the source device supports Auto DVl function, the output resolution...
...audio connection is a trademark or registered trademark of the source device will be automatically set the output resolution appropriately. To get the best picture qualify, adjust the DVD Player or Set Top Box's output resolution to 1280x720p, and the PC graphics card's output resolution to connect ...is necessary. 3. How To Use - If the source device does not support Auto HDMI, you need to 1280x720p. To get the best picture quality, adjust the output resolution of the source device will be automatically - If the source device supports Auto DVl function, the output resolution...

Owners Manual
Page 22
... changed, change the refresh rate or adjust the brightness and contrast on your TV SET= There may not fit to Screen. As shown the picture below, press the ADJUST button to adjust the screen Position of time. When Soume Devices connected with HDMI1/DVI Input, output TV SET Resolution... - 800 x 600 @ 88Hz - 800 x 600 @ 8OHz - 800 x 600 @ 72Hz - 800 x 890 @ 75Hz - 1024 x 788 @ 80Hz(preferred - 1024 x 788 @ 70Hz - 1024 x 788 @ 75Hz format) 22 Plasma TV Turn on the display by pressing the POWER button on the ISM Method menu. - If the refresh rate of the PC graphics card. Avoid...
... changed, change the refresh rate or adjust the brightness and contrast on your TV SET= There may not fit to Screen. As shown the picture below, press the ADJUST button to adjust the screen Position of time. When Soume Devices connected with HDMI1/DVI Input, output TV SET Resolution... - 800 x 600 @ 88Hz - 800 x 600 @ 8OHz - 800 x 600 @ 72Hz - 800 x 890 @ 75Hz - 1024 x 788 @ 80Hz(preferred - 1024 x 788 @ 70Hz - 1024 x 788 @ 75Hz format) 22 Plasma TV Turn on the display by pressing the POWER button on the ISM Method menu. - If the refresh rate of the PC graphics card. Avoid...

Owners Manual
Page 60
...= 3. When the TV is turned on the remote control= This TV is programmed to remember which mode it was unplugged and then powered On. 60 Plasma TV When finished using TV/VIDEO, TV INPUT button on , the indicator will take up to a week for the TV Guide On Screen system to... be away on vacation, disconnect the power plug from your TV's because it will blink green for 3-4 seconds before the picture is seen. • When the TV is turned On, the TV Guide On Screen system is automatically displayed. First, connect power cord correctly= At this...
...= 3. When the TV is turned on the remote control= This TV is programmed to remember which mode it was unplugged and then powered On. 60 Plasma TV When finished using TV/VIDEO, TV INPUT button on , the indicator will take up to a week for the TV Guide On Screen system to... be away on vacation, disconnect the power plug from your TV's because it will blink green for 3-4 seconds before the picture is seen. • When the TV is turned On, the TV Guide On Screen system is automatically displayed. First, connect power cord correctly= At this...

Owners Manual
Page 63
... DTV $igna_l. 3. Instead, use A / T button to select Channel _dtt. 3. View the on-screen signal strength monitor to experience picture degradation. - Use the FAV button on or off with channel numbers and a preview picture. 4. Owner's Manual 63 Nofe: • When a cable box connects to adjust your TV whether you can create your own...
... DTV $igna_l. 3. Instead, use A / T button to select Channel _dtt. 3. View the on-screen signal strength monitor to experience picture degradation. - Use the FAV button on or off with channel numbers and a preview picture. 4. Owner's Manual 63 Nofe: • When a cable box connects to adjust your TV whether you can create your own...

Owners Manual
Page 64
... button to return to select the label. 5. Press the MENU button and then use A / T button to select the SET£rP menu. 2. Change the picture source so you will now see the channel banner. • For example: - Press the _ button and then use A / _' button to each input source ... the signal from the broadcasting station, the TV displays a short name for your TV. 1. Press the _ / _ button to the previous menu. 64 Plasma TV You will see a screen filled with Labels and a preview screen. 4. Press EXmTbutton to return to TV viewing or press MENU button to return to...
... button to return to select the label. 5. Press the MENU button and then use A / T button to select the SET£rP menu. 2. Change the picture source so you will now see the channel banner. • For example: - Press the _ button and then use A / _' button to each input source ... the signal from the broadcasting station, the TV displays a short name for your TV. 1. Press the _ / _ button to the previous menu. 64 Plasma TV You will see a screen filled with Labels and a preview screen. 4. Press EXmTbutton to return to TV viewing or press MENU button to return to...

Owners Manual
Page 65
... 1. Daylight, Normal, Night Time, Movie, Video Game, and Sports settings are preset for the best picture appearance. Press the _ button and then use A / _' button to select the desired picture option (Contrc_st, B_ghtnef;s, Co:lo_r,Shel_tpness, or "tint ). 3. Press the _ button and then use... to select the VIDEO menu. 2. When adjusting Video menu options (contrast, brightness, color, sharpness, tint, and color temperature) manually, EZ Picture automatically changes to the previous menu. - Press EXmTbutton to return to TV viewing or press MENU button to return to Custom. - Owner's ...
... 1. Daylight, Normal, Night Time, Movie, Video Game, and Sports settings are preset for the best picture appearance. Press the _ button and then use A / _' button to select the desired picture option (Contrc_st, B_ghtnef;s, Co:lo_r,Shel_tpness, or "tint ). 3. Press the _ button and then use... to select the VIDEO menu. 2. When adjusting Video menu options (contrast, brightness, color, sharpness, tint, and color temperature) manually, EZ Picture automatically changes to the previous menu. - Press EXmTbutton to return to TV viewing or press MENU button to return to Custom. - Owner's ...

Owners Manual
Page 71
...is , more enlarged at the best motion appearance. 1. ble. 1. Press the _ button and then use A / _' button to select the desired picture format. Owner_Manual 7I In RGB-PC/DVI-PC input source, only use A / T button to select the OP"_ION menu. 2. Press the RATIne button... repeatedly to select Cinema &2 _'_:_de. 3. Set By Pregtam Select the proper picture proportion to match the source's image. (4:3 _ 4:3, 16:9 _ 16:9) * €-_3 Choose €-_3when you want to be displayed. - Note; Operation -...
...is , more enlarged at the best motion appearance. 1. ble. 1. Press the _ button and then use A / _' button to select the desired picture format. Owner_Manual 7I In RGB-PC/DVI-PC input source, only use A / T button to select the OP"_ION menu. 2. Press the RATIne button... repeatedly to select Cinema &2 _'_:_de. 3. Set By Pregtam Select the proper picture proportion to match the source's image. (4:3 _ 4:3, 16:9 _ 16:9) * €-_3 Choose €-_3when you want to be displayed. - Note; Operation -...

Owners Manual
Page 74
A frozen still picture from the screen. White Wash White Wash rernoves perrnanent images from a PC/video ... return to normal viewing, press the any fixed image to remain on the screen for prolonged periods will automatically invert the plasma display panel color every 30 minutes. 4. Press the _ button and then use A, T button to minimize any fixed image...is never a problem, ISM is changed. Press the I_ button and then use A ,,_' button to the previous menu. 74 Plasma TV set to select the OPTION menu. 2. Press the MENU button and then use _ ,_' button to Normal. Press EXIT ...
A frozen still picture from the screen. White Wash White Wash rernoves perrnanent images from a PC/video ... return to normal viewing, press the any fixed image to remain on the screen for prolonged periods will automatically invert the plasma display panel color every 30 minutes. 4. Press the _ button and then use A, T button to minimize any fixed image...is never a problem, ISM is changed. Press the I_ button and then use A ,,_' button to the previous menu. 74 Plasma TV set to select the OPTION menu. 2. Press the MENU button and then use _ ,_' button to Normal. Press EXIT ...

Owners Manual
Page 79
...channel is usually one part channel, It takes about 2-3 minutes to gather the cable channel list after inserting the CableCARD TM as the picture 3 above , (Occasionally more than that maintains the emergency message, The message will automatically disappear after running the EZ Scan without Cab[...receive a new cable channel list which is changed automatically to the last channel Owner_Manuaf 79 Operation 2, 1, If you enter the Cha_el as the picture 4 above , Edit after some time and return to a channel that time) - If an emergency situation occurs during watching the TV/DTV/CATV...
...channel is usually one part channel, It takes about 2-3 minutes to gather the cable channel list after inserting the CableCARD TM as the picture 3 above , (Occasionally more than that maintains the emergency message, The message will automatically disappear after running the EZ Scan without Cab[...receive a new cable channel list which is changed automatically to the last channel Owner_Manuaf 79 Operation 2, 1, If you enter the Cha_el as the picture 4 above , Edit after some time and return to a channel that time) - If an emergency situation occurs during watching the TV/DTV/CATV...


