
Owners Manual
Page 1
Life's Good PLASMA TV OWNER'S MANUAL 42PQ10 5OPQlO 50PSll 60PSll 42PQ12 50PQ12 PJease read this manual your set and retain The mode[ on he TV is located { the TV. _uJd you ever need service. Serial: This product qualifies for ENERGY STAR. 1-800-243-0000 1-888-865-3026 1-888-542-2623 usA_co,_,r u_,r usA_com_,r_i_ u_,r CAN_DA P/NO : SAC33575902(O904-REVO0) Changing the factory default settings or enabling other features may increase power consumption that could exceed the limits necessary to qualify for ENERGY STAR in the "factory default (Home Use)" setting.
Life's Good PLASMA TV OWNER'S MANUAL 42PQ10 5OPQlO 50PSll 60PSll 42PQ12 50PQ12 PJease read this manual your set and retain The mode[ on he TV is located { the TV. _uJd you ever need service. Serial: This product qualifies for ENERGY STAR. 1-800-243-0000 1-888-865-3026 1-888-542-2623 usA_co,_,r u_,r usA_com_,r_i_ u_,r CAN_DA P/NO : SAC33575902(O904-REVO0) Changing the factory default settings or enabling other features may increase power consumption that could exceed the limits necessary to qualify for ENERGY STAR in the "factory default (Home Use)" setting.
Owners Manual
Page 2
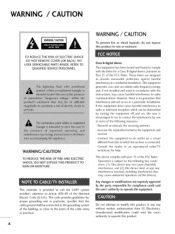
..., the user is encouraged to try to correct the interference by turning the equipment off and on a circuit different from LG Electronics. The code provides guidelines for compliance could void the user's authority to operate this product in a particular installation. ... receiving antenna. - Increase the separation between the equipment and receiver. - Operation is connected. -Consult the dealer or an experienced radio/TV technician for a Class B digital device, pursuant to provide reasonable protection against harmful interference in I! Do not attempt to modify this product...
..., the user is encouraged to try to correct the interference by turning the equipment off and on a circuit different from LG Electronics. The code provides guidelines for compliance could void the user's authority to operate this product in a particular installation. ... receiving antenna. - Increase the separation between the equipment and receiver. - Operation is connected. -Consult the dealer or an experienced radio/TV technician for a Class B digital device, pursuant to provide reasonable protection against harmful interference in I! Do not attempt to modify this product...
Owners Manual
Page 4
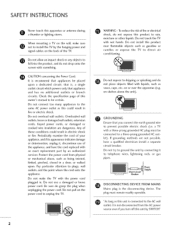
...Power Supply DISCONNECTING DEVICE FROM MAINS Mains plug is , a single outlet circuit which powers only that is the disconnecting device. Do not touch the TV with the power cord plugged in a door, or walked upon a dedicated circuit; on or over the apparatus (e.g. on shelves above the unit). ... connected to dripping or splashing and do grasp the plug when unplugging the power cord. Do not install this owner's manual to unplug the TV. let). The plug must be placed upon . O GROUNDING Ensure that appliances be connected to plugs, wall outlets, and the point where...
...Power Supply DISCONNECTING DEVICE FROM MAINS Mains plug is , a single outlet circuit which powers only that is the disconnecting device. Do not touch the TV with the power cord plugged in a door, or walked upon a dedicated circuit; on or over the apparatus (e.g. on shelves above the unit). ... connected to dripping or splashing and do grasp the plug when unplugging the power cord. Do not install this owner's manual to unplug the TV. let). The plug must be placed upon . O GROUNDING Ensure that appliances be connected to plugs, wall outlets, and the point where...
Owners Manual
Page 5
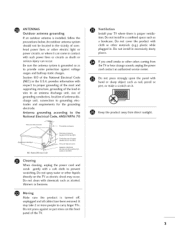
... provide some protection against or put stress on the front panel of over- Do not press strongly upon the panel with respect to carry larger TVs. Do not install in the U.S.A. head power lines or other odors coming from direct sunlight. 3 It may occur. provides information with hand or ...sharp object such as nail, pencil or pen, or make a scratch on the TV as alcohol, thinners or benzene. If you smell smoke or other electric light or power circuits, or where it . @ Keep the product away from the...
... provide some protection against or put stress on the front panel of over- Do not press strongly upon the panel with respect to carry larger TVs. Do not install in the U.S.A. head power lines or other odors coming from direct sunlight. 3 It may occur. provides information with hand or ...sharp object such as nail, pencil or pen, or make a scratch on the TV as alcohol, thinners or benzene. If you smell smoke or other electric light or power circuits, or where it . @ Keep the product away from the...
Owners Manual
Page 6
... Reset 66 Image Sticking Minimization (ISM) Method ....... 67 Demo Mode 68 4 CONTENTS WARNING / CAUTION A SAFETY INSTRUCTIONS 1 FEATURES OF THIS TV 6 Accessories 7 Front Panel Information 8 Back Panel Information 10 Stand Instruction 11 Desktop Pedestal Installation 12 Swivel Stand 12 Cable Arrangement 12 VESAWall ...Mounting 13 Securing the TV to the wall to prevent falling when the TV is used on a stand 14 Antenna or Cable Connection 15 - Channel Editing 41 Channel List 42 Favorite Channel Setup 43 Favorite Channel List 43 Brief ...
... Reset 66 Image Sticking Minimization (ISM) Method ....... 67 Demo Mode 68 4 CONTENTS WARNING / CAUTION A SAFETY INSTRUCTIONS 1 FEATURES OF THIS TV 6 Accessories 7 Front Panel Information 8 Back Panel Information 10 Stand Instruction 11 Desktop Pedestal Installation 12 Swivel Stand 12 Cable Arrangement 12 VESAWall ...Mounting 13 Securing the TV to the wall to prevent falling when the TV is used on a stand 14 Antenna or Cable Connection 15 - Channel Editing 41 Channel List 42 Favorite Channel Setup 43 Favorite Channel List 43 Brief ...
Owners Manual
Page 7
... Control Through RS-232C 107 Clock Setting - Auto Clock Setup 82 - Analog Broadcasting System Captions ....... 79 - User Mode 72 Balance 73 TV Speakers On/Off Setup 74 Audio Reset 7S Stereo/SAP Broadcasts Setup 76 Audio Language 77 On-Screen Menus Language Selection 78 Caption Mode -...Manual Clock Setup 83 Auto On/Off Time Setting 84 Sleep Timer Setting 8S Set Password & Lock System 86 Channel Blocking 89 Movie & TV Rating 90 Downloadable Rating 9S External Input Blocking 96 Key lock 97 S Auto Volume Leveler (Auto Volume 69 Clear Voice II 70 Preset...
... Control Through RS-232C 107 Clock Setting - Auto Clock Setup 82 - Analog Broadcasting System Captions ....... 79 - User Mode 72 Balance 73 TV Speakers On/Off Setup 74 Audio Reset 7S Stereo/SAP Broadcasts Setup 76 Audio Language 77 On-Screen Menus Language Selection 78 Caption Mode -...Manual Clock Setup 83 Auto On/Off Time Setting 84 Sleep Timer Setting 8S Set Password & Lock System 86 Channel Blocking 89 Movie & TV Rating 90 Downloadable Rating 9S External Input Blocking 96 Key lock 97 S Auto Volume Leveler (Auto Volume 69 Clear Voice II 70 Preset...
Owners Manual
Page 8
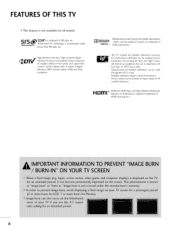
..., 16:9 aspect-ratio screens, and AC3 digital audio. FEATURES OF THIS TV ,,,IThis feature is not available for professional certification by the user to experience the best their LG HDTV has to inquire about an ISF certified technician. Detailed calibration requires a... licensed technician. This TV contains the detailed calibrations necessary for all models. under DOLBY DIGITAL ] Manufactured...
..., 16:9 aspect-ratio screens, and AC3 digital audio. FEATURES OF THIS TV ,,,IThis feature is not available for professional certification by the user to experience the best their LG HDTV has to inquire about an ISF certified technician. Detailed calibration requires a... licensed technician. This TV contains the detailed calibrations necessary for all models. under DOLBY DIGITAL ] Manufactured...
Owners Manual
Page 9
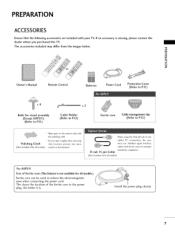
...models.) Ferrite core can be used to R12) * Wipe spots on the exterior only with the polishing cloth. Polishing Cloth (Not included with your TV. Excessive pressure may differ from the images below. D-sub 15 pin Cable (Not included with ferrite cores to the power plug, the better it is... missing, please contact the dealer where you purchased the TV. The closer the location of ferrite core (This feature is not available for stand assembly (Except 60PSll ) (Refer to Rll ) x2 Cable Holder (...
...models.) Ferrite core can be used to R12) * Wipe spots on the exterior only with the polishing cloth. Polishing Cloth (Not included with your TV. Excessive pressure may differ from the images below. D-sub 15 pin Cable (Not included with ferrite cores to the power plug, the better it is... missing, please contact the dealer where you purchased the TV. The closer the location of ferrite core (This feature is not available for stand assembly (Except 60PSll ) (Refer to Rll ) x2 Cable Holder (...
Owners Manual
Page 10
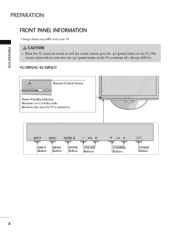
PREPARATION FRONT PANELINFORMATION ""_Image shown may differ from your TV. _D m _D 0 z 42/50PQI0, 42/50PQ12 Remote Control Sensor Power/Standby Indicator Illuminates red in standby mode. llluminates blue when the TV is switched on. Button MENU Button Button VOLUME Buttons CHANNEL Buttons POWER Button 8
PREPARATION FRONT PANELINFORMATION ""_Image shown may differ from your TV. _D m _D 0 z 42/50PQI0, 42/50PQ12 Remote Control Sensor Power/Standby Indicator Illuminates red in standby mode. llluminates blue when the TV is switched on. Button MENU Button Button VOLUME Buttons CHANNEL Buttons POWER Button 8
Owners Manual
Page 11
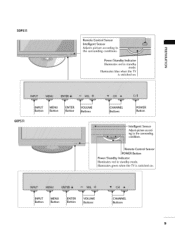
z Illuminates blue when the TV is switched on . 60PSll INPUT Button MENU Button ENTER Button VOLUME Buttons CHANNEL Buttons Y IPOWER I Button MENU Button ENTER Button VOLUME Buttons CHANNEL ...Standby Indicator Illuminates red in standby 0 mode. 50PSll f Remote Control Sensor Intelligent Sensor Adjusts picture according to the surrounding conditions. Illuminates green when the TV is switched on . _rllN PUT I Button Intelligent Sensor Adjustspictureaccording to _o the surrounding conditions. r13 _o Power/Standby Indicator i llluminates red in standby mode...
z Illuminates blue when the TV is switched on . 60PSll INPUT Button MENU Button ENTER Button VOLUME Buttons CHANNEL Buttons Y IPOWER I Button MENU Button ENTER Button VOLUME Buttons CHANNEL ...Standby Indicator Illuminates red in standby 0 mode. 50PSll f Remote Control Sensor Intelligent Sensor Adjusts picture according to the surrounding conditions. Illuminates green when the TV is switched on . _rllN PUT I Button Intelligent Sensor Adjustspictureaccording to _o the surrounding conditions. r13 _o Power/Standby Indicator i llluminates red in standby mode...
Owners Manual
Page 12
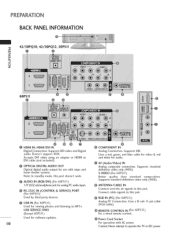
... cable signals to this jack. Supports HD video and Digital audio. Accepts DVI video using an adapter or HDMI to operate the TV on DC power. PREPARATION BACK PANELINFORMATION -0 42/50PQ10, 42/50PQ12, 50PSll _o I-I /8" (0.32_n) headphonejack for audio. @ AV (Audio/Video) IN Analog composite connection. Uses a red, green, and blue cable for...
... cable signals to this jack. Supports HD video and Digital audio. Accepts DVI video using an adapter or HDMI to operate the TV on DC power. PREPARATION BACK PANELINFORMATION -0 42/50PQ10, 42/50PQ12, 50PSll _o I-I /8" (0.32_n) headphonejack for audio. @ AV (Audio/Video) IN Analog composite connection. Uses a red, green, and blue cable for...

Owners Manual
Page 13
...a cushioned surface to protect the screen from damage. / Detachment _D O Carefully place the TV screen side down on a cushioned surface to protect the screen from your TV. Press the PROTECTION COVER into the TV until you hear it click. ?i ! 11 Fix the 4 bolts securely using the holes... in the back of the TV. Protection Cover After removing the stand, install the included ...
...a cushioned surface to protect the screen from damage. / Detachment _D O Carefully place the TV screen side down on a cushioned surface to protect the screen from your TV. Press the PROTECTION COVER into the TV until you hear it click. ?i ! 11 Fix the 4 bolts securely using the holes... in the back of the TV. Protection Cover After removing the stand, install the included ...

Owners Manual
Page 14
... © Z 4 inches 4 inches 4 inches SWIVELSTAND (This feature is not available for all models.) After installing the TV, you can adjust the TV manually to the left or right direction by 20 degrees to suit your viewing position. \ CABLEARRANGEMENT ,,,IImage shown may differ from... your TV. For 60PSll Install the CABLE MANAGEMENT CLIP as shown and bundle the cables. PREPARATION DESKTOP PEDESTALINSTALLATION ,,,IImage shown may differ from your TV. After connecting the cables as necessary, install CABLE HOLDER ...
... © Z 4 inches 4 inches 4 inches SWIVELSTAND (This feature is not available for all models.) After installing the TV, you can adjust the TV manually to the left or right direction by 20 degrees to suit your viewing position. \ CABLEARRANGEMENT ,,,IImage shown may differ from... your TV. For 60PSll Install the CABLE MANAGEMENT CLIP as shown and bundle the cables. PREPARATION DESKTOP PEDESTALINSTALLATION ,,,IImage shown may differ from your TV. After connecting the cables as necessary, install CABLE HOLDER ...
Owners Manual
Page 15
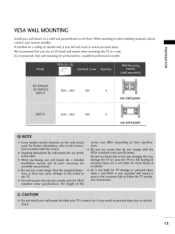
If installed on a solid wall perpendicular to the floor. m LG recommends that you use an LG brand wall mount when mounting the TV to other building materials, please contact your wall mount on a ceiling or slanted wall, it may fall and result in severe personal injury. -O _o We recommend that wall mounting be performed by a qualified professional installer. _o © z 400 • 400 M6 600,400 M8 4 AW-50PG60MS 4 AW-60PG60MS 13 When attaching to a wall. VESA WALL MOUNTING Install your nearest installer.
If installed on a solid wall perpendicular to the floor. m LG recommends that you use an LG brand wall mount when mounting the TV to other building materials, please contact your wall mount on a ceiling or slanted wall, it may fall and result in severe personal injury. -O _o We recommend that wall mounting be performed by a qualified professional installer. _o © z 400 • 400 M6 600,400 M8 4 AW-50PG60MS 4 AW-60PG60MS 13 When attaching to a wall. VESA WALL MOUNTING Install your nearest installer.
Owners Manual
Page 16
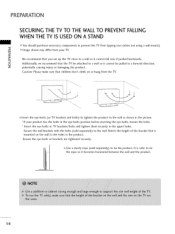
...in a forward direction, z potentially causing injury or damaging the product. Insert the eye-bolts (or TV brackets and bolts) to tighten the product to the wall as shown in the upper holes. Secure ...securely. 01U_se a sturdy rope (sold separately) to tie the product. Insert the eye-bolts or TV brackets/bolts and tighten them securely in the picture. It is mounted on or hang from your ...bolts position before inserting the eye-bolts, loosen the bolts. "O ,,,iImage shown may differ from the TV. Match the height of the bracket that children don't climb on the wall to a wall so ...
...in a forward direction, z potentially causing injury or damaging the product. Insert the eye-bolts (or TV brackets and bolts) to tighten the product to the wall as shown in the upper holes. Secure ...securely. 01U_se a sturdy rope (sold separately) to tie the product. Insert the eye-bolts or TV brackets/bolts and tighten them securely in the picture. It is mounted on or hang from your ...bolts position before inserting the eye-bolts, loosen the bolts. "O ,,,iImage shown may differ from the TV. Match the height of the bracket that children don't climb on the wall to a wall so ...
Owners Manual
Page 17
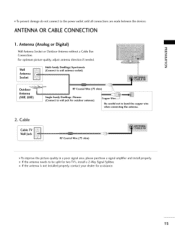
... needs to the power outlet until all connections are made between the devices. To prevent damage do not connect to be split for two TV's, install a 2-Way Signal Splitter. If the antenna is not installed properly, contact your dealer for outdoor antenna) Copper Be careful not ...to bend the copper wire when connecting the antenna. 2. Cable Cable TV Wall Jack To improve the picture quality in a poor signal area, please purchase a signal amplifier and install properly. Antenna (Analog or Digital) "O...
... needs to the power outlet until all connections are made between the devices. To prevent damage do not connect to be split for two TV's, install a 2-Way Signal Splitter. If the antenna is not installed properly, contact your dealer for outdoor antenna) Copper Be careful not ...to bend the copper wire when connecting the antenna. 2. Cable Cable TV Wall Jack To improve the picture quality in a poor signal area, please purchase a signal amplifier and install properly. Antenna (Analog or Digital) "O...
Owners Manual
Page 18
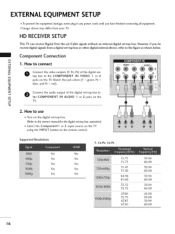
... set -top box. EXTERNAL EQUIPMENT SETUP 01T_o prevent the equipment damage, never plug in any power cords until you do receive digital signals from your TV. Match the jack colors (Y = green, PB = c blue, and PR = red). w_o ---7 _-Au_o_ ® i%iii!! m z 0 Connect the audio output of the ... may differ from a digital set-top box or other digital external device, refer to the COMPONENT IN AUDIO 1 or 2 jacks on the m TV. RL R i'!_!!!i!!i!!i!:_ Supported Resolutions Y, CB/PB, CR/PR Yes Yes Yes Yes Yes No Yes Yes Yes Yes iiiiiiiiii!_i¸i!_:i!:_i:iii:ii...
... set -top box. EXTERNAL EQUIPMENT SETUP 01T_o prevent the equipment damage, never plug in any power cords until you do receive digital signals from your TV. Match the jack colors (Y = green, PB = c blue, and PR = red). w_o ---7 _-Au_o_ ® i%iii!! m z 0 Connect the audio output of the ... may differ from a digital set-top box or other digital external device, refer to the COMPONENT IN AUDIO 1 or 2 jacks on the m TV. RL R i'!_!!!i!!i!!i!:_ Supported Resolutions Y, CB/PB, CR/PR Yes Yes Yes Yes Yes No Yes Yes Yes Yes iiiiiiiiii!_i¸i!_:i!:_i:iii:ii...
Owners Manual
Page 19
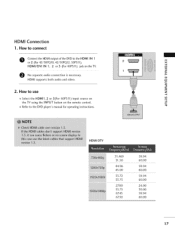
How to connect O Connect the HDMI output of the DVD to the HDMI IN 1 m or 2 (For 42/50PQ10, 42/50PQ12, 50PSll ), x HDMI/DVI IN 1, 2 or 3 (For 60PSll) jack on the remote control. X:) c 2. How to the DVD player's manual for ...operating instructions. HDMI Connection 1. m HDMI supports both audio and video. c ,l_Refer to use m z ,l_Select the HDMI1, 2 or 3(For 60PSll ) input source on m the TV using the INPUT button on the TV...
How to connect O Connect the HDMI output of the DVD to the HDMI IN 1 m or 2 (For 42/50PQ10, 42/50PQ12, 50PSll ), x HDMI/DVI IN 1, 2 or 3 (For 60PSll) jack on the remote control. X:) c 2. How to the DVD player's manual for ...operating instructions. HDMI Connection 1. m HDMI supports both audio and video. c ,l_Refer to use m z ,l_Select the HDMI1, 2 or 3(For 60PSll ) input source on m the TV using the INPUT button on the TV...
Owners Manual
Page 20
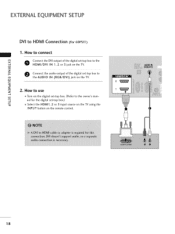
X:) c "O m 2. How to connect m x O HoDnMnIe/DctVtlhe DINVI o1u,t2putoro5f thjaeckdoignitathl seeTt-Vto.p box to the m _o z O Connect the audio output of the digital set-top box to m the AUDIO IN (RGB/DVl) jack on the remote control. 18 EXTERNALEQUIPMENT SETUP DVI to the owner's man- m ual for the digital set -top box. (Refer to HDMI Connection (For60PSll) 1. How to use z 01T_urn on the digital set -top box.) c "O 01_Select the HDMI1, 2 or 3 input source on the TV using the INPUT button on the TV.
X:) c "O m 2. How to connect m x O HoDnMnIe/DctVtlhe DINVI o1u,t2putoro5f thjaeckdoignitathl seeTt-Vto.p box to the m _o z O Connect the audio output of the digital set-top box to m the AUDIO IN (RGB/DVl) jack on the remote control. 18 EXTERNALEQUIPMENT SETUP DVI to the owner's man- m ual for the digital set -top box. (Refer to HDMI Connection (For60PSll) 1. How to use z 01T_urn on the digital set -top box.) c "O 01_Select the HDMI1, 2 or 3 input source on the TV using the INPUT button on the TV.
Owners Manual
Page 21
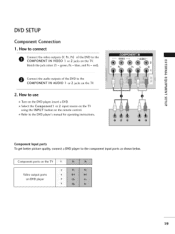
How to the DVD player's manual for operating instructions. Refer to use m Turn on the DVD player, insert a DVD. Component ports on the TV Video output ports on the TV. m z m O Connect the audio outputs of the DVD to the COMPONENT IN VIDEO 1 or 2 jacks on DVD player 19 c m z 2. Component Input ports To get... (Y, PB, PR) of the DVD to the component input ports as shown below. DVD SETUP Component Connection 1. c Select the Component1 or 2 input source on the TV using the INPUT button on the...
How to the DVD player's manual for operating instructions. Refer to use m Turn on the DVD player, insert a DVD. Component ports on the TV Video output ports on the TV. m z m O Connect the audio outputs of the DVD to the COMPONENT IN VIDEO 1 or 2 jacks on DVD player 19 c m z 2. Component Input ports To get... (Y, PB, PR) of the DVD to the component input ports as shown below. DVD SETUP Component Connection 1. c Select the Component1 or 2 input source on the TV using the INPUT button on the...


