
Owners Manual
Page 1
Changing the factory default settings or enabling other features may increase power consumption that could exceed the limits necessary to qualify for ENERGY STAR in the "factory default (Home Use)" setting. Serial: This product qualifies for ENERGY STAR. 1-800-243-0000 1-888-865-3026 1-888-542-2623 usA_co,_,r u_,r usA_com_,r_i_ u_,r CAN_DA P/NO : SAC33575902(O904-REVO0) Life's Good PLASMA TV OWNER'S MANUAL 42PQ10 5OPQlO 50PSll 60PSll 42PQ12 50PQ12 PJease read this manual your set and retain The mode[ on he TV is located { the TV. _uJd you ever need service.
Changing the factory default settings or enabling other features may increase power consumption that could exceed the limits necessary to qualify for ENERGY STAR in the "factory default (Home Use)" setting. Serial: This product qualifies for ENERGY STAR. 1-800-243-0000 1-888-865-3026 1-888-542-2623 usA_co,_,r u_,r usA_com_,r_i_ u_,r CAN_DA P/NO : SAC33575902(O904-REVO0) Life's Good PLASMA TV OWNER'S MANUAL 42PQ10 5OPQlO 50PSll 60PSll 42PQ12 50PQ12 PJease read this manual your set and retain The mode[ on he TV is located { the TV. _uJd you ever need service.
Owners Manual
Page 4
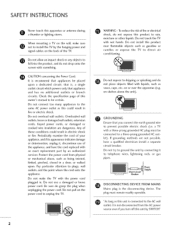
...back of your appliance, and if its appearance indicates damage or deterioration, unplug it is the disconnecting device. Any of this owner's manual to unplug the TV. a TV with a three-prong grounded AC plug must remain readily operable. @ "As long as being twisted, kinked, pinched, closed in ...be placed upon . Do not install this product near flammable objects such as vases, cups, etc. Pay particular attention to install the TV by an authorized servicer. O GROUNDING Ensure that appliance and has no additional outlets or branch circuits. Do not make sure not to...
...back of your appliance, and if its appearance indicates damage or deterioration, unplug it is the disconnecting device. Any of this owner's manual to unplug the TV. a TV with a three-prong grounded AC plug must remain readily operable. @ "As long as being twisted, kinked, pinched, closed in ...be placed upon . Do not install this product near flammable objects such as vases, cups, etc. Pay particular attention to install the TV by an authorized servicer. O GROUNDING Ensure that appliance and has no additional outlets or branch circuits. Do not make sure not to...
Owners Manual
Page 6
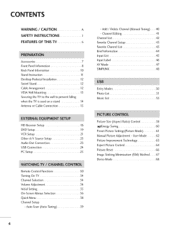
... 66 Image Sticking Minimization (ISM) Method ....... 67 Demo Mode 68 4 CONTENTS WARNING / CAUTION A SAFETY INSTRUCTIONS 1 FEATURES OF THIS TV 6 Accessories 7 Front Panel Information 8 Back Panel Information 10 Stand Instruction 11 Desktop Pedestal Installation 12 Swivel Stand 12 Cable Arrangement 12 ...39 Picture Size (Aspect Ratio) Control 58 e_l Energy Saving 60 Preset Picture Settings(Picture Mode 61 Manual Picture Adjustment - Channel Editing 41 Channel List 42 Favorite Channel Setup 43 Favorite Channel List 43 Brief Information 44 Input List 45 Input Label 46 AV...
... 66 Image Sticking Minimization (ISM) Method ....... 67 Demo Mode 68 4 CONTENTS WARNING / CAUTION A SAFETY INSTRUCTIONS 1 FEATURES OF THIS TV 6 Accessories 7 Front Panel Information 8 Back Panel Information 10 Stand Instruction 11 Desktop Pedestal Installation 12 Swivel Stand 12 Cable Arrangement 12 ...39 Picture Size (Aspect Ratio) Control 58 e_l Energy Saving 60 Preset Picture Settings(Picture Mode 61 Manual Picture Adjustment - Channel Editing 41 Channel List 42 Favorite Channel Setup 43 Favorite Channel List 43 Brief Information 44 Input List 45 Input Label 46 AV...
Owners Manual
Page 7
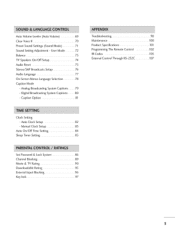
...Through RS-232C 107 Clock Setting - Analog Broadcasting System Captions ....... 79 - Auto Clock Setup 82 - User Mode 72 Balance 73 TV Speakers On/Off Setup 74 Audio Reset 7S Stereo/SAP Broadcasts Setup 76 Audio Language 77 On-Screen Menus Language Selection 78 Caption Mode... - Manual Clock Setup 83 Auto On/Off Time Setting 84 Sleep Timer Setting 8S Set Password & Lock System 86 Channel Blocking 89 Movie & TV Rating 90 Downloadable Rating 9S External Input Blocking 96 Key lock 97 ...
...Through RS-232C 107 Clock Setting - Analog Broadcasting System Captions ....... 79 - Auto Clock Setup 82 - User Mode 72 Balance 73 TV Speakers On/Off Setup 74 Audio Reset 7S Stereo/SAP Broadcasts Setup 76 Audio Language 77 On-Screen Menus Language Selection 78 Caption Mode... - Manual Clock Setup 83 Auto On/Off Time Setting 84 Sleep Timer Setting 8S Set Password & Lock System 86 Channel Blocking 89 Movie & TV Rating 90 Downloadable Rating 9S External Input Blocking 96 Key lock 97 ...
Owners Manual
Page 9
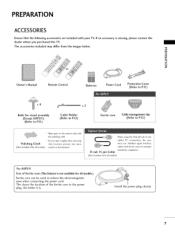
"0 _o r_l _o © z Owner's Manual Remote Control Batteries Power Cord Protection Cover (Refer to Rll ) Bolts for all models) * Do not wipe roughly when removing stain. When using the VGA (D-.... The accessories included may cause scratch or discoloration. Install the power plug closely. 7 If an accessory is . D-sub 15 pin Cable (Not included with your TV. PREPARATION ACCESSORIES Ensure that the following accessories are included with all models) For 60PSll Use of the ferrite core to the power plug, the better...
"0 _o r_l _o © z Owner's Manual Remote Control Batteries Power Cord Protection Cover (Refer to Rll ) Bolts for all models) * Do not wipe roughly when removing stain. When using the VGA (D-.... The accessories included may cause scratch or discoloration. Install the power plug closely. 7 If an accessory is . D-sub 15 pin Cable (Not included with your TV. PREPARATION ACCESSORIES Ensure that the following accessories are included with all models) For 60PSll Use of the ferrite core to the power plug, the better...

Owners Manual
Page 14
... 4 inches on all four sides from the wall. 4 inches © Z 4 inches 4 inches 4 inches SWIVELSTAND (This feature is not available for all models.) After installing the TV, you can adjust the TV manually to the left or right direction by 20 degrees to suit your viewing position. \ CABLEARRANGEMENT ,,,IImage shown may differ from your...
... 4 inches on all four sides from the wall. 4 inches © Z 4 inches 4 inches 4 inches SWIVELSTAND (This feature is not available for all models.) After installing the TV, you can adjust the TV manually to the left or right direction by 20 degrees to suit your viewing position. \ CABLEARRANGEMENT ,,,IImage shown may differ from your...
Owners Manual
Page 19
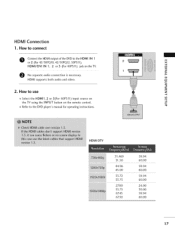
... connection is necessary. m HDMI supports both audio and video. How to connect O Connect the HDMI output of the DVD to the HDMI IN 1 m or 2 (For 42/50PQ10, 42/50PQ12, 50PSll ), x HDMI/DVI IN 1, 2 or 3 (For 60PSll) jack on the remote control. HDMI-DTV 44.96 45.00 59.94 60.00 33... 60.00 2zoo _.75 6Z43 24.00 _o.oo 59.94 6..Z...5..0 6..0...0..0 17 X:) c 2. c ,l_Refer to use m z ,l_Select the HDMI1, 2 or 3(For 60PSll ) input source on m the TV using the INPUT button on the TV. How to the DVD player's manual for operating instructions. HDMI Connection 1.
... connection is necessary. m HDMI supports both audio and video. How to connect O Connect the HDMI output of the DVD to the HDMI IN 1 m or 2 (For 42/50PQ10, 42/50PQ12, 50PSll ), x HDMI/DVI IN 1, 2 or 3 (For 60PSll) jack on the remote control. HDMI-DTV 44.96 45.00 59.94 60.00 33... 60.00 2zoo _.75 6Z43 24.00 _o.oo 59.94 6..Z...5..0 6..0...0..0 17 X:) c 2. c ,l_Refer to use m z ,l_Select the HDMI1, 2 or 3(For 60PSll ) input source on m the TV using the INPUT button on the TV. How to the DVD player's manual for operating instructions. HDMI Connection 1.
Owners Manual
Page 21
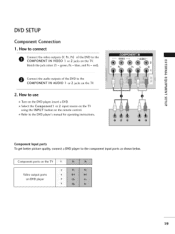
...video outputs (Y, PB, PR) of the DVD to the XD COMPONENT IN AUDIO 1 or 2 jacks on the TV. Component Input ports To get better picture quality, connect a DVD player to the DVD player's manual for operating instructions. c m z 2. m z m O Connect the audio outputs of the DVD to use ...m Turn on the TV. Refer to the component input ports as shown below. c Select the Component1 or 2 input source on the TV using the INPUT button on DVD...
...video outputs (Y, PB, PR) of the DVD to the XD COMPONENT IN AUDIO 1 or 2 jacks on the TV. Component Input ports To get better picture quality, connect a DVD player to the DVD player's manual for operating instructions. c m z 2. m z m O Connect the audio outputs of the DVD to use ...m Turn on the TV. Refer to the component input ports as shown below. c Select the Component1 or 2 input source on the TV using the INPUT button on DVD...
Owners Manual
Page 22
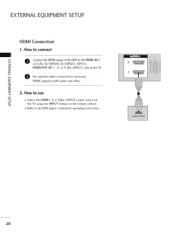
"O ,l_Refer to use m ,l_Select the HDMI1, 2 or 3(For 60PSll ) input source on c the TV using the INPUT button on the TV. X:) c HDMI supports both audio and video. m z 2. How to the DVD player's manual for operating instructions. 2O EXTERNALEQUIPMENT SETUP HDMI Connection 1. z m e No separate audio connection is necessary. How to connect m x O Connect the HDMI output of the DVD to the HDMI IN 1 or 2 (For 42/50PQ10, 42/50PQ12, 50PSll ), m HDMI/DVI IN 1, 2 or 3 (For 60PSll) jack on the remote control.
"O ,l_Refer to use m ,l_Select the HDMI1, 2 or 3(For 60PSll ) input source on c the TV using the INPUT button on the TV. X:) c HDMI supports both audio and video. m z 2. How to the DVD player's manual for operating instructions. 2O EXTERNALEQUIPMENT SETUP HDMI Connection 1. z m e No separate audio connection is necessary. How to connect m x O Connect the HDMI output of the DVD to the HDMI IN 1 or 2 (For 42/50PQ10, 42/50PQ12, 50PSll ), m HDMI/DVI IN 1, 2 or 3 (For 60PSll) jack on the remote control.
Owners Manual
Page 23
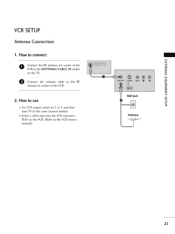
Insert a video tape into the VCR and press PLAY on the TV. Connect the antenna cable to the VCR owner's manual.) m x m _o z m XD c "O m z Wall Jack m c "O Antenna 21 How to use Set VCR output switch to 5 or 4 and then tune TV to the ANTENNA/CABLE IN socket on the VCR. (Refer to the RF antenna in socket of the VCR to the same channel number. VCR SETUP Antenna Connection 1. How to connect O Connect the RF antenna out socket of the VCR. 2.
Insert a video tape into the VCR and press PLAY on the TV. Connect the antenna cable to the VCR owner's manual.) m x m _o z m XD c "O m z Wall Jack m c "O Antenna 21 How to use Set VCR output switch to 5 or 4 and then tune TV to the ANTENNA/CABLE IN socket on the VCR. (Refer to the RF antenna in socket of the VCR to the same channel number. VCR SETUP Antenna Connection 1. How to connect O Connect the RF antenna out socket of the VCR. 2.
Owners Manual
Page 24
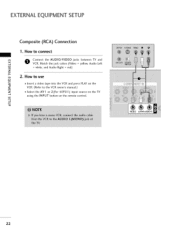
How to the VCR owner's manual.) m z 01S_elect the AVl or 2(For 60PSll) input source on the TV using the INPUT button on the "O VCR. (Refer to connect m x Connect the AUDIO/VIDEO jacks between TV and VCR. Match the jack colors (Video = yellow, Audio Left m _o = white, and Audio Right = red) z _> 2. How to use m X:) c 01I_nsert a video tape into the VCR and press PLAY on the remote control. EXTERNALEQUIPMENT SETUP Composite (RCA) Connection 1. m c "O 22
How to the VCR owner's manual.) m z 01S_elect the AVl or 2(For 60PSll) input source on the TV using the INPUT button on the "O VCR. (Refer to connect m x Connect the AUDIO/VIDEO jacks between TV and VCR. Match the jack colors (Video = yellow, Audio Left m _o = white, and Audio Right = red) z _> 2. How to use m X:) c 01I_nsert a video tape into the VCR and press PLAY on the remote control. EXTERNALEQUIPMENT SETUP Composite (RCA) Connection 1. m c "O 22
Owners Manual
Page 25
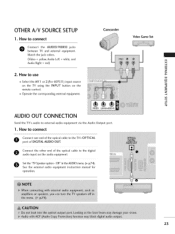
.... How to connect O Connect one end of DIGITAL AUDIO OUT. See the external audio equipment instruction manual for operation. O onnect the other end of the optical cable to the TV's OPTICAL port of the optical cable to the digital audio input on the remote control. 01_Operate the ...corresponding external equipment. O Set the "TV Speaker option - Off" in the AUDIO menu. (_ p.74). Match the jack colors. (Video = yellow, Audio Left = white, and Audio Right = red) 2. How...
.... How to connect O Connect one end of DIGITAL AUDIO OUT. See the external audio equipment instruction manual for operation. O onnect the other end of the optical cable to the TV's OPTICAL port of the optical cable to the digital audio input on the remote control. 01_Operate the ...corresponding external equipment. O Set the "TV Speaker option - Off" in the AUDIO menu. (_ p.74). Match the jack colors. (Video = yellow, Audio Left = white, and Audio Right = red) 2. How...

Owners Manual
Page 29
... Configure Automatically adjusts picture position and minimizes image instability. r_ z r_ c Select PICTURE. After adjustment, if the image is still not correct, try using the manual settings or a different resolution or refresh rate on the PC. Select Screen (RGB-PC). Start Auto Configuration. Select Yes. Select Screen (RGB-PC). Select Auto...
... Configure Automatically adjusts picture position and minimizes image instability. r_ z r_ c Select PICTURE. After adjustment, if the image is still not correct, try using the manual settings or a different resolution or refresh rate on the PC. Select Screen (RGB-PC). Start Auto Configuration. Select Yes. Select Screen (RGB-PC). Select Auto...

Owners Manual
Page 30
... screen background. Make appropriate adjustments. 01_Position: This function is not clear after auto adjustment and especially if characters are still trembling, adjust the picture phase manually. m x m z ii_!_iiiiiiiiiii_i_ii_I_iiiii_ii_iiii!iiiIi!!iiiii_iiii_i_i__ii_:ii_i_!_ii!ii_ii_i/_iiiii/_i_i_!¸i__iiiiii/ii!i_/iili!ii_[i[ii_/i_i[i!_i,i_iii,IiiYii]iiiHiii,iiiiiIHiiii!iiHiiiiiiiiiii_Ii_iiiiii_Ii_iiiiii_Ii_ii_iiiiii!iiiiiiiii_ii_iii m _D...
... screen background. Make appropriate adjustments. 01_Position: This function is not clear after auto adjustment and especially if characters are still trembling, adjust the picture phase manually. m x m z ii_!_iiiiiiiiiii_i_ii_I_iiiii_ii_iiii!iiiIi!!iiiii_iiii_i_i__ii_:ii_i_!_ii!ii_ii_i/_iiiii/_i_i_!¸i__iiiiii/ii!i_/iili!ii_[i[ii_/i_i[i!_i,i_iii,IiiYii]iiiHiii,iiiiiIHiiii!iiHiiiiiiiiiii_Ii_iiiiii_Ii_iiiiii_Ii_ii_iiiiii!iiiiiiiii_ii_iii m _D...
Owners Manual
Page 37
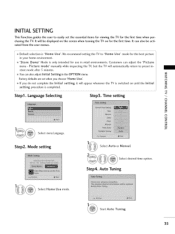
... Auto Tuning. 3S "Store Demo" Mode is only intended for the first time when purchasing the TV. Picture mode" manually while inspecting the TV, but the TV will automatically return to "Home Use" mode for the first time. Step2. Select desired time option. Language Selecting Step3. INITIAL SETTING This Function guides the ...
... Auto Tuning. 3S "Store Demo" Mode is only intended for the first time when purchasing the TV. Picture mode" manually while inspecting the TV, but the TV will automatically return to "Home Use" mode for the first time. Step2. Select desired time option. Language Selecting Step3. INITIAL SETTING This Function guides the ...
Owners Manual
Page 38
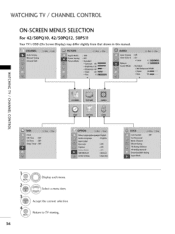
Select a menu item. Accept the current selection. Return to TV viewing. 36 z c_ < N -r" > Z Z fT1 N 0 Z 0 Display each menu. WATCHING TV / CHANNEL CONTROL ON-SCREENMENUSSELECTION For 42/50PQ10, 42/50PQ12, 50PSll Your TV's OSD (On Screen Display) may differ slightly from that shown in this manual.
Select a menu item. Accept the current selection. Return to TV viewing. 36 z c_ < N -r" > Z Z fT1 N 0 Z 0 Display each menu. WATCHING TV / CHANNEL CONTROL ON-SCREENMENUSSELECTION For 42/50PQ10, 42/50PQ12, 50PSll Your TV's OSD (On Screen Display) may differ slightly from that shown in this manual.

Owners Manual
Page 39
z < N I > z z fT1 T TT N © Z © For USA For Canada Display each menu. Accept the current selection. Return to TV viewing. 37 Select a menu item. For 60PSll Your TV's OSD (On Screen Display) may differ slightly from that shown in this manual.
z < N I > z z fT1 T TT N © Z © For USA For Canada Display each menu. Accept the current selection. Return to TV viewing. 37 Select a menu item. For 60PSll Your TV's OSD (On Screen Display) may differ slightly from that shown in this manual.
Owners Manual
Page 40
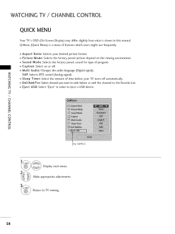
...; Z © For 60PSll Display each menu. Caption: Select on the viewing environment. Multi Audio: Changes the audio language (Digital signal). Return to TV viewing. 38 Picture Mode: Selects the factory preset picture depend on or off automatically. -r Del/Add/Fav: Select channel you want to add/delete or... add the channel to the Favorite List. Make appropriate adjustments. z Eject USB: Select "Eject" in this manual. WATCHING TV / CHANNEL CONTROL QUICK MENU Your TV's OSD (On Screen Display) may differ slightly from what is a menu of features which users might use ...
...; Z © For 60PSll Display each menu. Caption: Select on the viewing environment. Multi Audio: Changes the audio language (Digital signal). Return to TV viewing. 38 Picture Mode: Selects the factory preset picture depend on or off automatically. -r Del/Add/Fav: Select channel you want to add/delete or... add the channel to the Favorite List. Make appropriate adjustments. z Eject USB: Select "Eject" in this manual. WATCHING TV / CHANNEL CONTROL QUICK MENU Your TV's OSD (On Screen Display) may differ slightly from what is a menu of features which users might use ...

Owners Manual
Page 41
...or cable inputs, and stores them in the LOCK Menu to the previous menu. Select Yes. Run Auto Tuning. © z _1_The TV will ask for a password if parental © control has been activated (LOCK Menu). Return to allow a channel search. _ When setting... the Auto Tuning or Manual Tuning, the number of maximum channels you can store is subject to TV viewing. 39 It is 900. iiii_i__iiiii_i/i/ii!iiiHiiiiii_iii!i!i!i!i!i!ii_ii!i?i1¸iiil!ii!iii_i_i_i_iiiii!i_iiiiiii_i_iiii_iii_iiiiMi!!!iiiiiiii_iiii!i_i_ii_iiiiii...
...or cable inputs, and stores them in the LOCK Menu to the previous menu. Select Yes. Run Auto Tuning. © z _1_The TV will ask for a password if parental © control has been activated (LOCK Menu). Return to allow a channel search. _ When setting... the Auto Tuning or Manual Tuning, the number of maximum channels you can store is subject to TV viewing. 39 It is 900. iiii_i__iiiii_i/i/ii!iiiHiiiiii_iii!i!i!i!i!i!ii_ii!i?i1¸iiil!ii!iii_i_i_i_iiiii!i_iiiiiii_i_iiii_iii_iiiiMi!!!iiiiiiii_iiii!i_i_ii_iiiiii...

Owners Manual
Page 42
... want to change depending on -screen signal strength monitor to the previous menu. Use the password you set up in the LOCK Menu to TV viewing. 4O Return to allow a channel search. Return to see the quality of maximum channels you can view the on the broadcasting signal ...environment. WATCHING TV / CHANNEL CONTROL Add/Delete Channel (Manual Tuning) If you select DTV or CADTV input signal, you can store is subject to add or delete. Select DTV, TV, CADTV, or CATV. When setting the Auto Tuning or Manual Tuning, the number of the signal ...
... want to change depending on -screen signal strength monitor to the previous menu. Use the password you set up in the LOCK Menu to TV viewing. 4O Return to allow a channel search. Return to see the quality of maximum channels you can view the on the broadcasting signal ...environment. WATCHING TV / CHANNEL CONTROL Add/Delete Channel (Manual Tuning) If you select DTV or CADTV input signal, you can store is subject to add or delete. Select DTV, TV, CADTV, or CATV. When setting the Auto Tuning or Manual Tuning, the number of the signal ...

