Owners Manual
Page 6
... the wall to prevent falling when the TV is used on a stand 14 Antenna or Cable Connection 15 - Add / Delete Channel (Manual Tuning) ...... 40 - Channel Editing 41 Channel List 42 Favorite Channel Setup 43 Favorite Channel List 43 Brief Information 44 Input List 45 Input Label 46... DVD Setup 19 VCR Setup 21 Other A/V Source Setup 23 Audio Out Connection 23 USB Connection 24 PC Setup 25 Remote Control Functions 30 Turning On TV 34 Channel Selection 34 Volume Adjustment 34 Initial Setting 35 On-Screen Menus Selection 36 Quick Menu 38 Channel Setup -
... the wall to prevent falling when the TV is used on a stand 14 Antenna or Cable Connection 15 - Add / Delete Channel (Manual Tuning) ...... 40 - Channel Editing 41 Channel List 42 Favorite Channel Setup 43 Favorite Channel List 43 Brief Information 44 Input List 45 Input Label 46... DVD Setup 19 VCR Setup 21 Other A/V Source Setup 23 Audio Out Connection 23 USB Connection 24 PC Setup 25 Remote Control Functions 30 Turning On TV 34 Channel Selection 34 Volume Adjustment 34 Initial Setting 35 On-Screen Menus Selection 36 Quick Menu 38 Channel Setup -
Owners Manual
Page 7
...70 Preset Sound Settings (Sound Mode 71 Sound Setting Adjustment - Caption Option 81 Troubleshooting 98 Maintenance 100 Product Specifications 101 Programming The Remote Control 102 IR Codes 105 External Control Through RS-232C 107 Clock Setting - Manual Clock Setup 83 Auto On/Off Time Setting ...84 Sleep Timer Setting 8S Set Password & Lock System 86 Channel Blocking 89 Movie & TV Rating 90 Downloadable Rating 9S External Input Blocking 96 Key lock 97 S Analog Broadcasting System Captions ....... 79 - User Mode 72 Balance 73...
...70 Preset Sound Settings (Sound Mode 71 Sound Setting Adjustment - Caption Option 81 Troubleshooting 98 Maintenance 100 Product Specifications 101 Programming The Remote Control 102 IR Codes 105 External Control Through RS-232C 107 Clock Setting - Manual Clock Setup 83 Auto On/Off Time Setting ...84 Sleep Timer Setting 8S Set Password & Lock System 86 Channel Blocking 89 Movie & TV Rating 90 Downloadable Rating 9S External Input Blocking 96 Key lock 97 S Analog Broadcasting System Captions ....... 79 - User Mode 72 Balance 73...
Owners Manual
Page 9
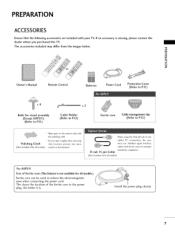
...pin cable) PC connection, the user must use shielded signal interface cables with the polishing cloth. "0 _o r_l _o © z Owner's Manual Remote Control Batteries Power Cord Protection Cover (Refer to Rll ) Bolts for all models.) Ferrite core can be used to R12) * Wipe spots on the... ferrite cores to the power plug, the better it is missing, please contact the dealer where you purchased the TV. D-sub 15 pin Cable (Not included with your TV. PREPARATION ACCESSORIES Ensure that the following accessories are included with all models) * Do not wipe roughly when removing ...
...pin cable) PC connection, the user must use shielded signal interface cables with the polishing cloth. "0 _o r_l _o © z Owner's Manual Remote Control Batteries Power Cord Protection Cover (Refer to Rll ) Bolts for all models.) Ferrite core can be used to R12) * Wipe spots on the... ferrite cores to the power plug, the better it is missing, please contact the dealer where you purchased the TV. D-sub 15 pin Cable (Not included with your TV. PREPARATION ACCESSORIES Ensure that the following accessories are included with all models) * Do not wipe roughly when removing ...
Owners Manual
Page 10
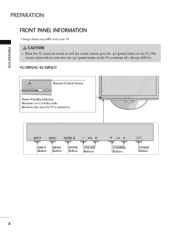
llluminates blue when the TV is switched on. Button MENU Button Button VOLUME Buttons CHANNEL Buttons POWER Button 8 PREPARATION FRONT PANELINFORMATION ""_Image shown may differ from your TV. _D m _D 0 z 42/50PQI0, 42/50PQ12 Remote Control Sensor Power/Standby Indicator Illuminates red in standby mode.
llluminates blue when the TV is switched on. Button MENU Button Button VOLUME Buttons CHANNEL Buttons POWER Button 8 PREPARATION FRONT PANELINFORMATION ""_Image shown may differ from your TV. _D m _D 0 z 42/50PQI0, 42/50PQ12 Remote Control Sensor Power/Standby Indicator Illuminates red in standby mode.
Owners Manual
Page 11
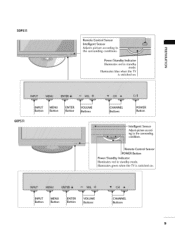
... Button ENTER Button VOLUME Buttons CHANNEL Buttons 9 Illuminates green when the TV is switched on . _rllN PUT I Button Intelligent Sensor Adjustspictureaccording to _o the surrounding conditions. Remote Control Sensor POWER Button Power/Standby Indicator Illuminates red in standby 0 mode. 50PSll f Remote Control Sensor Intelligent Sensor Adjusts picture according to the surrounding conditions. r13...
... Button ENTER Button VOLUME Buttons CHANNEL Buttons 9 Illuminates green when the TV is switched on . _rllN PUT I Button Intelligent Sensor Adjustspictureaccording to _o the surrounding conditions. Remote Control Sensor POWER Button Power/Standby Indicator Illuminates red in standby 0 mode. 50PSll f Remote Control Sensor Intelligent Sensor Adjusts picture according to the surrounding conditions. r13...
Owners Manual
Page 12
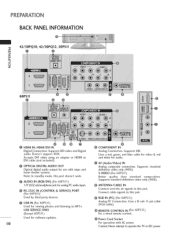
... 480i. Supports standard definition video only (480i). Uses a D-sub 15 pin cable (VGA cable). @ REMOTE CONTROL IN (For 60PSll ) For a wired remote control. Used for audio. @ AV (Audio/Video) IN Analog composite connection. PREPARATION BACK PANELINFORMATION -0 42/50PQ10, 42/50PQ12, 50PSll _o I-I /8" (0.32_n) headphonejack for viewing photos USB SERVICE ONLY and listening to MP3s...) Used for analogPCaudio inpuL Analog Connection. S-VIDEO (For 60PS11 ) Better quality than standard composition. Accepts DVI video using an adapter or HDMI to operate the TV on DC power.
... 480i. Supports standard definition video only (480i). Uses a D-sub 15 pin cable (VGA cable). @ REMOTE CONTROL IN (For 60PSll ) For a wired remote control. Used for audio. @ AV (Audio/Video) IN Analog composite connection. PREPARATION BACK PANELINFORMATION -0 42/50PQ10, 42/50PQ12, 50PSll _o I-I /8" (0.32_n) headphonejack for viewing photos USB SERVICE ONLY and listening to MP3s...) Used for analogPCaudio inpuL Analog Connection. S-VIDEO (For 60PS11 ) Better quality than standard composition. Accepts DVI video using an adapter or HDMI to operate the TV on DC power.
Owners Manual
Page 18
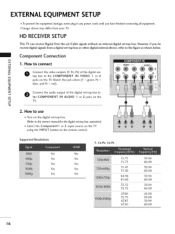
... z 0 Connect the audio output of the digital set -top box. How to the COMPONENT IN VIDEO 1 or2 m X_ jacks on the remote control. RL R i'!_!!!i!!i!!i!:_ Supported Resolutions Y, CB/PB, CR/PR Yes Yes Yes Yes Yes No Yes Yes Yes Yes iiiiiiiiii!_i¸i!_:i!:_i:iii..., if you have finished connecting all equipment. operation) 0_Select the Component1 or 2 input source on the TV using the INPUT button on the TV. top box to use 01T0u_rn on the m TV. w_o ---7 _-Au_o_ ® i%iii!! c "O 2. Component Connection x 1. EXTERNAL EQUIPMENT SETUP 01T_o...
... z 0 Connect the audio output of the digital set -top box. How to the COMPONENT IN VIDEO 1 or2 m X_ jacks on the remote control. RL R i'!_!!!i!!i!!i!:_ Supported Resolutions Y, CB/PB, CR/PR Yes Yes Yes Yes Yes No Yes Yes Yes Yes iiiiiiiiii!_i¸i!_:i!:_i:iii..., if you have finished connecting all equipment. operation) 0_Select the Component1 or 2 input source on the TV using the INPUT button on the TV. top box to use 01T0u_rn on the m TV. w_o ---7 _-Au_o_ ® i%iii!! c "O 2. Component Connection x 1. EXTERNAL EQUIPMENT SETUP 01T_o...
Owners Manual
Page 19
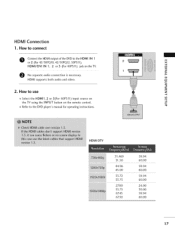
... the HDMI1, 2 or 3(For 60PSll ) input source on m the TV using the INPUT button on the TV. m HDMI supports both audio and video. How to the HDMI IN 1 m or 2 (For 42/50PQ10, 42/50PQ12, 50PSll ), x HDMI/DVI IN 1, 2 or 3 (For 60PSll) jack on the remote control. c ,l_Refer to the DVD player's manual for operating instructions...
... the HDMI1, 2 or 3(For 60PSll ) input source on m the TV using the INPUT button on the TV. m HDMI supports both audio and video. How to the HDMI IN 1 m or 2 (For 42/50PQ10, 42/50PQ12, 50PSll ), x HDMI/DVI IN 1, 2 or 3 (For 60PSll) jack on the remote control. c ,l_Refer to the DVD player's manual for operating instructions...
Owners Manual
Page 20
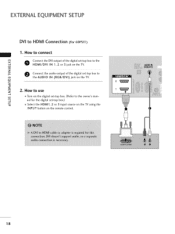
X:) c "O m 2. m ual for the digital set -top box. (Refer to use z 01T_urn on the digital set -top box.) c "O 01_Select the HDMI1, 2 or 3 input source on the TV using the INPUT button on the TV. How to the owner's man- How to connect m x O HoDnMnIe/DctVtlhe DINVI o1u,t2putoro5f thjaeckdoignitathl seeTt-Vto.p box to the m _o z O Connect the audio output of the digital set-top box to HDMI Connection (For60PSll) 1. EXTERNALEQUIPMENT SETUP DVI to m the AUDIO IN (RGB/DVl) jack on the remote control. 18
X:) c "O m 2. m ual for the digital set -top box. (Refer to use z 01T_urn on the digital set -top box.) c "O 01_Select the HDMI1, 2 or 3 input source on the TV using the INPUT button on the TV. How to the owner's man- How to connect m x O HoDnMnIe/DctVtlhe DINVI o1u,t2putoro5f thjaeckdoignitathl seeTt-Vto.p box to the m _o z O Connect the audio output of the digital set-top box to HDMI Connection (For60PSll) 1. EXTERNALEQUIPMENT SETUP DVI to m the AUDIO IN (RGB/DVl) jack on the remote control. 18
Owners Manual
Page 21
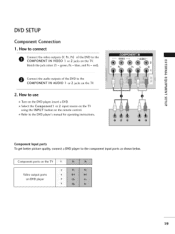
... get better picture quality, connect a DVD player to the COMPONENT IN VIDEO 1 or 2 jacks on the TV. Component ports on the TV Video output ports on the remote control. c Select the Component1 or 2 input source on the TV using the INPUT button on DVD player 19 c m z 2. Refer to the XD COMPONENT IN AUDIO 1 or... DVD player, insert a DVD. m z m O Connect the audio outputs of the DVD to the component input ports as shown below. How to use m Turn on the TV. x Match the jack colors (Y = green, PB = blue, and PR = red). DVD SETUP Component Connection 1.
... get better picture quality, connect a DVD player to the COMPONENT IN VIDEO 1 or 2 jacks on the TV. Component ports on the TV Video output ports on the remote control. c Select the Component1 or 2 input source on the TV using the INPUT button on DVD player 19 c m z 2. Refer to the XD COMPONENT IN AUDIO 1 or... DVD player, insert a DVD. m z m O Connect the audio outputs of the DVD to the component input ports as shown below. How to use m Turn on the TV. x Match the jack colors (Y = green, PB = blue, and PR = red). DVD SETUP Component Connection 1.
Owners Manual
Page 22
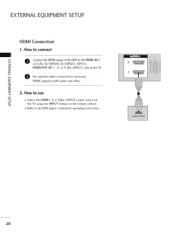
How to use m ,l_Select the HDMI1, 2 or 3(For 60PSll ) input source on c the TV using the INPUT button on the TV. How to connect m x O Connect the HDMI output of the DVD to the DVD player's manual for operating instructions. 2O z m e No separate audio connection is necessary. EXTERNALEQUIPMENT SETUP HDMI Connection 1. m z 2. "O ,l_Refer to the HDMI IN 1 or 2 (For 42/50PQ10, 42/50PQ12, 50PSll ), m HDMI/DVI IN 1, 2 or 3 (For 60PSll) jack on the remote control. X:) c HDMI supports both audio and video.
How to use m ,l_Select the HDMI1, 2 or 3(For 60PSll ) input source on c the TV using the INPUT button on the TV. How to connect m x O Connect the HDMI output of the DVD to the DVD player's manual for operating instructions. 2O z m e No separate audio connection is necessary. EXTERNALEQUIPMENT SETUP HDMI Connection 1. m z 2. "O ,l_Refer to the HDMI IN 1 or 2 (For 42/50PQ10, 42/50PQ12, 50PSll ), m HDMI/DVI IN 1, 2 or 3 (For 60PSll) jack on the remote control. X:) c HDMI supports both audio and video.
Owners Manual
Page 24
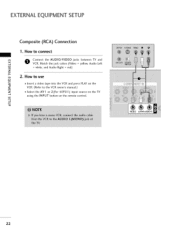
How to use m X:) c 01I_nsert a video tape into the VCR and press PLAY on the remote control. m c "O 22 How to the VCR owner's manual.) m z 01S_elect the AVl or 2(For 60PSll) input source on the TV using the INPUT button on the "O VCR. (Refer to connect m x Connect the AUDIO/VIDEO jacks between TV and VCR. Match the jack colors (Video = yellow, Audio Left m _o = white, and Audio Right = red) z _> 2. EXTERNALEQUIPMENT SETUP Composite (RCA) Connection 1.
How to use m X:) c 01I_nsert a video tape into the VCR and press PLAY on the remote control. m c "O 22 How to the VCR owner's manual.) m z 01S_elect the AVl or 2(For 60PSll) input source on the TV using the INPUT button on the "O VCR. (Refer to connect m x Connect the AUDIO/VIDEO jacks between TV and VCR. Match the jack colors (Video = yellow, Audio Left m _o = white, and Audio Right = red) z _> 2. EXTERNALEQUIPMENT SETUP Composite (RCA) Connection 1.
Owners Manual
Page 25
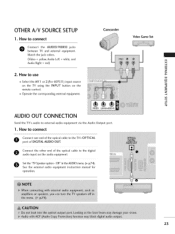
... or 2 (For 60PSll ) input source on the TV using the INPUT button on the audio equipment. See the external audio equipment instruction manual for operation. How to the digital audio input on the remote control. 01_Operate the corresponding external equipment. O onnect the... other end of DIGITAL AUDIO OUT. O Set the "TV Speaker option - Match the jack colors. (Video = yellow, Audio Left = white,...
... or 2 (For 60PSll ) input source on the TV using the INPUT button on the audio equipment. See the external audio equipment instruction manual for operation. How to the digital audio input on the remote control. 01_Operate the corresponding external equipment. O onnect the... other end of DIGITAL AUDIO OUT. O Set the "TV Speaker option - Match the jack colors. (Video = yellow, Audio Left = white,...
Owners Manual
Page 27
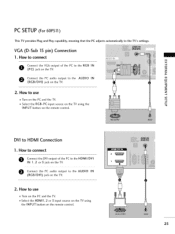
... adjusts automatically to the HDMI/DVI IN 1,2 or 3 jack on the TV. VGA (D-Sub 15 pin) Connection I. How to use 01_Turn on the PC and the TV. 01S_elect the HDMII, 2 or 3 input source on the TV using the c INPUT button on the remote control. How to the AUDIO IN _0 (RGB/DVI) jack on... the remote control. 25 How to connect O onnect the DVI output of the PC...
... adjusts automatically to the HDMI/DVI IN 1,2 or 3 jack on the TV. VGA (D-Sub 15 pin) Connection I. How to use 01_Turn on the PC and the TV. 01S_elect the HDMII, 2 or 3 input source on the TV using the c INPUT button on the remote control. How to the AUDIO IN _0 (RGB/DVI) jack on... the remote control. 25 How to connect O onnect the DVI output of the PC...
Owners Manual
Page 32
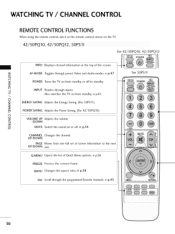
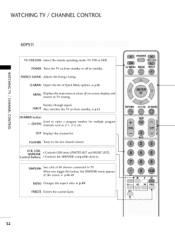
... from standby or off . WATCHING TV / CHANNEL CONTROL REMOTE CONTROL FUNCTIONS When using the remote control, aim it at the top of the screen. z INPUT Rotates through inputs. < Also switches the TV on from standby, b p.45 N I POWER Turns the TV on from one full set of Quick... Saving. (For 50PSll ) z z fT1 POWERSAVING Adjusts the Power Saving. (For 42/50PQ10) N © Z VOLUME UP Adjusts the volume. /DOWN © MUTE Switch the sound on the TV. For 42/50PQ10, 42/50PQ12 INFO Displays channel information at the remote control sensor on or off to the next UP/DOWN one.
... from standby or off . WATCHING TV / CHANNEL CONTROL REMOTE CONTROL FUNCTIONS When using the remote control, aim it at the top of the screen. z INPUT Rotates through inputs. < Also switches the TV on from standby, b p.45 N I POWER Turns the TV on from one full set of Quick... Saving. (For 50PSll ) z z fT1 POWERSAVING Adjusts the Power Saving. (For 42/50PQ10) N © Z VOLUME UP Adjusts the volume. /DOWN © MUTE Switch the sound on the TV. For 42/50PQ10, 42/50PQ12 INFO Displays channel information at the remote control sensor on or off to the next UP/DOWN one.
Owners Manual
Page 34
... -- (DASH) channels such as 2-1,2-2, etc. © LIST Displays the channel list. J i_ ii i 32 STB or DVD. FLASHBK Tunes to TV viewing. N I L-----. ............ ...--. WATCHING TV / CHANNEL CONTROL 60PSll TV/STB/DVD Select the remote operating mode: TV. the SIMPLINK compatible devices. ...... VCR, USB, SIMPLINK Control buttons _ Controls _ Controls USB menu (PHOTO LIST and MUSIC LIST). r POWER...
... -- (DASH) channels such as 2-1,2-2, etc. © LIST Displays the channel list. J i_ ii i 32 STB or DVD. FLASHBK Tunes to TV viewing. N I L-----. ............ ...--. WATCHING TV / CHANNEL CONTROL 60PSll TV/STB/DVD Select the remote operating mode: TV. the SIMPLINK compatible devices. ...... VCR, USB, SIMPLINK Control buttons _ Controls _ Controls USB menu (PHOTO LIST and MUSIC LIST). r POWER...
Owners Manual
Page 36
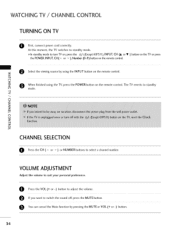
...to suit your personal preference. VOLUMEADJUSTMENT Adjust the volume to select a channel number. WATCHING TV / CHANNEL CONTROL TURNING ON TV @ First, connect power cord correctly. z When finished using the INPUT button on the remote control. Press the VOL (+ or -) button to switch the sound off, press the...button. You can cancel the Mute function by using the TV, press the POWER button on the remote control. --r- If you want to adjust the volume. At this moment, the TV switches to standby mode. 0,_In standby mode to turn TV on, press the (b/l (Except 60PS11 ), INPUT, CH...
...to suit your personal preference. VOLUMEADJUSTMENT Adjust the volume to select a channel number. WATCHING TV / CHANNEL CONTROL TURNING ON TV @ First, connect power cord correctly. z When finished using the INPUT button on the remote control. Press the VOL (+ or -) button to switch the sound off, press the...button. You can cancel the Mute function by using the TV, press the POWER button on the remote control. --r- If you want to adjust the volume. At this moment, the TV switches to standby mode. 0,_In standby mode to turn TV on, press the (b/l (Except 60PS11 ), INPUT, CH...

Owners Manual
Page 43
Select a channel. Return to select the deleted channel, directly enter the channel number with the NUMBER buttons or select it in the Channel Edit menu. _h -r" z (_ Ch.Change _ Move CH Move Page o_ Previous Add/Delete < N -r > Z Z N © Z © Select CHANNEL. If you will be unable to TV viewing. 41 Select the blue button on the remote control. Select Channel Edit. Add or delete the channel. Return to select it using CH ^, v button during TV viewing. Channel Editing When a channel number is deleted, it means that you wish to the previous menu.
Select a channel. Return to select the deleted channel, directly enter the channel number with the NUMBER buttons or select it in the Channel Edit menu. _h -r" z (_ Ch.Change _ Move CH Move Page o_ Previous Add/Delete < N -r > Z Z N © Z © Select CHANNEL. If you will be unable to TV viewing. 41 Select the blue button on the remote control. Select Channel Edit. Add or delete the channel. Return to select it using CH ^, v button during TV viewing. Channel Editing When a channel number is deleted, it means that you wish to the previous menu.
Owners Manual
Page 48
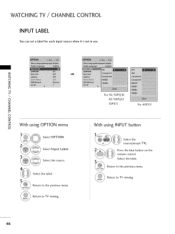
... menu. Select the label. For 42/50PQ10 42/50PQ12 50PSll For 60PS 11 With using OPTION menu Select OPTION. Return to TV viewing. 46 _i!1i%i%_ _i!i!!i!!i!!i!_!i!iii!_%iiiiiiiiiiiiili!i!iiiiiiiii!iii_ili iiiiiiiitiiiiiiMiiiiiiMiiiMii_iii@iiiiiiiiii!JJiiiJiiJiii/i! Return to TV viewing. Press the blue button on the remote control. Select the source. WATCHING TV / CHANNEL CONTROL INPUT LABEL You...
... menu. Select the label. For 42/50PQ10 42/50PQ12 50PSll For 60PS 11 With using OPTION menu Select OPTION. Return to TV viewing. 46 _i!1i%i%_ _i!i!!i!!i!!i!_!i!iii!_%iiiiiiiiiiiiili!i!iiiiiiiii!iii_ili iiiiiiiitiiiiiiMiiiiiiMiiiMii_iii@iiiiiiiiii!JJiiiJiiJiii/i! Return to TV viewing. Press the blue button on the remote control. Select the source. WATCHING TV / CHANNEL CONTROL INPUT LABEL You...

Owners Manual
Page 53
... devices. PHOTO LIST You can play JPG files only, Only baseline scan is supported amongJPG. c Screen Components Select USB. The On Screen Display on the remote control I ':' Move (_) PopUp Menu CH Move Page r_IAR_ Mark o_-_ Exit I 51 Select Photo List. @ Moves to upper level file @ Preview: Display the thumbnail/folder...
... devices. PHOTO LIST You can play JPG files only, Only baseline scan is supported amongJPG. c Screen Components Select USB. The On Screen Display on the remote control I ':' Move (_) PopUp Menu CH Move Page r_IAR_ Mark o_-_ Exit I 51 Select Photo List. @ Moves to upper level file @ Preview: Display the thumbnail/folder...


