
Owners Manual
Page 14
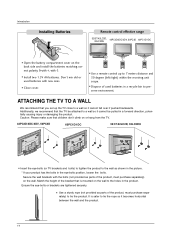
... so it becomes horizontal between the wall and the product. 14 Introduction Installing Batteries Remote control effective range 32/37/42LC2D, 32LC2DU 42PC3D/3DC/3DV, 50PC3D 60PC1D/1DC I Open the battery compartment cover on the back side and install the batteries matching correct polarity (+with... +,-with the bolts (not provided as parts of the product, must purchase separately) to tie the product. Ensure the eye-bolts or brackets are tightened securely. Additionally, we ...
... so it becomes horizontal between the wall and the product. 14 Introduction Installing Batteries Remote control effective range 32/37/42LC2D, 32LC2DU 42PC3D/3DC/3DV, 50PC3D 60PC1D/1DC I Open the battery compartment cover on the back side and install the batteries matching correct polarity (+with... +,-with the bolts (not provided as parts of the product, must purchase separately) to tie the product. Ensure the eye-bolts or brackets are tightened securely. Additionally, we ...
Owners Manual
Page 17
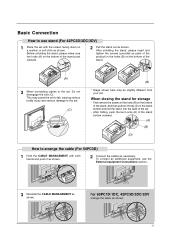
... outward. (A) (B) (D) How to the set, Do not disengage the lock (C). After unfolding the stand, please insert and tighten the screws (provided as parts of the product) in the holes (B) on the bottom of the stand. (A) 3 When connecting cables to arrange the cable (For 50PC3D) 1 Hold ...out as shown. To connect an additional equipment, see the External equipment Connections section. 3 Reinstall the CABLE MANAGEMENT as shown. For 60PC1D/1DC, 42PC3D/3DC/3DV Arrange the cable as shown. 17 Basic Connection How to the set. (C) (B) * Image shown here may cause the set to fall...
... outward. (A) (B) (D) How to the set, Do not disengage the lock (C). After unfolding the stand, please insert and tighten the screws (provided as parts of the product) in the holes (B) on the bottom of the stand. (A) 3 When connecting cables to arrange the cable (For 50PC3D) 1 Hold ...out as shown. To connect an additional equipment, see the External equipment Connections section. 3 Reinstall the CABLE MANAGEMENT as shown. For 60PC1D/1DC, 42PC3D/3DC/3DV Arrange the cable as shown. 17 Basic Connection How to the set. (C) (B) * Image shown here may cause the set to fall...
Owners Manual
Page 57
...is meaningless, you should set this bit high(1). ture Command: ma 00 23 xx xx xx xx 01attribute(0x01): main picture, two part(it can also adjust Low Power in 42PC3D/3DC/3DV, 50PC3D, 60PC1D/1DC models only. 18. Acknowledgement [a][ ][Set ID][ ][OK][Data0][Data1][Data2][Data3][Data4][Data5][x] [a][ ... (physical(20), major (30), minor (5)), main picture Command: ma 00 14 00 1E 00 05 02 attribute(0x02): main picture, two part, using one part channel number, minor channel does not need. These functions are two cases that physical channel enable or disable. Data 3, Data 4: Minor Channel ...
...is meaningless, you should set this bit high(1). ture Command: ma 00 23 xx xx xx xx 01attribute(0x01): main picture, two part(it can also adjust Low Power in 42PC3D/3DC/3DV, 50PC3D, 60PC1D/1DC models only. 18. Acknowledgement [a][ ][Set ID][ ][OK][Data0][Data1][Data2][Data3][Data4][Data5][x] [a][ ... (physical(20), major (30), minor (5)), main picture Command: ma 00 14 00 1E 00 05 02 attribute(0x02): main picture, two part, using one part channel number, minor channel does not need. These functions are two cases that physical channel enable or disable. Data 3, Data 4: Minor Channel ...


