Owner's Manual (English)
Page 3
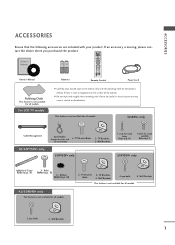
INPUT D/A INPUT POWER SIMPLINK BRIGHT MODE TV VCR DVD RATIO TEXT INFO i GUIDE Owner's Manual 1.5V 1.5V Batteries MENU EXIT SUBTITLE MARK OK VOL Q.VIEW PR PAGE MUTE 1 2 3 4 5 6 7 8 9 LIST 0 FAV SIZE ? This feature is not available for .../II TIME USB SLEEP Remote Control Power Cord Polishing Cloth This feature is not available for all models. 2-eye-bolts 2- TV Bracket Bolts the twist holder. 2- Rubber Refer to p. 16 42/50PB4D* only This feature is not available for all models. 32LB9D* only Cable Management 50/60PY3DF* only Twist Holder Arrange ...
INPUT D/A INPUT POWER SIMPLINK BRIGHT MODE TV VCR DVD RATIO TEXT INFO i GUIDE Owner's Manual 1.5V 1.5V Batteries MENU EXIT SUBTITLE MARK OK VOL Q.VIEW PR PAGE MUTE 1 2 3 4 5 6 7 8 9 LIST 0 FAV SIZE ? This feature is not available for .../II TIME USB SLEEP Remote Control Power Cord Polishing Cloth This feature is not available for all models. 2-eye-bolts 2- TV Bracket Bolts the twist holder. 2- Rubber Refer to p. 16 42/50PB4D* only This feature is not available for all models. 32LB9D* only Cable Management 50/60PY3DF* only Twist Holder Arrange ...
Owner's Manual (English)
Page 4
... . . . . 75 Low Power 76 Front Display(50/60PY3DF* only 77 2 Picture Mode - Auto Colour Tone Control (Warm/Medium/Cool 67 Manual Picture Adjustment - User Option 68 - Preset 66 - Colour Tone - Picture Improvement Technology 71 Advanced - Cinema 72 Advanced - CONTENTS CONTENTS ACCESSORIES 1 PREPARATION...Key Functions 34 Turning on the TV 36 Initializing Setup 36 Programme Selection 37 Volume Adjustment 37 On-Screen Menus Selection and Adjustment . . 38 Factory Reset 39 Model Info 39 Auto Programme Tuning 40 Manual Programme Tuning 42 Fine Tuning 44 Assigning a ...
... . . . . 75 Low Power 76 Front Display(50/60PY3DF* only 77 2 Picture Mode - Auto Colour Tone Control (Warm/Medium/Cool 67 Manual Picture Adjustment - User Option 68 - Preset 66 - Colour Tone - Picture Improvement Technology 71 Advanced - Cinema 72 Advanced - CONTENTS CONTENTS ACCESSORIES 1 PREPARATION...Key Functions 34 Turning on the TV 36 Initializing Setup 36 Programme Selection 37 Volume Adjustment 37 On-Screen Menus Selection and Adjustment . . 38 Factory Reset 39 Model Info 39 Auto Programme Tuning 40 Manual Programme Tuning 42 Fine Tuning 44 Assigning a ...

Owner's Manual (English)
Page 5
... 109 Open Source License 115 TELETEXT Switch On/Off 96 Simple Text 96 TOP Text 96 Fastext 97 Special Teletext Functions 97 After reading this manual, keep it handy for future reference. 3 CONTENTS SOUND & LANGUAGE CONTROL Auto Volume Leveler ( Auto Volume 78 Preset Sound Settings- Stereo/Dual Reception 84 - Sound Mode...
... 109 Open Source License 115 TELETEXT Switch On/Off 96 Simple Text 96 TOP Text 96 Fastext 97 Special Teletext Functions 97 After reading this manual, keep it handy for future reference. 3 CONTENTS SOUND & LANGUAGE CONTROL Auto Volume Leveler ( Auto Volume 78 Preset Sound Settings- Stereo/Dual Reception 84 - Sound Mode...
Owner's Manual (English)
Page 12
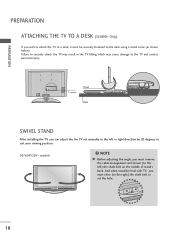
...* Only) If you wish to attach the TV to a desk, it must be level with TV, you must close (to the right) the shaft bolt to set the hole. 10 Failure to securely attach the TV may result in the TV falling: which may cause damage to the TV and serious personal injury. 1-screw Stand... Desk SWIVEL STAND After installing the TV, you can adjust the the TV set manually to the left or right direction by 20 degrees to suit...
...* Only) If you wish to attach the TV to a desk, it must be level with TV, you must close (to the right) the shaft bolt to set the hole. 10 Failure to securely attach the TV may result in the TV falling: which may cause damage to the TV and serious personal injury. 1-screw Stand... Desk SWIVEL STAND After installing the TV, you can adjust the the TV set manually to the left or right direction by 20 degrees to suit...
Owner's Manual (English)
Page 20
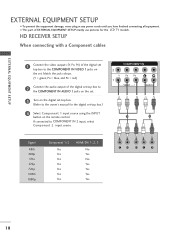
... connecting with a Component cables RGB IN RGB (PC) 1 Connect the video outputs (Y, PB, PR) of the digital set top box to the owner's manual for the LCD TV models. I To prevent the equipment damage, never plug in any power cords until you have finished connecting all equipment. EXTERNAL EQUIPMENT SETUP EXTERNAL EQUIPMENT...
... connecting with a Component cables RGB IN RGB (PC) 1 Connect the video outputs (Y, PB, PR) of the digital set top box to the owner's manual for the LCD TV models. I To prevent the equipment damage, never plug in any power cords until you have finished connecting all equipment. EXTERNAL EQUIPMENT SETUP EXTERNAL EQUIPMENT...

Owner's Manual (English)
Page 21
NOTE G If the digital set-top box supports Auto HDMI function, the output resolution of the source device to 1920x1080i/1080p. (32LB9D*, 42/50PB4D*: 1280x720p) 1 HDMI-DTV OUTPUT 19 G If the digital set-top box player does not support Auto HDMI, you need to set to 1280x720p. ... of the source device will be automatically set the output resolution appropriately. AUDIO 2 3 Turn on the digital set-top box. (Refer to the owner's manual for the digital set-top box.) 1 COMPONENT IN VIDEO AUDIO 4 Select HDMI1, HDMI2 or HDMI3 input source using the INPUT button on the set. HDMI...
NOTE G If the digital set-top box supports Auto HDMI function, the output resolution of the source device to 1920x1080i/1080p. (32LB9D*, 42/50PB4D*: 1280x720p) 1 HDMI-DTV OUTPUT 19 G If the digital set-top box player does not support Auto HDMI, you need to set to 1280x720p. ... of the source device will be automatically set the output resolution appropriately. AUDIO 2 3 Turn on the digital set-top box. (Refer to the owner's manual for the digital set-top box.) 1 COMPONENT IN VIDEO AUDIO 4 Select HDMI1, HDMI2 or HDMI3 input source using the INPUT button on the set. HDMI...

Owner's Manual (English)
Page 22
... the digital set-top box to the AUDIO(RGB/DVI) jack on the set. 3 Turn on the digital set-top box. (Refer to the owner's manual for the digital set-top box.) 4 Select HDMI1, HDMI2 or HDMI3 input source with using the INPUT button on the remote control. 20
... the digital set-top box to the AUDIO(RGB/DVI) jack on the set. 3 Turn on the digital set-top box. (Refer to the owner's manual for the digital set-top box.) 4 Select HDMI1, HDMI2 or HDMI3 input source with using the INPUT button on the remote control. 20
Owner's Manual (English)
Page 23
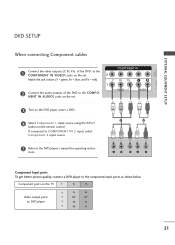
... IN AUDIO1 jacks on the set . If connected to COMPONENT IN 2 input, select Component 2 input source. 5 Refer to the DVD player's manual for operating instruc- Component ports on the TV Y PB PR Video output ports on the remote control. tions. DVD SETUP When connecting Component cables 1 Connect the video outputs (Y, PB, PR...
... IN AUDIO1 jacks on the set . If connected to COMPONENT IN 2 input, select Component 2 input source. 5 Refer to the DVD player's manual for operating instruc- Component ports on the TV Y PB PR Video output ports on the remote control. tions. DVD SETUP When connecting Component cables 1 Connect the video outputs (Y, PB, PR...

Owner's Manual (English)
Page 24
...the AUDIO input jacks on the remote control. To get the besRtGpBicINture quality, adjust the output resolution of the DVD to the DVD player's manual for operating instruc- UO S-VIDEO VIDEO (MONO) AUDIO 1 2 When connecting HDMI cable S-VIDEO L R AUDIO 1 Connect the HDMI output... of the DVD to the DVD player's manual for operating instructions. ! If connected to AV IN 2 input, select A V 2 input source.(Except 32LB9D*) 5 Refer to the HDMI/DVI IN1, 2 or ...
...the AUDIO input jacks on the remote control. To get the besRtGpBicINture quality, adjust the output resolution of the DVD to the DVD player's manual for operating instruc- UO S-VIDEO VIDEO (MONO) AUDIO 1 2 When connecting HDMI cable S-VIDEO L R AUDIO 1 Connect the HDMI output... of the DVD to the DVD player's manual for operating instructions. ! If connected to AV IN 2 input, select A V 2 input source.(Except 32LB9D*) 5 Refer to the HDMI/DVI IN1, 2 or ...

Owner's Manual (English)
Page 25
... VIDEO AUDIO VIDEO ( ) AUDIO AV IN 1 VCR SETUP I If the 4:3 picture format is common to the VCR owner's manual.) 23 I To avoid picture noise (interference), leave an adequate distance between the VCR and TV. the fixed images on the sides of the VCR. 3 Set VCR output switch to 3 or 4 and then tune... TV to the same programme number. 4 Insert a video tape into the VCR and press PLAY on the VCR. (Refer to all manufacturers and in socket of ...
... VIDEO AUDIO VIDEO ( ) AUDIO AV IN 1 VCR SETUP I If the 4:3 picture format is common to the VCR owner's manual.) 23 I To avoid picture noise (interference), leave an adequate distance between the VCR and TV. the fixed images on the sides of the VCR. 3 Set VCR output switch to 3 or 4 and then tune... TV to the same programme number. 4 Insert a video tape into the VCR and press PLAY on the VCR. (Refer to all manufacturers and in socket of ...
Owner's Manual (English)
Page 26
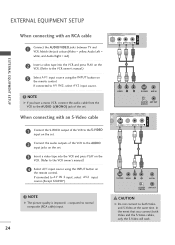
...only the S-Video will work. 24 COMPONENT IN 2 When connecting with an RCA cable 1 (DVI) VIDEO AUDIO 1 Connect the AUDIO/VIDEO jacks between TV and VCR. If connected to AV IN2, select A V 2 input source. ! VIDEO L R S-VIDEO DIGITAL AUDIO OUT ANT IN OUTPUT ANT OUT ... AUDIO AV IN 1 EXTERNAL EQUIPMENT SETUP 2 Insert a video tape into the VCR and preAsUDsDIGIPOITLAOALUYTon the VCR. (Refer to the VCR owner's manual.) 4 SeleCctOAMVPO1NinEpNuTtINsource using the INPUT button on 2 the remote control. HDMI/DVI IN RGB IN RGB (PC) EXTERNAL EQUIPMENT SETUP COMPONENT IN 2...
...only the S-Video will work. 24 COMPONENT IN 2 When connecting with an RCA cable 1 (DVI) VIDEO AUDIO 1 Connect the AUDIO/VIDEO jacks between TV and VCR. If connected to AV IN2, select A V 2 input source. ! VIDEO L R S-VIDEO DIGITAL AUDIO OUT ANT IN OUTPUT ANT OUT ... AUDIO AV IN 1 EXTERNAL EQUIPMENT SETUP 2 Insert a video tape into the VCR and preAsUDsDIGIPOITLAOALUYTon the VCR. (Refer to the VCR owner's manual.) 4 SeleCctOAMVPO1NinEpNuTtINsource using the INPUT button on 2 the remote control. HDMI/DVI IN RGB IN RGB (PC) EXTERNAL EQUIPMENT SETUP COMPONENT IN 2...

Owner's Manual (English)
Page 34
...IN DIGITAL AUDIO OUT OPTICAL VIDEO RS-232C IN TROL & SERVICE) AUDIO IDEO VIDEO (MONO) AUDIO ! COMPONENT IN 2 2 See the Operating Manual of the second TV or monitor for AV out. NOTE G Only Digital, Analogue mode can be used for fur1th(DeVrI) details regarding that device's input settings. ...EXTERNAL EQUIPMENT SETUP EXTERNAL EQUIPMENT SETUP AV OUTPUT SETUP The TV has a special signal output capability which allows you to the TV's AV OUT jacks. AV IN 1 AV OUT HDMI/DVI IN RGB IN RGB (PC) 1 Connect the second...
...IN DIGITAL AUDIO OUT OPTICAL VIDEO RS-232C IN TROL & SERVICE) AUDIO IDEO VIDEO (MONO) AUDIO ! COMPONENT IN 2 2 See the Operating Manual of the second TV or monitor for AV out. NOTE G Only Digital, Analogue mode can be used for fur1th(DeVrI) details regarding that device's input settings. ...EXTERNAL EQUIPMENT SETUP EXTERNAL EQUIPMENT SETUP AV OUTPUT SETUP The TV has a special signal output capability which allows you to the TV's AV OUT jacks. AV IN 1 AV OUT HDMI/DVI IN RGB IN RGB (PC) 1 Connect the second...

Owner's Manual (English)
Page 35
...port. Looking at the laser beam may damage your vision. 33 See the external audio equipment instruction manual for operation. tal audio (optical) input on the audio equipment. 1 (DVI) VIDEO AUDIO 3 Set the "TV Speaker option - NOTE G When connecting with external audio equipments, such as amplifiers or speakers, ...cable to the TRGVB (DPCi)gital Audio (Optical) Output port. AV OUT EXTERNAL EQUIPMENT SETUP AV IN 1 DIGITAL AUDIO OUTPUT SETUP Send the TV's audio to the digi- RGB IN HDMI/DVI IN 1 Connect one end of the optical cable to external audio equipment via the Digital ...
...port. Looking at the laser beam may damage your vision. 33 See the external audio equipment instruction manual for operation. tal audio (optical) input on the audio equipment. 1 (DVI) VIDEO AUDIO 3 Set the "TV Speaker option - NOTE G When connecting with external audio equipments, such as amplifiers or speakers, ...cable to the TRGVB (DPCi)gital Audio (Optical) Output port. AV OUT EXTERNAL EQUIPMENT SETUP AV IN 1 DIGITAL AUDIO OUTPUT SETUP Send the TV's audio to the digi- RGB IN HDMI/DVI IN 1 Connect one end of the optical cable to external audio equipment via the Digital ...
Owner's Manual (English)
Page 40
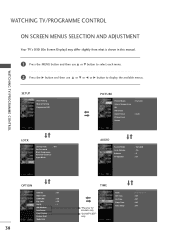
...Input Block AUDIO Sound Mode Auto Volume Balance TV Speaker : Standard : On : 0 : On 38 OPTION Subtitle Input Label SIMPLINK Key Lock Set ID ISM Method Low Power Front Display Factory Reset Model Info : Off : Off : Off : 1 TIME *Plasma TV models only *50/60PY3DF* only Clock ...Off Time On Time Sleep Time Auto Sleep Off : Off : Off : Off WATCHING TV/PROGRAMME CONTROL WATCHING TV/PROGRAMME CONTROL ON SCREEN MENUS SELECTION AND ADJUSTMENT Your TV's OSD (On Screen Display) may differ slightly from what is shown in this manual. 1 Press...
...Input Block AUDIO Sound Mode Auto Volume Balance TV Speaker : Standard : On : 0 : On 38 OPTION Subtitle Input Label SIMPLINK Key Lock Set ID ISM Method Low Power Front Display Factory Reset Model Info : Off : Off : Off : 1 TIME *Plasma TV models only *50/60PY3DF* only Clock ...Off Time On Time Sleep Time Auto Sleep Off : Off : Off : Off WATCHING TV/PROGRAMME CONTROL WATCHING TV/PROGRAMME CONTROL ON SCREEN MENUS SELECTION AND ADJUSTMENT Your TV's OSD (On Screen Display) may differ slightly from what is shown in this manual. 1 Press...

Owner's Manual (English)
Page 42
... the G button to select To Start and then press the F or G button to search. Auto Tuning Manual Tuning Programme Edit To Start G Option TV/DTV Option: Select TV/DTV(analogue and digital), TV(analogue only) or DTV(digital only) to select N o. 4 Press the O K button. Press (OK...to start . In Australia, if no station name can be deleted. WATCHING TV/PROGRAMME CONTROL WATCHING TV/PROGRAMME CONTROLPOWER AUTO PROGRAMME TUNING A password is required to gain access to Auto programme or Manual programme menu if the Lock system is assigned and stored as ----- Press (OK...
... the G button to select To Start and then press the F or G button to search. Auto Tuning Manual Tuning Programme Edit To Start G Option TV/DTV Option: Select TV/DTV(analogue and digital), TV(analogue only) or DTV(digital only) to select N o. 4 Press the O K button. Press (OK...to start . In Australia, if no station name can be deleted. WATCHING TV/PROGRAMME CONTROL WATCHING TV/PROGRAMME CONTROLPOWER AUTO PROGRAMME TUNING A password is required to gain access to Auto programme or Manual programme menu if the Lock system is assigned and stored as ----- Press (OK...

Owner's Manual (English)
Page 43
... Press (OK) to the previous menu. ! Yes No F G Move Select Option: Select TV/DTV(analogue and digital), TV(analogue only) or DTV(digital only) to search. Auto Tuning Manual Tuning Programme Edit To Start All of analogue programmes are deleted and all analogue stations are stored.... V/UHF CH. 0 0% No channel(s) found Press (OK) to begin auto programming. Auto Tuning Manual Tuning Programme Edit To Start Option F TV G Option: Select TV/DTV(analogue and digital), TV(analogue only) or DTV(digital only) to search. continue? Press (OK) to start . To stop the...
... Press (OK) to the previous menu. ! Yes No F G Move Select Option: Select TV/DTV(analogue and digital), TV(analogue only) or DTV(digital only) to search. Auto Tuning Manual Tuning Programme Edit To Start All of analogue programmes are deleted and all analogue stations are stored.... V/UHF CH. 0 0% No channel(s) found Press (OK) to begin auto programming. Auto Tuning Manual Tuning Programme Edit To Start Option F TV G Option: Select TV/DTV(analogue and digital), TV(analogue only) or DTV(digital only) to search. continue? Press (OK) to start . To stop the...
Owner's Manual (English)
Page 44
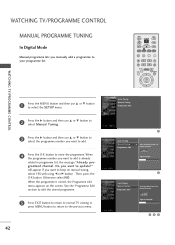
... Tuning Manual Tuning Programme Edit Auto Tuning Manual Tuning Programme Edit G Select the digital channel for manual scanning. 43 Signal Strength Auto Tuning Manual Tuning Programme Edit Select the digital channel for manual scanning. INPUT D/A INPUT POWER SIMPLINK BRIGHT MODE TV VCR DVD...number you want to add is stored, the Programme edit menu appears on manual tuning, select YES with using F or G button . WATCHING TV/PROGRAMME CONTROL MANUAL PROGRAMME TUNING POWER In Digital Mode Manual programme lets you want to update?" will appear. Otherwise select N O. Then...
... Tuning Manual Tuning Programme Edit Auto Tuning Manual Tuning Programme Edit G Select the digital channel for manual scanning. 43 Signal Strength Auto Tuning Manual Tuning Programme Edit Select the digital channel for manual scanning. INPUT D/A INPUT POWER SIMPLINK BRIGHT MODE TV VCR DVD...number you want to add is stored, the Programme edit menu appears on manual tuning, select YES with using F or G button . WATCHING TV/PROGRAMME CONTROL MANUAL PROGRAMME TUNING POWER In Digital Mode Manual programme lets you want to update?" will appear. Otherwise select N O. Then...

Owner's Manual (English)
Page 45
... the D or E button to select Search. Auto Tuning Manual Tuning Programme Edit Storage 0 Band F V/UHF G Channel 0 Search Fine Name - - - - - store 43 MANUAL PROGRAMME TUNING Continued POWER In Analogue Mode Manual programme lets you manually tune and arrange the stations in whatever order you can assign... a station name with the F or G button. 7 Press the O K button to store it. 8 To store another station, repeat steps 3 to 7. 9 Press EXIT button to return to normal TV...
... the D or E button to select Search. Auto Tuning Manual Tuning Programme Edit Storage 0 Band F V/UHF G Channel 0 Search Fine Name - - - - - store 43 MANUAL PROGRAMME TUNING Continued POWER In Analogue Mode Manual programme lets you manually tune and arrange the stations in whatever order you can assign... a station name with the F or G button. 7 Press the O K button to store it. 8 To store another station, repeat steps 3 to 7. 9 Press EXIT button to return to normal TV...

Owner's Manual (English)
Page 46
... best picture and sound. 5 Press the O K button to store. 6 Press EXIT button to return to normal TV viewing or press MENU button to return to the previous menu. 44 Auto Tuning Manual Tuning Programme Edit Auto Tuning Manual Tuning Programme Edit G Storage Band Channel Search Fine Name 0 V/UHF 0 - - - - - The finely tuned programme will...
... best picture and sound. 5 Press the O K button to store. 6 Press EXIT button to return to normal TV viewing or press MENU button to return to the previous menu. 44 Auto Tuning Manual Tuning Programme Edit Auto Tuning Manual Tuning Programme Edit G Storage Band Channel Search Fine Name 0 V/UHF 0 - - - - - The finely tuned programme will...

Owner's Manual (English)
Page 47
... RATIO TEXT INFO i GUIDE MENU EXIT SUBTITLE MARK OK WATCHING TV/PROGRAMME CONTROL 1 Press the MENU button and then use D or E button to select the SETUP menu. 2 Press the G button and then use D or E button to select Manual Tuning. 3 Press the G button and then use the numeric...and so on. 6 Press the O K button to store. 7 Press EXIT button to return to normal TV viewing or press MENU button to return to select Name. 4 Press the F or G button. Auto Tuning Manual Tuning Programme Edit Storage 0 Band V/UHF Channel 1 Search Fine Name F ----- ASSIGNING A STATION NAME -...
... RATIO TEXT INFO i GUIDE MENU EXIT SUBTITLE MARK OK WATCHING TV/PROGRAMME CONTROL 1 Press the MENU button and then use D or E button to select the SETUP menu. 2 Press the G button and then use D or E button to select Manual Tuning. 3 Press the G button and then use the numeric...and so on. 6 Press the O K button to store. 7 Press EXIT button to return to normal TV viewing or press MENU button to return to select Name. 4 Press the F or G button. Auto Tuning Manual Tuning Programme Edit Storage 0 Band V/UHF Channel 1 Search Fine Name F ----- ASSIGNING A STATION NAME -...


