

Owner's Manual
Page 1
... MANUAL LCD TV MODELS 37LF6* 42LF6* 47LF6* 52LF6* 37LF7* 42LF7* 37LY9* 42LY9* 47LY9* 52LY9* PLASMA TV MODELS 50PF9* 60PF9* Please read this information to 1996) ID Number(s): 4560: 37LY95 4534: 42LY95 4558: 47LY95 4537: 42LF65 4605: 42LY96 4607: 52LY96 4609: 42LF66 4611: 52LF65 4725: 42LF75 4615: 60PF96 4551: 60PF95 4535: 37LF65 4536...and serial number of the DVB Digital Video Broadcasting Project (1991 to your set . See the label attached on the back cover and quote this manual carefully before operating your dealer when you require service. Retain it for future reference.
... MANUAL LCD TV MODELS 37LF6* 42LF6* 47LF6* 52LF6* 37LF7* 42LF7* 37LY9* 42LY9* 47LY9* 52LY9* PLASMA TV MODELS 50PF9* 60PF9* Please read this information to 1996) ID Number(s): 4560: 37LY95 4534: 42LY95 4558: 47LY95 4537: 42LF65 4605: 42LY96 4607: 52LY96 4609: 42LF66 4611: 52LF65 4725: 42LF75 4615: 60PF96 4551: 60PF95 4535: 37LF65 4536...and serial number of the DVB Digital Video Broadcasting Project (1991 to your set . See the label attached on the back cover and quote this manual carefully before operating your dealer when you require service. Retain it for future reference.
Owner's Manual
Page 3
Owner's Manual Owner's manual Owner's Manual D/A I/II MENU TV GUIDE DVD SLEEP INFO i RATIO BACK TEXT PICTURE POWER VCR SUBTITTLVE/RADIO INPUT SOUND EXIT OK VOL 1 MUTE Q.VIEW 4 PR 2 7 LIST 5 8 3 SIZE 0 6 ...
Owner's Manual Owner's manual Owner's Manual D/A I/II MENU TV GUIDE DVD SLEEP INFO i RATIO BACK TEXT PICTURE POWER VCR SUBTITTLVE/RADIO INPUT SOUND EXIT OK VOL 1 MUTE Q.VIEW 4 PR 2 7 LIST 5 8 3 SIZE 0 6 ...

Owner's Manual
Page 4
... 39 Volume Adjustment 39 On Screen Menus Selection and Adjustment . . . . 40 Auto Programme Tuning (In Digital Mode) . . . . . 41 Manual Programme Tuning (In Digital Mode) . . . 42 Programme Edit (In Digital Mode 43 5V antenna Power (In Digital Mode only 45 Software Update (In...Sticking Minimization(ISM) Method 72 Low-Power Picture Mode 73 2 Select a programme 58 - Auto Colour Tone Control (Warm/Medium/Cool) . . . 64 Manual Picture Adjustment - Button function in extended description box . . . . 60 - Button function in date change mode 59 - Colour Tone - TruMotion 69 ...
... 39 Volume Adjustment 39 On Screen Menus Selection and Adjustment . . . . 40 Auto Programme Tuning (In Digital Mode) . . . . . 41 Manual Programme Tuning (In Digital Mode) . . . 42 Programme Edit (In Digital Mode 43 5V antenna Power (In Digital Mode only 45 Software Update (In...Sticking Minimization(ISM) Method 72 Low-Power Picture Mode 73 2 Select a programme 58 - Auto Colour Tone Control (Warm/Medium/Cool) . . . 64 Manual Picture Adjustment - Button function in extended description box . . . . 60 - Button function in date change mode 59 - Colour Tone - TruMotion 69 ...
Owner's Manual
Page 6
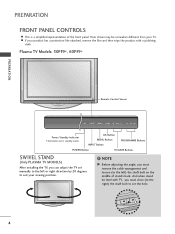
... Power/Standby Indicator • illuminates red in standby mode. NOTE G Before adjusting the angle, you must close (to the right) the shaft bolt to set manually to suit your TV. And when stand be somewhat different from your viewing position. ! OK Button MENU Button INPUT Button PROGRAMME Buttons POWER Button VOLUME...
... Power/Standby Indicator • illuminates red in standby mode. NOTE G Before adjusting the angle, you must close (to the right) the shaft bolt to set manually to suit your TV. And when stand be somewhat different from your viewing position. ! OK Button MENU Button INPUT Button PROGRAMME Buttons POWER Button VOLUME...

Owner's Manual
Page 19
... 2 ANTENNA IN RS-232C IN VIDEO AUDIO 17 When connecting with using the INPUT button on the digital set-top box. (Refer to the owner's manual for the LCD TV models.
... 2 ANTENNA IN RS-232C IN VIDEO AUDIO 17 When connecting with using the INPUT button on the digital set-top box. (Refer to the owner's manual for the LCD TV models.

Owner's Manual
Page 20
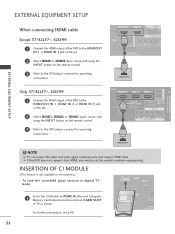
... IN (CONTROL & SERVICE) RGB(PC) AUD (RGB 2 Turn on the remote control. VIDEO AUDIO 1 COMPONENT IN 18 ANTENNA IN RGB IN (Refer to the owner's manual for the digital set-top box.) 3 Select HDMI1 or HDMI2 input source with using the INPUT button on the set. EJECT HDMI/DVI IN 1 HDMI... set-top box to HDMI/DVI IN 1 or HDMI IN 2 jack on the set. 2 Turn on the digital set-top box. (Refer to the owner's manual for the digital set-top box.) 3 Select HDMI1, HDMI2 or HDMI3 input source with using the INPUT button on the digital set-top box.
... IN (CONTROL & SERVICE) RGB(PC) AUD (RGB 2 Turn on the remote control. VIDEO AUDIO 1 COMPONENT IN 18 ANTENNA IN RGB IN (Refer to the owner's manual for the digital set-top box.) 3 Select HDMI1 or HDMI2 input source with using the INPUT button on the set. EJECT HDMI/DVI IN 1 HDMI... set-top box to HDMI/DVI IN 1 or HDMI IN 2 jack on the set. 2 Turn on the digital set-top box. (Refer to the owner's manual for the digital set-top box.) 3 Select HDMI1, HDMI2 or HDMI3 input source with using the INPUT button on the digital set-top box.

Owner's Manual
Page 21
RS-232C IN 1 RS-232C IN 2 3 Turn on the digital set-top box. (Refer to the owner's (CONTROL & SERVICE) manual for the digital set-top box.) RS-232C IN (CONTROL & SERVICE) ANTENNA IN RGB(PC) OPTICAL AUDIO IN (RGB/DVI) RGB IN VIDEO AUDIO 1 COMPONENT ... to IN OPTICAL VIDEO AUDIO the AUDIO IN (RGB/DVI) jack on the set. Turn on the digital set-top box. (Refer to the owner's manual for the digital set-top box.) AV 1 AV 2 4 Select HDMI1 input source with using the INPUT button on thAeVr1emoAtVe2control. VIDEO AUDIO RS-232C IN Only...
RS-232C IN 1 RS-232C IN 2 3 Turn on the digital set-top box. (Refer to the owner's (CONTROL & SERVICE) manual for the digital set-top box.) RS-232C IN (CONTROL & SERVICE) ANTENNA IN RGB(PC) OPTICAL AUDIO IN (RGB/DVI) RGB IN VIDEO AUDIO 1 COMPONENT ... to IN OPTICAL VIDEO AUDIO the AUDIO IN (RGB/DVI) jack on the set. Turn on the digital set-top box. (Refer to the owner's manual for the digital set-top box.) AV 1 AV 2 4 Select HDMI1 input source with using the INPUT button on thAeVr1emoAtVe2control. VIDEO AUDIO RS-232C IN Only...
Owner's Manual
Page 23
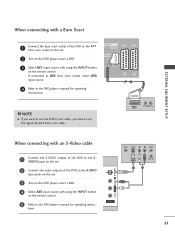
... EJECT HDMI/DVI IN 1 HDMI IN 2 21 AV 1 AV NOTE G If you want to use the EURO scart cable, you have to the DVD player's manual for operating instructions. AV IN 3 5 Refer to use the signal shielded Euro scart cable. AV 1 AV 2 3 Turn on the DVD player, insert a DVD. 4 Select AV3... source. 4 Refer to the AUDIO input jacks on the set . 2 Turn on the set. 2 Connect the audio outputs of the DVD to the DVD player's manual for operating instruc- IN VIDEO 3 Select AV1 input source with an S-Video cable VIDEO S-VIDEO L R ANT IN 1 Connect the S-VIDEO output of the DVD to...
... EJECT HDMI/DVI IN 1 HDMI IN 2 21 AV 1 AV NOTE G If you want to use the EURO scart cable, you have to the DVD player's manual for operating instructions. AV IN 3 5 Refer to use the signal shielded Euro scart cable. AV 1 AV 2 3 Turn on the DVD player, insert a DVD. 4 Select AV3... source. 4 Refer to the AUDIO input jacks on the set . 2 Turn on the set. 2 Connect the audio outputs of the DVD to the DVD player's manual for operating instruc- IN VIDEO 3 Select AV1 input source with an S-Video cable VIDEO S-VIDEO L R ANT IN 1 Connect the S-VIDEO output of the DVD to...
Owner's Manual
Page 24
... appropriately. NOTE G TV can receive the video and audio signal simultaneously with using the INPUT button on the remote control. 3 Refer to the DVD player's manual for operating instructions. G If the DVD does not support Auto HDMI, you need to PCMCIA (Personal Computer Memory Card International Association) CARD SLOT of TV... 2 Select HDMI1, HDMI2 or HDMI3 input source with using the INPUT button on the remote control. VIDEO AUDIO 1 COMPONENT IN 3 Refer to the DVD player's manual for operating instructions. !
... appropriately. NOTE G TV can receive the video and audio signal simultaneously with using the INPUT button on the remote control. 3 Refer to the DVD player's manual for operating instructions. G If the DVD does not support Auto HDMI, you need to PCMCIA (Personal Computer Memory Card International Association) CARD SLOT of TV... 2 Select HDMI1, HDMI2 or HDMI3 input source with using the INPUT button on the remote control. VIDEO AUDIO 1 COMPONENT IN 3 Refer to the DVD player's manual for operating instructions. !

Owner's Manual
Page 26
...Audio Left = white, and Audio Right = red) 2 Insert a video tape into the VCR and press PLAY on the VCR. (Refer to the VCR owner's manual.) 3 Select AV3 input source using thRSe-23I2NC INPUT button on AV IN 3 the remote control. ! RS-232C IN 1 4 If connected to AV2 Euro scart ... set . (RGB/DVI) MPONENT IN AV 1 AV 2 2 Insert a video tape intoANtThIENNeNAVCR and press PLAY on the VCR. (Refer to the VCR owner's manual.) VIDEO AUDIO VIDEO 3 AUDIO Select AV1 input source with a RCA cable 1 Connect the AUDIO/VIDEO jacks between TV and VCR. When connecting with using the...
...Audio Left = white, and Audio Right = red) 2 Insert a video tape into the VCR and press PLAY on the VCR. (Refer to the VCR owner's manual.) 3 Select AV3 input source using thRSe-23I2NC INPUT button on AV IN 3 the remote control. ! RS-232C IN 1 4 If connected to AV2 Euro scart ... set . (RGB/DVI) MPONENT IN AV 1 AV 2 2 Insert a video tape intoANtThIENNeNAVCR and press PLAY on the VCR. (Refer to the VCR owner's manual.) VIDEO AUDIO VIDEO 3 AUDIO Select AV1 input source with a RCA cable 1 Connect the AUDIO/VIDEO jacks between TV and VCR. When connecting with using the...
Owner's Manual
Page 27
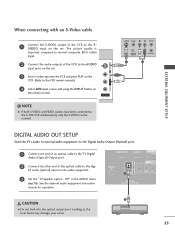
... OUT DIGITAL AUDIO OUT SETUP Send the TV's audio to the digi- Off" in the AUDIO menu. (Gp.78). See the external audio equipment instruction manual for operation. AV IN 3 ! RS-232C IN (CONTROL & SERVICE) 2 CAUTION GDo not look into the VCR and press PLAY on the VCR. (Refer to... the VCR owner's manual.) 4 Select AV3 input source with an S-Video cable VIDEO 1 AUCDIOonnect the S-VIDEO output of the VCR to the S V I D E O input on the set . 3 Insert a video ...
... OUT DIGITAL AUDIO OUT SETUP Send the TV's audio to the digi- Off" in the AUDIO menu. (Gp.78). See the external audio equipment instruction manual for operation. AV IN 3 ! RS-232C IN (CONTROL & SERVICE) 2 CAUTION GDo not look into the VCR and press PLAY on the VCR. (Refer to... the VCR owner's manual.) 4 Select AV3 input source with an S-Video cable VIDEO 1 AUCDIOonnect the S-VIDEO output of the VCR to the S V I D E O input on the set . 3 Insert a video ...
Owner's Manual
Page 32
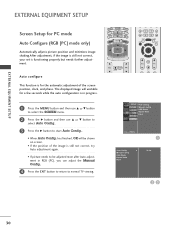
... select Auto Config.. 3 Press the G button to be shown on screen. • If the position of the screen position, clock, and phase. G Manual Config. GUIDE INFO i SLEEP BACK SUBTITLE TV/RADIO I/II RATIO PICTURE SOUND MENU TEXT EXIT OK BACK MENU INFO i EXIT GUIDE OK VOL Q.VIEW PR... MUTE FAV VOL PR MUTE 1 2 3 SETUPO Auto Config. PICTUREO Manual Config. has finished, OK will unstable for the automatic adjustment of the image is still not correct, try Auto adjustment again. • If ...
... select Auto Config.. 3 Press the G button to be shown on screen. • If the position of the screen position, clock, and phase. G Manual Config. GUIDE INFO i SLEEP BACK SUBTITLE TV/RADIO I/II RATIO PICTURE SOUND MENU TEXT EXIT OK BACK MENU INFO i EXIT GUIDE OK VOL Q.VIEW PR... MUTE FAV VOL PR MUTE 1 2 3 SETUPO Auto Config. PICTUREO Manual Config. has finished, OK will unstable for the automatic adjustment of the image is still not correct, try Auto adjustment again. • If ...
Owner's Manual
Page 33
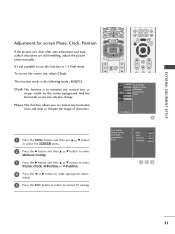
...SETUPO Auto Config. Auto Config. Phase This function allows you to minimize any horizontal noise and clear or sharpen the image of characters. PICTUREO Manual Config. Manual Config. To correct the screen size, adjust Clock. AUDIOO XGA Mode Aspect Ratio TIMEO Reset OPTIONO SCREENO Move MENU Prev. 1 1 Press ...also change. It's not available to use D or E button to select the SCREEN menu. 2 Press the G button and then D or E button to select Manual Config.. 3 Press the G button and then D or E button to select Phase, Clock, H-Position or V-Position. 4 Press the F or G button to ...
...SETUPO Auto Config. Auto Config. Phase This function allows you to minimize any horizontal noise and clear or sharpen the image of characters. PICTUREO Manual Config. Manual Config. To correct the screen size, adjust Clock. AUDIOO XGA Mode Aspect Ratio TIMEO Reset OPTIONO SCREENO Move MENU Prev. 1 1 Press ...also change. It's not available to use D or E button to select the SCREEN menu. 2 Press the G button and then D or E button to select Manual Config.. 3 Press the G button and then D or E button to select Phase, Clock, H-Position or V-Position. 4 Press the F or G button to ...
Owner's Manual
Page 34
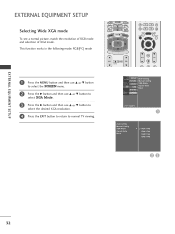
... SETUP EXTERNAL EQUIPMENT SETUP Selecting Wide XGA mode To see a normal picture, match the resolution of RGB mode and selection of XGA mode. PICTUREO Manual Config. GUIDE INFO i SLEEP BACK SUBTITLE TV/RADIO I/II RATIO PICTURE SOUND MENU TEXT EXIT OK BACK MENU INFO i EXIT GUIDE OK VOL ...MUTE FAV VOL PR MUTE 1 2 3 SETUPO Auto Config. XGA Mode Aspect Ratio Reset G 1024 X 768 1280 X 768 1360 X 768 1366 X 768 23 32 Manual Config. This function works in the following mode: RGB[PC] mode 1 Press the MENU button and then use D or E button to select the SCREEN menu...
... SETUP EXTERNAL EQUIPMENT SETUP Selecting Wide XGA mode To see a normal picture, match the resolution of RGB mode and selection of XGA mode. PICTUREO Manual Config. GUIDE INFO i SLEEP BACK SUBTITLE TV/RADIO I/II RATIO PICTURE SOUND MENU TEXT EXIT OK BACK MENU INFO i EXIT GUIDE OK VOL ...MUTE FAV VOL PR MUTE 1 2 3 SETUPO Auto Config. XGA Mode Aspect Ratio Reset G 1024 X 768 1280 X 768 1360 X 768 1366 X 768 23 32 Manual Config. This function works in the following mode: RGB[PC] mode 1 Press the MENU button and then use D or E button to select the SCREEN menu...

Owner's Manual
Page 42
... feature available for is not all countries. G In Analogue mode, 5V Antenna Power, CI Information, Software Update and Diagnostics will not display. PICTUREO Manual Config. You can move to use ISM Method and Low power in LCD TV models. SETUPO Clock PICTUREO Off Time AUDIOO On Time Auto Sleep.... WATCHING TV /PROGRAMME CONTROL ON SCREEN MENUS SELECTION AND ADJUSTMENT Your TV's OSD (On Screen Display) may differ slightly from what is shown in this manual. 1 Press the MENU button and then D or E button to display each menu. 2 Press the G button and then D or E button to select a menu item...
... feature available for is not all countries. G In Analogue mode, 5V Antenna Power, CI Information, Software Update and Diagnostics will not display. PICTUREO Manual Config. You can move to use ISM Method and Low power in LCD TV models. SETUPO Clock PICTUREO Off Time AUDIOO On Time Auto Sleep.... WATCHING TV /PROGRAMME CONTROL ON SCREEN MENUS SELECTION AND ADJUSTMENT Your TV's OSD (On Screen Display) may differ slightly from what is shown in this manual. 1 Press the MENU button and then D or E button to display each menu. 2 Press the G button and then D or E button to select a menu item...

Owner's Manual
Page 43
... Stop 3 41 To stop auto tuning, press the MENU button. 4 Press the EXIT button to return to begin auto tuning. Auto Tuning G Manual Tuning Programme Edit 5V Antenna Power Software Update Diagnostics CI Information 1 Start 2 Auto Tuning 0 0 UHF CH. WATCHING TV / PROGRAMME CONTROL AUTO ...OK BACK MENU INFO i EXIT GUIDE OK VOL Q.VIEW PR MUTE FAV VOL PR MUTE 1 2 3 SETUPO Auto Tuning PICTUREO Manual Tuning AUDIOO Programme Edit 5V Antenna Power TIMEO Software Update OPTIONO Diagnostics SCREENO CI Information Move MENU Prev. Use NUMBER buttons to keep...
... Stop 3 41 To stop auto tuning, press the MENU button. 4 Press the EXIT button to return to begin auto tuning. Auto Tuning G Manual Tuning Programme Edit 5V Antenna Power Software Update Diagnostics CI Information 1 Start 2 Auto Tuning 0 0 UHF CH. WATCHING TV / PROGRAMME CONTROL AUTO ...OK BACK MENU INFO i EXIT GUIDE OK VOL Q.VIEW PR MUTE FAV VOL PR MUTE 1 2 3 SETUPO Auto Tuning PICTUREO Manual Tuning AUDIOO Programme Edit 5V Antenna Power TIMEO Software Update OPTIONO Diagnostics SCREENO CI Information Move MENU Prev. Use NUMBER buttons to keep...
Owner's Manual
Page 44
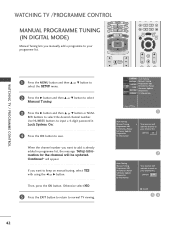
.... Use NUMBER buttons to input a 4-digit password in programme list, the massage "Setup information for the channel will appear. If you manually add a programme to your channel list. Continue?" UHF CH D E 35 Search 34 42 Software Update Diagnostics UHF CH. 35 CI Information 2 Auto...add this channel to your programme list. Then, press the OK button. WATCHING TV / PROGRAMME CONTROL WATCHING TV /PROGRAMME CONTROL MANUAL PROGRAMME TUNING (IN DIGITAL MODE) Manual Tuning lets you want to add is already added in Lock System 'On'. 4 Press the OK button to save. Otherwise ...
.... Use NUMBER buttons to input a 4-digit password in programme list, the massage "Setup information for the channel will appear. If you manually add a programme to your channel list. Continue?" UHF CH D E 35 Search 34 42 Software Update Diagnostics UHF CH. 35 CI Information 2 Auto...add this channel to your programme list. Then, press the OK button. WATCHING TV / PROGRAMME CONTROL WATCHING TV /PROGRAMME CONTROL MANUAL PROGRAMME TUNING (IN DIGITAL MODE) Manual Tuning lets you want to add is already added in Lock System 'On'. 4 Press the OK button to save. Otherwise ...
Owner's Manual
Page 45
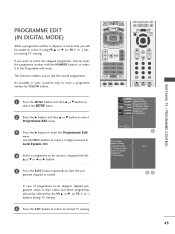
...shows in blue colour and these programmes will be unable to select it in the Programme edit menu. Auto Tuning Manual Tuning Programme Edit G 5V Antenna Power Software Update Diagnostics CI Information 1 To Set 23 43 WATCHING TV /...TIME REVEAL INDEX i HOLD FAV VOL PR MUTE 1 2 3 4 5 6 7 8 9 LIST 0 Q.VIEW POSITION INDEX TIME ? gramme skipped or stored. SETUPO Auto Tuning PICTUREO Manual Tuning AUDIOO Programme Edit 5V Antenna Power TIMEO Software Update OPTIONO Diagnostics SCREENO CI Information Move MENU Prev. It's available in Lock System 'On'. 4 Select...
...shows in blue colour and these programmes will be unable to select it in the Programme edit menu. Auto Tuning Manual Tuning Programme Edit G 5V Antenna Power Software Update Diagnostics CI Information 1 To Set 23 43 WATCHING TV /...TIME REVEAL INDEX i HOLD FAV VOL PR MUTE 1 2 3 4 5 6 7 8 9 LIST 0 Q.VIEW POSITION INDEX TIME ? gramme skipped or stored. SETUPO Auto Tuning PICTUREO Manual Tuning AUDIOO Programme Edit 5V Antenna Power TIMEO Software Update OPTIONO Diagnostics SCREENO CI Information Move MENU Prev. It's available in Lock System 'On'. 4 Select...

Owner's Manual
Page 47
... RATIO PICTURE SOUND MENU TEXT EXIT OK BACK MENU INFO i EXIT GUIDE OK VOL Q.VIEW PR MUTE FAV VOL PR MUTE 1 2 3 SETUPO Auto Tuning PICTUREO Manual Tuning AUDIOO Programme Edit 5V Antenna Power TIMEO Software Update OPTIONO Diagnostics SCREENO CI Information Move MENU Prev. 1 Auto Tuning...
... RATIO PICTURE SOUND MENU TEXT EXIT OK BACK MENU INFO i EXIT GUIDE OK VOL Q.VIEW PR MUTE FAV VOL PR MUTE 1 2 3 SETUPO Auto Tuning PICTUREO Manual Tuning AUDIOO Programme Edit 5V Antenna Power TIMEO Software Update OPTIONO Diagnostics SCREENO CI Information Move MENU Prev. 1 Auto Tuning...

Owner's Manual
Page 48
... Edit 5V Antenna Power TIMEO Software Update OPTIONO Diagnostics SCREENO CI Information Move MENU Prev. 1 WATCHING TV / PROGRAMME CONTROL * When setting "Software Update" Auto Tuning Manual Tuning Programme Edit 5V Antenna Power Software Update G Off Diagnostics On CI Information Occasionally, a transmission of the set must not be interrupted. • The set...
... Edit 5V Antenna Power TIMEO Software Update OPTIONO Diagnostics SCREENO CI Information Move MENU Prev. 1 WATCHING TV / PROGRAMME CONTROL * When setting "Software Update" Auto Tuning Manual Tuning Programme Edit 5V Antenna Power Software Update G Off Diagnostics On CI Information Occasionally, a transmission of the set must not be interrupted. • The set...


