
Owner's Manual
Page 1
Record model number and serial number of the set . www.lg.ca PLASMA TV OWNER'S MANUAL 32PC5RV Please read this information to your set . Retain it for future reference. See the label attached on the back cover and quote this manual carefully before operating your dealer when you require service.
Record model number and serial number of the set . www.lg.ca PLASMA TV OWNER'S MANUAL 32PC5RV Please read this information to your set . Retain it for future reference. See the label attached on the back cover and quote this manual carefully before operating your dealer when you require service.
Owner's Manual
Page 6
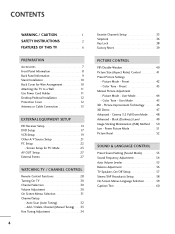
... On Screen Menus Selection 31 Channel Setup - Cinema 3:2 Pull Down Mode 48 Advanced - Power Picture Mode 51 Picture Reset 52 SOUND & LANGUAGE CONTROL Preset Sound Setting (Sound Mode 53 Sound Frequency Adjustment 54 Auto Volume Leveler 55 Balance Adjustment 56 TV Speakers On/Off Setup 57 Stereo/SAP Broadcasts Setup 58... Channels Setup 35 SimpLink 36 Key Lock 38 Factory Reset 39 PICTURE CONTROL PIP/Double Window 40 Picture Size (Aspect Ratio) Control 41 Preset Picture Settings - Preset 42 Color Tone -
... On Screen Menus Selection 31 Channel Setup - Cinema 3:2 Pull Down Mode 48 Advanced - Power Picture Mode 51 Picture Reset 52 SOUND & LANGUAGE CONTROL Preset Sound Setting (Sound Mode 53 Sound Frequency Adjustment 54 Auto Volume Leveler 55 Balance Adjustment 56 TV Speakers On/Off Setup 57 Stereo/SAP Broadcasts Setup 58... Channels Setup 35 SimpLink 36 Key Lock 38 Factory Reset 39 PICTURE CONTROL PIP/Double Window 40 Picture Size (Aspect Ratio) Control 41 Preset Picture Settings - Preset 42 Color Tone -

Owner's Manual
Page 7
Canadian 71 APPENDIX Troubleshooting 72 Maintenance 74 Product Specifications 75 5 Auto Clock Setup 61 Manual Clock Setup 62 Auto On/Off Time Setting 63 Sleep Time Setting 64 Auto Shut-off Setting 65 PARENTAL CONTROL / RATINGS Set Password & Lock System 66 Movie & TV Rating 68 Age Block 69 Content Block 70 Aux. Block 70 - TIME SETTING Clock Setting -
Canadian 71 APPENDIX Troubleshooting 72 Maintenance 74 Product Specifications 75 5 Auto Clock Setup 61 Manual Clock Setup 62 Auto On/Off Time Setting 63 Sleep Time Setting 64 Auto Shut-off Setting 65 PARENTAL CONTROL / RATINGS Set Password & Lock System 66 Movie & TV Rating 68 Age Block 69 Content Block 70 Aux. Block 70 - TIME SETTING Clock Setting -

Owner's Manual
Page 10
And then wipe the product with a cloth (If a polishing cloth is switched on. INPUT MENU ENTER VOL CH INPUT MENU ENTER VOL CH POWER Button INPUT Button MENU Button ENTER Button VOLUME (F,G)Buttons CHANNEL (E,D)Buttons 8 Illuminates green when the set is included with your product, use it). PREPARATION FRONT PANEL INFORMATION I NOTE: If your product has a protection tape attached, remove the tape. PREPARATION Remote Control Sensor Power/Standby Indicator Illuminates red in standby mode. I Here shown may be somewhat different from your TV.
And then wipe the product with a cloth (If a polishing cloth is switched on. INPUT MENU ENTER VOL CH INPUT MENU ENTER VOL CH POWER Button INPUT Button MENU Button ENTER Button VOLUME (F,G)Buttons CHANNEL (E,D)Buttons 8 Illuminates green when the set is included with your product, use it). PREPARATION FRONT PANEL INFORMATION I NOTE: If your product has a protection tape attached, remove the tape. PREPARATION Remote Control Sensor Power/Standby Indicator Illuminates red in standby mode. I Here shown may be somewhat different from your TV.

Owner's Manual
Page 11
The voltage is indicated on the set 7 5 AV IN Connect audio/video output from a PC. Or DVI(VIDEO)signal to HDMI/DVI port with DVI to HDMI cable. 7 ANTENNA IN Connect over-...
The voltage is indicated on the set 7 5 AV IN Connect audio/video output from a PC. Or DVI(VIDEO)signal to HDMI/DVI port with DVI to HDMI cable. 7 ANTENNA IN Connect over-...

Owner's Manual
Page 13
.... I Use a sturdy rope (not provided as parts of the TV by using the bracket for all models. Match the height of the bracket that you set up the TV close to the AC input terminal, remove the bolt at the hole on or hang from your product has the bolts in...
.... I Use a sturdy rope (not provided as parts of the TV by using the bracket for all models. Match the height of the bracket that you set up the TV close to the AC input terminal, remove the bolt at the hole on or hang from your product has the bolts in...
Owner's Manual
Page 16
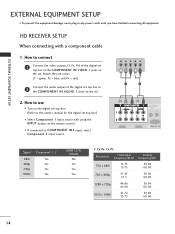
... PR = red). 2 Connect the audio output of the digital set top box to the COMPONENT IN VIDEO 1 jacks on the set . 2. HD RECEIVER SETUP When connecting with using the INPUT button on the set . How to use I Turn on the digital set-top box. (Refer to the owner's manual for the digital...60.00 1920 x 1080i 33.72 33.75 59.94 60.00 14 How to connect 1 Connect the video outputs (Y, PB, PR) of the digital set -top box.) I Select Component 1 input source with a component cable 1. EXTERNAL EQUIPMENT SETUP EXTERNAL EQUIPMENT SETUP I If connected to COMPONENT IN2 input, select Component...
... PR = red). 2 Connect the audio output of the digital set top box to the COMPONENT IN VIDEO 1 jacks on the set . 2. HD RECEIVER SETUP When connecting with using the INPUT button on the set . How to use I Turn on the digital set-top box. (Refer to the owner's manual for the digital...60.00 1920 x 1080i 33.72 33.75 59.94 60.00 14 How to connect 1 Connect the video outputs (Y, PB, PR) of the digital set -top box.) I Select Component 1 input source with a component cable 1. EXTERNAL EQUIPMENT SETUP EXTERNAL EQUIPMENT SETUP I If connected to COMPONENT IN2 input, select Component...
Owner's Manual
Page 17
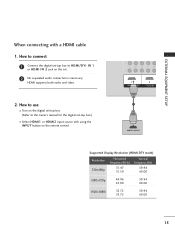
... box.) I Select HDMI1 or HDMI2 input source with a HDMI cable 1. EXTERNAL EQUIPMENT SETUP When connecting with using the INPUT button on the set -top box to connect 1 Connect the digital set . 2 No separated audio connection is necessary. How to HDMI/DVI IN 1 or HDMI IN 2 jack on the remote control. 1 HDMI-DTV...
... box.) I Select HDMI1 or HDMI2 input source with a HDMI cable 1. EXTERNAL EQUIPMENT SETUP When connecting with using the INPUT button on the set -top box to connect 1 Connect the digital set . 2 No separated audio connection is necessary. How to HDMI/DVI IN 1 or HDMI IN 2 jack on the remote control. 1 HDMI-DTV...
Owner's Manual
Page 18
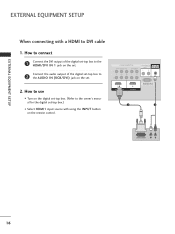
Connect the audio output of the digital set . How to use I Select HDMI1 input source with a HDMI to 2 the AUDIO IN (RGB/DVI) jack on the digital set . 2. al for the digital set-top box.) 1 2 I Turn on the set -top box. (Refer to the HDMI/DVI IN 1 jack on the remote control. How to connect 1 Connect the DVI output of the digital set-top box to DVI cable 1. DVI-DTV OUTPUT L R 16 EXTERNAL EQUIPMENT SETUP EXTERNAL EQUIPMENT SETUP When connecting with using the INPUT button on the set -top box to the owner's manu-
Connect the audio output of the digital set . How to use I Select HDMI1 input source with a HDMI to 2 the AUDIO IN (RGB/DVI) jack on the digital set . 2. al for the digital set-top box.) 1 2 I Turn on the set -top box. (Refer to the HDMI/DVI IN 1 jack on the remote control. How to connect 1 Connect the DVI output of the digital set-top box to DVI cable 1. DVI-DTV OUTPUT L R 16 EXTERNAL EQUIPMENT SETUP EXTERNAL EQUIPMENT SETUP When connecting with using the INPUT button on the set -top box to the owner's manu-

Owner's Manual
Page 19
... with a component cable 1. I Turn on the DVD player, insert a DVD. I If connected to use I Refer to the COMPONENT IN VIDEO1 jacks on the set . 2. How to COMPONENT IN 2 input, select Component 2 input source. Y PB PR L R 1 2 Component Input ports To get better picture quality, connect... a DVD player to the COMPONENT IN AUDIO1 jacks on the set . Component ports on the TV Y PB PR Video output ports on DVD player Y PB PR Y B-Y R-Y Y Cb Cr Y Pb Pr 17 Match the...
... with a component cable 1. I Turn on the DVD player, insert a DVD. I If connected to use I Refer to the COMPONENT IN VIDEO1 jacks on the set . 2. How to COMPONENT IN 2 input, select Component 2 input source. Y PB PR L R 1 2 Component Input ports To get better picture quality, connect... a DVD player to the COMPONENT IN AUDIO1 jacks on the set . Component ports on the TV Y PB PR Video output ports on DVD player Y PB PR Y B-Y R-Y Y Cb Cr Y Pb Pr 17 Match the...
Owner's Manual
Page 20
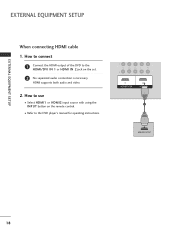
HDMI supports both audio and video. 2. How to use I Refer to the HDMI/DVI IN 1 or HDMI IN 2 jack on the remote control. I Select HDMI1 or HDMI2 input source with using the INPUT button on the set. 2 No separated audio connection is necessary. How to connect 1 Connect the HDMI output of the DVD to the DVD player's manual for operating instructions. 1 HDMI-DVD OUTPUT 18 EXTERNAL EQUIPMENT SETUP EXTERNAL EQUIPMENT SETUP When connecting HDMI cable 1.
HDMI supports both audio and video. 2. How to use I Refer to the HDMI/DVI IN 1 or HDMI IN 2 jack on the remote control. I Select HDMI1 or HDMI2 input source with using the INPUT button on the set. 2 No separated audio connection is necessary. How to connect 1 Connect the HDMI output of the DVD to the DVD player's manual for operating instructions. 1 HDMI-DVD OUTPUT 18 EXTERNAL EQUIPMENT SETUP EXTERNAL EQUIPMENT SETUP When connecting HDMI cable 1.
Owner's Manual
Page 21
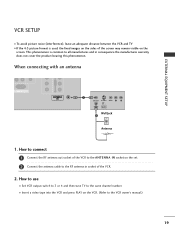
... the screen may remain visible on the VCR. (Refer to all manufactures and in socket of the VCR to the ANTENNA IN socket on the set. 2 Connect the antenna cable to the same channel number. This phenomenon is used; When connecting with an antenna R AUDIO L/MONO VIDEO EXTERNAL EQUIPMENT SETUP 1...), leave an adequate distance between the VCR and TV I If the 4:3 picture format is common to the VCR owner's manual.) 19 How to use I Set VCR output switch to 3 or 4 and then tune TV to the RF antenna in consequence the manufactures warranty does not cover the product bearing this...
... the screen may remain visible on the VCR. (Refer to all manufactures and in socket of the VCR to the ANTENNA IN socket on the set. 2 Connect the antenna cable to the same channel number. This phenomenon is used; When connecting with an antenna R AUDIO L/MONO VIDEO EXTERNAL EQUIPMENT SETUP 1...), leave an adequate distance between the VCR and TV I If the 4:3 picture format is common to the VCR owner's manual.) 19 How to use I Set VCR output switch to 3 or 4 and then tune TV to the RF antenna in consequence the manufactures warranty does not cover the product bearing this...
Owner's Manual
Page 22
... INPUT button on the VCR. (Refer to the VCR owner's manual.) I Select A V input source with a RCA cable 1. How to the AUDIO L/MONO jack of the set. 20
... INPUT button on the VCR. (Refer to the VCR owner's manual.) I Select A V input source with a RCA cable 1. How to the AUDIO L/MONO jack of the set. 20

Owner's Manual
Page 23
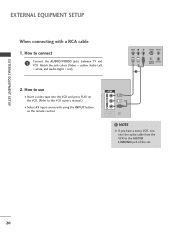
Match the jack colors. (Video = yellow, Audio Left = white, and Audio Right = red) 2. EXTERNAL EQUIPMENT SETUP OTHER A/V SOURCE SETUP 1. How to connect 1 Connect the AUDIO/VIDEO jacks between TV and external equipment. I Select A V input source with using the INPUT button on the remote control. T Camcorder Video Game Set VIDEO L R 1 21 How to use I Operate the corresponding external equipment.
Match the jack colors. (Video = yellow, Audio Left = white, and Audio Right = red) 2. EXTERNAL EQUIPMENT SETUP OTHER A/V SOURCE SETUP 1. How to connect 1 Connect the AUDIO/VIDEO jacks between TV and external equipment. I Select A V input source with using the INPUT button on the remote control. T Camcorder Video Game Set VIDEO L R 1 21 How to use I Operate the corresponding external equipment.
Owner's Manual
Page 24
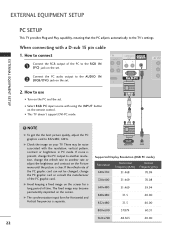
...00 800x600 37.879 60.31 1024x768 48.363 60.00 22 How to use I Turn on the set . If the refresh rate of the PC graphic card can not be noise associated with the resolution,...may be changed, change the refresh rate to the RGB IN (P C) jack on the PC and the set . When connecting with using the INPUT button on the Picture menu until the picture is clear. How to .../DVI) jack on the screen for Horizontal and Vertical frequencies is present, change the PC output to the TV's settings. G Check the image on the screen. AV OUT Connect the PC audio output to 852x480, 60Hz. If noise...
...00 800x600 37.879 60.31 1024x768 48.363 60.00 22 How to use I Turn on the set . If the refresh rate of the PC graphic card can not be noise associated with the resolution,...may be changed, change the refresh rate to the RGB IN (P C) jack on the PC and the set . When connecting with using the INPUT button on the Picture menu until the picture is clear. How to .../DVI) jack on the screen for Horizontal and Vertical frequencies is present, change the PC output to the TV's settings. G Check the image on the screen. AV OUT Connect the PC audio output to 852x480, 60Hz. If noise...
Owner's Manual
Page 25
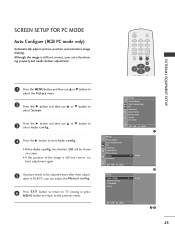
...MODE Auto Configure (RGB PC mode only) Automatically adjusts picture position and minimizes image shaking. Although the image is still not correct, your set is still not correct, try Auto adjustment again. 5 If picture needs to be shown on screen. • If the position of the...Advanced Aspect Ratio Picture Reset Screen XD Demo DE F G MENU 1 Picture Picture Mode Color Temperature XD Advanced Aspect Ratio Picture Reset Screen XD Demo G To Set DE F G MENU 2 Screen Auto config. has finished, O K will be adjusted more after Auto adjustment in RGB PC, you can adjust the Manual...
...MODE Auto Configure (RGB PC mode only) Automatically adjusts picture position and minimizes image shaking. Although the image is still not correct, your set is still not correct, try Auto adjustment again. 5 If picture needs to be shown on screen. • If the position of the...Advanced Aspect Ratio Picture Reset Screen XD Demo DE F G MENU 1 Picture Picture Mode Color Temperature XD Advanced Aspect Ratio Picture Reset Screen XD Demo G To Set DE F G MENU 2 Screen Auto config. has finished, O K will be adjusted more after Auto adjustment in RGB PC, you can adjust the Manual...
Owner's Manual
Page 26
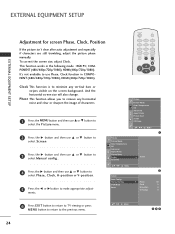
... Advanced Aspect Ratio Picture Reset Screen XD Demo DE F G MENU 1 Picture Picture Mode Color Temperature XD Advanced Aspect Ratio Picture Reset Screen XD Demo G To Set DE F G MENU Screen Auto Config. And the horizontal screen size will also change. It's not available to use D or E button to select Phase, Clock, H-position...
... Advanced Aspect Ratio Picture Reset Screen XD Demo DE F G MENU 1 Picture Picture Mode Color Temperature XD Advanced Aspect Ratio Picture Reset Screen XD Demo G To Set DE F G MENU Screen Auto Config. And the horizontal screen size will also change. It's not available to use D or E button to select Phase, Clock, H-position...

Owner's Manual
Page 27
... Advanced Aspect Ratio Picture Reset Screen XD Demo DE F G MENU 1 Picture Picture Mode Color Temperature XD Advanced Aspect Ratio Picture Reset Screen XD Demo G To Set DE F G MENU 2 Screen Auto Config. This function works in the following mode: RGB PC mode. VGA Mode Reset G 640x480 848x480 852x480 DE F G MENU 34 25...
... Advanced Aspect Ratio Picture Reset Screen XD Demo DE F G MENU 1 Picture Picture Mode Color Temperature XD Advanced Aspect Ratio Picture Reset Screen XD Demo G To Set DE F G MENU 2 Screen Auto Config. This function works in the following mode: RGB PC mode. VGA Mode Reset G 640x480 848x480 852x480 DE F G MENU 34 25...
Owner's Manual
Page 28
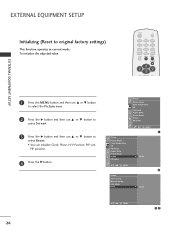
To initialize the adjusted value. VGA Mode Reset G To Set 26 DE F G MENU 34 POWER TV 1 4 7 INPUT 2 3 5 6 8 9 0 MUTE RATIO EXIT MENU ENTER CH VOL VOL CH EXTERNAL EQUIPMENT SETUP 1 Press the MENU button and then ... the Picture menu. 2 Press the G button and then use D or E button to select Screen. 3 Press the G button and then use D or E button to original factory settings) This function operates in current mode. Manual Config. EXTERNAL EQUIPMENT SETUP Initializing (Reset to select Reset. • You can initialize Clock, Phase, H/V-Position, PIP size...
To initialize the adjusted value. VGA Mode Reset G To Set 26 DE F G MENU 34 POWER TV 1 4 7 INPUT 2 3 5 6 8 9 0 MUTE RATIO EXIT MENU ENTER CH VOL VOL CH EXTERNAL EQUIPMENT SETUP 1 Press the MENU button and then ... the Picture menu. 2 Press the G button and then use D or E button to select Screen. 3 Press the G button and then use D or E button to original factory settings) This function operates in current mode. Manual Config. EXTERNAL EQUIPMENT SETUP Initializing (Reset to select Reset. • You can initialize Clock, Phase, H/V-Position, PIP size...

Owner's Manual
Page 29
NOTE G Component, RGB PC, HDMI input sources cannot be used for further details regarding that device's input settings. ! How to connect 1 Connect the input jack of the second TV or monitor 2 for AV out. EXTERNAL STEREO Use to connected either an external amplifier, ... IN OUTPUT ANT OUT SWITCH 1 EXTERNAL EQUIPMENT SETUP 1 27 See the Operating Manual of the stereos amplifier to the VARIABLE AUDIO OUT jacks on the set. 2 Set up the second TV or monitor. 1. AV OUT SETUP The TV has a special signal output capability which allows you to hook up your speakers through...
NOTE G Component, RGB PC, HDMI input sources cannot be used for further details regarding that device's input settings. ! How to connect 1 Connect the input jack of the second TV or monitor 2 for AV out. EXTERNAL STEREO Use to connected either an external amplifier, ... IN OUTPUT ANT OUT SWITCH 1 EXTERNAL EQUIPMENT SETUP 1 27 See the Operating Manual of the stereos amplifier to the VARIABLE AUDIO OUT jacks on the set. 2 Set up the second TV or monitor. 1. AV OUT SETUP The TV has a special signal output capability which allows you to hook up your speakers through...

