

Owner's Manual (English)
Page 1
LCD TV PLASMA TV OWNER'S MANUAL LCD TV MODELS 32LG30 37LG30 42LG30 42LGX 47LGX 32LG60 37LG60 42LG60 47LG60 52LG60 37LG50 42LG50 47LG50 52LG50 32LG70 42LG70 47LG70 52LG70 PLASMA TV MODELS 42PG25 50PG25 50PG60 60PG60 50PG70 60PG70 47LG90 Please read this manual carefully before operating your dealer when ... cover and quote this product meets the ENERGY STAR guidelines for future reference. ENERGY STAR is a set . As an ENERGY STAR Partner LG Electronics USA, Inc. Record model number and serial number of the set of power-saving guidelines issued by the U.S. P/NO : SAC30708020 ...
LCD TV PLASMA TV OWNER'S MANUAL LCD TV MODELS 32LG30 37LG30 42LG30 42LGX 47LGX 32LG60 37LG60 42LG60 47LG60 52LG60 37LG50 42LG50 47LG50 52LG50 32LG70 42LG70 47LG70 52LG70 PLASMA TV MODELS 42PG25 50PG25 50PG60 60PG60 50PG70 60PG70 47LG90 Please read this manual carefully before operating your dealer when ... cover and quote this product meets the ENERGY STAR guidelines for future reference. ENERGY STAR is a set . As an ENERGY STAR Partner LG Electronics USA, Inc. Record model number and serial number of the set of power-saving guidelines issued by the U.S. P/NO : SAC30708020 ...
Owner's Manual (English)
Page 2
... uses and can be determined by turning the equipment off and on a circuit different from LG Electronics. Increase the separation between the equipment and receiver. - NOTE TO CABLE/TV INSTALLER This reminder is encouraged to try to correct the interference by the party responsible for... void the user's authority to radio or television reception, which the receiver is connected. - Consult the dealer or an experienced radio/TV technician for a Class B digital device, pursuant to rain or moisture. The code provides guidelines for proper grounding and, in particular,...
... uses and can be determined by turning the equipment off and on a circuit different from LG Electronics. Increase the separation between the equipment and receiver. - NOTE TO CABLE/TV INSTALLER This reminder is encouraged to try to correct the interference by the party responsible for... void the user's authority to radio or television reception, which the receiver is connected. - Consult the dealer or an experienced radio/TV technician for a Class B digital device, pursuant to rain or moisture. The code provides guidelines for proper grounding and, in particular,...
Owner's Manual (English)
Page 4
... walked upon a dedicated circuit; SAFETY INSTRUCTIONS 11 Never touch this product near flammable objects such as gasoline or candles or expose the TV to direct air conditioning. 16 Do not expose to fall into the product, and do not drop onto the screen with something. 14... CAUTION concerning the Power Cord: It is recommend that appliances be certain. Pay particular attention to prevent possible electric shock (i.e. a TV with an exact replacement part by the hanging power and signal cables on or over the apparatus (e.g. Overloaded wall outlets, loose or damaged...
... walked upon a dedicated circuit; SAFETY INSTRUCTIONS 11 Never touch this product near flammable objects such as gasoline or candles or expose the TV to direct air conditioning. 16 Do not expose to fall into the product, and do not drop onto the screen with something. 14... CAUTION concerning the Power Cord: It is recommend that appliances be certain. Pay particular attention to prevent possible electric shock (i.e. a TV with an exact replacement part by the hanging power and signal cables on or over the apparatus (e.g. Overloaded wall outlets, loose or damaged...
Owner's Manual (English)
Page 5
... unplug the power cord and scrub gently with respect to proper grounding of the mast and supporting structure, grounding of the TV. 23 Ventilation Install your TV where there is turned off, unplugged and all cables have been removed. Section 810 of antenna discharge unit, connection to ...National Electrical Code, ANSI/NFPA 70 22 Moving Make sure the product is proper ventilation. provides information with a soft cloth to carry larger TVs. Do not press against voltage surges and built-up static charges. Be sure the antenna system is installed, follow the precautions below. ...
... unplug the power cord and scrub gently with respect to proper grounding of the mast and supporting structure, grounding of the TV. 23 Ventilation Install your TV where there is turned off, unplugged and all cables have been removed. Section 810 of antenna discharge unit, connection to ...National Electrical Code, ANSI/NFPA 70 22 Moving Make sure the product is proper ventilation. provides information with a soft cloth to carry larger TVs. Do not press against voltage surges and built-up static charges. Be sure the antenna system is installed, follow the precautions below. ...
Owner's Manual (English)
Page 6
... 81 Advanced Control - Expert Control 77 Picture Improvement Technology 78 Advanced Control - CONTENTS WARNING / CAUTION A SAFETY INSTRUCTIONS 1 FEATURE OF THIS TV 6 PREPARATION Accessories 7 Front Panel Information 8 Back Panel Information 10 Stand Instruction 13 VESA Wall Mounting 17 Cable Management 18 Desktop Pedestal Installation... Source Setup 36 PC Setup 37 USB Connection 46 Audio Out Connection 47 WATCHING TV / CHANNEL CONTROL Remote Control Functions 48 Turning On the TV 50 Channel Selection 50 Volume Adjustment 50 Quick Menu 51 Initial Setting 52 On-Screen...
... 81 Advanced Control - Expert Control 77 Picture Improvement Technology 78 Advanced Control - CONTENTS WARNING / CAUTION A SAFETY INSTRUCTIONS 1 FEATURE OF THIS TV 6 PREPARATION Accessories 7 Front Panel Information 8 Back Panel Information 10 Stand Instruction 13 VESA Wall Mounting 17 Cable Management 18 Desktop Pedestal Installation... Source Setup 36 PC Setup 37 USB Connection 46 Audio Out Connection 47 WATCHING TV / CHANNEL CONTROL Remote Control Functions 48 Turning On the TV 50 Channel Selection 50 Volume Adjustment 50 Quick Menu 51 Initial Setting 52 On-Screen...

Owner's Manual (English)
Page 7
...Sleep Timer Setting 104 Auto Shut-off Setting 105 PARENTAL CONTROL / RATINGS Set Password & Lock System 106 Channel Blocking 109 Movie & TV Rating 110 Downloadable Rating 115 External Input Blocking 116 Key lock 117 APPENDIX Troubleshooting 118 Maintenance 120 Product Specifications 121 Programming the Remote ... 129 Open Source License 136 5 Caption Option 100 TIME SETTING Clock Setting - User Mode 90 Clear Voice 91 Balance 92 TV Speakers On/Off Setup 93 Audio Reset 94 Stereo/SAP Broadcast Setup 95 Audio Language 96 On-Screen Menus Language Selection 97 Caption Mode...
...Sleep Timer Setting 104 Auto Shut-off Setting 105 PARENTAL CONTROL / RATINGS Set Password & Lock System 106 Channel Blocking 109 Movie & TV Rating 110 Downloadable Rating 115 External Input Blocking 116 Key lock 117 APPENDIX Troubleshooting 118 Maintenance 120 Product Specifications 121 Programming the Remote ... 129 Open Source License 136 5 Caption Option 100 TIME SETTING Clock Setting - User Mode 90 Clear Voice 91 Balance 92 TV Speakers On/Off Setup 93 Audio Reset 94 Stereo/SAP Broadcast Setup 95 Audio Language 96 On-Screen Menus Language Selection 97 Caption Mode...
Owner's Manual (English)
Page 8
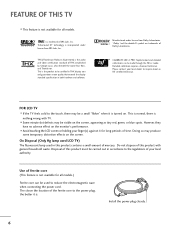
...the power plug, the better it is not available for all models. Use of time. Install the power plug closely. 6 FOR LCD TV I Avoid touching the LCD screen or holding your local authority. Doing so may produce some temporary distortion effects on the monitor's performance. On Disposal (Only ...Hg lamp used LCD TV) The fluorescent lamp used to be certified in THX display area and guarantees screen quality that exceeds the display standard specification in ...
...the power plug, the better it is not available for all models. Use of time. Install the power plug closely. 6 FOR LCD TV I Avoid touching the LCD screen or holding your local authority. Doing so may produce some temporary distortion effects on the monitor's performance. On Disposal (Only ...Hg lamp used LCD TV) The fluorescent lamp used to be certified in THX display area and guarantees screen quality that exceeds the display standard specification in ...
Owner's Manual (English)
Page 9
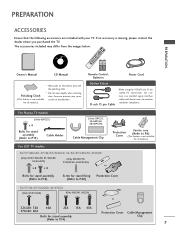
... models.) For LCD TV models 32/37/42LG30, 37/42/47/52LG50, 32/42/47/52LG70, 47LG90 (Only 32/37/42LG30, 37/42LG50, 32/42LG70) (Only 32LG30/70, 37LG30/50, 42LG30/50) or x4 x4 Bolts for stand assembly (Refer to P.16) Screw for stand fixing (Refer to P.20) Protection Cover 32/37/42/47.../52LG60, 42/47LGX (Only 32/37LG60) (Only 42LG60, 42LGX) or 32LG60: 3EA 4EA 2EA 1EA 4EA 37LG60: 4EA Protection Cover Cable Management Bolts for all models.) Remote Control, Batteries ...
... models.) For LCD TV models 32/37/42LG30, 37/42/47/52LG50, 32/42/47/52LG70, 47LG90 (Only 32/37/42LG30, 37/42LG50, 32/42LG70) (Only 32LG30/70, 37LG30/50, 42LG30/50) or x4 x4 Bolts for stand assembly (Refer to P.16) Screw for stand fixing (Refer to P.20) Protection Cover 32/37/42/47.../52LG60, 42/47LGX (Only 32/37LG60) (Only 42LG60, 42LGX) or 32LG60: 3EA 4EA 2EA 1EA 4EA 37LG60: 4EA Protection Cover Cable Management Bolts for all models.) Remote Control, Batteries ...
Owner's Manual (English)
Page 10
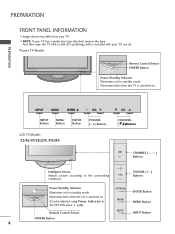
INPUT INPUT MENU INPUT MENU ENTER VOL MENU ENTER INPUT Button ENTER VOL MENU Button VOL CH ENTER VOLUME Button (-, +) Buttons CH LCD TV Models 32/42/47/52LG70, 47LG90 CH CHANNEL (E,D)Buttons CH CHANNEL ( , ) Buttons Intelligent Sensor Adjusts picture according to the surrounding VOL conditions VOLUME (+, -) Buttons Power/Standby Indicator ...
INPUT INPUT MENU INPUT MENU ENTER VOL MENU ENTER INPUT Button ENTER VOL MENU Button VOL CH ENTER VOLUME Button (-, +) Buttons CH LCD TV Models 32/42/47/52LG70, 47LG90 CH CHANNEL (E,D)Buttons CH CHANNEL ( , ) Buttons Intelligent Sensor Adjusts picture according to the surrounding VOL conditions VOLUME (+, -) Buttons Power/Standby Indicator ...
Owner's Manual (English)
Page 11
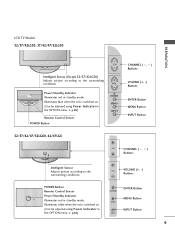
...G p.85) Remote Control Sensor POWER Button ENTER MENU INPUT CHANNEL ( , ) Buttons VOLUME (+, -) Buttons ENTER Button MENU Button INPUT Button 32/37/42/47/52LG60, 42/47LGX CH CHANNEL ( , ) Buttons Intelligent Sensor Adjusts picture according to the surrounding conditions VOL Power/Standby Indicator ... when the set is switched on . (Can be adjusted using Power Indicator in standby mode. LCD TV Models 32/37/42LG30, 37/42/47/52LG50 PREPARATION CH Intelligent Sensor (Except 32/37/42LG30) Adjusts picture according to the surrounding conditions. G p.85) ENTER MENU INPUT ENTER ...
...G p.85) Remote Control Sensor POWER Button ENTER MENU INPUT CHANNEL ( , ) Buttons VOLUME (+, -) Buttons ENTER Button MENU Button INPUT Button 32/37/42/47/52LG60, 42/47LGX CH CHANNEL ( , ) Buttons Intelligent Sensor Adjusts picture according to the surrounding conditions VOL Power/Standby Indicator ... when the set is switched on . (Can be adjusted using Power Indicator in standby mode. LCD TV Models 32/37/42LG30, 37/42/47/52LG50 PREPARATION CH Intelligent Sensor (Except 32/37/42LG30) Adjusts picture according to the surrounding conditions. G p.85) ENTER MENU INPUT ENTER ...

Owner's Manual (English)
Page 12
...an optical and/or coaxial connection. Uses a D-sub 15 pin cable (VGA cable). Accepts DVI video using an adapter or HDMI to operate the TV on DC power. 10 Caution: Never attempt to DVI cable (not included). 2 COMPONENT IN Analog Connection. R R PREPARATION BACK PANEL INFORMATION I ...Image shown may differ from your TV. Note: In standby mode, these ports do not work. 8 AUDIO OUT Analog audio output for use with AC power. AUDIO (RGB/DVI) 1/8" ...
...an optical and/or coaxial connection. Uses a D-sub 15 pin cable (VGA cable). Accepts DVI video using an adapter or HDMI to operate the TV on DC power. 10 Caution: Never attempt to DVI cable (not included). 2 COMPONENT IN Analog Connection. R R PREPARATION BACK PANEL INFORMATION I ...Image shown may differ from your TV. Note: In standby mode, these ports do not work. 8 AUDIO OUT Analog audio output for use with AC power. AUDIO (RGB/DVI) 1/8" ...
Owner's Manual (English)
Page 15
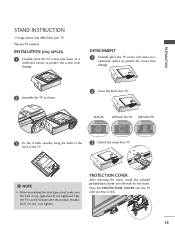
... included protection cover over tighten. PREPARATION STAND INSTRUCTION I Image shown may differ from TV. ! NOTE G When assembling the desk type stand, make sure the bolt is fully tightened (If not tightened fully, the TV can tilt forward after the product installation). Do not over the hole for the ...stand. DETACHMENT 1 Carefully place the TV screen side down on a cushioned surface to protect the screen from damage. Press...
... included protection cover over tighten. PREPARATION STAND INSTRUCTION I Image shown may differ from TV. ! NOTE G When assembling the desk type stand, make sure the bolt is fully tightened (If not tightened fully, the TV can tilt forward after the product installation). Do not over the hole for the ...stand. DETACHMENT 1 Carefully place the TV screen side down on a cushioned surface to protect the screen from damage. Press...
Owner's Manual (English)
Page 16
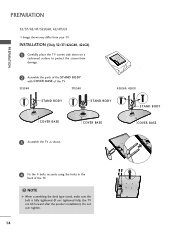
...). PREPARATION PREPARATION 32/37/42/47/52LG60, 42/47LGX I Image shown may differ from damage. 2 Assemble the parts of the STAND BODY with COVER BASE of the TV. 32LG60 37LG60 42LG60, 42LGX STAND BODY STAND BODY STAND BODY COVER BASE COVER BASE COVER BASE 3 Assemble the TV as shown. ...4 Fix the 4 bolts securely using the holes in the back of the TV. ! INSTALLATION (Only 32/37/42LG60, 42LGX) 1 Carefully place the TV screen side down ...
...). PREPARATION PREPARATION 32/37/42/47/52LG60, 42/47LGX I Image shown may differ from damage. 2 Assemble the parts of the STAND BODY with COVER BASE of the TV. 32LG60 37LG60 42LG60, 42LGX STAND BODY STAND BODY STAND BODY COVER BASE COVER BASE COVER BASE 3 Assemble the TV as shown. ...4 Fix the 4 bolts securely using the holes in the back of the TV. ! INSTALLATION (Only 32/37/42LG60, 42LGX) 1 Carefully place the TV screen side down ...
Owner's Manual (English)
Page 17
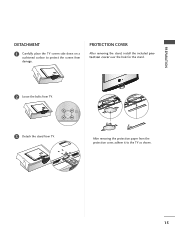
PREPARATION DETACHMENT 1 Carefully place the TV screen side down on a cushioned surface to the TV as shown. 15 After removing the protection paper from the protection cover, adhere it to protect the screen from TV. PROTECTION COVER After removing the stand, install the included p r otection cover over the hole for the stand. 2 Loose the bolts from TV. 3 Detach the stand from damage.
PREPARATION DETACHMENT 1 Carefully place the TV screen side down on a cushioned surface to the TV as shown. 15 After removing the protection paper from the protection cover, adhere it to protect the screen from TV. PROTECTION COVER After removing the stand, install the included p r otection cover over the hole for the stand. 2 Loose the bolts from TV. 3 Detach the stand from damage.
Owner's Manual (English)
Page 18
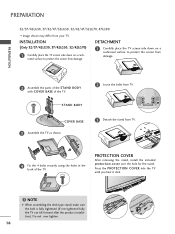
... fully tightened (If not tightened fully, the TV can tilt forward after the product installation). PREPARATION PREPARATION 32/37/42LG30, 37/42/47/52LG50, 32/42/47/52LG70, 47LG90 I Image shown may differ from TV. DETACHMENT 1 Carefully place the TV screen side down on a cushioned surface to ...After removing the stand, install the included protection cover over tighten. 16 INSTALLATION (Only 32/37/42LG30, 37/42LG50, 32/42LG70) 1 Carefully place the TV screen side down on a cush- COVER BASE 3 Assemble the TV as shown. 3 Detach the stand from damage. 2 Assemble the parts of the STAND...
... fully tightened (If not tightened fully, the TV can tilt forward after the product installation). PREPARATION PREPARATION 32/37/42LG30, 37/42/47/52LG50, 32/42/47/52LG70, 47LG90 I Image shown may differ from TV. DETACHMENT 1 Carefully place the TV screen side down on a cushioned surface to ...After removing the stand, install the included protection cover over tighten. 16 INSTALLATION (Only 32/37/42LG30, 37/42LG50, 32/42LG70) 1 Carefully place the TV screen side down on a cush- COVER BASE 3 Assemble the TV as shown. 3 Detach the stand from damage. 2 Assemble the parts of the STAND...
Owner's Manual (English)
Page 19
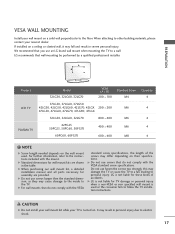
LG recommends that you use fasten the screws too strongly, this may damage the TV or cause the TV to other building materials, please contact your nearest dealer. A B Product LCD TV PLASMA TV Model 32LG30, 32LG60, 32LG70 VESA (A * B) 200 * 100 37LG30, 37LG60, 37LG50 42LG30, 42LG50, 42LG60, 42LG70, 42LGX 200 * 200 47LG50,...kit, a detailed installation manual and all parts necessary for these kinds of the screws may cause damage to the inside to the TV. LG is used . It may fall , leading to personal injury. When attaching to a fall and result in severe personal injury. ...
LG recommends that you use fasten the screws too strongly, this may damage the TV or cause the TV to other building materials, please contact your nearest dealer. A B Product LCD TV PLASMA TV Model 32LG30, 32LG60, 32LG70 VESA (A * B) 200 * 100 37LG30, 37LG60, 37LG50 42LG30, 42LG50, 42LG60, 42LG70, 42LGX 200 * 200 47LG50,...kit, a detailed installation manual and all parts necessary for these kinds of the screws may cause damage to the inside to the TV. LG is used . It may fall , leading to personal injury. When attaching to a fall and result in severe personal injury. ...

Owner's Manual (English)
Page 20
... HOLDER, install it upward. CABLE HOLDER CABLE MANAGEMENT CLIP How to remove the CABLE MANAGEMENT CLIP 42PG25 G First, press the cable management. Plasma TV Models 1 Connect the cables as shown. Hold the CABLE MANAGEMENT CLIP with both hands and pull it upward. 50PG25, 50/60PG60, 50/60PG70 ...Hold the CABLE MANAGEMENT CLIP with both hands and pull it as shown and bundle the cables. If the TV is dropped, you may be injured or the product may differ from TV by pressing two latches. ! PREPARATION 2 Install the CABLE MANAGEMENT CLIP as necessary. To connect additional equipment...
... HOLDER, install it upward. CABLE HOLDER CABLE MANAGEMENT CLIP How to remove the CABLE MANAGEMENT CLIP 42PG25 G First, press the cable management. Plasma TV Models 1 Connect the cables as shown. Hold the CABLE MANAGEMENT CLIP with both hands and pull it upward. 50PG25, 50/60PG60, 50/60PG70 ...Hold the CABLE MANAGEMENT CLIP with both hands and pull it as shown and bundle the cables. If the TV is dropped, you may be injured or the product may differ from TV by pressing two latches. ! PREPARATION 2 Install the CABLE MANAGEMENT CLIP as necessary. To connect additional equipment...
Owner's Manual (English)
Page 21
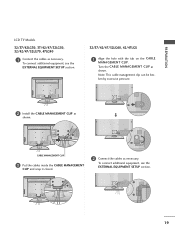
PREPARATION LCD TV Models 32/37/42LG30, 37/42/47/52LG50, 32/42/47/52LG70, 47LG90 1 Connect the cables as shown. Note: This cable management clip can be bro- ken by excessive pressure. 2 Install the CABLE MANAGEMENT ... snap it closed. 2 Connect the cables as shown. Turn the CABLE MANAGEMENT CLIP as necessary. To connect additional equipment, see the EXTERNAL EQUIPMENT SETUP section. 32/37/42/47/52LG60, 42/47LGX 1 Align the hole with the tab on the CABLE MANAGEMENT CLIP. To connect additional equipment, see the EXTERNAL EQUIPMENT...
PREPARATION LCD TV Models 32/37/42LG30, 37/42/47/52LG50, 32/42/47/52LG70, 47LG90 1 Connect the cables as shown. Note: This cable management clip can be bro- ken by excessive pressure. 2 Install the CABLE MANAGEMENT ... snap it closed. 2 Connect the cables as shown. Turn the CABLE MANAGEMENT CLIP as necessary. To connect additional equipment, see the EXTERNAL EQUIPMENT SETUP section. 32/37/42/47/52LG60, 42/47LGX 1 Align the hole with the tab on the CABLE MANAGEMENT CLIP. To connect additional equipment, see the EXTERNAL EQUIPMENT...
Owner's Manual (English)
Page 22
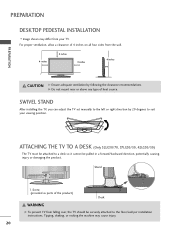
...rocking the machine may differ from your viewing position. G Do not mount near or above any type of the product) Desk WARNING G To prevent TV from the wall. 4 inches 4 inches 4 inches 4 inches CAUTION G Ensure adequate ventilation by 20 degrees to a desk so it cannot be...right direction by following the clearance recommendations. For proper ventilation, allow a clearance of 4 inches on all four sides from falling over, the TV should be pulled in a forward/backward direction, potentially causing injury or damaging the product. Stand 1-Screw (provided as parts of heat source....
...rocking the machine may differ from your viewing position. G Do not mount near or above any type of the product) Desk WARNING G To prevent TV from the wall. 4 inches 4 inches 4 inches 4 inches CAUTION G Ensure adequate ventilation by 20 degrees to a desk so it cannot be...right direction by following the clearance recommendations. For proper ventilation, allow a clearance of 4 inches on all four sides from falling over, the TV should be pulled in a forward/backward direction, potentially causing injury or damaging the product. Stand 1-Screw (provided as parts of heat source....
Owner's Manual (English)
Page 23
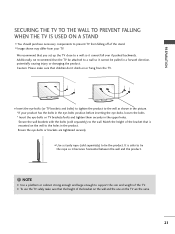
...hang from your product has the bolts in the eye-bolts position before inserting the eye-bolts, loosen the bolts. * Insert the eye-bolts or TV brackets/bolts and tighten them securely in the product. I Use a sturdy rope (sold separately) to the holes in the upper holes. Caution: Please... or cabinet strong enough and large enough to a wall so it becomes horizontal between the wall and the product. ! I Insert the eye-bolts (or TV brackets and bolts) to tighten the product to tie the rope so it cannot fall over if pushed backwards. I You should purchase necessary components to...
...hang from your product has the bolts in the eye-bolts position before inserting the eye-bolts, loosen the bolts. * Insert the eye-bolts or TV brackets/bolts and tighten them securely in the product. I Use a sturdy rope (sold separately) to the holes in the upper holes. Caution: Please... or cabinet strong enough and large enough to a wall so it becomes horizontal between the wall and the product. ! I Insert the eye-bolts (or TV brackets and bolts) to tighten the product to tie the rope so it cannot fall over if pushed backwards. I You should purchase necessary components to...


