Specification (English)
Page 2
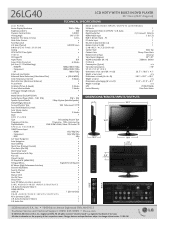
...S Dimensions w/out stand (W x H x D) 26.3" x 18.0" x 4.1" Weight w/out stand n/a Dimensions w/stand (W x H x D) 26.3" x 20.7" x 10.5" Weight w/stand n/a ...26.3" 18.0" 10.5" 3.9" (100mm) N/A 7.9" (200mm) 20.7" LG Electronics U.S.A., Inc. • 1000 Sylvan Avenue Englewood Cliffs, NJ 07632 Customer Service and Technical Support: (800) 243-0000 • LGusa.com © 2008 LG... Electronics U.S.A., Inc., Englewood Cliffs, NJ. All other trademarks are the property of LG...26LG40 LCD HDTV WITH BUILT-IN DVD PLAYER 26" Class (26.0" diagonal) TECHNICAL SPECIFICATIONS LCD...LG...
...S Dimensions w/out stand (W x H x D) 26.3" x 18.0" x 4.1" Weight w/out stand n/a Dimensions w/stand (W x H x D) 26.3" x 20.7" x 10.5" Weight w/stand n/a ...26.3" 18.0" 10.5" 3.9" (100mm) N/A 7.9" (200mm) 20.7" LG Electronics U.S.A., Inc. • 1000 Sylvan Avenue Englewood Cliffs, NJ 07632 Customer Service and Technical Support: (800) 243-0000 • LGusa.com © 2008 LG... Electronics U.S.A., Inc., Englewood Cliffs, NJ. All other trademarks are the property of LG...26LG40 LCD HDTV WITH BUILT-IN DVD PLAYER 26" Class (26.0" diagonal) TECHNICAL SPECIFICATIONS LCD...LG...

Owner's Manual (English)
Page 1
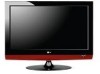
CLASS 1M VISIBLE AND INVISIBLE LASER RADIATION WHEN OPEN DO NOT VIEW DIRECTLY WITH OPTICAL INSTRUMENTS P/NO : SAC31712401 (0810-REV06) www.lgusa.com / www.lg.ca Write the model number and serial number from the label on the back cabinet on the front or back of this manual carefully before operating your set and retain it for future reference. CAUTION - LCD TV / DVD Combo OWNER'S MANUAL 26LG40 32LG40 Please read this manual.
CLASS 1M VISIBLE AND INVISIBLE LASER RADIATION WHEN OPEN DO NOT VIEW DIRECTLY WITH OPTICAL INSTRUMENTS P/NO : SAC31712401 (0810-REV06) www.lgusa.com / www.lg.ca Write the model number and serial number from the label on the back cabinet on the front or back of this manual carefully before operating your set and retain it for future reference. CAUTION - LCD TV / DVD Combo OWNER'S MANUAL 26LG40 32LG40 Please read this manual.

Owner's Manual (English)
Page 4
... a three-prong grounded AC outlet). Do not overload wall outlets. Periodically examine the cord of this owner's manual to be connected to telephone wires, lightening rods, or gas pipes. Pay particular attention to unplug the TV. 15 WARNING - Do not pull on the back of these conditions could result in . Do not...
... a three-prong grounded AC outlet). Do not overload wall outlets. Periodically examine the cord of this owner's manual to be connected to telephone wires, lightening rods, or gas pipes. Pay particular attention to unplug the TV. 15 WARNING - Do not pull on the back of these conditions could result in . Do not...
Owner's Manual (English)
Page 6
...Ratio) Control 62 Preset Picture Settings - Picture Mode - Expert Control 67 Picture Improvement Technology 68 Advanced Control - Add / Delete Channel (Manual Tuning 39 - Picture Mode - Picture Mode - Channel Editing 40 4 Input List 41 Input Label 42 AV Mode 43 SIMPLINK 44 DVD ...On TV 34 Channel Selection 34 Volume Adjustment 34 Quick Menu / Favorite Channel Setup 35 Initial Setting 36 On-Screen Menus Selection 37 Channel Setup - Preset 64 - Parental Control Setup 51 - Black (Darkness) Level 69 Advanced Control - Color Tone - Preset 65 Manual Picture...
...Ratio) Control 62 Preset Picture Settings - Picture Mode - Expert Control 67 Picture Improvement Technology 68 Advanced Control - Add / Delete Channel (Manual Tuning 39 - Picture Mode - Picture Mode - Channel Editing 40 4 Input List 41 Input Label 42 AV Mode 43 SIMPLINK 44 DVD ...On TV 34 Channel Selection 34 Volume Adjustment 34 Quick Menu / Favorite Channel Setup 35 Initial Setting 36 On-Screen Menus Selection 37 Channel Setup - Preset 64 - Parental Control Setup 51 - Black (Darkness) Level 69 Advanced Control - Color Tone - Preset 65 Manual Picture...
Owner's Manual (English)
Page 7
...Broadcasting System Captions 84 - Auto Clock Setup 87 Manual Clock Setup 88 Auto On/Off Time Setting 89 Sleep Timer Setting 90 Auto Shut-off Setting 91 PARENTAL CONTROL / RATINGS Set Password & Lock System 92 Channel Blocking 95 Movie & TV Rating 96 Downloadable Rating 101 External Input Blocking ... Leveler (Auto Volume) 74 Clear Voice 75 Preset Sound Setting (Sound Mode 76 Sound Setting Adjustment - User Mode 77 Balance 78 TV Speakers On/Off Setup 79 Audio Reset 80 Stereo/SAP Broadcasts Setup 81 Audio Language 82 On-Screen Menus Language Selection 83 Caption Mode -
...Broadcasting System Captions 84 - Auto Clock Setup 87 Manual Clock Setup 88 Auto On/Off Time Setting 89 Sleep Timer Setting 90 Auto Shut-off Setting 91 PARENTAL CONTROL / RATINGS Set Password & Lock System 92 Channel Blocking 95 Movie & TV Rating 96 Downloadable Rating 101 External Input Blocking ... Leveler (Auto Volume) 74 Clear Voice 75 Preset Sound Setting (Sound Mode 76 Sound Setting Adjustment - User Mode 77 Balance 78 TV Speakers On/Off Setup 79 Audio Reset 80 Stereo/SAP Broadcasts Setup 81 Audio Language 82 On-Screen Menus Language Selection 83 Caption Mode -
Owner's Manual (English)
Page 9
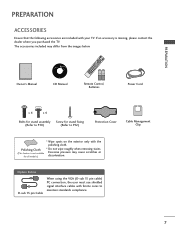
... SLOW - Polishing Cloth (This feature is missing, please contact the dealer where you purchased the TV. Option Extras D-sub 15 pin Cable When using the VGA (D-sub 15 pin cable) PC ...connection, the user must use shielded signal interface cables with your TV. Q. PREPARATION ROTA ROTA PREPARATION ACCESSORIES Ensure that the following accessories ... 2 3 SUBTITLE A-B ANGLE 8 6 AUDIO TITLE MENU CH P A G E AV MODE 0 9 FLASHRBEKTURN RETURN ROTAT TV E- If an accessory is not available for stand fixing (Refer to P.10) (Refer to maintain standards compliance. 7 SLOW...
... SLOW - Polishing Cloth (This feature is missing, please contact the dealer where you purchased the TV. Option Extras D-sub 15 pin Cable When using the VGA (D-sub 15 pin cable) PC ...connection, the user must use shielded signal interface cables with your TV. Q. PREPARATION ROTA ROTA PREPARATION ACCESSORIES Ensure that the following accessories ... 2 3 SUBTITLE A-B ANGLE 8 6 AUDIO TITLE MENU CH P A G E AV MODE 0 9 FLASHRBEKTURN RETURN ROTAT TV E- If an accessory is not available for stand fixing (Refer to P.10) (Refer to maintain standards compliance. 7 SLOW...
Owner's Manual (English)
Page 14
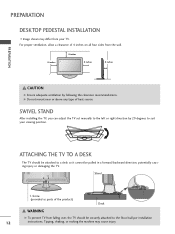
... to a desk so it cannot be securely attached to the floor/wall per installation 12 instructions. SWIVEL STAND After installing the TV, you can adjust the TV set manually to suit your TV. Tipping, shaking, or rocking the machine may differ from your viewing position. G Do not mount near or above any type of...
... to a desk so it cannot be securely attached to the floor/wall per installation 12 instructions. SWIVEL STAND After installing the TV, you can adjust the TV set manually to suit your TV. Tipping, shaking, or rocking the machine may differ from your viewing position. G Do not mount near or above any type of...
Owner's Manual (English)
Page 15
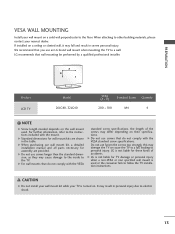
... for TV damage or personal injury when a non-VESA or non specified wall mount is turned on. G For wall mounts that do not comply with the mount. For further information, refer to a wall. G When purchasing our wall mount kit, a detailed installation manual and all... with the VESA standard screw specifications. It may damage the TV or cause the TV to the TV. LG is not liable for assembly are shown in the table. We recommend that wall mounting be performed by a qualified professional installer. A B Product LCD TV Model 26LG40, 32LG40 VESA (A * B) Standard Screw Quantity 200 *...
... for TV damage or personal injury when a non-VESA or non specified wall mount is turned on. G For wall mounts that do not comply with the mount. For further information, refer to a wall. G When purchasing our wall mount kit, a detailed installation manual and all... with the VESA standard screw specifications. It may damage the TV or cause the TV to the TV. LG is not liable for assembly are shown in the table. We recommend that wall mounting be performed by a qualified professional installer. A B Product LCD TV Model 26LG40, 32LG40 VESA (A * B) Standard Screw Quantity 200 *...
Owner's Manual (English)
Page 18
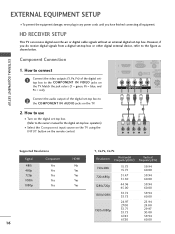
.... (Refer to the owner's manual for the digital set -top box to the figure as shown below. Match the jack colors (Y = green, PB = blue, and PR = red). HD RECEIVER SETUP This TV can receive digital over-the-air... signals without an external digital set -top box or other digital external device, refer to the COMPONENT IN AUDIO jacks on the TV. Component Connection 1. RGB(PC) AUDIO A (RGB/DVI) 2 RS-232C 1 REMOTE (CONTROL & S CONTROL IN VIDEO AUDIO... 45.00 59.94 60.00 1920x1080i 33.72 33.75 59.94 60.00 ( ) 1920x1080p 26.97 27.00 33.71 33.75 67.43 67.50 23.94 24.00 29.97 30...
.... (Refer to the owner's manual for the digital set -top box to the figure as shown below. Match the jack colors (Y = green, PB = blue, and PR = red). HD RECEIVER SETUP This TV can receive digital over-the-air... signals without an external digital set -top box or other digital external device, refer to the COMPONENT IN AUDIO jacks on the TV. Component Connection 1. RGB(PC) AUDIO A (RGB/DVI) 2 RS-232C 1 REMOTE (CONTROL & S CONTROL IN VIDEO AUDIO... 45.00 59.94 60.00 1920x1080i 33.72 33.75 59.94 60.00 ( ) 1920x1080p 26.97 27.00 33.71 33.75 67.43 67.50 23.94 24.00 29.97 30...
Owner's Manual (English)
Page 19
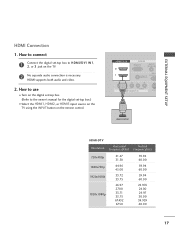
... -top box.) I Select the HDMI1, HDMI2, or HDMI3 input source on the TV using the INPUT button on the TV. 2 No separate audio connection is necessary. HDMI Connection 1. How to connect 1 Connect the digital set-top box to the owner's manual for the digital set -top box. (Refer to HDMI/DVI IN1, 2, or....47 31.50 59.94 60.00 1280x720p 44.96 45.00 59.94 60.00 1920x1080i 33.72 33.75 59.94 60.00 26.97 23.976 27.00 24.00 ( ) 1920x1080p 33.71 33.75 29.97 30.00 67.432 59.939 67.50 60.00 17...
... -top box.) I Select the HDMI1, HDMI2, or HDMI3 input source on the TV using the INPUT button on the TV. 2 No separate audio connection is necessary. HDMI Connection 1. How to connect 1 Connect the digital set-top box to the owner's manual for the digital set -top box. (Refer to HDMI/DVI IN1, 2, or....47 31.50 59.94 60.00 1280x720p 44.96 45.00 59.94 60.00 1920x1080i 33.72 33.75 59.94 60.00 26.97 23.976 27.00 24.00 ( ) 1920x1080p 33.71 33.75 29.97 30.00 67.432 59.939 67.50 60.00 17...
Owner's Manual (English)
Page 20
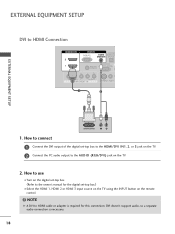
... on the digital set -top box to the HDMI/DVI IN1, 2, or 3 jack on the TV. 2 Connect the PC audio output to the AUDIO (RGB/DVI) jack on the remote control. ! NOTE G A DVI to the owner's manual for this connection. How to connect 1 Connect the DVI output of the digital set -top... IN S-VIDEO VIDEO ( ) 1 2 EXTERNAL EQUIPMENT SETUP DVI-DTV OUTPUT L R 1. EXTERNAL EQUIPMENT SETUP DVI to use I Select the HDMI 1, HDMI 2 or HDMI 3 input source on the TV using the INPUT button on the...
... on the digital set -top box to the HDMI/DVI IN1, 2, or 3 jack on the TV. 2 Connect the PC audio output to the AUDIO (RGB/DVI) jack on the remote control. ! NOTE G A DVI to the owner's manual for this connection. How to connect 1 Connect the DVI output of the digital set -top... IN S-VIDEO VIDEO ( ) 1 2 EXTERNAL EQUIPMENT SETUP DVI-DTV OUTPUT L R 1. EXTERNAL EQUIPMENT SETUP DVI to use I Select the HDMI 1, HDMI 2 or HDMI 3 input source on the TV using the INPUT button on the...
Owner's Manual (English)
Page 21
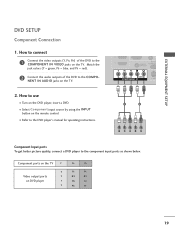
...the jack colors (Y = green, PB = blue, and PR = red). 2 Connect the audio outputs of the DVD to the DVD player's manual for operating instructions. Component ports on the TV Y Y Video output ports Y on the remote control. EXTERNAL EQUIPMENT SETUP 2 RS-23 1 REMOTE (CONTROL & CONTROL IN VIDEO AUDIO COMPONENT IN...VIDE ( ) 1 2 Y PB PR L R Component Input ports To get better picture quality, connect a DVD player to the COMPONENT IN AUDIO jacks on the TV. How to connect 1 Connect the video outputs (Y, PB, PR) of the DVD to the component input ports as shown below.
...the jack colors (Y = green, PB = blue, and PR = red). 2 Connect the audio outputs of the DVD to the DVD player's manual for operating instructions. Component ports on the TV Y Y Video output ports Y on the remote control. EXTERNAL EQUIPMENT SETUP 2 RS-23 1 REMOTE (CONTROL & CONTROL IN VIDEO AUDIO COMPONENT IN...VIDE ( ) 1 2 Y PB PR L R Component Input ports To get better picture quality, connect a DVD player to the COMPONENT IN AUDIO jacks on the TV. How to connect 1 Connect the video outputs (Y, PB, PR) of the DVD to the component input ports as shown below.
Owner's Manual (English)
Page 22
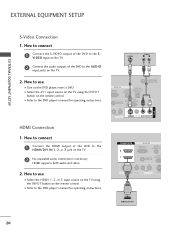
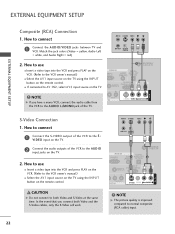
I Refer to the DVD player's manual for operating instructions. I Select the A V 1 input source on the TV using the INPUT button on the DVD player, insert a DVD. S-VIDEO AUDIO L R RGB IN GB(PC) 1 DIGITAL AUDIO AUDIO OUT (RGB/DVI) OPTICAL ANTENNA/... use I Turn on the remote control. HDMI supports both audio and video. ( ) 2. I Select the HDMI 1, 2, or 3 input source on the TV using the INPUT button on the TV. 2. How to the AUDIO input jacks on the remote control. EXTERNAL EQUIPMENT SETUP EXTERNAL EQUIPMENT SETUP S-Video Connection 1. How to connect 1 Connect...
I Refer to the DVD player's manual for operating instructions. I Select the A V 1 input source on the TV using the INPUT button on the DVD player, insert a DVD. S-VIDEO AUDIO L R RGB IN GB(PC) 1 DIGITAL AUDIO AUDIO OUT (RGB/DVI) OPTICAL ANTENNA/... use I Turn on the remote control. HDMI supports both audio and video. ( ) 2. I Select the HDMI 1, 2, or 3 input source on the TV using the INPUT button on the TV. 2. How to the AUDIO input jacks on the remote control. EXTERNAL EQUIPMENT SETUP EXTERNAL EQUIPMENT SETUP S-Video Connection 1. How to connect 1 Connect...

Owner's Manual (English)
Page 23
... to the RF antenna in socket of the screen may remain visible on the screen. I Set VCR output switch to 3 or 4 and then tune TV to the same channel number. Antenna Connection ANTENNA/ CABLE IN DIGITAL AUDIO AUDIO OUT (RGB/DVI) OPTICAL 1 RS-232C IN AUDIO OUT TE (CONTROL... 2 Antenna 1. EXTERNAL EQUIPMENT SETUP VCR SETUP ( ) I Insert a video tape into the VCR and press PLAY on the VCR. (Refer to the VCR owner's manual.) ( ) 21 This phenomenon is common to use I If the 4:3 picture format is not covered by warranty. I To avoid picture noise (interference), leave an adequate...
... to the RF antenna in socket of the screen may remain visible on the screen. I Set VCR output switch to 3 or 4 and then tune TV to the same channel number. Antenna Connection ANTENNA/ CABLE IN DIGITAL AUDIO AUDIO OUT (RGB/DVI) OPTICAL 1 RS-232C IN AUDIO OUT TE (CONTROL... 2 Antenna 1. EXTERNAL EQUIPMENT SETUP VCR SETUP ( ) I Insert a video tape into the VCR and press PLAY on the VCR. (Refer to the VCR owner's manual.) ( ) 21 This phenomenon is common to use I If the 4:3 picture format is not covered by warranty. I To avoid picture noise (interference), leave an adequate...
Owner's Manual (English)
Page 24
... use I Insert a video tape into the VCR and press PLAY on the VCR. (Refer to the VCR owner's manual.) I If connected to the VCR owner's manual.) I Select the A V 1 input source on the TV using the INPUT button on the remote control. How to use I Insert a video tape into the VCR and press... PLAY on the VCR. (Refer to AV IN2, select AV2 input source on the TV. 2. I Select the A V 1 input source ...
... use I Insert a video tape into the VCR and press PLAY on the VCR. (Refer to the VCR owner's manual.) I If connected to the VCR owner's manual.) I Select the A V 1 input source on the TV using the INPUT button on the remote control. How to use I Insert a video tape into the VCR and press... PLAY on the VCR. (Refer to AV IN2, select AV2 input source on the TV. 2. I Select the A V 1 input source ...
Owner's Manual (English)
Page 26
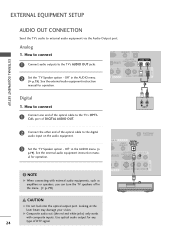
... in the AUDIO menu. (G p.79). Use optical audio output for operation. See the external audio equipment instruction manual for any 24 type of the optical cable to the TV's AUDIO OUT jacks. ( C) (RGB/DVI) OPTICAL RS-232C IN AUDIO OUT REMOTE (CONTROL & SERVICE) CONTROL... port. How to connect 1 Connect audio outputs to the digital audio input on the audio equipment. 3 Set the "TV Speaker option - See the external audio equipment instruction manual for operation. AUDIO N S-VIDEO VIDEO (MONO) AUDIO ( ) 1 Digital 1. EXTERNAL EQUIPMENT SETUP AV IN 1 EXTERNAL...
... in the AUDIO menu. (G p.79). Use optical audio output for operation. See the external audio equipment instruction manual for any 24 type of the optical cable to the TV's AUDIO OUT jacks. ( C) (RGB/DVI) OPTICAL RS-232C IN AUDIO OUT REMOTE (CONTROL & SERVICE) CONTROL... port. How to connect 1 Connect audio outputs to the digital audio input on the audio equipment. 3 Set the "TV Speaker option - See the external audio equipment instruction manual for operation. AUDIO N S-VIDEO VIDEO (MONO) AUDIO ( ) 1 Digital 1. EXTERNAL EQUIPMENT SETUP AV IN 1 EXTERNAL...
Owner's Manual (English)
Page 31
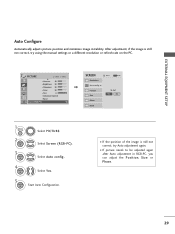
.... EXTERNAL EQUIPMENT SETUP Auto Configure Automatically adjusts picture position and minimizes image instability. After adjustment, if the image is still not correct, try using the manual settings or a different resolution or refresh rate on the PC. I If picture needs to be adjusted again after Auto adjustment in RGB-PC, you can...
.... EXTERNAL EQUIPMENT SETUP Auto Configure Automatically adjusts picture position and minimizes image instability. After adjustment, if the image is still not correct, try using the manual settings or a different resolution or refresh rate on the PC. I If picture needs to be adjusted again after Auto adjustment in RGB-PC, you can...
Owner's Manual (English)
Page 32
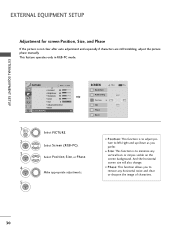
... only in RGB-PC mode. I Position: This function is not clear after auto adjustment and especially if characters are still trembling, adjust the picture phase manually. EXTERNAL EQUIPMENT SETUP EXTERNAL EQUIPMENT SETUP Adjustment for screen Position, Size, and Phase If the picture is to adjust picture to left/right and up...
... only in RGB-PC mode. I Position: This function is not clear after auto adjustment and especially if characters are still trembling, adjust the picture phase manually. EXTERNAL EQUIPMENT SETUP EXTERNAL EQUIPMENT SETUP Adjustment for screen Position, Size, and Phase If the picture is to adjust picture to left/right and up...
Owner's Manual (English)
Page 37
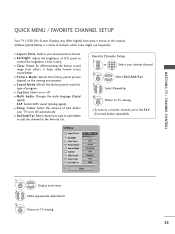
... the factory preset sound for type of the screen. I Caption: Select on the viewing environment. I Backlight: Adjust the brightness of LCD panel to a favorite channel, press the F A V (Favorite) button repeatedly. I Picture Mode: Selects the factory preset picture depend on... or off automatically. MENU Return to TV viewing. Q.Menu (Quick Menu) is shown in this manual. I Sleep Timer: Select the amount of features which users might use frequently. I Aspect Ratio: Selects your desired...
... the factory preset sound for type of the screen. I Caption: Select on the viewing environment. I Backlight: Adjust the brightness of LCD panel to a favorite channel, press the F A V (Favorite) button repeatedly. I Picture Mode: Selects the factory preset picture depend on... or off automatically. MENU Return to TV viewing. Q.Menu (Quick Menu) is shown in this manual. I Sleep Timer: Select the amount of features which users might use frequently. I Aspect Ratio: Selects your desired...
Owner's Manual (English)
Page 38
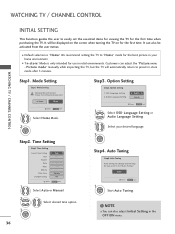
...manually while inspecting the TV, but the TV will be activated from the user menus. Audio Language Setting F English G French Enter RETURN Exit 1 Select OSD Language Setting or Audio Language Setting. 2 Select your home environment. Enter 1 ENTER Enter RETURN Exit Start Auto Tuning. ! NOTE I You can change channel map. WATCHING TV... Time Zone Daylight Saving F Auto G 2007 11 15 5 PM 52 Eastern Off Enter RETURN Exit 1 Select Auto or Manual. 2 Select desired time option. 3 ENTER 36 Step3. I Default selection is only intended for use in retail environments. Mode...
...manually while inspecting the TV, but the TV will be activated from the user menus. Audio Language Setting F English G French Enter RETURN Exit 1 Select OSD Language Setting or Audio Language Setting. 2 Select your home environment. Enter 1 ENTER Enter RETURN Exit Start Auto Tuning. ! NOTE I You can change channel map. WATCHING TV... Time Zone Daylight Saving F Auto G 2007 11 15 5 PM 52 Eastern Off Enter RETURN Exit 1 Select Auto or Manual. 2 Select desired time option. 3 ENTER 36 Step3. I Default selection is only intended for use in retail environments. Mode...


