Specification (English)
Page 1
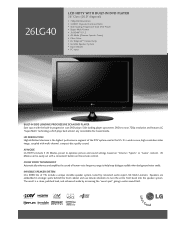
AV MODE LG HDTVs include 3 AV Modes, preset to optimize picture and sound settings based on the remote control. It's a wide screen, high-resolution video image, coupled with multi-channel, compact-disc-quality sound. AV Modes can be easily set with a convenient button on "Cinema", "Sports" or "Game" content. The result is the highest performance segment of the DTV system used in the US. HD RESOLUTION High definition television is a clean, polished look...
AV MODE LG HDTVs include 3 AV Modes, preset to optimize picture and sound settings based on the remote control. It's a wide screen, high-resolution video image, coupled with multi-channel, compact-disc-quality sound. AV Modes can be easily set with a convenient button on "Cinema", "Sports" or "Game" content. The result is the highest performance segment of the DTV system used in the US. HD RESOLUTION High definition television is a clean, polished look...
Specification (English)
Page 2
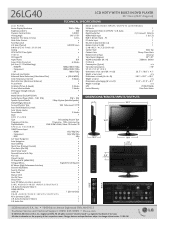
... Control w/V-Chip • Key Lock • Closed Caption • LG SimpLink™ (HDMI CEC) • Trilingual Menus English/French/Spanish EZ Menus (High Performance Interface) • Channel Add/Delete • Favorite Channel • Auto Clock • Manual Clock • On/Off Timer • Sleep Timer • Auto Off (When no video is a registered trademark of their respective owners. 26LG40 LCD HDTV WITH BUILT-IN DVD PLAYER 26" Class (26.0" diagonal) TECHNICAL SPECIFICATIONS LCD PANEL Native Display...
... Control w/V-Chip • Key Lock • Closed Caption • LG SimpLink™ (HDMI CEC) • Trilingual Menus English/French/Spanish EZ Menus (High Performance Interface) • Channel Add/Delete • Favorite Channel • Auto Clock • Manual Clock • On/Off Timer • Sleep Timer • Auto Off (When no video is a registered trademark of their respective owners. 26LG40 LCD HDTV WITH BUILT-IN DVD PLAYER 26" Class (26.0" diagonal) TECHNICAL SPECIFICATIONS LCD PANEL Native Display...
Owner's Manual (English)
Page 2
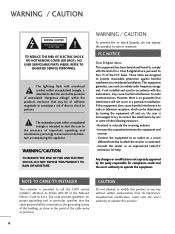
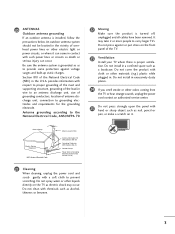
... TO CABLE/TV INSTALLER This reminder is intended to alert the user to operate the equipment. Unauthorized modification could void the user's authority to the presence of the following measures: - WARNING / CAUTION TO REDUCE THE RISK OF ELECTRIC SHOCK DO NOT REMOVE COVER (OR BACK). REFER TO QUALIFIED SERVICE PERSONNEL. The lightning flash with the instructions, may be determined by turning...
... TO CABLE/TV INSTALLER This reminder is intended to alert the user to operate the equipment. Unauthorized modification could void the user's authority to the presence of the following measures: - WARNING / CAUTION TO REDUCE THE RISK OF ELECTRIC SHOCK DO NOT REMOVE COVER (OR BACK). REFER TO QUALIFIED SERVICE PERSONNEL. The lightning flash with the instructions, may be determined by turning...

Owner's Manual (English)
Page 4
... to install the TV by the hanging power and signal cables on or over the apparatus (e.g. To reduce the risk of these conditions could result in a door, or walked upon a dedicated circuit; The plug must be certain. Overloaded wall outlets, loose or damaged wall outlets, extension cords, frayed power cords, or damaged or cracked wire insulation are not possible, have the cord replaced...
... to install the TV by the hanging power and signal cables on or over the apparatus (e.g. To reduce the risk of these conditions could result in a door, or walked upon a dedicated circuit; The plug must be certain. Overloaded wall outlets, loose or damaged wall outlets, extension cords, frayed power cords, or damaged or cracked wire insulation are not possible, have the cord replaced...
Owner's Manual (English)
Page 5
... proper grounding of the mast and supporting structure, grounding of the lead-in wire to an antenna discharge unit, size of grounding conductors, location of overhead power lines or other odors coming from the TV or hear strange sounds, unplug the power cord contact an authorized service center. 25 Do not press strongly upon the panel with hand or sharp object...
... proper grounding of the mast and supporting structure, grounding of the lead-in wire to an antenna discharge unit, size of grounding conductors, location of overhead power lines or other odors coming from the TV or hear strange sounds, unplug the power cord contact an authorized service center. 25 Do not press strongly upon the panel with hand or sharp object...
Owner's Manual (English)
Page 6
... Mode 43 SIMPLINK 44 DVD OPERATION Notes on a stand 14 Antenna or Cable Connection 15 EXTERNAL EQUIPMENT SETUP HD Receiver Setup 16 DVD Setup 19 VCR Setup 21 Other A/V Source Setup 23 Audio out Connection 24 PC Setup 25 WATCHING TV / CHANNEL CONTROL Remote Control Functions 32 Turning On TV 34 Channel Selection 34 Volume Adjustment 34 Quick Menu / Favorite Channel Setup 35 Initial Setting 36 On-Screen Menus Selection 37 Channel Setup - Black (Darkness) Level 69 Advanced Control - Color Tone - Changing the password 52 Picture Size Control 53 Digital Audio Output...
... Mode 43 SIMPLINK 44 DVD OPERATION Notes on a stand 14 Antenna or Cable Connection 15 EXTERNAL EQUIPMENT SETUP HD Receiver Setup 16 DVD Setup 19 VCR Setup 21 Other A/V Source Setup 23 Audio out Connection 24 PC Setup 25 WATCHING TV / CHANNEL CONTROL Remote Control Functions 32 Turning On TV 34 Channel Selection 34 Volume Adjustment 34 Quick Menu / Favorite Channel Setup 35 Initial Setting 36 On-Screen Menus Selection 37 Channel Setup - Black (Darkness) Level 69 Advanced Control - Color Tone - Changing the password 52 Picture Size Control 53 Digital Audio Output...
Owner's Manual (English)
Page 7
... Caption Mode - Auto Clock Setup 87 Manual Clock Setup 88 Auto On/Off Time Setting 89 Sleep Timer Setting 90 Auto Shut-off Setting 91 PARENTAL CONTROL / RATINGS Set Password & Lock System 92 Channel Blocking 95 Movie & TV Rating 96 Downloadable Rating 101 External Input Blocking 102 Key Lock 103 APPENDIX Troubleshooting 104 Maintenance 106 Product Specifications 107 Programing the Remote Control 108 IR Code 111 External Control Through RS-232C 113 Open Source License 120 5 SOUND & LANGUAGE CONTROL Auto Volume Leveler (Auto Volume) 74 Clear Voice 75 Preset Sound Setting...
... Caption Mode - Auto Clock Setup 87 Manual Clock Setup 88 Auto On/Off Time Setting 89 Sleep Timer Setting 90 Auto Shut-off Setting 91 PARENTAL CONTROL / RATINGS Set Password & Lock System 92 Channel Blocking 95 Movie & TV Rating 96 Downloadable Rating 101 External Input Blocking 102 Key Lock 103 APPENDIX Troubleshooting 104 Maintenance 106 Product Specifications 107 Programing the Remote Control 108 IR Code 111 External Control Through RS-232C 113 Open Source License 120 5 SOUND & LANGUAGE CONTROL Auto Volume Leveler (Auto Volume) 74 Clear Voice 75 Preset Sound Setting...
Owner's Manual (English)
Page 11
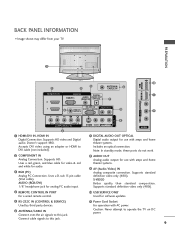
...Uses a red, green, and blue cable for video & red and white for use with amps and home theater systems. Includes an optical connection. Note: In standby mode, these ports do not work. 2 COMPONENT IN Analog Connection. Supports HD. Uses a D-sub 15 pin cable (VGA cable). Connect cable signals to operate the TV on DC power. 9 R PREPARATION R 11 HDMI IN 3 SERVICE ONLY 10 USB 1 5 3 ANTENNA/ CABLE IN 6 HDMI/DVI IN RGB IN DIGITAL 1 RGB(PC) AUDIO AUDIO OUT (RGB/DVI) OPTICAL 7 2 1 RS-232C IN AUDIO OUT 4 REMOTE (CONTROL & SERVICE) CONTROL IN 8 9 VIDEO L/MONO AUDIO...
...Uses a red, green, and blue cable for video & red and white for use with amps and home theater systems. Includes an optical connection. Note: In standby mode, these ports do not work. 2 COMPONENT IN Analog Connection. Supports HD. Uses a D-sub 15 pin cable (VGA cable). Connect cable signals to operate the TV on DC power. 9 R PREPARATION R 11 HDMI IN 3 SERVICE ONLY 10 USB 1 5 3 ANTENNA/ CABLE IN 6 HDMI/DVI IN RGB IN DIGITAL 1 RGB(PC) AUDIO AUDIO OUT (RGB/DVI) OPTICAL 7 2 1 RS-232C IN AUDIO OUT 4 REMOTE (CONTROL & SERVICE) CONTROL IN 8 9 VIDEO L/MONO AUDIO...
Owner's Manual (English)
Page 18
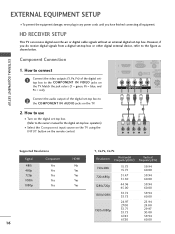
.... operation) I Select the Component input source on the TV using the INPUT button on the TV. 2. RGB(PC) AUDIO A (RGB/DVI) 2 RS-232C 1 REMOTE (CONTROL & S CONTROL IN VIDEO AUDIO COMPONENT IN S-VIDEO ( ) 2 Connect the audio output of the digital settop box to the COMPONENT IN VIDEO jacks on the digital set-top box. (Refer to the owner's manual for the digital set-top box. How to connect 1 Connect the video outputs (Y, PB, PR) of the digital set-top box to the COMPONENT IN AUDIO jacks on the remote control. 1 2 Y PB PR L R Supported Resolutions Signal...
.... operation) I Select the Component input source on the TV using the INPUT button on the TV. 2. RGB(PC) AUDIO A (RGB/DVI) 2 RS-232C 1 REMOTE (CONTROL & S CONTROL IN VIDEO AUDIO COMPONENT IN S-VIDEO ( ) 2 Connect the audio output of the digital settop box to the COMPONENT IN VIDEO jacks on the digital set-top box. (Refer to the owner's manual for the digital set-top box. How to connect 1 Connect the video outputs (Y, PB, PR) of the digital set-top box to the COMPONENT IN AUDIO jacks on the remote control. 1 2 Y PB PR L R Supported Resolutions Signal...
Owner's Manual (English)
Page 19
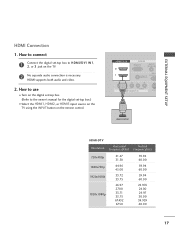
... box. (Refer to the owner's manual for the digital set -top box to connect 1 Connect the digital set -top box.) I Select the HDMI1, HDMI2, or HDMI3 input source on the TV using the INPUT button on the TV. 2 No separate audio connection is necessary. HDMI supports both audio and video. 2. How to HDMI/DVI IN1, 2, or 3 jack on the remote control. HDMI/DVI IN 2 1 RGB IN RGB(PC) AUDIO (RGB/DVI) RS-23 REMOTE (CONTROL CONTROL IN VIDEO AUDIO COMPONENT IN S-VID ( ) 1 HDMI-DTV OUTPUT EXTERNAL EQUIPMENT SETUP HDMI-DTV Resolution...
... box. (Refer to the owner's manual for the digital set -top box to connect 1 Connect the digital set -top box.) I Select the HDMI1, HDMI2, or HDMI3 input source on the TV using the INPUT button on the TV. 2 No separate audio connection is necessary. HDMI supports both audio and video. 2. How to HDMI/DVI IN1, 2, or 3 jack on the remote control. HDMI/DVI IN 2 1 RGB IN RGB(PC) AUDIO (RGB/DVI) RS-23 REMOTE (CONTROL CONTROL IN VIDEO AUDIO COMPONENT IN S-VID ( ) 1 HDMI-DTV OUTPUT EXTERNAL EQUIPMENT SETUP HDMI-DTV Resolution...
Owner's Manual (English)
Page 20
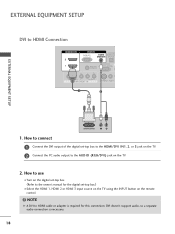
...'t support audio, so a separate audio connection is required for the digital set -top box to the HDMI/DVI IN1, 2, or 3 jack on the TV. 2 Connect the PC audio output to connect 1 Connect the DVI output of the digital set -top box.) I Select the HDMI 1, HDMI 2 or HDMI 3 input source on the TV using the INPUT button on the TV. 2. NOTE G A DVI to HDMI Connection HDMI/DVI IN 2 1 RGB IN DIGITAL RGB(PC) AUDIO AUDIO OU (RGB/DVI) OPTICA RS-232C IN REMOTE (CONTROL & SERVICE) CONTROL IN VIDEO AUDIO COMPONENT IN S-VIDEO VIDEO ( ) 1 2 EXTERNAL EQUIPMENT SETUP...
...'t support audio, so a separate audio connection is required for the digital set -top box to the HDMI/DVI IN1, 2, or 3 jack on the TV. 2 Connect the PC audio output to connect 1 Connect the DVI output of the digital set -top box.) I Select the HDMI 1, HDMI 2 or HDMI 3 input source on the TV using the INPUT button on the TV. 2. NOTE G A DVI to HDMI Connection HDMI/DVI IN 2 1 RGB IN DIGITAL RGB(PC) AUDIO AUDIO OU (RGB/DVI) OPTICA RS-232C IN REMOTE (CONTROL & SERVICE) CONTROL IN VIDEO AUDIO COMPONENT IN S-VIDEO VIDEO ( ) 1 2 EXTERNAL EQUIPMENT SETUP...
Owner's Manual (English)
Page 21
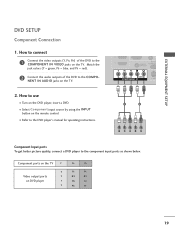
...Pr 19 I Turn on the DVD player, insert a DVD. EXTERNAL EQUIPMENT SETUP 2 RS-23 1 REMOTE (CONTROL & CONTROL IN VIDEO AUDIO COMPONENT IN S-VIDE ( ) 1 2 Y PB PR L R Component Input ports To get better picture quality, connect a DVD player to the DVD player's manual for operating instructions. Component ports on the TV Y Y Video output ports Y on the TV. DVD SETUP Component Connection 1. I Select Component input source by using the INPUT button on the TV. 2. Match the jack colors (Y = green, PB = blue, and PR = red). 2 Connect the audio outputs of the...
...Pr 19 I Turn on the DVD player, insert a DVD. EXTERNAL EQUIPMENT SETUP 2 RS-23 1 REMOTE (CONTROL & CONTROL IN VIDEO AUDIO COMPONENT IN S-VIDE ( ) 1 2 Y PB PR L R Component Input ports To get better picture quality, connect a DVD player to the DVD player's manual for operating instructions. Component ports on the TV Y Y Video output ports Y on the TV. DVD SETUP Component Connection 1. I Select Component input source by using the INPUT button on the TV. 2. Match the jack colors (Y = green, PB = blue, and PR = red). 2 Connect the audio outputs of the...
Owner's Manual (English)
Page 22
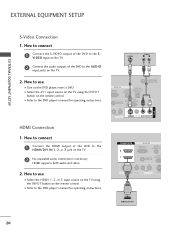
... player, insert a DVD. I Refer to the DVD player's manual for operating instructions. S-VIDEO AUDIO L R RGB IN GB(PC) 1 DIGITAL AUDIO AUDIO OUT (RGB/DVI) OPTICAL ANTENNA/ CABLE IN 2 RS-232C IN AUDIO OUT REMOTE (CONTROL & SERVICE) CONTROL IN AV IN 1 AUDIO T IN S-VIDEO VIDEO (MONO) AUDIO HDMI Connection 1. I Select the HDMI 1, 2, or 3 input source on the TV using the INPUT button on the remote control. HDMI/DVI IN 2 1 RGB IN RGB(PC) AUDIO (RGB/DVI) RS-23 REMOTE (CONTROL CONTROL IN VIDEO AUDIO COMPONENT IN S-VID ( ) 1 HDMI-DVD OUTPUT 20 HDMI supports...
... player, insert a DVD. I Refer to the DVD player's manual for operating instructions. S-VIDEO AUDIO L R RGB IN GB(PC) 1 DIGITAL AUDIO AUDIO OUT (RGB/DVI) OPTICAL ANTENNA/ CABLE IN 2 RS-232C IN AUDIO OUT REMOTE (CONTROL & SERVICE) CONTROL IN AV IN 1 AUDIO T IN S-VIDEO VIDEO (MONO) AUDIO HDMI Connection 1. I Select the HDMI 1, 2, or 3 input source on the TV using the INPUT button on the remote control. HDMI/DVI IN 2 1 RGB IN RGB(PC) AUDIO (RGB/DVI) RS-23 REMOTE (CONTROL CONTROL IN VIDEO AUDIO COMPONENT IN S-VID ( ) 1 HDMI-DVD OUTPUT 20 HDMI supports...
Owner's Manual (English)
Page 27
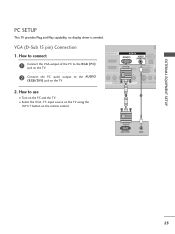
EXTERNAL EQUIPMENT SETUP PC SETUP This TV provides Plug and Play capability, no display driver is needed. HDMI/DVI IN RGB IN DIGITAL RGB(PC) AUDIO AUDIO OUT (RGB/DVI) OPTICAL RS-232C IN A REMOTE (CONTROL & SERVICE) CONTROL IN VIDEO AUDIO COMPONENT IN S-VIDEO VIDEO (M ) 1 2 RGB OUTPUT AUDIO ( ) 25 VGA (D-Sub 15 pin) Connection 1. How to the A U D I Select the RGB-PC input source on the TV using the INPUT button on the remote control. How to connect 1 Connect the VGA output of the PC to the RG B (P C) jack...
EXTERNAL EQUIPMENT SETUP PC SETUP This TV provides Plug and Play capability, no display driver is needed. HDMI/DVI IN RGB IN DIGITAL RGB(PC) AUDIO AUDIO OUT (RGB/DVI) OPTICAL RS-232C IN A REMOTE (CONTROL & SERVICE) CONTROL IN VIDEO AUDIO COMPONENT IN S-VIDEO VIDEO (M ) 1 2 RGB OUTPUT AUDIO ( ) 25 VGA (D-Sub 15 pin) Connection 1. How to the A U D I Select the RGB-PC input source on the TV using the INPUT button on the remote control. How to connect 1 Connect the VGA output of the PC to the RG B (P C) jack...
Owner's Manual (English)
Page 37
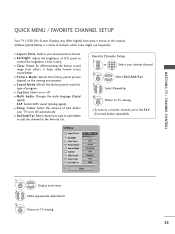
...SAP: Selects MTS sound (Analog signal). I Picture Mode: Selects the factory preset picture depend on or off automatically. I Sleep Timer: Select the amount of features which users might use frequently. MENU Return to a favorite channel, press the F A V (Favorite) button repeatedly. Q.Menu (Quick Menu) is shown in this manual. MENU Return to TV viewing. 35 Make appropriate adjustments. 3 Q. Favorite Channle Setup 1 CH 123 or 4 5 6 Select your desired picture format. WATCHING TV / CHANNEL CONTROL QUICK MENU / FAVORITE CHANNEL SETUP Your TV's OSD (On Screen Display) may...
...SAP: Selects MTS sound (Analog signal). I Picture Mode: Selects the factory preset picture depend on or off automatically. I Sleep Timer: Select the amount of features which users might use frequently. MENU Return to a favorite channel, press the F A V (Favorite) button repeatedly. Q.Menu (Quick Menu) is shown in this manual. MENU Return to TV viewing. 35 Make appropriate adjustments. 3 Q. Favorite Channle Setup 1 CH 123 or 4 5 6 Select your desired picture format. WATCHING TV / CHANNEL CONTROL QUICK MENU / FAVORITE CHANNEL SETUP Your TV's OSD (On Screen Display) may...
Owner's Manual (English)
Page 83
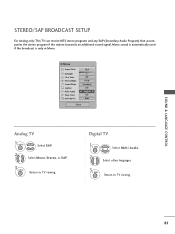
... Mono. Q.Menu Aspect Ratio Backlight Clear Voice Picture Mode Sound Mode Caption Multi Audio Sleep Timer CH Del/Add/Fav 16:9 3 Off Vivid Standard Off F English G Off Add Close Analog TV 1Q. Digital TV 1Q. SOUND & LANGUAGE CONTROL STEREO/SAP BROADCAST SETUP For Analog only: This TV can receive MTS stereo programs and any SAP (Secondary Audio Program) that accompanies the stereo program if the station transmits an additional sound signal. MENU Return to TV viewing. MENU Return to TV viewing. 81
... Mono. Q.Menu Aspect Ratio Backlight Clear Voice Picture Mode Sound Mode Caption Multi Audio Sleep Timer CH Del/Add/Fav 16:9 3 Off Vivid Standard Off F English G Off Add Close Analog TV 1Q. Digital TV 1Q. SOUND & LANGUAGE CONTROL STEREO/SAP BROADCAST SETUP For Analog only: This TV can receive MTS stereo programs and any SAP (Secondary Audio Program) that accompanies the stereo program if the station transmits an additional sound signal. MENU Return to TV viewing. MENU Return to TV viewing. 81
Owner's Manual (English)
Page 94
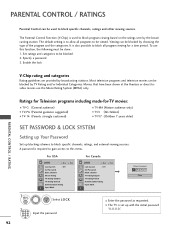
... gain access to block specific channels, ratings, and external viewing sources. Set ratings and categories to block program viewing based on the ratings sent by broadcasting stations. The default setting is set up blocking schemes to this function, the following must be viewed. To use the Movie Rating System (MPAA) only. For USA LOCK Move Enter Lock System : Off Set Password Block Channel Movie Rating TV Rating-Children TV Rating-General Downloadable Rating Input...
... gain access to block specific channels, ratings, and external viewing sources. Set ratings and categories to block program viewing based on the ratings sent by broadcasting stations. The default setting is set up blocking schemes to this function, the following must be viewed. To use the Movie Rating System (MPAA) only. For USA LOCK Move Enter Lock System : Off Set Password Block Channel Movie Rating TV Rating-Children TV Rating-General Downloadable Rating Input...
Owner's Manual (English)
Page 106
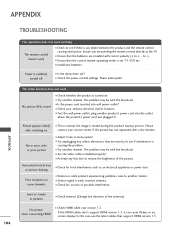
... product's power cord into wall power outlet? I Check antenna (Change the direction of possible interference. The problem may be with the broadcast. I Station signal is turned on contact your antenna direction and/or location. Lines or streaks in menu option. If the HDMI cables don't support HDMI version 1.3, it can cause flickers or no screen display. APPENDIX TROUBLESHOOTING APPENDIX 104 The operation does not work . I Check your service center, if the picture has...
... product's power cord into wall power outlet? I Check antenna (Change the direction of possible interference. The problem may be with the broadcast. I Station signal is turned on contact your antenna direction and/or location. Lines or streaks in menu option. If the HDMI cables don't support HDMI version 1.3, it can cause flickers or no screen display. APPENDIX TROUBLESHOOTING APPENDIX 104 The operation does not work . I Check your service center, if the picture has...
Owner's Manual (English)
Page 109
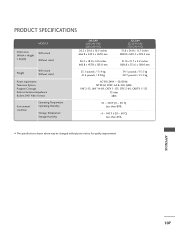
PRODUCT SPECIFICATIONS MODELS Dimensions (Width x Height x Depth) With stand Without stand Weight With stand Without stand Power requirement Television System Program Coverage External Antenna Impedance Built-In DVD Video Format Environment condition Operating Temperature Operating Humidity Storage Temperature Storage Humidity 26LG40 (26LG40-UA) (26LG40-UG) 26.2 x 20.6 x 10.5 inches 666.8 x 524.5 x 267.0 mm 32LG40 (32LG40-UA) (32LG40-UG) 31.8 x 24.8 x 11.7 inches 808.8 x 630.3 x 299.2 mm 26.2 x 18.0 x 4.0 inches 666.8 x 457.8 x 103.0 mm 31.8 x 21.7 x 4.2 inches 808.8 x 551...
PRODUCT SPECIFICATIONS MODELS Dimensions (Width x Height x Depth) With stand Without stand Weight With stand Without stand Power requirement Television System Program Coverage External Antenna Impedance Built-In DVD Video Format Environment condition Operating Temperature Operating Humidity Storage Temperature Storage Humidity 26LG40 (26LG40-UA) (26LG40-UG) 26.2 x 20.6 x 10.5 inches 666.8 x 524.5 x 267.0 mm 32LG40 (32LG40-UA) (32LG40-UG) 31.8 x 24.8 x 11.7 inches 808.8 x 630.3 x 299.2 mm 26.2 x 18.0 x 4.0 inches 666.8 x 457.8 x 103.0 mm 31.8 x 21.7 x 4.2 inches 808.8 x 551...

Owner's Manual (English)
Page 110
... code. 4 Enter a code number using the number buttons on the remote control. If the code is ready to see if the component responds correctly. If not, repeat from step 2. The remote control button of other components without programming, turn off. 5 Press the MENU button to store the code. 6 Test the remote control functions to operate most remote-controllable devices. Programming code numbers for the corresponding component can be programmed to see if the component responds correctly. Programming a code into a remote mode 1 Testing your remote control can operate...
... code. 4 Enter a code number using the number buttons on the remote control. If the code is ready to see if the component responds correctly. If not, repeat from step 2. The remote control button of other components without programming, turn off. 5 Press the MENU button to store the code. 6 Test the remote control functions to operate most remote-controllable devices. Programming code numbers for the corresponding component can be programmed to see if the component responds correctly. Programming a code into a remote mode 1 Testing your remote control can operate...


