

Owners Manual
Page 2
... this product in a particular installation. The code provides guidelines for help. Connect the equipment into an outlet on , the user is intended to alert the user to the presence of important operating and maintenance (servicing) instructions in particular, specifies that may cause harmful interference to which can radiate radio frequency energy and, if not installed and used in a residential installation. U.S.A. If this product...
... this product in a particular installation. The code provides guidelines for help. Connect the equipment into an outlet on , the user is intended to alert the user to the presence of important operating and maintenance (servicing) instructions in particular, specifies that may cause harmful interference to which can radiate radio frequency energy and, if not installed and used in a residential installation. U.S.A. If this product...
Owners Manual
Page 6
... Channels with EZ scan 24 Add/Delete Channels with Manual program 24 Favorite Channels Setup 25 EZ Video 25 Manual Picture Control (User option) 26 Cinema Mode Setup 26 Picture format (ARC-Aspect Ratio Correction) 27 EZ Audio 27 Equalizer Adjustments 28 AVL (Auto Volume Leveler) 28 Sound Balance 29 Stereo/SAP Broadcasts Setup 30 Auto Clock Setup 30 Manual Clock Setup 31 On/Off Timer Setup 31 Sleep timer Setup 32 Auto off 33 Closed Captions 34 Caption/Text 34 Captions 35 Key Lock 35 Lightening Logo Display Lamp 36 Parental Menu Options Operation...
... Channels with EZ scan 24 Add/Delete Channels with Manual program 24 Favorite Channels Setup 25 EZ Video 25 Manual Picture Control (User option) 26 Cinema Mode Setup 26 Picture format (ARC-Aspect Ratio Correction) 27 EZ Audio 27 Equalizer Adjustments 28 AVL (Auto Volume Leveler) 28 Sound Balance 29 Stereo/SAP Broadcasts Setup 30 Auto Clock Setup 30 Manual Clock Setup 31 On/Off Timer Setup 31 Sleep timer Setup 32 Auto off 33 Closed Captions 34 Caption/Text 34 Captions 35 Key Lock 35 Lightening Logo Display Lamp 36 Parental Menu Options Operation...

Owners Manual
Page 8
CH VOL ENTER MENU TV VIDEO DVD / CD PLAYER OPCELNO/SE PLAY STOP SKSICPA/ N SKSICPA/ N Remote Control Sensor Power/Standby Indicator Illuminates red in standby mode, illuminates green when the set is a simplified representation of front panel. - ON/OFF Button Channel (D / E) Buttons Volume (F / G) Buttons ENTER Button MENU Button TVvVIDEO Button DVD / CD PLAYER OCPELONS/ E PLAY STOP SKSICPA/ N SKSICPA/ N Disc Tray Insert a disc here. Forward SKIP (GGI) / SCAN ( GG) Button • Go to the beginning. • Press and...
CH VOL ENTER MENU TV VIDEO DVD / CD PLAYER OPCELNO/SE PLAY STOP SKSICPA/ N SKSICPA/ N Remote Control Sensor Power/Standby Indicator Illuminates red in standby mode, illuminates green when the set is a simplified representation of front panel. - ON/OFF Button Channel (D / E) Buttons Volume (F / G) Buttons ENTER Button MENU Button TVvVIDEO Button DVD / CD PLAYER OCPELONS/ E PLAY STOP SKSICPA/ N SKSICPA/ N Disc Tray Insert a disc here. Forward SKIP (GGI) / SCAN ( GG) Button • Go to the beginning. • Press and...
Owners Manual
Page 10
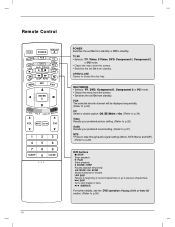
...; Selects: TV, DVD, Component 1, Component 2 or PC mode. • Clears the menu from the screen. • Switches the set On from standby. FCR The selected favorite channel will be displayed sequentially. (Refer to p.24) CC Select a closed caption: Off, EZ Mute or On. (Refer to p.34) Video Recalls your preferred picture setting. (Refer to p.25) Audio Recalls your preferred sound setting. (Refer to p.27) MTS • Press to step through audio signal settings (Mono...
...; Selects: TV, DVD, Component 1, Component 2 or PC mode. • Clears the menu from the screen. • Switches the set On from standby. FCR The selected favorite channel will be displayed sequentially. (Refer to p.24) CC Select a closed caption: Off, EZ Mute or On. (Refer to p.34) Video Recalls your preferred picture setting. (Refer to p.25) Audio Recalls your preferred sound setting. (Refer to p.27) MTS • Press to step through audio signal settings (Mono...

Owners Manual
Page 11
... Remote Control TV/AV OPEN/CLOSE POWER MULTIMEDIA VIDEO STOP FCR CC AUDIO AUDIO MTS PLAY PAUSE/STEP REPEAT SKIP SCAN SCAN MENU ARC SKIP EXIT MENU Selects a menu. D / E / F / G (up / down / left / right) Selects or adjusts an item in a menu. ENTER DISC MENU TITLE DISPLAY RETURN VOL MUTE FLASHBK CH DISC MENU Accesses menu on the MARKER SEARCH menu. (Refer to p.59) 1 2 3 4 5 6 7 8 9 SLEEP 0 CLEAR A-B RANDOM ANGLE SUB_T MARKER SEARCH PROGRAM ZOOM VOL (Volume) D / E Adjusts the volume. CH (Channel) D / E Selects a programme. 0-9 number buttons • Selects...
... Remote Control TV/AV OPEN/CLOSE POWER MULTIMEDIA VIDEO STOP FCR CC AUDIO AUDIO MTS PLAY PAUSE/STEP REPEAT SKIP SCAN SCAN MENU ARC SKIP EXIT MENU Selects a menu. D / E / F / G (up / down / left / right) Selects or adjusts an item in a menu. ENTER DISC MENU TITLE DISPLAY RETURN VOL MUTE FLASHBK CH DISC MENU Accesses menu on the MARKER SEARCH menu. (Refer to p.59) 1 2 3 4 5 6 7 8 9 SLEEP 0 CLEAR A-B RANDOM ANGLE SUB_T MARKER SEARCH PROGRAM ZOOM VOL (Volume) D / E Adjusts the volume. CH (Channel) D / E Selects a programme. 0-9 number buttons • Selects...

Owners Manual
Page 13
... it up. 2 Connect the cables as necessary. To connect an additional equipment, see the External equipment Connections section. 3 Align the holes on the TV back panel with the protuberances on each side and from the wall. 4 inches 4 inches 4 inches 4 inches DVD / CD PLAYER OCPLEONS/E PPALAUYS//E STOP S KIP/ S KIP 13 Cable Arranagement Pull the cables through the hole on the set and bundle the cables using the supplied twister holder.
... it up. 2 Connect the cables as necessary. To connect an additional equipment, see the External equipment Connections section. 3 Align the holes on the TV back panel with the protuberances on each side and from the wall. 4 inches 4 inches 4 inches 4 inches DVD / CD PLAYER OCPLEONS/E PPALAUYS//E STOP S KIP/ S KIP 13 Cable Arranagement Pull the cables through the hole on the set and bundle the cables using the supplied twister holder.
Owners Manual
Page 14
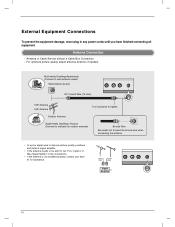
... two TV's, install a "2Way Signal Splitter" in any power cords until you have finished connecting all equipment. Signal Amplifier 14 External Equipment Connections To prevent the equipment damage, never plug in the connections. • If the antenna is not installed properly, contact your dealer for assistance. Antenna or Cable Service without a Cable Box Connection. - For optimum picture quality, adjust antenna direction if needed. Antenna Connection - Outdoor Antenna Single-family Dwellings /Houses (Connect to wall jack for outdoor antenna) Bronze Wire...
... two TV's, install a "2Way Signal Splitter" in any power cords until you have finished connecting all equipment. Signal Amplifier 14 External Equipment Connections To prevent the equipment damage, never plug in the connections. • If the antenna is not installed properly, contact your dealer for assistance. Antenna or Cable Service without a Cable Box Connection. - For optimum picture quality, adjust antenna direction if needed. Antenna Connection - Outdoor Antenna Single-family Dwellings /Houses (Connect to wall jack for outdoor antenna) Bronze Wire...

Owners Manual
Page 15
... fixed images on the sides of the screen may remain visible on the VCR. (Refer to the VCR owner's manual.) When connecting with using the TV/AV button on the remote control. • If you have a mono VCR, connect the audio cable from a VCR. Installation External Equipment Connections VCR Setup - If the 4:3 picture format is used; Match the jack colors (Video = yellow, Audio Left = white, and Audio Right = red) 2 Insert a video tape into the VCR and press PLAY on the VCR. (Refer to the same channel number...
... fixed images on the sides of the screen may remain visible on the VCR. (Refer to the VCR owner's manual.) When connecting with using the TV/AV button on the remote control. • If you have a mono VCR, connect the audio cable from a VCR. Installation External Equipment Connections VCR Setup - If the 4:3 picture format is used; Match the jack colors (Video = yellow, Audio Left = white, and Audio Right = red) 2 Insert a video tape into the VCR and press PLAY on the VCR. (Refer to the same channel number...

Owners Manual
Page 17
...DVD player's manual for operating instructions. (R) AUDIO (L) B R DVD TV side panel • Component Input ports To get better picture quality, connect a DVD player to the AUDIO input jacks on the set . 2 Connect the audio outputs of the DVD to the COMPONENT DVD IN (Y, PB, PR) jacks on the set . 3 Turn on the DVD player, insert a DVD. 4 Select Component1 input source with using the TV/AV button on the TV Y PB PR 1 2 (R) AUDIO (L) DVD B R 17 Installation External Equipment Connections External DVD Setup When connecting with a component cable TV back panel 1 1 1 Connect the video...
...DVD player's manual for operating instructions. (R) AUDIO (L) B R DVD TV side panel • Component Input ports To get better picture quality, connect a DVD player to the AUDIO input jacks on the set . 2 Connect the audio outputs of the DVD to the COMPONENT DVD IN (Y, PB, PR) jacks on the set . 3 Turn on the DVD player, insert a DVD. 4 Select Component1 input source with using the TV/AV button on the TV Y PB PR 1 2 (R) AUDIO (L) DVD B R 17 Installation External Equipment Connections External DVD Setup When connecting with a component cable TV back panel 1 1 1 Connect the video...

Owners Manual
Page 18
... the remote control. 5 Refer to the DVD player's manual for further details regarding that device's input settings. Looking at the laser beam may damage your TV. 18 Do not look into the optical output port. If your second TV or monitor has no optical digital audio input jack, it to your vision. DVD Output Setup The TV has a special signal output capability which allows you can connect it 's impossible to use DVD digital sound output. When connecting with a S-Video cable...
... the remote control. 5 Refer to the DVD player's manual for further details regarding that device's input settings. Looking at the laser beam may damage your TV. 18 Do not look into the optical output port. If your second TV or monitor has no optical digital audio input jack, it to your vision. DVD Output Setup The TV has a special signal output capability which allows you can connect it 's impossible to use DVD digital sound output. When connecting with a S-Video cable...
Owners Manual
Page 19
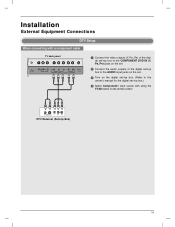
Installation External Equipment Connections DTV Setup When connecting with a component cable TV back panel 1 1 Connect the video outputs (Y, PB, PR) of the digital set-top box to the COMPONENT DVD IN (Y, PB, PR) jacks on the set. 2 Connect the audio outputs of the digital set-top box to the AUDIO input jacks on the set. 3 Turn on the digital set-top box. (Refer to the owner's manual for the digital set-top box.) 4 Select Component1 input source with using the TV/AV button on the remote control. (R) AUDIO (L) B R DTV Receiver (Set-top Box) 19
Installation External Equipment Connections DTV Setup When connecting with a component cable TV back panel 1 1 Connect the video outputs (Y, PB, PR) of the digital set-top box to the COMPONENT DVD IN (Y, PB, PR) jacks on the set. 2 Connect the audio outputs of the digital set-top box to the AUDIO input jacks on the set. 3 Turn on the digital set-top box. (Refer to the owner's manual for the digital set-top box.) 4 Select Component1 input source with using the TV/AV button on the remote control. (R) AUDIO (L) B R DTV Receiver (Set-top Box) 19
Owners Manual
Page 20
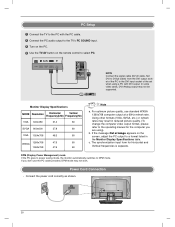
... PC to DPM mode. Power Cord Connection - PC Setup 1 Connect the TV to the PC with the PC cable. 2 Connect the PC audio output to the TV's PC SOUND input. 3 Turn on the PC. 4 Use the TV/AV button on the screen, adjust the PC output to select PC. In some video cards, DVI-Analog output may not work. b. Using other formats (VGA, SVGA, etc.) or refresh rates may result in the Monitor Display Specifications table. AC INPUT 20 Monitor Display Specifications MODE Resolution Horizontal Vertical...
... PC to DPM mode. Power Cord Connection - PC Setup 1 Connect the TV to the PC with the PC cable. 2 Connect the PC audio output to the TV's PC SOUND input. 3 Turn on the PC. 4 Use the TV/AV button on the screen, adjust the PC output to select PC. In some video cards, DVI-Analog output may not work. b. Using other formats (VGA, SVGA, etc.) or refresh rates may result in the Monitor Display Specifications table. AC INPUT 20 Monitor Display Specifications MODE Resolution Horizontal Vertical...

Owners Manual
Page 22
... the ENTER or MENU button. Channel EZ Scan Manual prog. Favorite ch. Picture EZ Video User Cinema Sound EZ Audio AVL Balance D E F G OK MENU Channel menu D E FG OK MENU Picture menu D E FG OK MENU Sound menu PC H-Position V-Position Clock Phase Auto Configure Reset D E FG OK MENU PC menu Special Language Caption/Text Captions Key lock Parental Logo D E FG OK MENU Special menu Timer Clock Off timer On timer Auto off D E FG OK MENU Timer menu Note In the TV, Video, S-Video, DVD, Component 1, Component 2 and mode, the PC menu(option) is not...
... the ENTER or MENU button. Channel EZ Scan Manual prog. Favorite ch. Picture EZ Video User Cinema Sound EZ Audio AVL Balance D E F G OK MENU Channel menu D E FG OK MENU Picture menu D E FG OK MENU Sound menu PC H-Position V-Position Clock Phase Auto Configure Reset D E FG OK MENU PC menu Special Language Caption/Text Captions Key lock Parental Logo D E FG OK MENU Special menu Timer Clock Off timer On timer Auto off D E FG OK MENU Timer menu Note In the TV, Video, S-Video, DVD, Component 1, Component 2 and mode, the PC menu(option) is not...

Owners Manual
Page 23
... receiving programming signals either overthe-air or from a cable-type service provider. 1 Press the MENU button and then use D / E button to select the Channel menu. 2 Press the G button and then use the D / E buttons to begin the channel search. • Wait for over-the-air channels and then channels provided by a cable service. When the channel search is complete, use D / E button to select EZ Scan. 3 Press the G button to review the memorized channels. ming up TV stations Channel EZ Scan Manual prog. Auto program...
... receiving programming signals either overthe-air or from a cable-type service provider. 1 Press the MENU button and then use D / E button to select the Channel menu. 2 Press the G button and then use the D / E buttons to begin the channel search. • Wait for over-the-air channels and then channels provided by a cable service. When the channel search is complete, use D / E button to select EZ Scan. 3 Press the G button to review the memorized channels. ming up TV stations Channel EZ Scan Manual prog. Auto program...

Owners Manual
Page 24
... channels. 1 Press the MENU button and then use D / E button to select the Channel menu. 2 Press the G button and then use D / E button to select Manual prog.. 3 Press the G button and then use F / G button to select a channel you quickly tune in up to 8 channels of your choice without having to wait for first favorite channel. 5 Repeat steps 3 to 4 to memorize other channels. 6 Press the ENTER button to set D E FG OK MENU - TV/AV OPEN/CLOSE POWER MULTIMEDIA VIDEO STOP FFCCRR AUDIO PLAY...
... channels. 1 Press the MENU button and then use D / E button to select the Channel menu. 2 Press the G button and then use D / E button to select Manual prog.. 3 Press the G button and then use F / G button to select a channel you quickly tune in up to 8 channels of your choice without having to wait for first favorite channel. 5 Repeat steps 3 to 4 to memorize other channels. 6 Press the ENTER button to set D E FG OK MENU - TV/AV OPEN/CLOSE POWER MULTIMEDIA VIDEO STOP FFCCRR AUDIO PLAY...

Owners Manual
Page 25
... Sharpness are displayed in PC mode. 25 You can adjust picture contrast, brightness, color, sharpness and tint to save . TV/AV OPEN/CLOSE POWER MULTIMEDIA FCR CC VVIDEidO eo AUDIO AUDIO MTS STOP PLAY PAUSE/STEP REPEAT D E F OK MENU 1 Press the MENU button and then D / E button to select the Picture menu. 2 Press the G button and then D / E button to select EZ Video. 3 Press the G button and then D / E button to select a picture setting on the EZ Video menu. 4 Press the...
... Sharpness are displayed in PC mode. 25 You can adjust picture contrast, brightness, color, sharpness and tint to save . TV/AV OPEN/CLOSE POWER MULTIMEDIA FCR CC VVIDEidO eo AUDIO AUDIO MTS STOP PLAY PAUSE/STEP REPEAT D E F OK MENU 1 Press the MENU button and then D / E button to select the Picture menu. 2 Press the G button and then D / E button to select EZ Video. 3 Press the G button and then D / E button to select a picture setting on the EZ Video menu. 4 Press the...

Owners Manual
Page 26
... Cinema Mode Setup Picture EZ Video User Cinema On Off D E FG OK MENU - D E F OK MENU 1 Press the MENU button and then use D / E button to select the Picture menu. 2 Press the G button and then use D / E button to select Cimena. 3 Press the G button and then use D / E button to to select On or Off. 4 Press the ENTER button to the left / right sides so that the screen 16:9 is full. Picture format (ARC-Aspect Ratio Correction) TV/AV OPEN/CLOSE POWER MULTIMEDIA VIDEO STOP FCR AUDIO PLAY...
... Cinema Mode Setup Picture EZ Video User Cinema On Off D E FG OK MENU - D E F OK MENU 1 Press the MENU button and then use D / E button to select the Picture menu. 2 Press the G button and then use D / E button to select Cimena. 3 Press the G button and then use D / E button to to select On or Off. 4 Press the ENTER button to the left / right sides so that the screen 16:9 is full. Picture format (ARC-Aspect Ratio Correction) TV/AV OPEN/CLOSE POWER MULTIMEDIA VIDEO STOP FCR AUDIO PLAY...

Owners Manual
Page 38
... select the PC menu. 2 Press the G button and then use the D / E button to select Reset. 3 Press the G button to remove any vertical bars or stripes visible on the screen background. default settings cannot be changed. PC Menu Options PC H-Position V-Position Clock Phase Auto Configure Reset Clock / Phase PC H-Position 85 V-Position Clock Phase Auto Configure Reset D E FG OK MENU • Clock This function is to the default settings programmed at the factory...
... select the PC menu. 2 Press the G button and then use the D / E button to select Reset. 3 Press the G button to remove any vertical bars or stripes visible on the screen background. default settings cannot be changed. PC Menu Options PC H-Position V-Position Clock Phase Auto Configure Reset Clock / Phase PC H-Position 85 V-Position Clock Phase Auto Configure Reset D E FG OK MENU • Clock This function is to the default settings programmed at the factory...

Owners Manual
Page 51
... one track, you must set PBC to Off on the remote control during DVD playback, press DISPLAY button and press D / E to select the required speed: F I 1/16, F I 1/8, F I 1/4, or F I 1/2 (backward), or I G 1/16, I G 1/8, I G 1/4, or I G 1/2 (forward). 3 To exit Slow Motion mode, press G PLAY button. With a DivX Disc and Video CD, the Slow speed changes: I G 1/16, I G 1/8, I G 1/4 or I G 1/2 (forward). The DVD player will now go directly to any chapter during playback...
... one track, you must set PBC to Off on the remote control during DVD playback, press DISPLAY button and press D / E to select the required speed: F I 1/16, F I 1/8, F I 1/4, or F I 1/2 (backward), or I G 1/16, I G 1/8, I G 1/4, or I G 1/2 (forward). 3 To exit Slow Motion mode, press G PLAY button. With a DivX Disc and Video CD, the Slow speed changes: I G 1/16, I G 1/8, I G 1/4 or I G 1/2 (forward). The DVD player will now go directly to any chapter during playback...
Owners Manual
Page 63
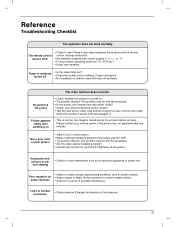
... remote operating mode set ? • Check the power control settings. Power interrupted • No broadcast on • This is normal, the image is any function to +, - No or poor color or poor picture • Adjust Color in menu option. • Keep a sufficient distance between the product and the remote control causing obstruction. • Are batteries installed with Auto off • Is the sleep timer set : TV, VCR etc.? • Install new batteries. Reference Troubleshooting...
... remote operating mode set ? • Check the power control settings. Power interrupted • No broadcast on • This is normal, the image is any function to +, - No or poor color or poor picture • Adjust Color in menu option. • Keep a sufficient distance between the product and the remote control causing obstruction. • Are batteries installed with Auto off • Is the sleep timer set : TV, VCR etc.? • Install new batteries. Reference Troubleshooting...

