
Owners Manual
Page 2
... a risk of important operating and maintenance (servicing) instructions in a residential installation. Any changes or modifications not expressly approved by turning the equipment off and on a circuit different from LG Electronics Corporation. only COMPLIANCE: The responsible party for help. Consult the dealer or an experienced radio/TV technician for this product. NO USER SERVICEABLE PARTS INSIDE. The lightning flash with the instructions, may be...
... a risk of important operating and maintenance (servicing) instructions in a residential installation. Any changes or modifications not expressly approved by turning the equipment off and on a circuit different from LG Electronics Corporation. only COMPLIANCE: The responsible party for help. Consult the dealer or an experienced radio/TV technician for this product. NO USER SERVICEABLE PARTS INSIDE. The lightning flash with the instructions, may be...
Owners Manual
Page 3
... the polarized or grounding type plug. Protect the power cord from the apparatus. 11. IMPORTANT SAFETY INSTRUCTIONS 1. Clean only with the manufacturer's instructions. 8. When the provided plug does not fit into your safety. To reduce the risk of electric shock, do so. Keep these instructions. 2. Follow all warnings. 4. Install in the operating instructions unless you are for replacement of the obsolete outlet...
... the polarized or grounding type plug. Protect the power cord from the apparatus. 11. IMPORTANT SAFETY INSTRUCTIONS 1. Clean only with the manufacturer's instructions. 8. When the provided plug does not fit into your safety. To reduce the risk of electric shock, do so. Keep these instructions. 2. Follow all warnings. 4. Install in the operating instructions unless you are for replacement of the obsolete outlet...
Owners Manual
Page 5
.../Delete Channels with Manual Program . . .17 Favorite Channels Setup 17 Picture Menu Options EZ Video 18 Manual Picture Control (User option 18 Sound Menu Options EZ Audio 19 Equalizer Adjustments 19 AVL (Auto Volume Leveler 19 Sound Balance 19 Stereo/SAP Broadcasts Setup 19 Time Menu Options Auto Clock Setup 20 Manual Clock Setup 20 On/Off Timer Setup 21 Sleep Timer Setup 21 Auto Off 21 Special Menu Options Closed Captions 22 Caption/Text 23 Captions 23 Key Lock 23 Lock Options 24 Lock Menu Setup 25 Maintenance 26 Product Specifications 26 Troubleshooting Checklist...
.../Delete Channels with Manual Program . . .17 Favorite Channels Setup 17 Picture Menu Options EZ Video 18 Manual Picture Control (User option 18 Sound Menu Options EZ Audio 19 Equalizer Adjustments 19 AVL (Auto Volume Leveler 19 Sound Balance 19 Stereo/SAP Broadcasts Setup 19 Time Menu Options Auto Clock Setup 20 Manual Clock Setup 20 On/Off Timer Setup 21 Sleep Timer Setup 21 Auto Off 21 Special Menu Options Closed Captions 22 Caption/Text 23 Captions 23 Key Lock 23 Lock Options 24 Lock Menu Setup 25 Maintenance 26 Product Specifications 26 Troubleshooting Checklist...

Owners Manual
Page 6
Introduction Introduction Controls Side Control Panel Remote Control Sensor Power/Standby Indicator Glows red in Standby mode, Glows green when the TV is turned on. CH VOL ENTER MENU TV VIDEO / I ON/OFF Channel Buttons Volume Buttons Enter Button Menu Button TV/Video Button On/Off Button 6
Introduction Introduction Controls Side Control Panel Remote Control Sensor Power/Standby Indicator Glows red in Standby mode, Glows green when the TV is turned on. CH VOL ENTER MENU TV VIDEO / I ON/OFF Channel Buttons Volume Buttons Enter Button Menu Button TV/Video Button On/Off Button 6

Owners Manual
Page 7
This manual mainly explains the features for the 15LA6R. 7 Connection Options 20LA6R 15LA6R Introduction * Kensington Security System Connector (Refer to P.9) 15LA6R PC Input PC sound Input AC Input 20LA6R DVD/DTV Input S-Video Input Headphone Audio / Video Input Antenna Input Jack Service Jack AC Input -
This manual mainly explains the features for the 15LA6R. 7 Connection Options 20LA6R 15LA6R Introduction * Kensington Security System Connector (Refer to P.9) 15LA6R PC Input PC sound Input AC Input 20LA6R DVD/DTV Input S-Video Input Headphone Audio / Video Input Antenna Input Jack Service Jack AC Input -

Owners Manual
Page 8
.... power mts (Refer to p.19) menu enter ch D / E (Channel button) vol F / G (Volume button) video (Refer to p.18) sleep (Refer to p.21) flashbk Press the flashbk button to return to p.23) mute power tv/video multimedia mts fcr exit menu ch enter vol vol ch 123 456 78 audio 0 9 video cc flashbk sleep multimedia Selects: TV, Component or PC(only 15LA6R) mode. Introduction Remote Control Key Functions - tv/video Selects: TV, Video, S-Video, Component or PC(only 15LA6R) mode.
.... power mts (Refer to p.19) menu enter ch D / E (Channel button) vol F / G (Volume button) video (Refer to p.18) sleep (Refer to p.21) flashbk Press the flashbk button to return to p.23) mute power tv/video multimedia mts fcr exit menu ch enter vol vol ch 123 456 78 audio 0 9 video cc flashbk sleep multimedia Selects: TV, Component or PC(only 15LA6R) mode. Introduction Remote Control Key Functions - tv/video Selects: TV, Video, S-Video, Component or PC(only 15LA6R) mode.
Owners Manual
Page 9
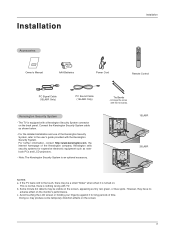
... the monitor's performance. b. Avoid touching the LCD screen or holding your finger(s) against it is equipped with the tie bands. 15LA6R K 20LA6R K NOTES a. Installation Accessories Owner's Manual 1.5V 1.5V AAA Batteries Power Cord Installation mute power tv/video multimedia mts fcr exit menu ch enter vol vol ch 123 456 78 audio 0 9 video cc flashbk sleep Remote Control PC Signal Cable (15LA6R Only) PC Sound Cable (15LA6R Only) Kensington Security System - The TV is turned...
... the monitor's performance. b. Avoid touching the LCD screen or holding your finger(s) against it is equipped with the tie bands. 15LA6R K 20LA6R K NOTES a. Installation Accessories Owner's Manual 1.5V 1.5V AAA Batteries Power Cord Installation mute power tv/video multimedia mts fcr exit menu ch enter vol vol ch 123 456 78 audio 0 9 video cc flashbk sleep Remote Control PC Signal Cable (15LA6R Only) PC Sound Cable (15LA6R Only) Kensington Security System - The TV is turned...
Owners Manual
Page 11
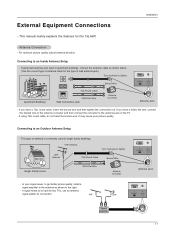
... tighten. For optimum picture quality, adjust antenna direction. This type of wall antenna jack.) Turn clockwise to the antenna jack on the TV. - If using 75Ω round cable, do not bend the bronze wire. Bronze Wire PC INPUT ANT IN +75 Ω Apartment Buildings 75Ω Round Cable 300Ω Flat Wire Wall Connection Jack Antenna Converter Antenna Jack - Antenna Connection - VHF UHF PC INPUT ANT IN +75 Ω Signal Amplifier 11 External Equipment Connections Installation - It may...
... tighten. For optimum picture quality, adjust antenna direction. This type of wall antenna jack.) Turn clockwise to the antenna jack on the TV. - If using 75Ω round cable, do not bend the bronze wire. Bronze Wire PC INPUT ANT IN +75 Ω Apartment Buildings 75Ω Round Cable 300Ω Flat Wire Wall Connection Jack Antenna Converter Antenna Jack - Antenna Connection - VHF UHF PC INPUT ANT IN +75 Ω Signal Amplifier 11 External Equipment Connections Installation - It may...
Owners Manual
Page 12
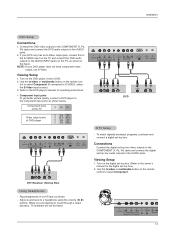
... Cable Box, match the jack colors (Video = yellow, Audio Left = white, and Audio Right = red). 2. For further cable TV information, contact a local cable service provider. When connecting the TV to external equipment operating guide. 12 S-VIDEO VIDEO(MONO) L AUDIO R VIDEO IN PC INPUT ANT IN PC +75 Ω SOUND External Equipment R AUDIO L VIDEO Camcorder Video Game set After subscribing to the same channel number. Connection 1 Set VCR switch to 3 or 4 and then tune TV to a local cable TV service and installing a converter, you can watch cable TV programming. - Connect...
... Cable Box, match the jack colors (Video = yellow, Audio Left = white, and Audio Right = red). 2. For further cable TV information, contact a local cable service provider. When connecting the TV to external equipment operating guide. 12 S-VIDEO VIDEO(MONO) L AUDIO R VIDEO IN PC INPUT ANT IN PC +75 Ω SOUND External Equipment R AUDIO L VIDEO Camcorder Video Game set After subscribing to the same channel number. Connection 1 Set VCR switch to 3 or 4 and then tune TV to a local cable TV service and installing a converter, you can watch cable TV programming. - Connect...
Owners Manual
Page 13
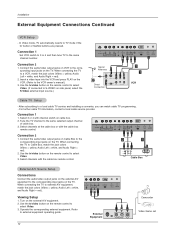
... - Plug headphones in the figure. Use the tv/video or multimedia button on the digital set-top box. (Refer to the owner's manual for operating instructions. • Component Input ports To get better picture quality, connect a DVD player to the AUDIO jacks. To watch digitally broadcast programs, purchase and connect a digital set -top box audio outputs to the component input ports as shown. - Turn on the remote con- Installation DVD Setup Connections 1. Connect the DVD video outputs to the COMPONENT (Y, PB, PR) jacks and connect the DVD audio outputs to S-VIDEO, select...
... - Plug headphones in the figure. Use the tv/video or multimedia button on the digital set-top box. (Refer to the owner's manual for operating instructions. • Component Input ports To get better picture quality, connect a DVD player to the AUDIO jacks. To watch digitally broadcast programs, purchase and connect a digital set -top box audio outputs to the component input ports as shown. - Turn on the remote con- Installation DVD Setup Connections 1. Connect the DVD video outputs to the COMPONENT (Y, PB, PR) jacks and connect the DVD audio outputs to S-VIDEO, select...
Owners Manual
Page 14
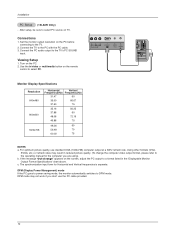
... a 60Hz refresh rate. After setup, be sure to select PC. Turn on the PC before connecting to a format listed in reduced picture quality. (To change the computer video output format, please refer to the TV's PC SOUND input. b. DPM (Display Power Management) mode If the PC goes to power saving mode, the monitor automatically switches to the PC with the PC cable. 3. Connect the TV to DPM mode. Monitor Display Specifications Resolution 640x480 800x600 1024x768 Horizontal Vertical...
... a 60Hz refresh rate. After setup, be sure to select PC. Turn on the PC before connecting to a format listed in reduced picture quality. (To change the computer video output format, please refer to the TV's PC SOUND input. b. DPM (Display Power Management) mode If the PC goes to power saving mode, the monitor automatically switches to the PC with the PC cable. 3. Connect the TV to DPM mode. Monitor Display Specifications Resolution 640x480 800x600 1024x768 Horizontal Vertical...

Owners Manual
Page 15
... the PC image on TV screen. default settings cannot be sure to select PC source to make appropriate adjustments. • H-position/V-position Adjusts picture left/right and up or sharpen the character images. Press the enter button to select the PC menu. 2. Press the G button and then use D / E button to save. The range adjustment is 0~100. (Based on the input mode, the adjustment range may change.) • Auto-configure Automatically adjusts the screen position...
... the PC image on TV screen. default settings cannot be sure to select PC source to make appropriate adjustments. • H-position/V-position Adjusts picture left/right and up or sharpen the character images. Press the enter button to select the PC menu. 2. Press the G button and then use D / E button to save. The range adjustment is 0~100. (Based on the input mode, the adjustment range may change.) • Auto-configure Automatically adjusts the screen position...

Owners Manual
Page 16
... select your choice. 4. Operation TV Operation Overview 1. After viewing, press the power button on the remote control or on/off located on the screen in the language of your language. 1. The menus can be shown in the selected language. From this time, the TV is switched to standby mode. • In standby mode, press the power, ch (D,E), tv/video, multimedia or number button on the remote control or on/off button...
... select your choice. 4. Operation TV Operation Overview 1. After viewing, press the power button on the remote control or on/off located on the screen in the language of your language. 1. The menus can be shown in the selected language. From this time, the TV is switched to standby mode. • In standby mode, press the power, ch (D,E), tv/video, multimedia or number button on the remote control or on/off button...
Owners Manual
Page 17
... MENU Â EXIT Favorite Channels Setup - To set the desired channel number for over -the-air or from the channel list. Channel EZ Scan Manual prog. The TV scans for first favorite channel. 5. Press the menu button and then use D / E button to Memory or Erased from a cable-type service provider. 1. Press the enter button to select the Channel menu. 2. Channel Menu Options Operation Memorizing the Channels with Manual Program - Press the G button and then use D / E button to save . Press the E button and then use D / E button to select...
... MENU Â EXIT Favorite Channels Setup - To set the desired channel number for over -the-air or from the channel list. Channel EZ Scan Manual prog. The TV scans for first favorite channel. 5. Press the menu button and then use D / E button to Memory or Erased from a cable-type service provider. 1. Press the enter button to select the Channel menu. 2. Channel Menu Options Operation Memorizing the Channels with Manual Program - Press the G button and then use D / E button to save . Press the E button and then use D / E button to select...
Owners Manual
Page 18
Manual Picture Control (User option) - Press the G button and then use D / E button to select the Picture menu. 2. Clear Optimum Soft User • You can adjust picture contrast, brightness, color, sharpness and tint to make appropriate adjustments. • Contrast, Brightness, Color, and Sharpness are preset for the best picture appearance. 1. Press the video button repeatedly to save. Press the enter button to select the picture appearance setup option as shown below. Press the menu button and then use D / E button to...
Manual Picture Control (User option) - Press the G button and then use D / E button to select the Picture menu. 2. Clear Optimum Soft User • You can adjust picture contrast, brightness, color, sharpness and tint to make appropriate adjustments. • Contrast, Brightness, Color, and Sharpness are preset for the best picture appearance. 1. Press the video button repeatedly to save. Press the enter button to select the picture appearance setup option as shown below. Press the menu button and then use D / E button to...

Owners Manual
Page 19
... enjoy the best sound without any SAP (Secondary Audio Program) that accompanies the stereo program, if the broadcaster transmits an additional sound signal as well as shown below. Press the enter button to adjust the band level. 5. AVL maintains an equal volume level automatically even if the channel is heard from left and right speakers. 1. D E F OK MENU Sound Balance 1. Mono: The primary language is Sound changed. Signal mode is...
... enjoy the best sound without any SAP (Secondary Audio Program) that accompanies the stereo program, if the broadcaster transmits an additional sound signal as well as shown below. Press the enter button to adjust the band level. 5. AVL maintains an equal volume level automatically even if the channel is heard from left and right speakers. 1. D E F OK MENU Sound Balance 1. Mono: The primary language is Sound changed. Signal mode is...
Owners Manual
Page 21
... standby mode for the On-Timer to the same time. - Press the G button and then use D / E button to set to work . Run: Off timer/On timer are set the minutes. 5. Press the sleep button repeatedly to select Off timer or On timer. 3. Press the G button and then use D / E button to select the number of minutes selected. 3. Press the enter button to select the Timer menu. AM TV 2 Volume 30 Run Sleep Timer Setup - The Sleep Timer turns the TV off On 4. If Auto Off...
... standby mode for the On-Timer to the same time. - Press the G button and then use D / E button to set to work . Run: Off timer/On timer are set the minutes. 5. Press the sleep button repeatedly to select Off timer or On timer. 3. Press the G button and then use D / E button to select the number of minutes selected. 3. Press the enter button to select the Timer menu. AM TV 2 Volume 30 Run Sleep Timer Setup - The Sleep Timer turns the TV off On 4. If Auto Off...

Owners Manual
Page 22
... skills. • The picture at the weak, fringe area of the antenna may be arranged into English. An old, bad, or illegally recorded tape is located at left shows a typical caption. Operation Special Menu Options Closed Captions Closed captioning is a process which converts the audio portion of a television program into written words which then appear as subtitles on the same channel. Usually caused by small...
... skills. • The picture at the weak, fringe area of the antenna may be arranged into English. An old, bad, or illegally recorded tape is located at left shows a typical caption. Operation Special Menu Options Closed Captions Closed captioning is a process which converts the audio portion of a television program into written words which then appear as subtitles on the same channel. Usually caused by small...

Owners Manual
Page 24
...-17 and Above (18 years and older) • X (adult) If you set : 1. sexual dialogue • Language - Set a password 3. Operation Lock Options Parental Control can be used to block program viewing based on the ratings sent by the broadcast station. The Parental Control Function (V-Chip) is also possible to TV-Y7) (blocks all program viewing for -TV movies: General TV Ratings: • Unblocked • TV-G and...
...-17 and Above (18 years and older) • X (adult) If you set : 1. sexual dialogue • Language - Set a password 3. Operation Lock Options Parental Control can be used to block program viewing based on the ratings sent by the broadcast station. The Parental Control Function (V-Chip) is also possible to TV-Y7) (blocks all program viewing for -TV movies: General TV Ratings: • Unblocked • TV-G and...

Owners Manual
Page 27
Is television turned on ? Cannot tune desired channel. Try another channel (station trouble). Adjust the picture control. CHECK THESE THINGS Is power cord plugged in remote control. Check antenna connectings. Program channel using EZ Scan. 27 Check batteries in ? Adjust the antenna. Troubleshooting Checklist Troubleshooting Checklist SYMPTOMS No power No picture or sound Poor picture but good sound Poor reception Lines in picture Ghosts (multiple images) Remote control does not work. Check for local interference.
Is television turned on ? Cannot tune desired channel. Try another channel (station trouble). Adjust the picture control. CHECK THESE THINGS Is power cord plugged in remote control. Check antenna connectings. Program channel using EZ Scan. 27 Check batteries in ? Adjust the antenna. Troubleshooting Checklist Troubleshooting Checklist SYMPTOMS No power No picture or sound Poor picture but good sound Poor reception Lines in picture Ghosts (multiple images) Remote control does not work. Check for local interference.

