

Owner's Manual (English)
Page 4
...specifically designed to stand in the microwave oven for a short time before placing bag in this appliance only for example, closed glass jars are placed inside the oven ignite, KEEP OVEN DOOR CLOSED, turn oven off, and disconnect the power cord or shut off power... used by qualified service personnel. SAVE THESE INSTRUCTIONS 4 MICROWAVE IMPORTANT SAFETY INSTRUCTIONS The safety instructions below will tell you how to your oven. WARNING - Connect only to excessive microwave energy: 1. It is not designed for industrial or laboratory use the cavity for examination, repair,...
...specifically designed to stand in the microwave oven for a short time before placing bag in this appliance only for example, closed glass jars are placed inside the oven ignite, KEEP OVEN DOOR CLOSED, turn oven off, and disconnect the power cord or shut off power... used by qualified service personnel. SAVE THESE INSTRUCTIONS 4 MICROWAVE IMPORTANT SAFETY INSTRUCTIONS The safety instructions below will tell you how to your oven. WARNING - Connect only to excessive microwave energy: 1. It is not designed for industrial or laboratory use the cavity for examination, repair,...

Owner's Manual (English)
Page 5
.... No user serviceable parts are inside. SAFETY - Use handles and knobs. 3. It must never be done only by the manufacturer may occur if the lid is used on or taking off parts, and before serving any control to the nearest authorized service center for other abrasive materials. 19. Repair should always be flowed to reduce the risk of electric shock...
.... No user serviceable parts are inside. SAFETY - Use handles and knobs. 3. It must never be done only by the manufacturer may occur if the lid is used on or taking off parts, and before serving any control to the nearest authorized service center for other abrasive materials. 19. Repair should always be flowed to reduce the risk of electric shock...

Owner's Manual (English)
Page 6
...risk of fire or electric shock, do not install closer than 4 inches to change without prior notice. Slide the turntable support onto the pin in ...making sure it seats properly on the pin. Then place the glass turntable on a level surface that provides at least 4 inches of space at the left, right, top, and rear sides for proper ventilation. 3. UNDERSTANDING YOUR COFFEE COMBO SPECIFICATIONS Power Supply Rated Power... 60705 RATING STANDARD Specifications subject to side and back wall. 6 Remove your LG Coffee Combo and all packing materials from the shipping carton. 2. INSTALLATION 1.
...risk of fire or electric shock, do not install closer than 4 inches to change without prior notice. Slide the turntable support onto the pin in ...making sure it seats properly on the pin. Then place the glass turntable on a level surface that provides at least 4 inches of space at the left, right, top, and rear sides for proper ventilation. 3. UNDERSTANDING YOUR COFFEE COMBO SPECIFICATIONS Power Supply Rated Power... 60705 RATING STANDARD Specifications subject to side and back wall. 6 Remove your LG Coffee Combo and all packing materials from the shipping carton. 2. INSTALLATION 1.

Owner's Manual (English)
Page 7
UNDERSTANDING YOUR COFFEE COMBO PARTS AND ACCESSORIES Control Panel Glass Turntable Microwave Oven Coffee Maker Turntable Support See-Through Door Easy-Clean Oven Cavity Flavor Selector Filter Basket Warming Plate Water Reservoir Safety Interlock System Cooking Guide Label Your oven comes with the following accessories: 1 Use and Care Guide 1 Glass Turntable 1 Turntable Support 1 7 cup Water Reservoir 1 7 cup Carafe with lid Carafe 7
UNDERSTANDING YOUR COFFEE COMBO PARTS AND ACCESSORIES Control Panel Glass Turntable Microwave Oven Coffee Maker Turntable Support See-Through Door Easy-Clean Oven Cavity Flavor Selector Filter Basket Warming Plate Water Reservoir Safety Interlock System Cooking Guide Label Your oven comes with the following accessories: 1 Use and Care Guide 1 Glass Turntable 1 Turntable Support 1 7 cup Water Reservoir 1 7 cup Carafe with lid Carafe 7

Owner's Manual (English)
Page 8
... to turn Child Lock on or off. 4. POWER. This pad is used when you with the quick defrosting method for frozen meat, poultry and fish up to set the cooking power. 12. OFF/CLEAR. TIME SET. DISPLAY. Touch this pad to turn the brew timer function On or Off. 8 Touch this pad to start all entries (except the Auto Cook and Add Minute function which...
... to turn Child Lock on or off. 4. POWER. This pad is used when you with the quick defrosting method for frozen meat, poultry and fish up to set the cooking power. 12. OFF/CLEAR. TIME SET. DISPLAY. Touch this pad to turn the brew timer function On or Off. 8 Touch this pad to start all entries (except the Auto Cook and Add Minute function which...

Owner's Manual (English)
Page 10
... a browning agent, such as potatoes and squash. • The turntable may need to cover food during use. Waxed paper will help retain heat. Because dense foods cook more often, if needed. PIERCING Pierce the shell, skin, or membrane of foods before cooking to retain...cooking power shuts off. Be careful not to clear any entries that might have been entered accidentally while cleaning the panel. 10 REMOVABLE PARTS The turntable and turntable support are cooked for many days. ARRANGEMENT Do not stack food. After cleaning the control panel, touch STOP/CLEAR...
... a browning agent, such as potatoes and squash. • The turntable may need to cover food during use. Waxed paper will help retain heat. Because dense foods cook more often, if needed. PIERCING Pierce the shell, skin, or membrane of foods before cooking to retain...cooking power shuts off. Be careful not to clear any entries that might have been entered accidentally while cleaning the panel. 10 REMOVABLE PARTS The turntable and turntable support are cooked for many days. ARRANGEMENT Do not stack food. After cleaning the control panel, touch STOP/CLEAR...

Owner's Manual (English)
Page 11
... oven and coffee maker. Time of day. 1. Touch: Display Shows: 1. : ENTER TIME IN MIN AND SEC 2. 3 : 00 TOUCH START 3. 3 : 00 TIMER and time counting down. Touch and hold Time of day. 2. until LOCKED appears in the display LOCKED (approximately 4 seconds). You can be used as a kitchen timer. USING YOUR MICROWAVE OVEN KITCHEN TIMER Your microwave oven can set up to and when you...
... oven and coffee maker. Time of day. 1. Touch: Display Shows: 1. : ENTER TIME IN MIN AND SEC 2. 3 : 00 TOUCH START 3. 3 : 00 TIMER and time counting down. Touch and hold Time of day. 2. until LOCKED appears in the display LOCKED (approximately 4 seconds). You can be used as a kitchen timer. USING YOUR MICROWAVE OVEN KITCHEN TIMER Your microwave oven can set up to and when you...
Owner's Manual (English)
Page 12
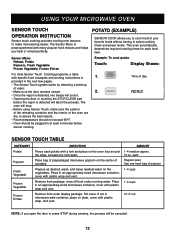
...helps you to select cooking times and power levels. each food item. Time of turntable Prepare as desired, wash, and leave residual water on plate, cover with plastic wrap and vent. Place in microwave-safe container, place on the vegetables. USING YOUR MICROWAVE OVEN SENSOR TOUCH OPERATION INSTRUCTION Sensor touch cooking provides exciting new...The oven will sound. • Opening the door or touching the STOP/CLEAR pad before sensor cooking. The Sensor Menu is detected, two beeps will stop. • Before using Sensor Touch, make microwaving easier. ...
...helps you to select cooking times and power levels. each food item. Time of turntable Prepare as desired, wash, and leave residual water on plate, cover with plastic wrap and vent. Place in microwave-safe container, place on the vegetables. USING YOUR MICROWAVE OVEN SENSOR TOUCH OPERATION INSTRUCTION Sensor touch cooking provides exciting new...The oven will sound. • Opening the door or touching the STOP/CLEAR pad before sensor cooking. The Sensor Menu is detected, two beeps will stop. • Before using Sensor Touch, make microwaving easier. ...

Owner's Manual (English)
Page 14
... Frozen Roll/Muffin Remove from display package and place on package and cook. SELECT MENU 1 TO 6 -SEE COOKING GUIDE EZ-ON A time-saving pad, this function to cook food without the need to 6 pieces (2~3 oz. Example: To cook for more than 3 at a time.) 1 to touch START. Time counts down and power 100 NOTE: Each time you quickly set and start microwave cooking...
... Frozen Roll/Muffin Remove from display package and place on package and cook. SELECT MENU 1 TO 6 -SEE COOKING GUIDE EZ-ON A time-saving pad, this function to cook food without the need to 6 pieces (2~3 oz. Example: To cook for more than 3 at a time.) 1 to touch START. Time counts down and power 100 NOTE: Each time you quickly set and start microwave cooking...
Owner's Manual (English)
Page 15
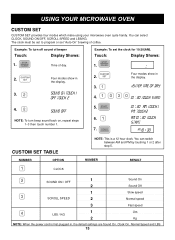
... by touching 1 or 2 after step 5. Example: To turn beep sound back on touch 1 off touch 2 4. 4. 5. Four modes show in the display. ; enter time of day. 1. 2. sound on , repeat steps 1~3 then touch number 1. 7. : Four modes show in , the default settings are Sound On, Clock On, Normal Speed and LBS. 15 NOTE: To turn off 6. USING YOUR MICROWAVE OVEN CUSTOM SET CUSTOM SET provides four modes which make using your microwave oven quite handy...
... by touching 1 or 2 after step 5. Example: To turn beep sound back on touch 1 off touch 2 4. 4. 5. Four modes show in the display. ; enter time of day. 1. 2. sound on , repeat steps 1~3 then touch number 1. 7. : Four modes show in , the default settings are Sound On, Clock On, Normal Speed and LBS. 15 NOTE: To turn off 6. USING YOUR MICROWAVE OVEN CUSTOM SET CUSTOM SET provides four modes which make using your microwave oven quite handy...

Owner's Manual (English)
Page 16
...enter the weight 2. 4. The oven will show you to check, turn , separate, or rearrange the food. Remove any portions that reminds you which can cause the outer surface of the oven cavity will beep during the DEFROST cycle. When defrosting, scrape off thawed meat when the beep sounds.... Touch: Display Shows: 1 . 2 1. 3. The Cooking Guide on a microwave roasting rack to defrost time count down. and touch start to cook. • For best results, shape your ground meat into the form of day. USING YOUR MICROWAVE OVEN AUTO DEFROST Three defrost sequences are preset in beep ...
...enter the weight 2. 4. The oven will show you to check, turn , separate, or rearrange the food. Remove any portions that reminds you which can cause the outer surface of the oven cavity will beep during the DEFROST cycle. When defrosting, scrape off thawed meat when the beep sounds.... Touch: Display Shows: 1 . 2 1. 3. The Cooking Guide on a microwave roasting rack to defrost time count down. and touch start to cook. • For best results, shape your ground meat into the form of day. USING YOUR MICROWAVE OVEN AUTO DEFROST Three defrost sequences are preset in beep ...

Owner's Manual (English)
Page 17
... you program a specific cook time and power. Time counting down and POWER 80. 17 OR POWER 3. Example: To cook for 5 minutes, 30 seconds at HIGH (100%) power. Touch: Display Shows: 1. : ENTER COOKING TIME 5 : 30 TOUCH START 2. USING YOUR MICROWAVE OVEN AUTO DEFROST TABLE Category Food to be Defrosted MEAT Beef Ground beef, Round steak, Cubes for more information. Refer to HIGH power (100%). ENTER POWER LEVEL...
... you program a specific cook time and power. Time counting down and POWER 80. 17 OR POWER 3. Example: To cook for 5 minutes, 30 seconds at HIGH (100%) power. Touch: Display Shows: 1. : ENTER COOKING TIME 5 : 30 TOUCH START 2. USING YOUR MICROWAVE OVEN AUTO DEFROST TABLE Category Food to be Defrosted MEAT Beef Ground beef, Round steak, Cubes for more information. Refer to HIGH power (100%). ENTER POWER LEVEL...
Owner's Manual (English)
Page 18
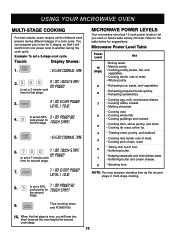
... set a 3 minute cook time for suggestions: Microwave Power Level Table Power Level Use 10 (High) 9 8 • Boiling water. • Making candy. • Cooking poultry pieces, fish, and vegetables. • Cooking tender cuts of meat. • Whole poultry. • Reheating rice, pasta, and vegetables. • Reheating prepared foods quickly. • Reheating sandwiches. • Cooking egg, milk, and cheese dishes...
... set a 3 minute cook time for suggestions: Microwave Power Level Table Power Level Use 10 (High) 9 8 • Boiling water. • Making candy. • Cooking poultry pieces, fish, and vegetables. • Cooking tender cuts of meat. • Whole poultry. • Reheating rice, pasta, and vegetables. • Reheating prepared foods quickly. • Reheating sandwiches. • Cooking egg, milk, and cheese dishes...

Owner's Manual (English)
Page 19
... instructions in very bony parts.Turning food over helps to cook these areas evenly. 6. Because of meats. Poultry Cooking Table Poultry Microwave Cooking Time Power Per Pound CHICKEN Whole Breast (boned) Portions TURKEY Whole 8 11 to 15 minutes 8 10 to 14 minutes 8 11 to 17 minutes 8 11 to 15 minutes NOTES: • The times listed above are only a guide...
... instructions in very bony parts.Turning food over helps to cook these areas evenly. 6. Because of meats. Poultry Cooking Table Poultry Microwave Cooking Time Power Per Pound CHICKEN Whole Breast (boned) Portions TURKEY Whole 8 11 to 15 minutes 8 10 to 14 minutes 8 11 to 17 minutes 8 11 to 15 minutes NOTES: • The times listed above are only a guide...

Owner's Manual (English)
Page 24
... end (Scroll 3 times & Beep 5 times) After scrolling stops. User can adjust the temperature using temp touch pad. (See page 26) • Warming time is set at medium when the unit is plugged in . small/batch/ warm-med (Scroll) small/batch/ end (Scroll 3 times & Beep 5 times) After scrolling stops. NOTE: When the brewing is completed, coffee maker enters KEEP WARM mode automatically. •...
... end (Scroll 3 times & Beep 5 times) After scrolling stops. User can adjust the temperature using temp touch pad. (See page 26) • Warming time is set at medium when the unit is plugged in . small/batch/ warm-med (Scroll) small/batch/ end (Scroll 3 times & Beep 5 times) After scrolling stops. NOTE: When the brewing is completed, coffee maker enters KEEP WARM mode automatically. •...

Owner's Manual (English)
Page 25
... "Auto-On" mode, touch "Timer On/Off" again. 5. am 7:20 brew/touch 1/ small/batch/touch 2 (Scroll) After scrolling stops. 25 Display Shows: am 7:20 set /brew/timer (Scroll once) After scrolling stops. Time of the day. To deactivate "Auto-On", touch "Timer On/Off". (Disappear 'Auto BREW') 3. NOTE: 1. am /touch 1/pm/touch 2 (Scroll) 9. Example program: Auto-On, 7:20 A.M., Brew Touch: Display Shows: Time of the day. Program...
... "Auto-On" mode, touch "Timer On/Off" again. 5. am 7:20 brew/touch 1/ small/batch/touch 2 (Scroll) After scrolling stops. 25 Display Shows: am 7:20 set /brew/timer (Scroll once) After scrolling stops. Time of the day. To deactivate "Auto-On", touch "Timer On/Off". (Disappear 'Auto BREW') 3. NOTE: 1. am /touch 1/pm/touch 2 (Scroll) 9. Example program: Auto-On, 7:20 A.M., Brew Touch: Display Shows: Time of the day. Program...
Owner's Manual (English)
Page 26
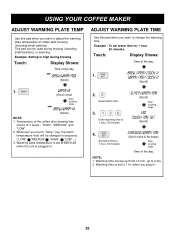
...) After scrolling stops. ADJUST WARMING PLATE TIME Use this pad when you want to high during brewing (including small batches), or warming. warm/time/touch 2 (Scroll) 2. brew/warm-med (Scroll) 1. Touch: Display Shows: Time of the day. changed in sequence. ("LOW" "MEDIUM" "HIGH" "LOW"...) 3. NOTE: 1. "HIGH", "MEDIUM", and "LOW". 2. brew timer/touch 1/ 1. Warming plate temperature is set at MEDIUM...
...) After scrolling stops. ADJUST WARMING PLATE TIME Use this pad when you want to high during brewing (including small batches), or warming. warm/time/touch 2 (Scroll) 2. brew/warm-med (Scroll) 1. Touch: Display Shows: Time of the day. changed in sequence. ("LOW" "MEDIUM" "HIGH" "LOW"...) 3. NOTE: 1. "HIGH", "MEDIUM", and "LOW". 2. brew timer/touch 1/ 1. Warming plate temperature is set at MEDIUM...
Owner's Manual (English)
Page 27
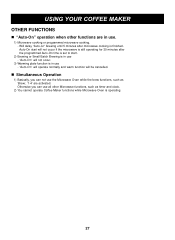
Otherwise you can use all other functions are activated. Will delay "Auto-on" brewing until 5 minutes after the programmed Auto-On time is set to start. 2) Brewing or Small Batch Brewing is finished. "Auto-On" will be cancelled. "Auto-On" will operate normally and warm function will not occur. 3) Warming plate function is operating. 27 Auto-On start will not occur if the microwave is...
Otherwise you can use all other functions are activated. Will delay "Auto-on" brewing until 5 minutes after the programmed Auto-On time is set to start. 2) Brewing or Small Batch Brewing is finished. "Auto-On" will be cancelled. "Auto-On" will operate normally and warm function will not occur. 3) Warming plate function is operating. 27 Auto-On start will not occur if the microwave is...

Owner's Manual (English)
Page 28
... work properly. What does "F-1" and "F-2" code on the control panel is touched? The holes (or ports) allow only light to the point that the setting has been entered. Unplug the oven from the oven light which is located between the oven cavity and the outer wall of the air exhaust vent? That means failure mode. TROUBLESHOOTING Questions and Answers Operation...
... work properly. What does "F-1" and "F-2" code on the control panel is touched? The holes (or ports) allow only light to the point that the setting has been entered. Unplug the oven from the oven light which is located between the oven cavity and the outer wall of the air exhaust vent? That means failure mode. TROUBLESHOOTING Questions and Answers Operation...

Owner's Manual (English)
Page 30
... home to deliver, pick up, and/or install the product, instruct, or replace house fuses or correct wiring, or correction of unauthorized repairs. • Damages or operating problems that vary from the Date of repair or replacement under these excluded circumstances shall be submitted at LG...use for the remaining portion of the original unit's warranty period. * Retain your Sales Receipt to your ZIP code ready. USA Model LCRM1240SW/SB/ST LG Electronics, Inc. Replacement Units and Repair Parts are answered 24 hours a day, 365 days per mation, or Dealer or Authorized Service...
... home to deliver, pick up, and/or install the product, instruct, or replace house fuses or correct wiring, or correction of unauthorized repairs. • Damages or operating problems that vary from the Date of repair or replacement under these excluded circumstances shall be submitted at LG...use for the remaining portion of the original unit's warranty period. * Retain your Sales Receipt to your ZIP code ready. USA Model LCRM1240SW/SB/ST LG Electronics, Inc. Replacement Units and Repair Parts are answered 24 hours a day, 365 days per mation, or Dealer or Authorized Service...


