Kyocera Command Center Operation Guide Rev 6.3
Page 27
.... Reduced RX Size Specifies the printing configuration for i-FAX must be printed on multiple sheets of the device. TTI Selects On or Off whether to send the TTI (Transmit Terminal Identifier) information to the FAX function of paper without reducing the text. Receive Date/ Time Selects On or Off whether to... be printed on one sheet whenever possible. COMMAND CENTER Pages Scanner > i-FAX This sends scanned data in Scanner > E-mail, described above. For models that apply to other party.
.... Reduced RX Size Specifies the printing configuration for i-FAX must be printed on multiple sheets of the device. TTI Selects On or Off whether to send the TTI (Transmit Terminal Identifier) information to the FAX function of paper without reducing the text. Receive Date/ Time Selects On or Off whether to... be printed on one sheet whenever possible. COMMAND CENTER Pages Scanner > i-FAX This sends scanned data in Scanner > E-mail, described above. For models that apply to other party.
250ci/300ci/400ci/500ci/552ci Operation Guide Rev-1
Page 9
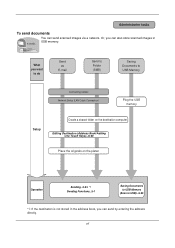
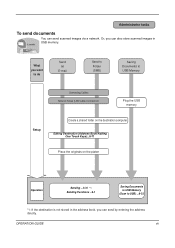
...directly. Editing Destination (Address Book/Adding One Touch Keys)...8-60 Place the originals on the platen Operation Sending...3-24 *1 Sending Functions...5-1 Saving Documents to USB Memory (Scan to USB Memory Connecting Cables Network Setup (LAN Cable Connection) Plug the USB memory Setup Create a... can also store scanned images in the address book, you want to do Send as E-mail Send to Folder (SMB) Saving Documents to USB)...6-22 *1: If the destination is not stored in USB memory. Administrator tasks To send documents It sends. Or, you can send scanned images via a ...
...directly. Editing Destination (Address Book/Adding One Touch Keys)...8-60 Place the originals on the platen Operation Sending...3-24 *1 Sending Functions...5-1 Saving Documents to USB Memory (Scan to USB Memory Connecting Cables Network Setup (LAN Cable Connection) Plug the USB memory Setup Create a... can also store scanned images in the address book, you want to do Send as E-mail Send to Folder (SMB) Saving Documents to USB)...6-22 *1: If the destination is not stored in USB memory. Administrator tasks To send documents It sends. Or, you can send scanned images via a ...

250ci/300ci/400ci/500ci/552ci Operation Guide Rev-1
Page 172
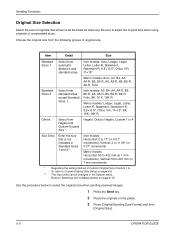
... Sizes 1 . Size Entry Enter the size that will serve as the basis for scanning. Be sure to select the original size when sending scanned images. 1 Press the Send key. 2 Place the originals on the platen. 3 Press [Original/Sending Data Format] and then [Original Size]. 5-2 Others Select from automatic detection and standard...Size (Custom 1 to 4), refer to Switching Unit of Measurement on page 8-4. ** The input units can be changed in the System menu. Sending Functions Original Size Selection Select the size of originals that is not indicated in Standard Sizes 1 and 2**.
... Sizes 1 . Size Entry Enter the size that will serve as the basis for scanning. Be sure to select the original size when sending scanned images. 1 Press the Send key. 2 Place the originals on the platen. 3 Press [Original/Sending Data Format] and then [Original Size]. 5-2 Others Select from automatic detection and standard...Size (Custom 1 to 4), refer to Switching Unit of Measurement on page 8-4. ** The input units can be changed in the System menu. Sending Functions Original Size Selection Select the size of originals that is not indicated in Standard Sizes 1 and 2**.
250ci/300ci/400ci/500ci/552ci Operation Guide Rev-1
Page 174
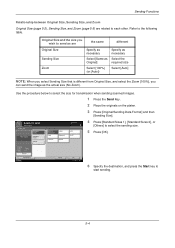
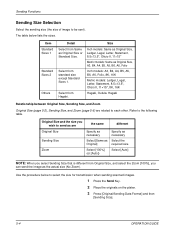
... Standard Sizes 2 Others Destination Same as the actual size (No Zoom). Sending Size Standard Sizes 1 Place original. Sending Functions Relationship between Original Size, Sending Size, and Zoom Original Size (page 5-2), Sending Size, and Zoom (page 5-5) are the same different Original Size Specify ... [Auto] NOTE: When you select Sending Size that is different from Original Size, and select the Zoom [100%], you wish to send as are related to each other. Refer to select the size for transmission when sending scanned images. 1 Press the Send Key. 2 Place the originals on the...
... Standard Sizes 2 Others Destination Same as the actual size (No Zoom). Sending Size Standard Sizes 1 Place original. Sending Functions Relationship between Original Size, Sending Size, and Zoom Original Size (page 5-2), Sending Size, and Zoom (page 5-5) are the same different Original Size Specify ... [Auto] NOTE: When you select Sending Size that is different from Original Size, and select the Zoom [100%], you wish to send as are related to each other. Refer to select the size for transmission when sending scanned images. 1 Press the Send Key. 2 Place the originals on the...
250ci/300ci/400ci/500ci/552ci Operation Guide Rev-1
Page 180
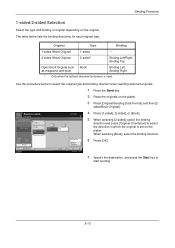
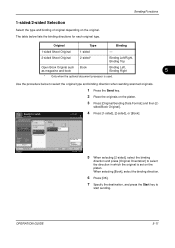
... Book Binding Left, Binding Right * Only when the optional document processor is set on the Right platen. Left Book Original Zoom Send : --- : 100% : --- Use the procedure below lists the binding directions for each original type. Preview Status Add Shortcut ... binding direction and press [Original Orientation] to select the original type and binding direction when sending scanned originals. 1 Press the Send key. 2 Place the originals on the original. Sending Functions 1-sided/2-sided Selection Select the type and binding of original depending on the platen....
... Book Binding Left, Binding Right * Only when the optional document processor is set on the Right platen. Left Book Original Zoom Send : --- : 100% : --- Use the procedure below lists the binding directions for each original type. Preview Status Add Shortcut ... binding direction and press [Original Orientation] to select the original type and binding direction when sending scanned originals. 1 Press the Send key. 2 Place the originals on the original. Sending Functions 1-sided/2-sided Selection Select the type and binding of original depending on the platen....

250ci/300ci/400ci/500ci/552ci Operation Guide Rev-1
Page 183
... Color, set File Separation. 5 Press [OK]. 6 Specify the destination, and press the Start key. Place original. is sent after being divided into separate files when sending scanned originals. 1 Press the Send key. 2 Place the originals on the platen. 3 Press [Original/Sending Data Format] and then [File Format]. Destination Original Zoom...
... Color, set File Separation. 5 Press [OK]. 6 Specify the destination, and press the Start key. Place original. is sent after being divided into separate files when sending scanned originals. 1 Press the Send key. 2 Place the originals on the platen. 3 Press [Original/Sending Data Format] and then [File Format]. Destination Original Zoom...
250ci/300ci/400ci/500ci/552ci Operation Guide Rev-1
Page 186
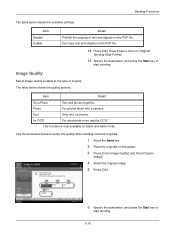
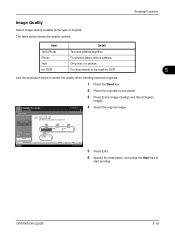
Use the procedure below to select the quality when sending scanned originals. 1 Press the Send key. 2 Place the originals on the PDF file. Place original. Original Zoom Send : --- : 100% : --- Sending Functions The table below shows the quality options. Image Quality Select image quality suitable to be read by... and objects on the PDF file. 14 Press [OK] three times to return to Original/ Sending Data Format. 15 Specify the destination, and press the Start key to send. Original Image Place original. Photo For photos taken with a camera. for OCR Cancel OK 08...
Use the procedure below to select the quality when sending scanned originals. 1 Press the Send key. 2 Place the originals on the PDF file. Place original. Original Zoom Send : --- : 100% : --- Sending Functions The table below shows the quality options. Image Quality Select image quality suitable to be read by... and objects on the PDF file. 14 Press [OK] three times to return to Original/ Sending Data Format. 15 Specify the destination, and press the Start key to send. Original Image Place original. Photo For photos taken with a camera. for OCR Cancel OK 08...
250ci/300ci/400ci/500ci/552ci Operation Guide Rev-1
Page 189
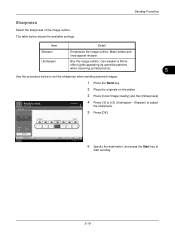
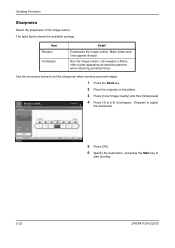
... of the image outline. The table below to set the sharpness when sending scanned images. 1 Press the Send key. 2 Place the originals on the platen. 3 Press [Color/Image Quality] and then [Sharpness]. Unsharpen Destination Sharpen 4 Press [-3] to start sending. 5-19 Original Zoom Send : --: 100% : --- Preview Status Add Shortcut -3 -2 -1 0 +1 +2 +3 Cancel OK 08/08/2009 10:10...
... of the image outline. The table below to set the sharpness when sending scanned images. 1 Press the Send key. 2 Place the originals on the platen. 3 Press [Color/Image Quality] and then [Sharpness]. Unsharpen Destination Sharpen 4 Press [-3] to start sending. 5-19 Original Zoom Send : --: 100% : --- Preview Status Add Shortcut -3 -2 -1 0 +1 +2 +3 Cancel OK 08/08/2009 10:10...

250ci/300ci/400ci/500ci/552ci Operation Guide Rev-1
Page 190
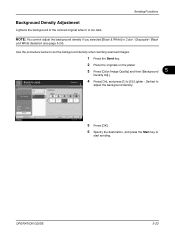
...(Lighter - On Destination Background Lighter Darker 1 2 3 4 5 4 Press [On], and press [1] to set the background density when sending scanned images. 1 Press the Send key. 2 Place the originals on the platen. 3 Press [Color/Image Quality] and then [Background Density Adj.]. Place original. Off Place... original. Background Density Adj. Original Zoom Send : --: 100% : --- Preview Status Add Shortcut Cancel OK 08/08/2009 10:10 6 Specify the destination, and press the ...
...(Lighter - On Destination Background Lighter Darker 1 2 3 4 5 4 Press [On], and press [1] to set the background density when sending scanned images. 1 Press the Send key. 2 Place the originals on the platen. 3 Press [Color/Image Quality] and then [Background Density Adj.]. Place original. Off Place... original. Background Density Adj. Original Zoom Send : --: 100% : --- Preview Status Add Shortcut Cancel OK 08/08/2009 10:10 6 Specify the destination, and press the ...
250ci/300ci/400ci/500ci/552ci Operation Guide Rev-1
Page 191
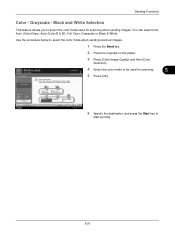
...sending scanned images. 1 Press the Send key. 2 Place the originals on the platen. 3 Press [Color/Image Quality] and then [Color Selection]. Place original. You can select from Auto (Color/Gray), Auto (Color/B & W), Full Color, Grayscale or Black & White. Use the procedure below to send. Original Zoom Send...white originals in black & white. Select scanning color. Select [Auto Color] to start sending. 5-21 Place original. Color Selection Destination 4 Select the color mode to be used for scanning. 5 5 Press [OK]. Sending Functions Color / Grayscale / Black and ...
...sending scanned images. 1 Press the Send key. 2 Place the originals on the platen. 3 Press [Color/Image Quality] and then [Color Selection]. Place original. You can select from Auto (Color/Gray), Auto (Color/B & W), Full Color, Grayscale or Black & White. Use the procedure below to send. Original Zoom Send...white originals in black & white. Select scanning color. Select [Auto Color] to start sending. 5-21 Place original. Color Selection Destination 4 Select the color mode to be used for scanning. 5 5 Press [OK]. Sending Functions Color / Grayscale / Black and ...

250ci/300ci/400ci/500ci/552ci Operation Guide Rev-1
Page 192
...; Original Size selection • Original Orientation • 1-sided / 2-sided selection • Scan density • Image quality • Scan resolution • Color selection • Sending Size selection • Zoom • Border Erase The procedure for using continuous scanning when sending scanned images is selected. 4 Press [OK]. Preview Status Add Shortcut Off On Cancel OK 08/08/2009...
...; Original Size selection • Original Orientation • 1-sided / 2-sided selection • Scan density • Image quality • Scan resolution • Color selection • Sending Size selection • Zoom • Border Erase The procedure for using continuous scanning when sending scanned images is selected. 4 Press [OK]. Preview Status Add Shortcut Off On Cancel OK 08/08/2009...

250ci/300ci/400ci/500ci/552ci Operation Guide Rev-1
Page 194
...10 4 Press [Border Erase Sheet] to erase borders for an individual sheet or [Border Erase Book] to erase borders for entry. Ready to send. Preview Status Add Shortcut Border Erase Sheet Border Erase Book Individual Border Erase Destination Top Bottom (0.00 - 2.00) 0.25 " 0.25 " ... border erase. Sending Functions Border Erase to Back Page When scanning a 2-sided original, this allows you to erase the borders on the platen. 3 Press [Advanced Setup] and then [Border Erase]. The table below to erase borders when sending scanned originals. 1 Press the Send key. 2 Place...
...10 4 Press [Border Erase Sheet] to erase borders for an individual sheet or [Border Erase Book] to erase borders for entry. Ready to send. Preview Status Add Shortcut Border Erase Sheet Border Erase Book Individual Border Erase Destination Top Bottom (0.00 - 2.00) 0.25 " 0.25 " ... border erase. Sending Functions Border Erase to Back Page When scanning a 2-sided original, this allows you to erase the borders on the platen. 3 Press [Advanced Setup] and then [Border Erase]. The table below to erase borders when sending scanned originals. 1 Press the Send key. 2 Place...
500ci/400ci/300ci/250ci Operation Guide Rev-1
Page 9
... send documents It sends. Or, you can send scanned images via a network. OPERATION GUIDE vii What you can send by entering the address directly. Editing Destination (Address Book/Adding One Touch Keys)...8-71 Place the originals on the destination computer. You can also store scanned images in the address book, you want to do Send as E-mail Send...
... send documents It sends. Or, you can send scanned images via a network. OPERATION GUIDE vii What you can send by entering the address directly. Editing Destination (Address Book/Adding One Touch Keys)...8-71 Place the originals on the destination computer. You can also store scanned images in the address book, you want to do Send as E-mail Send...
500ci/400ci/300ci/250ci Operation Guide Rev-1
Page 186
Sending Functions Original Size Selection Select the size of nonstandard sizes. Be sure to Switching Unit of...from the following groups of Measurement on the platen. 3 Press [Original/Sending Data Format] and then [Original Size]. 5-2 OPERATION GUIDE Enter the size that will serve as the basis for scanning. Refer to select the original size when using originals of originals that...) * Regarding the setting method of Custom Original Size (Custom 1 to 4), refer to select the original size when sending scanned images. 1 Press the Send key. 2 Place the originals on page 8-15.
Sending Functions Original Size Selection Select the size of nonstandard sizes. Be sure to Switching Unit of...from the following groups of Measurement on the platen. 3 Press [Original/Sending Data Format] and then [Original Size]. 5-2 OPERATION GUIDE Enter the size that will serve as the basis for scanning. Refer to select the original size when using originals of originals that...) * Regarding the setting method of Custom Original Size (Custom 1 to 4), refer to select the original size when sending scanned images. 1 Press the Send key. 2 Place the originals on page 8-15.
500ci/400ci/300ci/250ci Operation Guide Rev-1
Page 188
...Same as the actual size (No Zoom). Refer to select the size for transmission when sending scanned images. 1 Press the Send Key. 2 Place the originals on the platen. 3 Press [Original/Sending Data Format] and then [Sending Size]. 5-4 OPERATION GUIDE Size Inch models: Same as Original Size, Ledger, Legal, ...100%] (or [Auto]) Select [Auto] NOTE: When you wish to send as are related to be sent). Select from Hagaki. Use the procedure below lists the sizes. Sending Functions Sending Size Selection Select the sending size (the size of image to each other. The table below to...
...Same as the actual size (No Zoom). Refer to select the size for transmission when sending scanned images. 1 Press the Send Key. 2 Place the originals on the platen. 3 Press [Original/Sending Data Format] and then [Sending Size]. 5-4 OPERATION GUIDE Size Inch models: Same as Original Size, Ledger, Legal, ...100%] (or [Auto]) Select [Auto] NOTE: When you wish to send as are related to be sent). Select from Hagaki. Use the procedure below lists the sizes. Sending Functions Sending Size Selection Select the sending size (the size of image to each other. The table below to...
500ci/400ci/300ci/250ci Operation Guide Rev-1
Page 195
... select the binding direction and press [Original Orientation] to select the original type and binding direction when sending scanned originals. 1 Press the Send key. 2 Place the originals on the platen. 3 Press [Original/Sending Data Format] and then [2- OPERATION GUIDE 5-11 Binding Left/Right, Binding Top Open Book Original such ... [2-sided], or [Book]. When selecting [Book], select the binding direction. 6 Press [OK]. 7 Specify the destination, and press the Start key to send. Ready to start sending. The table below to select the direction in which the original is used.
... select the binding direction and press [Original Orientation] to select the original type and binding direction when sending scanned originals. 1 Press the Send key. 2 Place the originals on the platen. 3 Press [Original/Sending Data Format] and then [2- OPERATION GUIDE 5-11 Binding Left/Right, Binding Top Open Book Original such ... [2-sided], or [Book]. When selecting [Book], select the binding direction. 6 Press [OK]. 7 Specify the destination, and press the Start key to send. Ready to start sending. The table below to select the direction in which the original is used.

500ci/400ci/300ci/250ci Operation Guide Rev-1
Page 199
.... 5 Press [OK]. 6 Specify the destination, and press the Start key. is sent after being divided into separate files when sending scanned originals. 1 Press the Send key. 2 Place the originals on the platen. 3 Press [Original/Sending Data Format] and then [File Separation]. Place original. Original Zoom Paper : --: 100% : --- Destination 1 Original Zoom Paper : --: 100% : --- TIFF JPEG...
.... 5 Press [OK]. 6 Specify the destination, and press the Start key. is sent after being divided into separate files when sending scanned originals. 1 Press the Send key. 2 Place the originals on the platen. 3 Press [Original/Sending Data Format] and then [File Separation]. Place original. Original Zoom Paper : --: 100% : --- Destination 1 Original Zoom Paper : --: 100% : --- TIFF JPEG...
500ci/400ci/300ci/250ci Operation Guide Rev-1
Page 203
... a camera. Place original. Original Zoom Paper : --- : 100% : --- Select original image type for best results. [for OCR]: For documents to select the quality when sending scanned originals. 1 Press the Send key. 2 Place the originals on the platen. 3 Press [Color/Image Quality] and then [Original Image]. Text Only text, no photos. Ready to the type...
... a camera. Place original. Original Zoom Paper : --- : 100% : --- Select original image type for best results. [for OCR]: For documents to select the quality when sending scanned originals. 1 Press the Send key. 2 Place the originals on the platen. 3 Press [Color/Image Quality] and then [Original Image]. Text Only text, no photos. Ready to the type...
500ci/400ci/300ci/250ci Operation Guide Rev-1
Page 206
... image outline. Place original. Can weaken a Moire effect (grids appearing as wavelike patterns when scanning printed photos). Sharpness Destination 4 Press [-3] to adjust the sharpness. Sharpen) to [+3] (Unsharpen - The table below to set the sharpness when sending scanned images. 1 Press the Send key. 2 Place the originals on the platen. 3 Press [Color/Image Quality] and then...
... image outline. Place original. Can weaken a Moire effect (grids appearing as wavelike patterns when scanning printed photos). Sharpness Destination 4 Press [-3] to adjust the sharpness. Sharpen) to [+3] (Unsharpen - The table below to set the sharpness when sending scanned images. 1 Press the Send key. 2 Place the originals on the platen. 3 Press [Color/Image Quality] and then...
500ci/400ci/300ci/250ci Operation Guide Rev-1
Page 207
... & White] in Color / Grayscale / Black and White Selection (see page 5-24). Background Density Adj. Original Zoom Paper : --: 100% : --- Sending Functions Background Density Adjustment Lightens the background of the colored original when it is too dark. Preview Status Add Shortcut Cancel OK 10/10/2008...6 Specify the destination, and press the Start key to [5] (Lighter - Use the procedure below to set the background density when sending scanned images. 1 Press the Send key. 2 Place the originals on the platen. 3 Press [Color/Image Quality] and then [Background 5 Density Adj.].
... & White] in Color / Grayscale / Black and White Selection (see page 5-24). Background Density Adj. Original Zoom Paper : --: 100% : --- Sending Functions Background Density Adjustment Lightens the background of the colored original when it is too dark. Preview Status Add Shortcut Cancel OK 10/10/2008...6 Specify the destination, and press the Start key to [5] (Lighter - Use the procedure below to set the background density when sending scanned images. 1 Press the Send key. 2 Place the originals on the platen. 3 Press [Color/Image Quality] and then [Background 5 Density Adj.].


