
iTag Specification/Setup/Operation Guide Ver. 8.0
Page 16
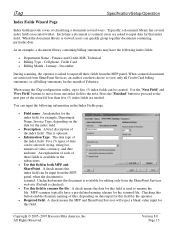
...the index field. Checking this field is optional. • Information Type. Copyright © 2005~2007 Kyocera Mita America, Inc All Rights Reserved. Finance and Credit, MIS, Technical • Billing Type - ...A check means this field in the Index Fields page. • Field name. MFP scanners typically have the following information in both MFP and SharePoint. A check means the MFP ...15 Use the 'Next Field' and 'Prev Field' buttons to the next. iTag Specification/Setup/Operation Index Fields Wizard Page Index fields provide a way of classifying a document several index...
...the index field. Checking this field is optional. • Information Type. Copyright © 2005~2007 Kyocera Mita America, Inc All Rights Reserved. Finance and Credit, MIS, Technical • Billing Type - ...A check means this field in the Index Fields page. • Field name. MFP scanners typically have the following information in both MFP and SharePoint. A check means the MFP ...15 Use the 'Next Field' and 'Prev Field' buttons to the next. iTag Specification/Setup/Operation Index Fields Wizard Page Index fields provide a way of classifying a document several index...
iTag Specification/Setup/Operation Guide Ver. 8.0
Page 22
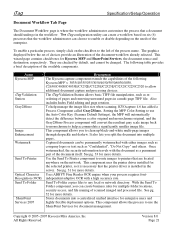
...and processing choices. Send To Folder copies files to use the Auto Color Key (Scanner Default Settings), the MFP will automatically detect the difference between a color original and ... checkbox to printers that a document should undergo in the workflow. The following Kyocera MFP's: 3035/4035/5035/3050/4050/5050/6030/8030, C2630/C4008/C4035E/C3232E/C3225E/C2525E...installed for document management. To help accommodate a significantly smaller image file. iTag Specification/Setup/Operation Document Workflow Tab Page The Document Workflow page is installed in the server. To...
...and processing choices. Send To Folder copies files to use the Auto Color Key (Scanner Default Settings), the MFP will automatically detect the difference between a color original and ... checkbox to printers that a document should undergo in the workflow. The following Kyocera MFP's: 3035/4035/5035/3050/4050/5050/6030/8030, C2630/C4008/C4035E/C3232E/C3225E/C2525E...installed for document management. To help accommodate a significantly smaller image file. iTag Specification/Setup/Operation Document Workflow Tab Page The Document Workflow page is installed in the server. To...

iTag Specification/Setup/Operation Guide Ver. 8.0
Page 35
...added a Process Component called Gray2Mono. Click OK to use the Auto Color Key (Scanner Default Settings), the MFP will automatically detect the difference between a color original and monochrome...Process Component will launch the Configure Gray2Mono dialogue box. 4. Copyright © 2005~2007 Kyocera Mita America, Inc All Rights Reserved. From the MFP Form within the KYOcapture Process...lock in the Color Type field and select the Components tab. 2. iTag Specification/Setup/Operation Configuring the Gray2Mono Process Component Normally KYOcapture will display the available components for the...
...added a Process Component called Gray2Mono. Click OK to use the Auto Color Key (Scanner Default Settings), the MFP will automatically detect the difference between a color original and monochrome...Process Component will launch the Configure Gray2Mono dialogue box. 4. Copyright © 2005~2007 Kyocera Mita America, Inc All Rights Reserved. From the MFP Form within the KYOcapture Process...lock in the Color Type field and select the Components tab. 2. iTag Specification/Setup/Operation Configuring the Gray2Mono Process Component Normally KYOcapture will display the available components for the...

iTag Specification/Setup/Operation Guide Ver. 8.0
Page 60
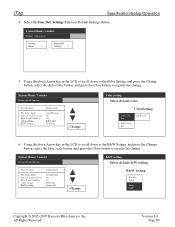
Press the *System Menu/Counter button on page 33 of the MFP. Version 8.0 Page 59 iTag Specification/Setup/Operation How to Enable the MFP Auto Color Scan for Gray2Mono Support The process component Gray2Mono, can be added to configure the ... in the LCD. 2. Using the numeric keys, enter the code 6 4 8 2 Enter the administrator number Copyright © 2005~2007 Kyocera Mita America, Inc All Rights Reserved. Select the Scanner Default setting button. This will display the System Menu / Counter menu in the Configuring the Gray2Mono Process Component instructions on the...
Press the *System Menu/Counter button on page 33 of the MFP. Version 8.0 Page 59 iTag Specification/Setup/Operation How to Enable the MFP Auto Color Scan for Gray2Mono Support The process component Gray2Mono, can be added to configure the ... in the LCD. 2. Using the numeric keys, enter the code 6 4 8 2 Enter the administrator number Copyright © 2005~2007 Kyocera Mita America, Inc All Rights Reserved. Select the Scanner Default setting button. This will display the System Menu / Counter menu in the Configuring the Gray2Mono Process Component instructions on the...
iTag Specification/Setup/Operation Guide Ver. 8.0
Page 61
.../Manual On On Full Color Grayscale Change B&W setting Select default B/W setting B&W setting Black& White Gray scale Copyright © 2005~2007 Kyocera Mita America, Inc All Rights Reserved. System Menu / Counter Scanner setting menu System Basic > Func. Def. Version 8.0 Page 60 System Menu / Counter Setting default function Default menu Setting mode File Name..., and press the Change button, select the Gray scale button, and press the Close button to register the change . Select the Fun. Def. iTag Specification/Setup/Operation 4.
.../Manual On On Full Color Grayscale Change B&W setting Select default B/W setting B&W setting Black& White Gray scale Copyright © 2005~2007 Kyocera Mita America, Inc All Rights Reserved. System Menu / Counter Scanner setting menu System Basic > Func. Def. Version 8.0 Page 60 System Menu / Counter Setting default function Default menu Setting mode File Name..., and press the Change button, select the Gray scale button, and press the Close button to register the change . Select the Fun. Def. iTag Specification/Setup/Operation 4.
iTag Specification/Setup/Operation Guide Ver. 8.0
Page 76
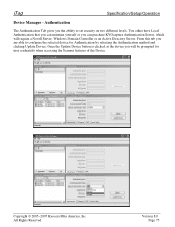
... at the device you are able to set security on two different levels. Version 8.0 Page 75 Copyright © 2005~2007 Kyocera Mita America, Inc All Rights Reserved. Authentication The Authentication Tab gives you can purchase KYOcapture Authentication Server, which will be prompted ...for Authentication by selecting the Authentication method and clicking Update Device. iTag Specification/Setup/Operation Device Manager - You either have Local Authentication that you can maintain yourself or you the ability to configure the ...
... at the device you are able to set security on two different levels. Version 8.0 Page 75 Copyright © 2005~2007 Kyocera Mita America, Inc All Rights Reserved. Authentication The Authentication Tab gives you can purchase KYOcapture Authentication Server, which will be prompted ...for Authentication by selecting the Authentication method and clicking Update Device. iTag Specification/Setup/Operation Device Manager - You either have Local Authentication that you can maintain yourself or you the ability to configure the ...
IB-2x Quick Configuration Guide Rev 2.2
Page 195
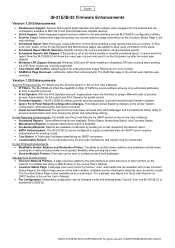
...22 to assign different levels of the setup. • Scheduled Report Month Selection. Management Enhancements. • Discover Network Printers. With the Print Operator account, organizations have the flexibility to another IB-21E/IB-22. ©2003 KYOCERA MITA CORPORATION All rights reserved. 7KKZ001526XB/...Status Page in the printer web interface was skipped. • Windows LPR Support Enhanced. Devices that support scanning now include scanner usage information on the first power up correctly. Dutch language support has been added to the web interface and all e-...
...22 to assign different levels of the setup. • Scheduled Report Month Selection. Management Enhancements. • Discover Network Printers. With the Print Operator account, organizations have the flexibility to another IB-21E/IB-22. ©2003 KYOCERA MITA CORPORATION All rights reserved. 7KKZ001526XB/...Status Page in the printer web interface was skipped. • Windows LPR Support Enhanced. Devices that support scanning now include scanner usage information on the first power up correctly. Dutch language support has been added to the web interface and all e-...
Network Fax Online Manual (Revision)
Page 8
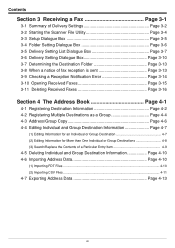
Contents Section 3 Receiving a Fax Page 3-1 3-1 Summary of Delivery Settings Page 3-2 3-2 Starting the Scanner File Utility Page 3-4 3-3 Setup Dialogue Box Page 3-5 3-4 Folder Setting Dialogue Box Page 3-6 3-5 Delivery Setting List Dialogue Box Page 3-7 3-6 Delivery Setting Dialogue Box Page 3-10 3-7 Determining the Destination Folder Page 3-...
Contents Section 3 Receiving a Fax Page 3-1 3-1 Summary of Delivery Settings Page 3-2 3-2 Starting the Scanner File Utility Page 3-4 3-3 Setup Dialogue Box Page 3-5 3-4 Folder Setting Dialogue Box Page 3-6 3-5 Delivery Setting List Dialogue Box Page 3-7 3-6 Delivery Setting Dialogue Box Page 3-10 3-7 Determining the Destination Folder Page 3-...
Network Fax Online Manual (Revision)
Page 16
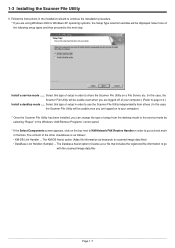
... scanned image data file) Page 1-7 The KM-DB Assist option (Adds file information as follows: • KM-DB Link Handler ... 1-3 Installing the Scanner File Utility 5. Install a service mode ....... Select this type of setup in order to use the Scanner File Utility independently from others. (In this case, the Scanner File Utility will be displayed. Follow the...
... scanned image data file) Page 1-7 The KM-DB Assist option (Adds file information as follows: • KM-DB Link Handler ... 1-3 Installing the Scanner File Utility 5. Install a service mode ....... Select this type of setup in order to use the Scanner File Utility independently from others. (In this case, the Scanner File Utility will be displayed. Follow the...
Network Fax Online Manual (Revision)
Page 40
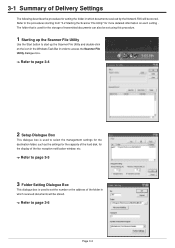
... Utility" for more detailed information on the icon in the Windows Task Bar in order to access the Scanner File Utility dialogue box. -> Refer to page 3-4 2 Setup Dialogue Box This dialogue box is used to select the management settings for the destination folder, such as the settings for the capacity of the... fax reception notification window, etc. -> Refer to page 3-5 3 Folder Setting Dialogue Box This dialogue box is used to set using this procedure. 1 Starting up the Scanner File Utility Use the Start button to start up the...
... Utility" for more detailed information on the icon in the Windows Task Bar in order to access the Scanner File Utility dialogue box. -> Refer to page 3-4 2 Setup Dialogue Box This dialogue box is used to select the management settings for the destination folder, such as the settings for the capacity of the... fax reception notification window, etc. -> Refer to page 3-5 3 Folder Setting Dialogue Box This dialogue box is used to set using this procedure. 1 Starting up the Scanner File Utility Use the Start button to start up the...
Network Fax Online Manual (Revision)
Page 42
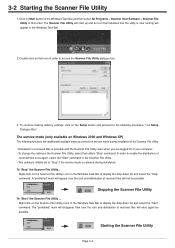
... Bar to display the drop-down list and select the "Stop" command. Right-click on the Setup button and proceed to access the Scanner File Utility dialogue box. 3. 3-2 Starting the Scanner File Utility 1. A "prohibited" mark will appear over the icon and distribution of your computer. ... (only available on that utility's "Stop" command. Stopping the Scanner File Utility To "Start" the Scanner File Utility ... Double-click on Windows 2000 and Windows XP) The following procedure, "3-3 Setup Dialogue Box". Click on the Scanner File Utility's icon in the Windows Task Bar to "Stop" if...
... Bar to display the drop-down list and select the "Stop" command. Right-click on the Setup button and proceed to access the Scanner File Utility dialogue box. 3. 3-2 Starting the Scanner File Utility 1. A "prohibited" mark will appear over the icon and distribution of your computer. ... (only available on that utility's "Stop" command. Stopping the Scanner File Utility To "Start" the Scanner File Utility ... Double-click on Windows 2000 and Windows XP) The following procedure, "3-3 Setup Dialogue Box". Click on the Scanner File Utility's icon in the Windows Task Bar to "Stop" if...
Network Fax Online Manual (Revision)
Page 43
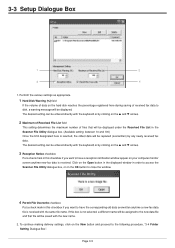
...of received fax data to the new data file and that file will be saved with the keyboard or by any newly received fax data. 3-3 Setup Dialogue Box 1 2 3 4 1. To continue making delivery settings, click on the OK button to close the window. 4 Permit File Overwrite ...checkbox Put a check mark in the Scanner File Utility dialogue box. (Available setting: between 10 and 100) Once the limit designated here is not selected, a different name will be assigned to disk...
...of received fax data to the new data file and that file will be saved with the keyboard or by any newly received fax data. 3-3 Setup Dialogue Box 1 2 3 4 1. To continue making delivery settings, click on the OK button to close the window. 4 Permit File Overwrite ...checkbox Put a check mark in the Scanner File Utility dialogue box. (Available setting: between 10 and 100) Once the limit designated here is not selected, a different name will be assigned to disk...
Network Fax Online Manual (Revision)
Page 44
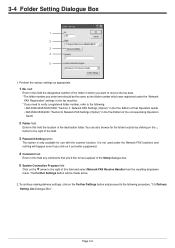
...appear in this field the location of the corresponding Operation Guide 2 Folder field Enter in the Setup dialogue box. 5 System Connection Program field Click on the ... The Further Settings button will happen...number you enter here should be made active. 2. You can also browse for use with the scanner function. field Enter in this field the designated number of that you click on it and enter... Perform the various settings as the folder number which you want to the following . • KM-3035/4035/5035/C850: "Section 9 Network FAX Settings (Option)" in the Fax Edition of the ...
...appear in this field the location of the corresponding Operation Guide 2 Folder field Enter in the Setup dialogue box. 5 System Connection Program field Click on the ... The Further Settings button will happen...number you enter here should be made active. 2. You can also browse for use with the scanner function. field Enter in this field the designated number of that you click on it and enter... Perform the various settings as the folder number which you want to the following . • KM-3035/4035/5035/C850: "Section 9 Network FAX Settings (Option)" in the Fax Edition of the ...
Network Fax Online Manual (Revision)
Page 51
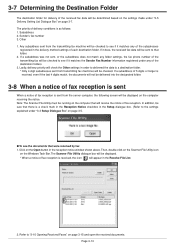
... if it matches any of the subadresses registered in the Receive File List. 2. Then, double-click on the Scanner File Utility icon on the Open button in the Setup dialogue box. (Refer to "3-10 Opening Received Faxes" on page 3-5. 3-7 Determining the Destination Folder The destination ...3-7. G To see the documents that will be displayed. * When a notice of fax reception. Click on the Windows Task Bar. The Scanner File Utility dialogue box will be determined based on the settings made under "3-5 Delivery Setting List Dialogue Box" on the computer receiving the notice....
... if it matches any of the subadresses registered in the Receive File List. 2. Then, double-click on the Scanner File Utility icon on the Open button in the Setup dialogue box. (Refer to "3-10 Opening Received Faxes" on page 3-5. 3-7 Determining the Destination Folder The destination ...3-7. G To see the documents that will be displayed. * When a notice of fax reception. Click on the Windows Task Bar. The Scanner File Utility dialogue box will be determined based on the settings made under "3-5 Delivery Setting List Dialogue Box" on the computer receiving the notice....
Fax System (J) Operation Guide Rev-1
Page 5
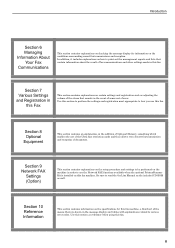
... about the result of fax communications and other settings made in this fax. Section 9 Network FAX Settings (Option) This section contains explanations on the setup procedure and settings to be performed on the machine in order to how you use the Network FAX functions available when the optional Printer.../Scanner Kit is installed on how to print out the management reports and lists that sounds in the event of some sort of documents. Introduction Section ...
... about the result of fax communications and other settings made in this fax. Section 9 Network FAX Settings (Option) This section contains explanations on the setup procedure and settings to be performed on the machine in order to how you use the Network FAX functions available when the optional Printer.../Scanner Kit is installed on how to print out the management reports and lists that sounds in the event of some sort of documents. Introduction Section ...
Scan System Operation Guide (Functions Edition) Rev-9
Page 206
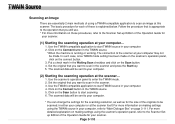
... your computer. 2. Use the TWAIN-compatible application to start scanning. 6. Click on page 3-111. For more information on making settings using the scanner's operation panel, refer to the Scanner Setup Edition of the Operation Guide for the size of the originals to be scanned, in the Waiting Scan checkbox and click on the...
... your computer. 2. Use the TWAIN-compatible application to start scanning. 6. Click on page 3-111. For more information on making settings using the scanner's operation panel, refer to the Scanner Setup Edition of the Operation Guide for the size of the originals to be scanned, in the Waiting Scan checkbox and click on the...
Scan System Operation Guide (Functions Edition) Rev-9
Page 210
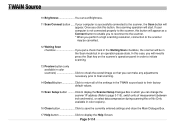
...TWAIN source back to display the Help Screen. If your computer is not connected properly to the scanner, this button, the scanning operation will appear. Click to display the Scanner Setup Dialogue Box in color copiers). 16 Close button Click to save the currently entered settings and ...close the Main Dialogue Box. 17 Help button Click to their factory default values. 15 Scan Setup button ......... If your computer is successfully...
...TWAIN source back to display the Help Screen. If your computer is not connected properly to the scanner, this button, the scanning operation will appear. Click to display the Scanner Setup Dialogue Box in color copiers). 16 Close button Click to save the currently entered settings and ...close the Main Dialogue Box. 17 Help button Click to their factory default values. 15 Scan Setup button ......... If your computer is successfully...
Scan System Operation Guide (Functions Edition) Rev-9
Page 211
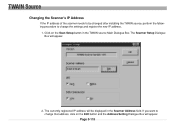
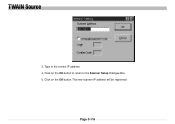
If you want to change that address, click on the Scan Setup button in the Scanner Address field. Page 3-115 The currently registered IP address will appear. 2. Click on the Edit button and the Address Setting Dialogue Box will appear. The Scanner Setup Dialogue Box will be changed after installing the TWAIN source, perform the following procedure to change the settings and register the new IP address. 1. TWAIN Source Changing the Scanner's IP Address If the IP address of the scanner needs to be displayed in the TWAIN source Main Dialogue Box.
If you want to change that address, click on the Scan Setup button in the Scanner Address field. Page 3-115 The currently registered IP address will appear. 2. Click on the Edit button and the Address Setting Dialogue Box will appear. The Scanner Setup Dialogue Box will be changed after installing the TWAIN source, perform the following procedure to change the settings and register the new IP address. 1. TWAIN Source Changing the Scanner's IP Address If the IP address of the scanner needs to be displayed in the TWAIN source Main Dialogue Box.
Scan System Operation Guide (Functions Edition) Rev-9
Page 212
The new scanner IP address will be registered. Click on the OK button. Type in the correct IP address. 4. Click on the OK button to return to the Scanner Setup Dialogue Box. 5. TWAIN Source 3. Page 3-116
The new scanner IP address will be registered. Click on the OK button. Type in the correct IP address. 4. Click on the OK button to return to the Scanner Setup Dialogue Box. 5. TWAIN Source 3. Page 3-116

Scan System Operation Guide (Functions Edition) Rev-9
Page 213
.... 6. TWAIN Source Copy Management Setting If the copy management function which controls machine use is turned ON in the scanner, it is carried out between the scanner and the computer that sends the scanning command. The Address Setting Dialogue Box will be necessary to the Operation Guide ...necessary to put a check in that you did not enter your department code when connecting to the scanner in step 4, a dialog box for entering the code will use the same department code a number of this machine. Thus, it will appear. 3. The Scanner Setup Dialogue Box will use the machine.
.... 6. TWAIN Source Copy Management Setting If the copy management function which controls machine use is turned ON in the scanner, it is carried out between the scanner and the computer that sends the scanning command. The Address Setting Dialogue Box will be necessary to the Operation Guide ...necessary to put a check in that you did not enter your department code when connecting to the scanner in step 4, a dialog box for entering the code will use the same department code a number of this machine. Thus, it will appear. 3. The Scanner Setup Dialogue Box will use the machine.


