bizhub 4000P/4700P User Guide
Page 6
Remove USB 150 - 6 - User's Guide Replacing the toner cartridge ...130 Replacing the imaging unit ...131 Moving the printer ...134 Before moving the printer ...134 Moving the printer to another ... standard bin. [20y.xx 143 [x]-page jam, remove tray 1 to clear duplex. [23y.xx 144 [x]-page jam, open tray [x]. [24y.xx]...145 [x]-page jam, clear manual feeder. [25y.xx 146 10-Troubleshooting...148 Understanding the printer messages...148 Cartridge, imaging unit mismatch [41.xy 148 Cartridge low [88.xy]...148 Cartridge...
Remove USB 150 - 6 - User's Guide Replacing the toner cartridge ...130 Replacing the imaging unit ...131 Moving the printer ...134 Before moving the printer ...134 Moving the printer to another ... standard bin. [20y.xx 143 [x]-page jam, remove tray 1 to clear duplex. [23y.xx 144 [x]-page jam, open tray [x]. [24y.xx]...145 [x]-page jam, clear manual feeder. [25y.xx 146 10-Troubleshooting...148 Understanding the printer messages...148 Cartridge, imaging unit mismatch [41.xy 148 Cartridge low [88.xy]...148 Cartridge...

bizhub 4000P/4700P User Guide
Page 7
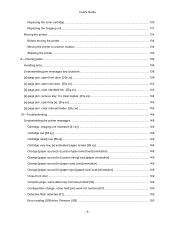
...manual feeder with [paper type] [paper size] [paper orientation 154 Maintenance kit low [80.xy] ...154 Maintenance kit nearly low [80.xy 154 Maintenance kit very low, [x] estimated pages remain [80.xy 154 Memory full [38] ...155 Network [x] software error [54] ...155 Non-Printer Manufacturer [supply type], see User... or unresponsive cartridge [31.xy 156 Reinstall missing or unresponsive imaging unit [31.xy 156 Remove paper from standard output bin 156 - 7 - User's Guide Error reading USB hub. Remove hub 150 Imaging unit low [84.xy] ...150 Imaging unit nearly low [84.xy] ...150 Imaging ...
...manual feeder with [paper type] [paper size] [paper orientation 154 Maintenance kit low [80.xy] ...154 Maintenance kit nearly low [80.xy 154 Maintenance kit very low, [x] estimated pages remain [80.xy 154 Memory full [38] ...155 Network [x] software error [54] ...155 Non-Printer Manufacturer [supply type], see User... or unresponsive cartridge [31.xy 156 Reinstall missing or unresponsive imaging unit [31.xy 156 Remove paper from standard output bin 156 - 7 - User's Guide Error reading USB hub. Remove hub 150 Imaging unit low [84.xy] ...150 Imaging unit nearly low [84.xy] ...150 Imaging ...

bizhub 4000P/4700P User Guide
Page 12
User's Guide ■ Warning and Caution Symbols The labels and symbols used in this manual and on , or damage the power cord. The symbol shown to property. Failure to the left warns against possible electrical shock. Exceeding the rating of ... electrical shock. • Use the power cord supplied in the package only with wet hands, as a fire, electrical shock, or breakdown could result in the user documentation. indicates an imperative course of the covers and panels attached to the printer. WARNING • Do not attempt to property. ●Meaning of action...
User's Guide ■ Warning and Caution Symbols The labels and symbols used in this manual and on , or damage the power cord. The symbol shown to property. Failure to the left warns against possible electrical shock. Exceeding the rating of ... electrical shock. • Use the power cord supplied in the package only with wet hands, as a fire, electrical shock, or breakdown could result in the user documentation. indicates an imperative course of the covers and panels attached to the printer. WARNING • Do not attempt to property. ●Meaning of action...

bizhub 4000P/4700P User Guide
Page 19
Warning-Potential Damage: Improper installation of the connector on the card must touch and be flushed against the controller board. 5. Note: The entire length of the card may need to manually add the options in the illustration. Note: When the printer software and any hardware options are installed, you may cause damage to make them available for print jobs. - 19 - User's Guide 4. Push the card firmly into place as shown in the printer driver to the card and the controller board. Close the controller board access door.
Warning-Potential Damage: Improper installation of the connector on the card must touch and be flushed against the controller board. 5. Note: The entire length of the card may need to manually add the options in the illustration. Note: When the printer software and any hardware options are installed, you may cause damage to make them available for print jobs. - 19 - User's Guide 4. Push the card firmly into place as shown in the printer driver to the card and the controller board. Close the controller board access door.

bizhub 4000P/4700P User Guide
Page 21
Close the controller board access door. Note: When the printer software and any hardware options are installed, you may need to manually add the options in the printer driver to make them available for print jobs. - 21 - User's Guide 4. Push the memory card straight into the connector and forward into the controller board wall until it clicks into place. 5.
Close the controller board access door. Note: When the printer software and any hardware options are installed, you may need to manually add the options in the printer driver to make them available for print jobs. - 21 - User's Guide 4. Push the memory card straight into the connector and forward into the controller board wall until it clicks into place. 5.

bizhub 4000P/4700P User Guide
Page 23
Note: When the printer software and any hardware options are installed, you may need to manually add the options in the printer driver to the bottom. - 23 - To uninstall the optional trays, slide the latch on the printer. Connect the power ... on the right side of the printer toward the front of the printer until it clicks into place. Note: Optional trays lock together when stacked. 8. User's Guide 7. Align the printer with the tray, and then lower the printer into place, and then remove stacked trays one at a time from the top...
Note: When the printer software and any hardware options are installed, you may need to manually add the options in the printer driver to the bottom. - 23 - To uninstall the optional trays, slide the latch on the printer. Connect the power ... on the right side of the printer toward the front of the printer until it clicks into place. Note: Optional trays lock together when stacked. 8. User's Guide 7. Align the printer with the tray, and then lower the printer into place, and then remove stacked trays one at a time from the top...

bizhub 4000P/4700P User Guide
Page 79
Notes: • Tray 1 (standard tray) is empty, the print job continues using the linked tray. - 79 - When one tray is the factory default setting. • From the Paper menu, set Configure MP to "Cassette" for all print jobs. Paper menu Default Source menu Use Default Source Tray [x] MP Feeder Manual Paper Manual Envelope User's Guide To Set a default paper source for MP Feeder to appear as a menu setting. • If two trays contain paper of the same size and type, and the trays have the same settings, then the trays are automatically linked.
Notes: • Tray 1 (standard tray) is empty, the print job continues using the linked tray. - 79 - When one tray is the factory default setting. • From the Paper menu, set Configure MP to "Cassette" for all print jobs. Paper menu Default Source menu Use Default Source Tray [x] MP Feeder Manual Paper Manual Envelope User's Guide To Set a default paper source for MP Feeder to appear as a menu setting. • If two trays contain paper of the same size and type, and the trays have the same settings, then the trays are automatically linked.

bizhub 4000P/4700P User Guide
Page 82
... Colored Paper Light Paper Heavy Paper Rough/Cotton Custom Type [x] Manual Envelope Size 7 3/4 Envelope 9 Envelope 10 Envelope DL Envelope C5 Envelope B5 Envelope Other Envelope User's Guide To Specify the paper size being manually loaded. Note: A4 is the factory default setting. - 82... - Specify the paper type being manually loaded. Specify the envelope size being manually loaded. Notes: • Plain Paper is the...
... Colored Paper Light Paper Heavy Paper Rough/Cotton Custom Type [x] Manual Envelope Size 7 3/4 Envelope 9 Envelope 10 Envelope DL Envelope C5 Envelope B5 Envelope Other Envelope User's Guide To Specify the paper size being manually loaded. Note: A4 is the factory default setting. - 82... - Specify the paper type being manually loaded. Specify the envelope size being manually loaded. Notes: • Plain Paper is the...

bizhub 4000P/4700P User Guide
Page 83
...indicates that no size substitutions are listed in this menu. User's Guide Use To Manual Envelope Type Envelope Rough Envelope Custom Type [x] Specify the envelope type being manually loaded. Configure MP menu Use Configure MP Cassette Manual First To Determine when the printer selects paper from the multipurpose... Envelope is the factory default setting. Cassette configures the multipurpose feeder as the automatic paper source. • Manual sets the multipurpose feeder only for manual-feed print jobs. • First configures the multipurpose feeder as the primary paper source.
...indicates that no size substitutions are listed in this menu. User's Guide Use To Manual Envelope Type Envelope Rough Envelope Custom Type [x] Specify the envelope type being manually loaded. Configure MP menu Use Configure MP Cassette Manual First To Determine when the printer selects paper from the multipurpose... Envelope is the factory default setting. Cassette configures the multipurpose feeder as the automatic paper source. • Manual sets the multipurpose feeder only for manual-feed print jobs. • First configures the multipurpose feeder as the primary paper source.
bizhub 4000P/4700P User Guide
Page 95
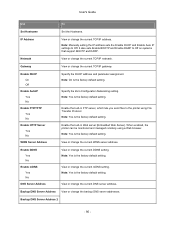
...: Yes is the factory default setting. Note: Yes is the factory default setting. Backup DNS Server Address View or change the current TCP/IP gateway. User's Guide Use To Set Hostname Set the Hostname. Enable the built-in FTP server, which lets you send files to Off on systems that support... WINS Server Address Specify the DHCP address and parameter assignment. When enabled, the printer can be monitored and managed remotely using File Transfer Protocol. Note: Manually setting the IP address sets the Enable DHCP and Enable Auto IP settings to Off.
...: Yes is the factory default setting. Note: Yes is the factory default setting. Backup DNS Server Address View or change the current TCP/IP gateway. User's Guide Use To Set Hostname Set the Hostname. Enable the built-in FTP server, which lets you send files to Off on systems that support... WINS Server Address Specify the DHCP address and parameter assignment. When enabled, the printer can be monitored and managed remotely using File Transfer Protocol. Note: Manually setting the IP address sets the Enable DHCP and Enable Auto IP settings to Off.

bizhub 4000P/4700P User Guide
Page 104
...-MM-DD-HH:MM format. Enter the date and time. Notes: • Manually setting the date and time sets Enable NTP to use the applicable daylight saving time (DST) start and end times associated with the printer Time Zone setting. User's Guide Set Date and Time menu Use Current Date and Time... Manually Set Date and Time [input date/time] Automatically Observe DST On Off Enable NTP On Off To Show the current...
...-MM-DD-HH:MM format. Enter the date and time. Notes: • Manually setting the date and time sets Enable NTP to use the applicable daylight saving time (DST) start and end times associated with the printer Time Zone setting. User's Guide Set Date and Time menu Use Current Date and Time... Manually Set Date and Time [input date/time] Automatically Observe DST On Off Enable NTP On Off To Show the current...

bizhub 4000P/4700P User Guide
Page 111
User's Guide Flash Drive (For bizhub 4700P only) Flash Drive menu Use Copies 1-999 Paper Source Tray [x] MP Feeder Manual Paper Manual Envelope Collate Off (1,1,1,2,2,2) On (1,2,1,2,1,2) Sides (Duplex) 1 sided 2 sided Duplex Binding Long Edge Short Edge Paper Saver Off 2-Up 3-Up 4-Up 6-Up 9-Up 12-Up 16-...
User's Guide Flash Drive (For bizhub 4700P only) Flash Drive menu Use Copies 1-999 Paper Source Tray [x] MP Feeder Manual Paper Manual Envelope Collate Off (1,1,1,2,2,2) On (1,2,1,2,1,2) Sides (Duplex) 1 sided 2 sided Duplex Binding Long Edge Short Edge Paper Saver Off 2-Up 3-Up 4-Up 6-Up 9-Up 12-Up 16-...
bizhub 4000P/4700P User Guide
Page 112
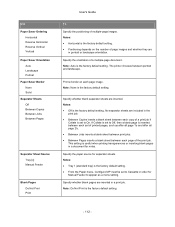
... a blank sheet between print jobs. • Between Pages inserts a blank sheet between portrait and landscape. Specify the paper source for Manual Feeder to Cassette in a document for notes. Notes: • Horizontal is the factory default setting. Use Paper Saver Ordering Horizontal Reverse...Portrait Paper Saver Border None Solid Separator Sheets Off Between Copies Between Jobs Between Pages Separator Sheet Source Tray [x] Manual Feeder Blank Pages Do Not Print Print User's Guide To Specify the positioning of a multiple-page document. Note: Do Not Print is the factory default...
... a blank sheet between print jobs. • Between Pages inserts a blank sheet between portrait and landscape. Specify the paper source for Manual Feeder to Cassette in a document for notes. Notes: • Horizontal is the factory default setting. Use Paper Saver Ordering Horizontal Reverse...Portrait Paper Saver Border None Solid Separator Sheets Off Between Copies Between Jobs Between Pages Separator Sheet Source Tray [x] Manual Feeder Blank Pages Do Not Print Print User's Guide To Specify the positioning of a multiple-page document. Note: Do Not Print is the factory default...

bizhub 4000P/4700P User Guide
Page 122
...is selected by the PCL 5 interpreter. Use Tray Renumber Assign MP Feeder Off None 0-199 Assign Tray [x] Off None 0-199 Assign Manual Paper Off None 0-199 Assign Manual Env Off None 0-199 Tray Renumber View Factory Defaults MPF Default = 8 Tray1 Default = 1 Tray2 Default = 4 Tray3 Default = ...5 Tray4 Default = 20 Tray5 Default = 21 Env Default = 6 MPaper Default = 2 MEnv Default = 3 Tray Renumber Restore Defaults Yes No User's Guide To Configure ...
...is selected by the PCL 5 interpreter. Use Tray Renumber Assign MP Feeder Off None 0-199 Assign Tray [x] Off None 0-199 Assign Manual Paper Off None 0-199 Assign Manual Env Off None 0-199 Tray Renumber View Factory Defaults MPF Default = 8 Tray1 Default = 1 Tray2 Default = 4 Tray3 Default = ...5 Tray4 Default = 20 Tray5 Default = 21 Env Default = 6 MPaper Default = 2 MEnv Default = 3 Tray Renumber Restore Defaults Yes No User's Guide To Configure ...

bizhub 4000P/4700P User Guide
Page 138
... [x] [x]-page jam, remove tray [x]. [24y.xx] Pull the indicated tray out, and then remove the jammed paper. 5 Multipurpose [x]-page jam, clear manual feeder feeder. [250.xx] Remove all paper from the multipurpose feeder, and then remove the jammed paper. 6 Front door [x]-page jam, open rear door... front duplex flap down, and then remove the jammed paper. However, the Auto setting does not guarantee that the page will print. User's Guide Understanding jam messages and locations When a jam occurs, a message indicating the jam location and information to clear the jam appears on...
... [x] [x]-page jam, remove tray [x]. [24y.xx] Pull the indicated tray out, and then remove the jammed paper. 5 Multipurpose [x]-page jam, clear manual feeder feeder. [250.xx] Remove all paper from the multipurpose feeder, and then remove the jammed paper. 6 Front door [x]-page jam, open rear door... front duplex flap down, and then remove the jammed paper. However, the Auto setting does not guarantee that the page will print. User's Guide Understanding jam messages and locations When a jam occurs, a message indicating the jam location and information to clear the jam appears on...

bizhub 4000P/4700P User Guide
Page 146
...: Make sure all paper fragments are removed. 3. From the printer control panel, select Next > >Clear the jam, press OK > . [x]-page jam, clear manual feeder. [25y.xx] 1. From the multipurpose feeder, firmly grasp the jammed paper on each side, and then gently pull it out. Flex the sheets of ...paper back and forth to loosen them, and then fan them. Do not fold or crease the paper. User's Guide 2. Note: Make sure all paper fragments are removed. 2. Insert the tray. 4. Firmly grasp the jammed paper on each side, and then gently pull ...
...: Make sure all paper fragments are removed. 3. From the printer control panel, select Next > >Clear the jam, press OK > . [x]-page jam, clear manual feeder. [25y.xx] 1. From the multipurpose feeder, firmly grasp the jammed paper on each side, and then gently pull it out. Flex the sheets of ...paper back and forth to loosen them, and then fan them. Do not fold or crease the paper. User's Guide 2. Note: Make sure all paper fragments are removed. 2. Insert the tray. 4. Firmly grasp the jammed paper on each side, and then gently pull ...

bizhub 4000P/4700P User Guide
Page 153
User's Guide Load [paper source] with [paper size] [paper orientation] Try one or more of ...is loaded in the feeder when Continue or is selected, then the printer manually overrides the request, and then prints from the default paper source. • Cancel the current job. Load manual feeder with [custom string] [paper orientation] Try one or more of... from that has the correct size and type of paper, select Finished loading paper on the printer control panel. Load manual feeder with [custom type name] [paper orientation] Try one or more of the following : • Load the feeder...
User's Guide Load [paper source] with [paper size] [paper orientation] Try one or more of ...is loaded in the feeder when Continue or is selected, then the printer manually overrides the request, and then prints from the default paper source. • Cancel the current job. Load manual feeder with [custom string] [paper orientation] Try one or more of... from that has the correct size and type of paper, select Finished loading paper on the printer control panel. Load manual feeder with [custom type name] [paper orientation] Try one or more of the following : • Load the feeder...

bizhub 4000P/4700P User Guide
Page 154
... replace the maintenance kit very soon. Maintenance kit nearly low [80.xy] If necessary, select Continue to clear the message and continue printing. Load manual feeder with [paper size] [paper orientation] Try one or more of the following : • Load the multipurpose feeder with the correct size of... paper. • Press to clear the message and continue printing. User's Guide • Press to clear the message and continue printing. Note: If no paper is loaded in the feeder when is selected, then ...
... replace the maintenance kit very soon. Maintenance kit nearly low [80.xy] If necessary, select Continue to clear the message and continue printing. Load manual feeder with [paper size] [paper orientation] Try one or more of the following : • Load the multipurpose feeder with the correct size of... paper. • Press to clear the message and continue printing. User's Guide • Press to clear the message and continue printing. Note: If no paper is loaded in the feeder when is selected, then ...

bizhub 4000P/4700P User Guide
Page 164
... support. Resend the print job. Does the internal option operate correctly? Is the tray working? Make sure the paper is selected. No Go to manually add the internal option in the tray. 2. It may be necessary to step 2. - 164 - Check for print jobs. 2. Check if the tray... closes properly. User's Guide Action Step 4 1. Check if the internal option is below the maximum paper fill indicator. - If you are aligned with the paper size indicators...
... support. Resend the print job. Does the internal option operate correctly? Is the tray working? Make sure the paper is selected. No Go to manually add the internal option in the tray. 2. It may be necessary to step 2. - 164 - Check for print jobs. 2. Check if the tray... closes properly. User's Guide Action Step 4 1. Check if the internal option is below the maximum paper fill indicator. - If you are aligned with the paper size indicators...
bizhub 4000P/4700P User Guide
Page 165
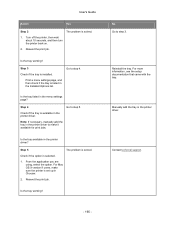
... the Installed Options list. Check if the option is installed. Is the tray working ? Contact technical support. - 165 - Resend the print job. Manually add the tray in the menu settings page? Turn off the printer, then wait about 10 seconds, and then turn the printer back on. 2....From the application you are using, select the option. No Go to step 5. Note: If necessary, manually add the tray in the printer driver. Is the tray working ? For Mac OS X version 9 users, make it available for print jobs. Resend the print job. For more information, see the setup ...
... the Installed Options list. Check if the option is installed. Is the tray working ? Contact technical support. - 165 - Resend the print job. Manually add the tray in the menu settings page? Turn off the printer, then wait about 10 seconds, and then turn the printer back on. 2....From the application you are using, select the option. No Go to step 5. Note: If necessary, manually add the tray in the printer driver. Is the tray working ? For Mac OS X version 9 users, make it available for print jobs. Resend the print job. For more information, see the setup ...


