
User guide
Page 14
... . (10 x 15 cm) print. 14 www.kodak.com/go/easysharecenter Press Wide Angle (W) to zoom out. 3 Take the picture or video. The slider on /off using digital zoom. NOTE: To get a focused picture every time, remember: ■ Use the framing marks, see page 16). Doing more with your camera Using optical zoom Use optical zoom to get up to 5X beyond optical zoom while taking pictures/videos. 1 Use the LCD to frame your subject...
... . (10 x 15 cm) print. 14 www.kodak.com/go/easysharecenter Press Wide Angle (W) to zoom out. 3 Take the picture or video. The slider on /off using digital zoom. NOTE: To get a focused picture every time, remember: ■ Use the framing marks, see page 16). Doing more with your camera Using optical zoom Use optical zoom to get up to 5X beyond optical zoom while taking pictures/videos. 1 Use the LCD to frame your subject...

User guide
Page 16
... the Menu button. 2 Press to highlight a tab: ■ Capture/Video for the most common picture/video-taking settings ■ Setup for other camera settings 3 Press to highlight a setting, then press OK. 4 Highlight an option, then press OK. (Some options let you change modes or turn off the camera. 16 www.kodak.com/go/easysharecenter others, until you use .) IMPORTANT: Your camera offers a built-in Help system. NOTE: Some modes offer limited settings.
... the Menu button. 2 Press to highlight a tab: ■ Capture/Video for the most common picture/video-taking settings ■ Setup for other camera settings 3 Press to highlight a setting, then press OK. 4 Highlight an option, then press OK. (Some options let you change modes or turn off the camera. 16 www.kodak.com/go/easysharecenter others, until you use .) IMPORTANT: Your camera offers a built-in Help system. NOTE: Some modes offer limited settings.

User guide
Page 22
...: Formatting a card deletes all pictures and videos, including protected files. number does not decrease after taking pictures. In Review mode, you do ■ Check the image storage location setting. (See the Setup menu.) not see page 18). 22 www.kodak.com/go /zd15support and select Interactive Troubleshooting & Repairs. on the LCD screen. Pictures remaining ■ The camera is on. Stored pictures are corrupted. ■ Retake pictures. Do not remove card while the camera is operating normally. Keep rechargeable batteries charged. ■ Transfer...
...: Formatting a card deletes all pictures and videos, including protected files. number does not decrease after taking pictures. In Review mode, you do ■ Check the image storage location setting. (See the Setup menu.) not see page 18). 22 www.kodak.com/go /zd15support and select Interactive Troubleshooting & Repairs. on the LCD screen. Pictures remaining ■ The camera is on. Stored pictures are corrupted. ■ Retake pictures. Do not remove card while the camera is operating normally. Keep rechargeable batteries charged. ■ Transfer...
Extended user guide
Page 1
KODAK EASYSHARE ZD15 Digital Camera Extended user guide www.kodak.com For interactive tutorials, visit www.kodak.com/go/howto For help with your camera, visit www.kodak.com/go/zd15support
KODAK EASYSHARE ZD15 Digital Camera Extended user guide www.kodak.com For interactive tutorials, visit www.kodak.com/go/howto For help with your camera, visit www.kodak.com/go/zd15support
Extended user guide
Page 5
... batteries 1 Turning on the camera 2 Setting the language, date/time 2 Storing pictures on an (accessory) SD or SDHC Card 3 2 Taking pictures/videos 4 Taking a picture 4 Taking a video 5 Capture modes 6 Using optical zoom 8 Using the flash 9 Using the Focus button 10 Using the self-timer 11 Using burst 11 Taking panoramic pictures 12 Getting help from your camera 13 P, A, S, and M modes 14 Using exposure compensation to adjust brightness 16 Using the histogram to view picture brightness 17 Understanding the picture-taking icons 17 3 Working with pictures/videos 18 Reviewing...
... batteries 1 Turning on the camera 2 Setting the language, date/time 2 Storing pictures on an (accessory) SD or SDHC Card 3 2 Taking pictures/videos 4 Taking a picture 4 Taking a video 5 Capture modes 6 Using optical zoom 8 Using the flash 9 Using the Focus button 10 Using the self-timer 11 Using burst 11 Taking panoramic pictures 12 Getting help from your camera 13 P, A, S, and M modes 14 Using exposure compensation to adjust brightness 16 Using the histogram to view picture brightness 17 Understanding the picture-taking icons 17 3 Working with pictures/videos 18 Reviewing...

Extended user guide
Page 18
... together. The flash is cancelled before stitching occurs. (Exposure Compensation, White Balance, Exposure Metering, AF Zone, AF Control, Color Mode, and Sharpness are not saved, even if panorama capture is set with the first picture. After a quickview, the LCD displays the liveview and an "overlay" from the first picture cover the same portion in the new picture. 5 If you are automatically stitched together. Take 2 or 3 pictures. Make the overlay...
... together. The flash is cancelled before stitching occurs. (Exposure Compensation, White Balance, Exposure Metering, AF Zone, AF Control, Color Mode, and Sharpness are not saved, even if panorama capture is set with the first picture. After a quickview, the LCD displays the liveview and an "overlay" from the first picture cover the same portion in the new picture. 5 If you are automatically stitched together. Take 2 or 3 pictures. Make the overlay...
Extended user guide
Page 20
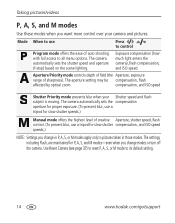
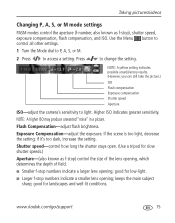
... turn off the camera. The camera automatically sets the compensation aperture for proper exposure. (To prevent blur, use a tripod for slow shutter speeds.) Manual mode offers the highest level of creative Aperture, shutter speed, flash control. (To prevent blur, use Press to control Program mode offers the ease of sharpness). Taking pictures/videos P, A, S, and M modes Use these modes when you change in P, A, S, or M modes apply only to pictures taken in those modes. Mode When to its default setting. 14 www.kodak.com/go/support...
... turn off the camera. The camera automatically sets the compensation aperture for proper exposure. (To prevent blur, use a tripod for slow shutter speeds.) Manual mode offers the highest level of creative Aperture, shutter speed, flash control. (To prevent blur, use Press to control Program mode offers the ease of sharpness). Taking pictures/videos P, A, S, and M modes Use these modes when you change in P, A, S, or M modes apply only to pictures taken in those modes. Mode When to its default setting. 14 www.kodak.com/go/support...
Extended user guide
Page 21
... subject sharp; www.kodak.com/go/support 15 Use the Menu button to control all other settings. 1 Turn the Mode dial to P, A, S, or M. 2 Press to light. if it's too dark, increase the setting. Press to change the setting. Shutter speed-control how long the shutter stays open. (Use a tripod for slow shutter speeds.) Aperture-(also known as f-stop numbers indicate a larger lens opening; Taking pictures/videos Changing P, A, S, or M mode settings PASM modes control the aperture (f-number, also known as f-stop) control the size of the lens opening, which determines the...
... subject sharp; www.kodak.com/go/support 15 Use the Menu button to control all other settings. 1 Turn the Mode dial to P, A, S, or M. 2 Press to light. if it's too dark, increase the setting. Press to change the setting. Shutter speed-control how long the shutter stays open. (Use a tripod for slow shutter speeds.) Aperture-(also known as f-stop numbers indicate a larger lens opening; Taking pictures/videos Changing P, A, S, or M mode settings PASM modes control the aperture (f-number, also known as f-stop) control the size of the lens opening, which determines the...
Extended user guide
Page 30
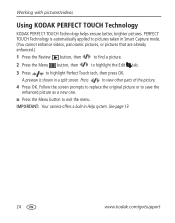
... exit the menu. Working with pictures/videos Using KODAK PERFECT TOUCH Technology KODAK PERFECT TOUCH Technology helps ensure better, brighter pictures. PERFECT TOUCH Technology is shown in a split screen. See page 13. 24 www.kodak.com/go/support Follow the screen prompts to replace the original picture or to save the enhanced picture as a new one. ■ Press the Menu button to view other parts of the picture. 4 Press OK. IMPORTANT: Your camera offers...
... exit the menu. Working with pictures/videos Using KODAK PERFECT TOUCH Technology KODAK PERFECT TOUCH Technology helps ensure better, brighter pictures. PERFECT TOUCH Technology is shown in a split screen. See page 13. 24 www.kodak.com/go/support Follow the screen prompts to replace the original picture or to save the enhanced picture as a new one. ■ Press the Menu button to view other parts of the picture. 4 Press OK. IMPORTANT: Your camera offers...

Extended user guide
Page 38
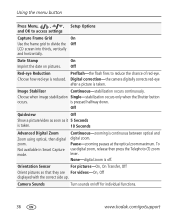
... quality; Video Size Available only in Help system. smallest file size. (4 GB maximum video size.) 32 www.kodak.com/go/support 4 Using the menu button You can change settings to get the best results from your camera. 1 Press the Menu button. 2 Press to highlight a tab: ■ Capture/Video for the most common picture/video-taking settings ■ Setup for other camera settings 3 Press to access settings Picture Size See Camera specifications, page 53. See page 13. NOTE: Some modes offer limited settings.
... quality; Video Size Available only in Help system. smallest file size. (4 GB maximum video size.) 32 www.kodak.com/go/support 4 Using the menu button You can change settings to get the best results from your camera. 1 Press the Menu button. 2 Press to highlight a tab: ■ Capture/Video for the most common picture/video-taking settings ■ Setup for other camera settings 3 Press to access settings Picture Size See Camera specifications, page 53. See page 13. NOTE: Some modes offer limited settings.

Extended user guide
Page 39
... cast of fluorescent lighting. Open Shade-for pictures in SCN, P, A, S, M, and Video modes. Panorama modes. Ideal for Choose your lighting condition. High Color Natural Color Low Color Black & White Sepia NOTE: EASYSHARE Software also lets you change a color picture to access settings Color Mode Choose color tones. Unavailable in natural lighting. Continuous AF-because the camera is always focusing, there is pressed halfway down to focus. AF Control Choose an auto-focus setting. White Balance Auto-automatically corrects white balance. Using the menu button Press Menu...
... cast of fluorescent lighting. Open Shade-for pictures in SCN, P, A, S, M, and Video modes. Panorama modes. Ideal for Choose your lighting condition. High Color Natural Color Low Color Black & White Sepia NOTE: EASYSHARE Software also lets you change a color picture to access settings Color Mode Choose color tones. Unavailable in natural lighting. Continuous AF-because the camera is always focusing, there is pressed halfway down to focus. AF Control Choose an auto-focus setting. White Balance Auto-automatically corrects white balance. Using the menu button Press Menu...
Extended user guide
Page 41
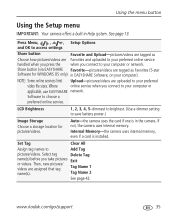
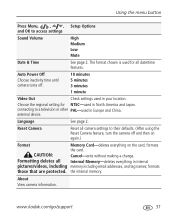
... online service. Internal Memory-the camera uses internal memory, even if a card is in EASYSHARE Software, on your computer or network. If not, the camera uses internal memory. www.kodak.com/go/support 35 Auto-the camera uses the card if one is installed. Tag Name 2 See page 42. LCD Brightness 1, 2, 3, 4, 5-dimmest to brightest. (Use a dimmer setting to your preferred online service handled when you press the when you take pictures Exit or videos. Then, new pictures/ videos are Favorites and uploaded to save battery power.) Image...
... online service. Internal Memory-the camera uses internal memory, even if a card is in EASYSHARE Software, on your computer or network. If not, the camera uses internal memory. www.kodak.com/go/support 35 Auto-the camera uses the card if one is installed. Tag Name 2 See page 42. LCD Brightness 1, 2, 3, 4, 5-dimmest to brightest. (Use a dimmer setting to your preferred online service handled when you press the when you take pictures Exit or videos. Then, new pictures/ videos are Favorites and uploaded to save battery power.) Image...
Extended user guide
Page 42
...-digital zoom is reduced. Digital correction-the camera digitally corrects red-eye after a picture is taken. 10 Seconds Advanced Digital Zoom Zoom using optical, then digital zoom. Off Quickview Off Show a picture/video as soon as it 5 Seconds is taken. Choose when image stabilization Single-stabilization occurs only when the Shutter button occurs. Not available in Smart Capture mode. Camera Sounds Turn sounds on pictures. Choose how red-eye is off for individual functions. 36 www.kodak.com/go/support Date Stamp...
...-digital zoom is reduced. Digital correction-the camera digitally corrects red-eye after a picture is taken. 10 Seconds Advanced Digital Zoom Zoom using optical, then digital zoom. Off Quickview Off Show a picture/video as soon as it 5 Seconds is taken. Choose when image stabilization Single-stabilization occurs only when the Shutter button occurs. Not available in Smart Capture mode. Camera Sounds Turn sounds on pictures. Choose how red-eye is off for individual functions. 36 www.kodak.com/go/support Date Stamp...
Extended user guide
Page 43
... setting for all Internal Memory-deletes everything on again.) Format Memory Card-deletes everything in your location. CAUTION: Cancel-exits without making a change. external device. formats the card. The format chosen is used in internal pictures/videos, including memory including email addresses, and tag names; About View camera information. www.kodak.com/go/support 37 Formatting deletes all date/time features. Using the menu button Press Menu, , , Setup Options and OK to their defaults. (After using the Reset Camera feature, turn the camera...
... setting for all Internal Memory-deletes everything on again.) Format Memory Card-deletes everything in your location. CAUTION: Cancel-exits without making a change. external device. formats the card. The format chosen is used in internal pictures/videos, including memory including email addresses, and tag names; About View camera information. www.kodak.com/go/support 37 Formatting deletes all date/time features. Using the menu button Press Menu, , , Setup Options and OK to their defaults. (After using the Reset Camera feature, turn the camera...

Extended user guide
Page 52
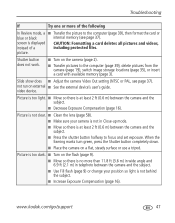
... the following Camera does not ■ Install new batteries (page 1). Do not remove card while the camera is operating normally. CAUTION: Formatting a card deletes all pictures and videos, including protected files. In Review mode, ■ Check the image storage location setting (page 35). number does not decrease after taking pictures. Keep corrupted. If the camera still does turn on. ■ Charge rechargeable batteries. Pictures remaining ■ The camera is on the LCD screen. 46 www.kodak.com/go/support you do...
... the following Camera does not ■ Install new batteries (page 1). Do not remove card while the camera is operating normally. CAUTION: Formatting a card deletes all pictures and videos, including protected files. In Review mode, ■ Check the image storage location setting (page 35). number does not decrease after taking pictures. Keep corrupted. If the camera still does turn on. ■ Charge rechargeable batteries. Pictures remaining ■ The camera is on the LCD screen. 46 www.kodak.com/go/support you do...
Extended user guide
Page 53
... or use a tripod. Picture is too light. ■ Move so there is displayed CAUTION: Formatting a card deletes all pictures and videos, instead of the following In Review mode, a ■ Transfer the picture to the computer (page 39), then format the card or blue or black internal memory (see page 37). When the framing marks turn green, press the Shutter button completely down. ■ Place the camera on external ■ See the external device's user's guide. Troubleshooting...
... or use a tripod. Picture is too light. ■ Move so there is displayed CAUTION: Formatting a card deletes all pictures and videos, instead of the following In Review mode, a ■ Transfer the picture to the computer (page 39), then format the card or blue or black internal memory (see page 37). When the framing marks turn green, press the Shutter button completely down. ■ Place the camera on external ■ See the external device's user's guide. Troubleshooting...

Extended user guide
Page 55
... Cannot transfer pictures. ■ Disconnect the USB cable. computer. cannot locate drivers.) The computer does not communicate with Orientation Sensor set to "On setting to the computer. Pictures taken in EASYSHARE Software to the computer. Then use the Add Pictures button in Smart Capture ■ In the Setup menu, change the Orientation Sensor with the camera. ■ Turn on the camera (page 2). ■ Install new batteries (page 1) or charge rechargeable batteries. ■ Connect cable to...
... Cannot transfer pictures. ■ Disconnect the USB cable. computer. cannot locate drivers.) The computer does not communicate with Orientation Sensor set to "On setting to the computer. Pictures taken in EASYSHARE Software to the computer. Then use the Add Pictures button in Smart Capture ■ In the Setup menu, change the Orientation Sensor with the camera. ■ Turn on the camera (page 2). ■ Install new batteries (page 1) or charge rechargeable batteries. ■ Connect cable to...

Extended user guide
Page 63
... SD Card. Battery life ■ KODAK MAX Alkaline Batteries, AA: < 150 pictures ■ KODAK Ni-MH Rechargeable Digital Camera Batteries: 280 pictures Battery life per CIPA testing method using your software and firmware Download the latest versions of the software included on the KODAK EASYSHARE Software CD and the camera firmware (the software that do not work; See www.kodak.com/go /kes. ■ Do not charge non-rechargeable batteries. Visit www.kodak.com/go /zd15downloads. set LCD Brightness settings;
... SD Card. Battery life ■ KODAK MAX Alkaline Batteries, AA: < 150 pictures ■ KODAK Ni-MH Rechargeable Digital Camera Batteries: 280 pictures Battery life per CIPA testing method using your software and firmware Download the latest versions of the software included on the KODAK EASYSHARE Software CD and the camera firmware (the software that do not work; See www.kodak.com/go /kes. ■ Do not charge non-rechargeable batteries. Visit www.kodak.com/go /zd15downloads. set LCD Brightness settings;
Extended user guide
Page 69
..., 8 burst, using, 13 button burst, 13 delete, 1, 2 flash, 7 review, 1 shutter, 1 telephoto, 1 wide angle, 1 www.kodak.com/go/support 1 zoom, 5 C cable audio/video, 11 USB, 2 camera sounds, 5 candle light, 4 capture frame grid, 4 caring for your camera, 6 clock, setting, 2 color mode, 2 continuous AF, 2 copy pictures card to memory, 13 memory to card, 13 to computer, 1 cropping pictures, 5 customer support, 1, 2 D date setting, 2 date stamp, 4 DC-in, 1 delete button, 1 deleting during quickview, 2 pictures/video, 2 protecting pictures, videos, 3 digital zoom, using, 5 displaying slide show...
..., 8 burst, using, 13 button burst, 13 delete, 1, 2 flash, 7 review, 1 shutter, 1 telephoto, 1 wide angle, 1 www.kodak.com/go/support 1 zoom, 5 C cable audio/video, 11 USB, 2 camera sounds, 5 candle light, 4 capture frame grid, 4 caring for your camera, 6 clock, setting, 2 color mode, 2 continuous AF, 2 copy pictures card to memory, 13 memory to card, 13 to computer, 1 cropping pictures, 5 customer support, 1, 2 D date setting, 2 date stamp, 4 DC-in, 1 delete button, 1 deleting during quickview, 2 pictures/video, 2 protecting pictures, videos, 3 digital zoom, using, 5 displaying slide show...

Extended user guide
Page 73
..., 4 software installing, 1 upgrading, 4 sound volume, 5 sounds, camera, 5 specifications, camera, 1 stage, 5 status, camera ready light, 4 storage capacity, 4 strap, 1 sunset, 4 support, technical, 1, 2 www.kodak.com/go/support Index T tag set, 4 tagging creating tags, 7 favorites, 7 for email, 6 for print, 5 pre-tagging, 8 telephone support, 2 telephoto button, 1 television, slide show, 11 text, 4 time, setting, 2 timer, shutter delay, 9 transferring pictures, videos, 1 trash can, deleting, 2 troubleshooting, 1 camera, 1 camera/computer communications, 4 error messages, 5 ready light status...
..., 4 software installing, 1 upgrading, 4 sound volume, 5 sounds, camera, 5 specifications, camera, 1 stage, 5 status, camera ready light, 4 storage capacity, 4 strap, 1 sunset, 4 support, technical, 1, 2 www.kodak.com/go/support Index T tag set, 4 tagging creating tags, 7 favorites, 7 for email, 6 for print, 5 pre-tagging, 8 telephone support, 2 telephoto button, 1 television, slide show, 11 text, 4 time, setting, 2 timer, shutter delay, 9 transferring pictures, videos, 1 trash can, deleting, 2 troubleshooting, 1 camera, 1 camera/computer communications, 4 error messages, 5 ready light status...


