User Manual
Page 1
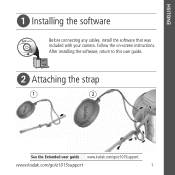
ENGLISH ᕡ Installing the software Before connecting any cables, install the software that was included with your camera. After installing the software, return to this user guide. ᕢ Attaching the strap 1 2 See the Extended user guide www.kodak.com/go/z1015support www.kodak.com/go/z1015support 1 Follow the on-screen instructions.
ENGLISH ᕡ Installing the software Before connecting any cables, install the software that was included with your camera. After installing the software, return to this user guide. ᕢ Attaching the strap 1 2 See the Extended user guide www.kodak.com/go/z1015support www.kodak.com/go/z1015support 1 Follow the on-screen instructions.

User Manual
Page 2
ENGLISH ᕣ Loading the battery Kodak Li-Ion rechargeable digital camera battery KLIC-8000 Kodak lithium digital camera battery CRV3 (non-rechargeable) See the Extended user guide www.kodak.com/go/z1015support 2 www.kodak.com/go/easysharecenter
ENGLISH ᕣ Loading the battery Kodak Li-Ion rechargeable digital camera battery KLIC-8000 Kodak lithium digital camera battery CRV3 (non-rechargeable) See the Extended user guide www.kodak.com/go/z1015support 2 www.kodak.com/go/easysharecenter

User Manual
Page 3
Important: DO NOT plug this cable into a computer. Note: This charger charges the battery; ENGLISH Charging the KLIC-8000 battery 1 Turn OFF the camera. 2 Connect the cable. Charging light • Blinking: charging • Steady: finished charging (approximately 3.5 hours) See the Extended user guide www.kodak.com/go/z1015support www.kodak.com/go/z1015support 3 it does not power the camera.
Important: DO NOT plug this cable into a computer. Note: This charger charges the battery; ENGLISH Charging the KLIC-8000 battery 1 Turn OFF the camera. 2 Connect the cable. Charging light • Blinking: charging • Steady: finished charging (approximately 3.5 hours) See the Extended user guide www.kodak.com/go/z1015support www.kodak.com/go/z1015support 3 it does not power the camera.
User Manual
Page 4
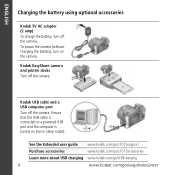
... the Extended user guide www.kodak.com/go/z1015support Purchase accessories www.kodak.com/go/z1015accessories Learn more about USB charging www.kodak.com/go/USBcharging 4 www.kodak.com/go/easysharecenter Ensure that the USB cable is connected to a powered USB port and the computer is turned on the camera. Kodak EasyShare camera and printer docks Turn off...
... the Extended user guide www.kodak.com/go/z1015support Purchase accessories www.kodak.com/go/z1015accessories Learn more about USB charging www.kodak.com/go/USBcharging 4 www.kodak.com/go/easysharecenter Ensure that the USB cable is connected to a powered USB port and the computer is turned on the camera. Kodak EasyShare camera and printer docks Turn off...
User Manual
Page 5
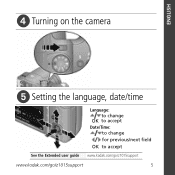
ENGLISH ᕤ Turning on the camera ᕥ Setting the language, date/time Language: to change OK to accept Date/Time: to change for previous/next field OK to accept See the Extended user guide www.kodak.com/go/z1015support www.kodak.com/go/z1015support 5
ENGLISH ᕤ Turning on the camera ᕥ Setting the language, date/time Language: to change OK to accept Date/Time: to change for previous/next field OK to accept See the Extended user guide www.kodak.com/go/z1015support www.kodak.com/go/z1015support 5
User Manual
Page 7
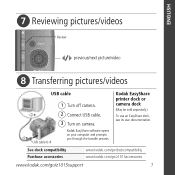
See dock compatibility Purchase accessories www.kodak.com/go/dockcompatibility www.kodak.com/go/z1015accessories www.kodak.com/go/z1015support 7 Kodak EasyShare printer dock or camera dock (May be sold separately.) To use an EasyShare dock, see its user documentation. ENGLISH ᕧ Reviewing pictures/videos Review previous/next picture/video ᕨ Transferring pictures/videos USB cable USB cable U-8 1 Turn off camera. 2 Connect USB cable. 3 Turn on your computer and prompts you through the transfer process. Kodak EasyShare software opens on camera.
See dock compatibility Purchase accessories www.kodak.com/go/dockcompatibility www.kodak.com/go/z1015accessories www.kodak.com/go/z1015support 7 Kodak EasyShare printer dock or camera dock (May be sold separately.) To use an EasyShare dock, see its user documentation. ENGLISH ᕧ Reviewing pictures/videos Review previous/next picture/video ᕨ Transferring pictures/videos USB cable USB cable U-8 1 Turn off camera. 2 Connect USB cable. 3 Turn on your computer and prompts you through the transfer process. Kodak EasyShare software opens on camera.
User Manual
Page 8
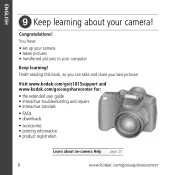
... you can take and share your computer Keep learning! You have: • set up your camera • taken pictures • transferred pictures to your best pictures! Congratulations! ENGLISH ᕩ Keep learning about on-camera Help page 23 8 www.kodak.com/go /easysharecenter for: • the extended user guide • interactive troubleshooting and repairs...
... you can take and share your computer Keep learning! You have: • set up your camera • taken pictures • transferred pictures to your best pictures! Congratulations! ENGLISH ᕩ Keep learning about on-camera Help page 23 8 www.kodak.com/go /easysharecenter for: • the extended user guide • interactive troubleshooting and repairs...
User Manual
Page 11
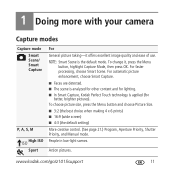
.... ■ Faces are detected. ■ The scene is analyzed for other content and for lighting. ■ In Smart Capture, Kodak Perfect Touch technology is the default mode. For faster processing, choose Smart Scene. NOTE: Smart Scene is applied (for better, brighter pictures... default setting) More creative control. (See page 21.) Program, Aperture Priority, Shutter Priority, and Manual mode. www.kodak.com/go/z1015support 11 Action pictures. 1 Doing more with your camera Capture modes Capture mode Smart Scene/ Smart Capture P, A, S, M ISO High ISO Sport For General picture taking-it...
.... ■ Faces are detected. ■ The scene is analyzed for other content and for lighting. ■ In Smart Capture, Kodak Perfect Touch technology is the default mode. For faster processing, choose Smart Scene. NOTE: Smart Scene is applied (for better, brighter pictures... default setting) More creative control. (See page 21.) Program, Aperture Priority, Shutter Priority, and Manual mode. www.kodak.com/go/z1015support 11 Action pictures. 1 Doing more with your camera Capture modes Capture mode Smart Scene/ Smart Capture P, A, S, M ISO High ISO Sport For General picture taking-it...

User Manual
Page 12
...is not available in /out. 3 Take the picture or video. Optical zoom Digital zoom ■ As you zoom in . (10 x 15 cm) print. 12 www.kodak.com/go/easysharecenter NOTE: You may notice decreased image quality when using digital zoom. Panorama "Stitching" 2 or 3 pictures into 1 panoramic scene. The ...from your subject. NOTE: To get up to 15X closer to your subject while taking pictures/videos. 1 Use the LCD to frame your camera Capture mode For SCN Scene Point-and-shoot simplicity when taking pictures. Press Telephoto (T) past the maximum optical zoom. Doing more with sound. ...
...is not available in /out. 3 Take the picture or video. Optical zoom Digital zoom ■ As you zoom in . (10 x 15 cm) print. 12 www.kodak.com/go/easysharecenter NOTE: You may notice decreased image quality when using digital zoom. Panorama "Stitching" 2 or 3 pictures into 1 panoramic scene. The ...from your subject. NOTE: To get up to 15X closer to your subject while taking pictures/videos. 1 Use the LCD to frame your camera Capture mode For SCN Scene Point-and-shoot simplicity when taking pictures. Press Telephoto (T) past the maximum optical zoom. Doing more with sound. ...
User Manual
Page 13
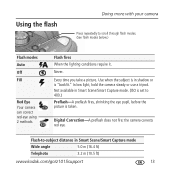
...picture. Use when the subject is in shadow or is set to -subject distance in Smart Scene/Smart Capture mode. (ISO is "backlit." Digital Correction-A preflash does not fire; Flash-to 400.) Preflash-A preflash fires, shrinking the eye pupil, before the picture is taken. In low ...Smart Scene/Smart Capture mode Wide angle Telephoto 5.0 m (16.4 ft) 3.2 m (10.5 ft) www.kodak.com/go/z1015support 13 the camera corrects red eye. Never. Using the flash Doing more with your camera Press repeatedly to scroll through flash modes. (See flash modes below.) Flash modes Auto Off Fill Red...
...picture. Use when the subject is in shadow or is set to -subject distance in Smart Scene/Smart Capture mode. (ISO is "backlit." Digital Correction-A preflash does not fire; Flash-to 400.) Preflash-A preflash fires, shrinking the eye pupil, before the picture is taken. In low ...Smart Scene/Smart Capture mode Wide angle Telephoto 5.0 m (16.4 ft) 3.2 m (10.5 ft) www.kodak.com/go/z1015support 13 the camera corrects red eye. Never. Using the flash Doing more with your camera Press repeatedly to scroll through flash modes. (See flash modes below.) Flash modes Auto Off Fill Red...
User Manual
Page 14
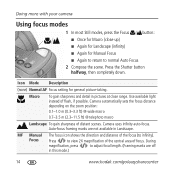
... position: 0.1-1.0 m (0.3-3.3 ft) @ wide macro 0.7-3.5 m (2.3-11.5 ft) @ telephoto macro Landscape To gain sharpness of flash, if possible. Camera uses infinity auto-focus. Press the Shutter button halfway, then completely down. Focus Press to view 2X magnification of the central area of the focus ...Focus ■ Again to return to adjust focal length. (Framing marks are not available in this mode.) 14 www.kodak.com/go/easysharecenter Doing more with your camera Using focus modes 1 In most Still modes, press the Focus button: ■ Once for Macro (close range. ...
... position: 0.1-1.0 m (0.3-3.3 ft) @ wide macro 0.7-3.5 m (2.3-11.5 ft) @ telephoto macro Landscape To gain sharpness of flash, if possible. Camera uses infinity auto-focus. Press the Shutter button halfway, then completely down. Focus Press to view 2X magnification of the central area of the focus ...Focus ■ Again to return to adjust focal length. (Framing marks are not available in this mode.) 14 www.kodak.com/go/easysharecenter Doing more with your camera Using focus modes 1 In most Still modes, press the Focus button: ■ Once for Macro (close range. ...

User Manual
Page 15
...■ Press the Shutter button completely down . and 10-second options are available in a picture, or to ensure a steady Shutter button press. 1 Place the camera on a tripod or flat surface. 2 In most Still modes, press the Self-timer/Burst button : ■ Once for a 10-second delay (so you ...video mode. To cancel the Self-timer during countdown, press the Self-timer/Burst button , or press the Shutter button completely down . www.kodak.com/go/z1015support 15 NOTE: The video stops when no storage space remains. Press the Shutter button halfway, then completely down. Only the 2-...
...■ Press the Shutter button completely down . and 10-second options are available in a picture, or to ensure a steady Shutter button press. 1 Place the camera on a tripod or flat surface. 2 In most Still modes, press the Self-timer/Burst button : ■ Once for a 10-second delay (so you ...video mode. To cancel the Self-timer during countdown, press the Self-timer/Burst button , or press the Shutter button completely down . www.kodak.com/go/z1015support 15 NOTE: The video stops when no storage space remains. Press the Shutter button halfway, then completely down. Only the 2-...
User Manual
Page 16
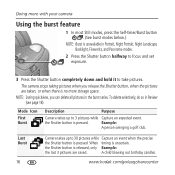
... Shutter button completely down and hold it to 3 pictures while Capture an expected event. The camera stops taking pictures when you can delete all pictures in Review (see page 18). www.kodak.com/go/easysharecenter Doing more storage space. To delete selectively, do so in the burst series.... Last Burst 16 Camera takes up to take pictures. NOTE: During quickview, you release the Shutter ...
... Shutter button completely down and hold it to 3 pictures while Capture an expected event. The camera stops taking pictures when you can delete all pictures in Review (see page 18). www.kodak.com/go/easysharecenter Doing more storage space. To delete selectively, do so in the burst series.... Last Burst 16 Camera takes up to take pictures. NOTE: During quickview, you release the Shutter ...
User Manual
Page 17
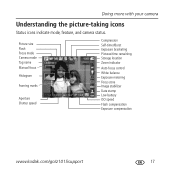
Picture size Flash Focus mode Camera mode Tag name Manual focus Histogram Framing marks Aperture Shutter speed Compression Self-timer/Burst Exposure bracketing Pictures/time remaining Storage location Zoom indicator Auto focus control White balance Exposure metering Focus zone Image stabilizer Date stamp Low battery ISO speed Flash compensation Exposure compensation www.kodak.com/go/z1015support 17 Doing more with your camera Understanding the picture-taking icons Status icons indicate mode, feature, and camera status.
Picture size Flash Focus mode Camera mode Tag name Manual focus Histogram Framing marks Aperture Shutter speed Compression Self-timer/Burst Exposure bracketing Pictures/time remaining Storage location Zoom indicator Auto focus control White balance Exposure metering Focus zone Image stabilizer Date stamp Low battery ISO speed Flash compensation Exposure compensation www.kodak.com/go/z1015support 17 Doing more with your camera Understanding the picture-taking icons Status icons indicate mode, feature, and camera status.

User Manual
Page 18
To get the most from your camera, see page 23. 18 www.kodak.com/go/easysharecenter Delete 2 Press to highlight a setting, then press OK. 4 Choose an option, then press OK. IMPORTANT: Your camera offers an on-board Help system. 2 Working with pictures/videos Deleting pictures/videos 1 Press the Review button. Using the ...then the Menu button. 2 Press to choose a tab: ■ Review to view pictures/videos ■ Edit to edit pictures/videos ■ Setup for other camera settings 3 Press to find a picture/video. 3 Press the Delete button. 4 Follow the screen prompts.
To get the most from your camera, see page 23. 18 www.kodak.com/go/easysharecenter Delete 2 Press to highlight a setting, then press OK. 4 Choose an option, then press OK. IMPORTANT: Your camera offers an on-board Help system. 2 Working with pictures/videos Deleting pictures/videos 1 Press the Review button. Using the ...then the Menu button. 2 Press to choose a tab: ■ Review to view pictures/videos ■ Edit to edit pictures/videos ■ Setup for other camera settings 3 Press to find a picture/video. 3 Press the Delete button. 4 Follow the screen prompts.
User Manual
Page 20
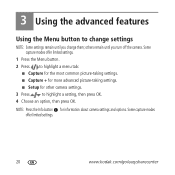
...capture modes offer limited settings. 20 www.kodak.com/go/easysharecenter 3 Using the advanced features Using the Menu button to change settings NOTE: Some settings remain until you change them; NOTE: Press the Info button for other camera settings. 3 Press to highlight a menu...; Capture for the most common picture-taking settings. ■ Capture + for more advanced picture-taking settings. ■ Setup for information about camera settings and options. Some capture modes offer limited settings. 1 Press the Menu button. 2 Press to highlight a setting, then press OK. ...
...capture modes offer limited settings. 20 www.kodak.com/go/easysharecenter 3 Using the advanced features Using the Menu button to change settings NOTE: Some settings remain until you change them; NOTE: Press the Info button for other camera settings. 3 Press to highlight a menu...; Capture for the most common picture-taking settings. ■ Capture + for more advanced picture-taking settings. ■ Setup for information about camera settings and options. Some capture modes offer limited settings. 1 Press the Menu button. 2 Press to highlight a setting, then press OK. ...

User Manual
Page 21
..., exposure range of creative control. www.kodak.com/go/z1015support 21 The aperture setting may be affected compensation, flash by optical zoom. NOTE: Settings you want more control over your subject Shutter speed, exposure is moving. The camera sets the shutter flash compensation, and ISO... Jog dial to control Program mode offers the ease of auto shooting with full Exposure compensation, access to all menu options. The camera automatically sets the aperture for compensation, and flash proper exposure. (Use a tripod for slow shutter speeds.) compensation Manual mode offers the...
..., exposure range of creative control. www.kodak.com/go/z1015support 21 The aperture setting may be affected compensation, flash by optical zoom. NOTE: Settings you want more control over your subject Shutter speed, exposure is moving. The camera sets the shutter flash compensation, and ISO... Jog dial to control Program mode offers the ease of auto shooting with full Exposure compensation, access to all menu options. The camera automatically sets the aperture for compensation, and flash proper exposure. (Use a tripod for slow shutter speeds.) compensation Manual mode offers the...

User Manual
Page 22
...possible unsatisfactory results. (However, you can still take the picture.) ISO Flash compensation Exposure compensation Shutter speed Aperture ISO-adjust the camera's sensitivity to unlock the setting. ISO 3200 and 6400 available only in a picture. Shutter speed-control how long the shutter ... A higher ISO may produce unwanted "noise" in 3.1 MP and lower picture sizes. good for landscapes and well-lit conditions. 22 www.kodak.com/go/easysharecenter Using the advanced features Changing P, A, S, or M mode settings PASM modes control the aperture, shutter speed, exposure compensation,...
...possible unsatisfactory results. (However, you can still take the picture.) ISO Flash compensation Exposure compensation Shutter speed Aperture ISO-adjust the camera's sensitivity to unlock the setting. ISO 3200 and 6400 available only in a picture. Shutter speed-control how long the shutter ... A higher ISO may produce unwanted "noise" in 3.1 MP and lower picture sizes. good for landscapes and well-lit conditions. 22 www.kodak.com/go/easysharecenter Using the advanced features Changing P, A, S, or M mode settings PASM modes control the aperture, shutter speed, exposure compensation,...
User Manual
Page 23
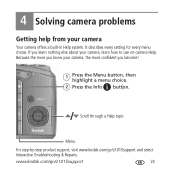
www.kodak.com/go /z1015support and select Interactive Troubleshooting & Repairs. Because the more you know your camera, the more confident you learn how to use on-camera Help. Scroll through a Help topic Menu For step-by-step product support, visit www.kodak.com/go /z1015support 23 4 Solving camera problems Getting help from your camera, learn nothing else about your camera Your camera offers a built-in Help system. It describes every setting for every menu choice. If you become! 1 Press the Menu button, then highlight a menu choice. 2 Press the Info button.
www.kodak.com/go /z1015support and select Interactive Troubleshooting & Repairs. Because the more you know your camera, the more confident you learn how to use on-camera Help. Scroll through a Help topic Menu For step-by-step product support, visit www.kodak.com/go /z1015support 23 4 Solving camera problems Getting help from your camera, learn nothing else about your camera Your camera offers a built-in Help system. It describes every setting for every menu choice. If you become! 1 Press the Menu button, then highlight a menu choice. 2 Press the Info button.

User Manual
Page 26
... with the instructions, may have been provided with the limits for a Class B digital device, pursuant to an outlet on a circuit different from state to state or by a Kodak company, no warranty or liability exists beyond any written or implied warranty is encouraged... the user's authority to provide reasonable protection against harmful interference in a particular installation. Regulatory compliance FCC compliance and advisory Kodak EasyShare Z1015 IS digital camera This equipment has been tested and found to you . However, there is no guarantee that to which vary from that...
... with the instructions, may have been provided with the limits for a Class B digital device, pursuant to an outlet on a circuit different from state to state or by a Kodak company, no warranty or liability exists beyond any written or implied warranty is encouraged... the user's authority to provide reasonable protection against harmful interference in a particular installation. Regulatory compliance FCC compliance and advisory Kodak EasyShare Z1015 IS digital camera This equipment has been tested and found to you . However, there is no guarantee that to which vary from that...


