User Manual
Page 5
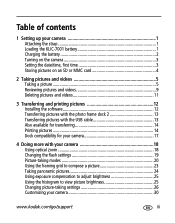
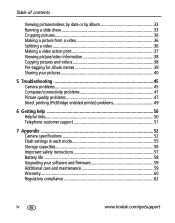
...battery 2 Turning on the camera 3 Setting the date/time, first time 3 Storing pictures on an SD or MMC card 4 2 Taking pictures and videos 5 Taking a picture 5 Reviewing pictures and videos 9 Deleting pictures and videos 11 3 Transferring and printing pictures 12 Installing the software 12 Transferring pictures with the photo frame dock 2 13 Transferring pictures with the USB cable 13 Also available for transferring 14 Printing pictures 14 Dock compatibility for your camera 17 4 Doing more with your camera 18 Using optical zoom 18 Changing the flash settings 19 Picture-taking...
...battery 2 Turning on the camera 3 Setting the date/time, first time 3 Storing pictures on an SD or MMC card 4 2 Taking pictures and videos 5 Taking a picture 5 Reviewing pictures and videos 9 Deleting pictures and videos 11 3 Transferring and printing pictures 12 Installing the software 12 Transferring pictures with the photo frame dock 2 13 Transferring pictures with the USB cable 13 Also available for transferring 14 Printing pictures 14 Dock compatibility for your camera 17 4 Doing more with your camera 18 Using optical zoom 18 Changing the flash settings 19 Picture-taking...
User Manual
Page 6
... a video 36 Making a video action print 37 Viewing picture/video information 38 Copying pictures and videos 38 Pre-tagging for album names 39 Sharing your pictures 40 5 Troubleshooting 45 Camera problems 45 Computer/connectivity problems 47 Picture quality problems 47 Direct printing (PictBridge enabled printer) problems 49 6 Getting help 50 Helpful links 50 Telephone customer support 51 7 Appendix 52 Camera specifications 52 Flash settings in each mode 55 Storage capacities 56 Important safety instructions 57 Battery life 58 Upgrading your software and firmware 59...
... a video 36 Making a video action print 37 Viewing picture/video information 38 Copying pictures and videos 38 Pre-tagging for album names 39 Sharing your pictures 40 5 Troubleshooting 45 Camera problems 45 Computer/connectivity problems 47 Picture quality problems 47 Direct printing (PictBridge enabled printer) problems 49 6 Getting help 50 Helpful links 50 Telephone customer support 51 7 Appendix 52 Camera specifications 52 Flash settings in each mode 55 Storage capacities 56 Important safety instructions 57 Battery life 58 Upgrading your software and firmware 59...

User Manual
Page 9
Setting the date/time, first time 1 At the prompt, press OK. 2 to accept. www.kodak.com/go/support 3 for previous/next field. 3 OK to change. NOTE: You can also press the Auto/SCN, Video, or Favorites button to turn the camera on the camera in Auto mode. Setting up your camera Turning on the camera Press the On/Off button to turn on in that mode. To set the date/time at a later time, see Date & Time, page 31.
Setting the date/time, first time 1 At the prompt, press OK. 2 to accept. www.kodak.com/go/support 3 for previous/next field. 3 OK to change. NOTE: You can also press the Auto/SCN, Video, or Favorites button to turn the camera on the camera in Auto mode. Setting up your camera Turning on the camera Press the On/Off button to turn on in that mode. To set the date/time at a later time, see Date & Time, page 31.
User Manual
Page 10
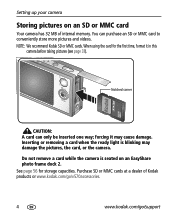
... light is seated on an SD or MMC card Your camera has 32 MB of Kodak products or www.kodak.com/go/v570accessories. 4 www.kodak.com/go/support NOTE: We recommend Kodak SD or MMC cards. Notched corner CAUTION: A card can purchase an SD or MMC card to conveniently store more pictures and videos. Setting up your camera Storing pictures on an EasyShare photo frame dock 2. When using the card...
... light is seated on an SD or MMC card Your camera has 32 MB of Kodak products or www.kodak.com/go/v570accessories. 4 www.kodak.com/go/support NOTE: We recommend Kodak SD or MMC cards. Notched corner CAUTION: A card can purchase an SD or MMC card to conveniently store more pictures and videos. Setting up your camera Storing pictures on an EasyShare photo frame dock 2. When using the card...
User Manual
Page 13
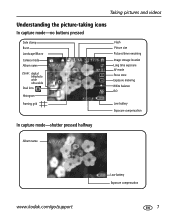
Taking pictures and videos Understanding the picture-taking icons In capture mode-no buttons pressed Date stamp Burst Landscape/Macro Camera mode Album name Zoom: digital telephoto wide ultra-wide Dual lens Histogram Framing grid Flash Picture size Pictures/time remaining Image storage location Long time exposure AF mode Focus zone Exposure metering White balance ISO Low battery Exposure compensation In capture mode-shutter pressed halfway Album name www.kodak.com/go/support Low battery Exposure compensation 7
Taking pictures and videos Understanding the picture-taking icons In capture mode-no buttons pressed Date stamp Burst Landscape/Macro Camera mode Album name Zoom: digital telephoto wide ultra-wide Dual lens Histogram Framing grid Flash Picture size Pictures/time remaining Image storage location Long time exposure AF mode Focus zone Exposure metering White balance ISO Low battery Exposure compensation In capture mode-shutter pressed halfway Album name www.kodak.com/go/support Low battery Exposure compensation 7
User Manual
Page 15
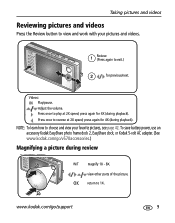
... how to choose and view your pictures and videos. 1 Review. (Press again to exit.) 2 for previous/next. To save battery power, use an accessory Kodak EasyShare photo frame dock 2, EasyShare dock, or Kodak 5-volt AC adapter. (See www.kodak.com/go /support 9 Adjust the volume. www.kodak.com/go /v570accessories.) Magnifying a picture during review W/T magnify 1X - 8X. Press once to play at 2X speed; press again for 4X (during playback). OK return to 1X...
... how to choose and view your pictures and videos. 1 Review. (Press again to exit.) 2 for previous/next. To save battery power, use an accessory Kodak EasyShare photo frame dock 2, EasyShare dock, or Kodak 5-volt AC adapter. (See www.kodak.com/go /support 9 Adjust the volume. www.kodak.com/go /v570accessories.) Magnifying a picture during review W/T magnify 1X - 8X. Press once to play at 2X speed; press again for 4X (during playback). OK return to 1X...
User Manual
Page 21
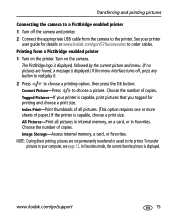
....kodak.com/go /support 15 Printing from the camera to the printer. Choose the number of copies. The PictBridge logo is displayed, followed by the current picture and menu. (If no pictures are not permanently transferred or saved to order cables. To transfer pictures to choose a picture. Current Picture-Press to your printer is displayed. NOTE: During direct printing, pictures are found, a message is capable, choose a print size. Choose the number of copies. Transferring and printing pictures Connecting the camera to a PictBridge enabled printer 1 Turn...
....kodak.com/go /support 15 Printing from the camera to the printer. Choose the number of copies. The PictBridge logo is displayed, followed by the current picture and menu. (If no pictures are not permanently transferred or saved to order cables. To transfer pictures to choose a picture. Current Picture-Press to your printer is displayed. NOTE: During direct printing, pictures are found, a message is capable, choose a print size. Choose the number of copies. Transferring and printing pictures Connecting the camera to a PictBridge enabled printer 1 Turn...
User Manual
Page 22
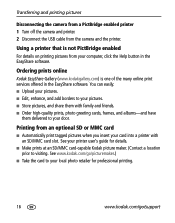
... the USB cable from your local photo retailer for details. ■ Make prints at an SD/MMC card-capable Kodak picture maker. (Contact a location prior to visiting. Using a printer that is one of the many online print services offered in the EasyShare software. See your printer user's guide for professional printing. 16 www.kodak.com/go /picturemaker.) ■ Take the card to your computer, click the Help button in the EasyShare software. See www.kodak.com/go /support...
... the USB cable from your local photo retailer for details. ■ Make prints at an SD/MMC card-capable Kodak picture maker. (Contact a location prior to visiting. Using a printer that is one of the many online print services offered in the EasyShare software. See your printer user's guide for professional printing. 16 www.kodak.com/go /picturemaker.) ■ Take the card to your computer, click the Help button in the EasyShare software. See www.kodak.com/go /support...
User Manual
Page 24
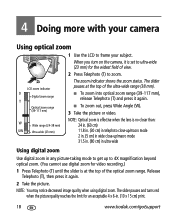
... (T) and press it again. 2 Take the picture. NOTE: Optical zoom is effective when the lens is set to ultra-wide (23 mm) for an acceptable 4 x 6-in any picture-taking mode to 4X magnification beyond optical zoom. (You cannot use digital zoom for video recording.) 1 Press Telephoto (T) until the slider is at the top of view. The zoom indicator shows the zoom status. LCD zoom indicator D Digital zoom range T Optical zoom range (39-117 mm...
... (T) and press it again. 2 Take the picture. NOTE: Optical zoom is effective when the lens is set to ultra-wide (23 mm) for an acceptable 4 x 6-in any picture-taking mode to 4X magnification beyond optical zoom. (You cannot use digital zoom for video recording.) 1 Press Telephoto (T) until the slider is at the top of view. The zoom indicator shows the zoom status. LCD zoom indicator D Digital zoom range T Optical zoom range (39-117 mm...

User Manual
Page 33
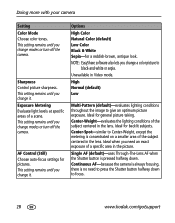
... indoor pictures under fluorescent lighting without flash. Ideal for printing up to 20 x 30 in 1.8 MP picture size.) www.kodak.com/go/support 27 Doing more with your lighting condition. Auto (default) ISO 64, 100, 200, 400, 800 (800 available only in . (50 x 76 cm); This setting remains until you change modes or turn off the camera. pictures are highest resolution and largest file size. 4.4 MP (3:2)- White Balance Choose your camera Setting Picture Size Choose a picture resolution...
... indoor pictures under fluorescent lighting without flash. Ideal for printing up to 20 x 30 in 1.8 MP picture size.) www.kodak.com/go/support 27 Doing more with your lighting condition. Auto (default) ISO 64, 100, 200, 400, 800 (800 available only in . (50 x 76 cm); This setting remains until you change modes or turn off the camera. pictures are highest resolution and largest file size. 4.4 MP (3:2)- White Balance Choose your camera Setting Picture Size Choose a picture resolution...
User Manual
Page 34
... the lighting conditions of a specific area in the lens. Ideal for a reddish-brown, antique look. Single AF (default)-uses Through-The-Lens AF when the Shutter button is no need an exact exposure of the subject centered in Video mode. Doing more with your camera Setting Color Mode Choose color tones. This setting remains until you change a color picture to focus. 28 www.kodak.com/go/support High Normal (default) Low Multi-Pattern (default)-evaluates lighting conditions...
... the lighting conditions of a specific area in the lens. Ideal for a reddish-brown, antique look. Single AF (default)-uses Through-The-Lens AF when the Shutter button is no need an exact exposure of the subject centered in Video mode. Doing more with your camera Setting Color Mode Choose color tones. This setting remains until you change a color picture to focus. 28 www.kodak.com/go/support High Normal (default) Low Multi-Pattern (default)-evaluates lighting conditions...
User Manual
Page 35
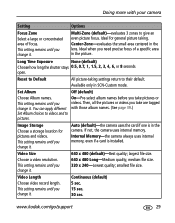
.... Auto (default)-the camera uses the card if one is installed. Multi-Zone (default)-evaluates 3 zones to give an even picture focus. Long Time Exposure None (default) Choose how long the shutter stays 0.5, 0.7, 1, 1.5, 2, 3, 4, 6, or 8 seconds open. www.kodak.com/go/support 29 Doing more with those album names. (See page 39.) Set Album choices to videos and to pictures. Internal Memory-the camera always uses internal memory, even if a card is in the picture. Video Size Choose a video resolution. largest file size...
.... Auto (default)-the camera uses the card if one is installed. Multi-Zone (default)-evaluates 3 zones to give an even picture focus. Long Time Exposure None (default) Choose how long the shutter stays 0.5, 0.7, 1, 1.5, 2, 3, 4, 6, or 8 seconds open. www.kodak.com/go/support 29 Doing more with those album names. (See page 39.) Set Album choices to videos and to pictures. Internal Memory-the camera always uses internal memory, even if a card is in the picture. Video Size Choose a video resolution. largest file size...
User Manual
Page 49
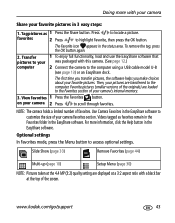
... transferred to customize the size of the screen. Videos tagged as 1 Press the Share button. To remove the tag, press the OK button again. 2. on your camera's internal memory. 3. NOTE: The camera holds a limited number of your camera 2 Press to access optional settings. The Favorite icon appears in 3 easy steps: 1. Doing more information, click the Help button in the EasyShare software. Tag pictures as favorites remain in the Favorites folder in the EasyShare software. View...
... transferred to customize the size of the screen. Videos tagged as 1 Press the Share button. To remove the tag, press the OK button again. 2. on your camera's internal memory. 3. NOTE: The camera holds a limited number of your camera 2 Press to access optional settings. The Favorite icon appears in 3 easy steps: 1. Doing more information, click the Help button in the EasyShare software. Tag pictures as favorites remain in the Favorites folder in the EasyShare software. View...
User Manual
Page 52
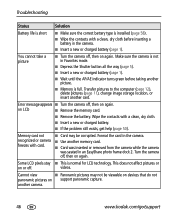
... panoramic pictures on LCD ■ Remove the memory card. ■ Remove the battery. another card. Turn the camera off , then on again. on support panoramic capture. Format the card in an EasyShare photo frame dock 2. You cannot take a picture ■ Turn the camera off , then on again. Make sure the camera is not in Favorites mode. ■ Depress the Shutter button all the way (page 5). ■ Insert a new or charged battery (page 1). ■ Wait until the AF/AE indicator turns green...
... panoramic pictures on LCD ■ Remove the memory card. ■ Remove the battery. another card. Turn the camera off , then on again. on support panoramic capture. Format the card in an EasyShare photo frame dock 2. You cannot take a picture ■ Turn the camera off , then on again. Make sure the camera is not in Favorites mode. ■ Depress the Shutter button all the way (page 5). ■ Insert a new or charged battery (page 1). ■ Wait until the AF/AE indicator turns green...
User Manual
Page 53
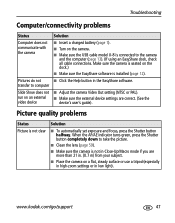
...-zoom settings or in Close-Up/Macro mode if you are correct. (See the device's user's guide). Troubleshooting Computer/connectivity problems Status Computer does not communicate with the camera Pictures do not transfer to computer Slide Show does not run on an external video device Solution ■ Insert a charged battery (page 1). ■ Turn on the camera. ■ Make sure the USB cable model U-8 is not clear Solution ■ To automatically set exposure and focus, press the Shutter button...
...-zoom settings or in Close-Up/Macro mode if you are correct. (See the device's user's guide). Troubleshooting Computer/connectivity problems Status Computer does not communicate with the camera Pictures do not transfer to computer Slide Show does not run on an external video device Solution ■ Insert a charged battery (page 1). ■ Turn on the camera. ■ Make sure the USB cable model U-8 is not clear Solution ■ To automatically set exposure and focus, press the Shutter button...
User Manual
Page 56
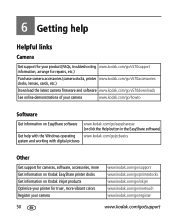
....) Purchase camera accessories (camera docks, printer www.kodak.com/go/v570accessories docks, lenses, cards, etc.) Download the latest camera firmware and software www.kodak.com/go/v570downloads See online demonstrations of your camera www.kodak.com/go/howto Software Get information on EasyShare software www.kodak.com/go/easysharesw (or click the Help button in the EasyShare software) Get help with the Windows operating www.kodak.com/go/pcbasics system and working with digital pictures Other Get support for cameras, software...
....) Purchase camera accessories (camera docks, printer www.kodak.com/go/v570accessories docks, lenses, cards, etc.) Download the latest camera firmware and software www.kodak.com/go/v570downloads See online demonstrations of your camera www.kodak.com/go/howto Software Get information on EasyShare software www.kodak.com/go/easysharesw (or click the Help button in the EasyShare software) Get help with the Windows operating www.kodak.com/go/pcbasics system and working with digital pictures Other Get support for cameras, software...
User Manual
Page 61
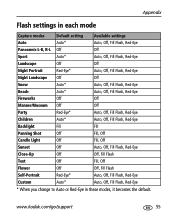
... settings in each mode Capture modes Default setting Available settings Auto Auto* Auto, Off, Fill Flash, Red-Eye Panoramic L-R, R-L Off Off Sport Auto* Auto, Off, Fill Flash, Red-Eye Landscape Off Off Night Portrait Red-Eye* Auto, Off, Fill Flash, Red-Eye Night Landscape Off Off Snow Auto* Auto, Off, Fill Flash, Red-Eye Beach Auto* Auto, Off, Fill Flash, Red-Eye Fireworks Off Off Manner/Museum Off Off Party Red-Eye* Auto, Off, Fill Flash, Red-Eye Children Auto* Auto, Off, Fill Flash, Red-Eye Backlight Fill Fill Panning Shot Off Fill, Off Candle Light...
... settings in each mode Capture modes Default setting Available settings Auto Auto* Auto, Off, Fill Flash, Red-Eye Panoramic L-R, R-L Off Off Sport Auto* Auto, Off, Fill Flash, Red-Eye Landscape Off Off Night Portrait Red-Eye* Auto, Off, Fill Flash, Red-Eye Night Landscape Off Off Snow Auto* Auto, Off, Fill Flash, Red-Eye Beach Auto* Auto, Off, Fill Flash, Red-Eye Fireworks Off Off Manner/Museum Off Off Party Red-Eye* Auto, Off, Fill Flash, Red-Eye Children Auto* Auto, Off, Fill Flash, Red-Eye Backlight Fill Fill Panning Shot Off Fill, Off Candle Light...

User Manual
Page 68
... www.kodak.com/go/support Any changes or modifications not expressly approved by one or more of the FCC Rules. This equipment generates, uses, and can be used in a residential installation. Appendix Regulatory compliance FCC compliance and advisory Kodak EasyShare V570 dual lens digital camera This equipment has been tested and found to comply with the limits for a Class B digital device, pursuant to operate...
... www.kodak.com/go/support Any changes or modifications not expressly approved by one or more of the FCC Rules. This equipment generates, uses, and can be used in a residential installation. Appendix Regulatory compliance FCC compliance and advisory Kodak EasyShare V570 dual lens digital camera This equipment has been tested and found to comply with the limits for a Class B digital device, pursuant to operate...
User Manual
Page 73
... transfer via photo frame dock, 13 transfer via USB cable, 13 portrait, 21 power auto off, 31 camera, 3 printer dock, 14 printing from a card, 16 from computer, 16 from EasyShare printer dock, 14 optimizing printer, 50 order online, 16 PictBridge, 14 tagged pictures, 16 protecting pictures, videos, 11 Q quickview, using, 6 www.kodak.com/go/support R ready light, ii recycling, disposal, 59, 63 red-eye pre-flash, 32 regulatory information, 62 removing favorites, 44 repair camera, 50 reset to default, 29 review button, ii reviewing pictures...
... transfer via photo frame dock, 13 transfer via USB cable, 13 portrait, 21 power auto off, 31 camera, 3 printer dock, 14 printing from a card, 16 from computer, 16 from EasyShare printer dock, 14 optimizing printer, 50 order online, 16 PictBridge, 14 tagged pictures, 16 protecting pictures, videos, 11 Q quickview, using, 6 www.kodak.com/go/support R ready light, ii recycling, disposal, 59, 63 red-eye pre-flash, 32 regulatory information, 62 removing favorites, 44 repair camera, 50 reset to default, 29 review button, ii reviewing pictures...
User Manual
Page 75
... sites, 50 USB transferring pictures, 13 USB / A/V out, ii, 35 V VCCI compliance, 63 video action print, 37 date display, 32 emailing tagged, 41 www.kodak.com/go/support Index length, 29 out, 31 protecting, 11 reviewing, 9 size/quality, 29 splitting, 36 storage capacities, 56 taking, 5 viewing, 9 viewing by date, album, 33 picture after taking, 6 picture, video information, 38 using review button, 9 volume, 31 W warranty, 60 WEEE, 63 white balance, 27 wide angle button, ii Windows OS, installing software, 12 Z zoom digital, 18 optical...
... sites, 50 USB transferring pictures, 13 USB / A/V out, ii, 35 V VCCI compliance, 63 video action print, 37 date display, 32 emailing tagged, 41 www.kodak.com/go/support Index length, 29 out, 31 protecting, 11 reviewing, 9 size/quality, 29 splitting, 36 storage capacities, 56 taking, 5 viewing, 9 viewing by date, album, 33 picture after taking, 6 picture, video information, 38 using review button, 9 volume, 31 W warranty, 60 WEEE, 63 white balance, 27 wide angle button, ii Windows OS, installing software, 12 Z zoom digital, 18 optical...


