
User Guide
Page 2
... kept short, using a hair net if needed, or tying long hair up in a residential area is a Class A product. These limits are not limited to correct the interference at their practices and make compliance with the limits for a Class A digital device, pursuant to part 15 of 10 minutes before installation. WARNING: Before changing a lamp, always power down the scanner and let it...
... kept short, using a hair net if needed, or tying long hair up in a residential area is a Class A product. These limits are not limited to correct the interference at their practices and make compliance with the limits for a Class A digital device, pursuant to part 15 of 10 minutes before installation. WARNING: Before changing a lamp, always power down the scanner and let it...
User Guide
Page 4
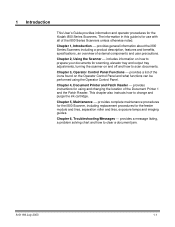
... information on how to prepare your documents for scanning, elevator tray and output tray adjustments, turning the scanner on the Operator Control Panel and what functions can be performed using and changing the location of the Document Printer 1 and the Patch Reader. Chapter 6, Troubleshooting/Messages provides a message listing, a problem solving chart and how to clear a document jam. The information in this guide is for the Kodak i800 Series Scanners. Chapter 1, Introduction provides general information...
... information on how to prepare your documents for scanning, elevator tray and output tray adjustments, turning the scanner on the Operator Control Panel and what functions can be performed using and changing the location of the Document Printer 1 and the Patch Reader. Chapter 6, Troubleshooting/Messages provides a message listing, a problem solving chart and how to clear a document jam. The information in this guide is for the Kodak i800 Series Scanners. Chapter 1, Introduction provides general information...
User Guide
Page 5
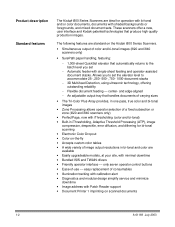
... ISIS and TWAIN drivers • Friendly operator interface only seven operator control buttons • Ease-of-use easy replacement of consumables • Illumination tracking with calibration alert • Diagnostics and modular design simplify service and minimize downtime • Image address with Patch Reader support • Document Printer 1 imprinting on the Kodak i800 Series Scanners. • Simultaneous output of color and bi-tonal images (i820 and i840 scanners only) • SurePath paper...
... ISIS and TWAIN drivers • Friendly operator interface only seven operator control buttons • Ease-of-use easy replacement of consumables • Illumination tracking with calibration alert • Diagnostics and modular design simplify service and minimize downtime • Image address with Patch Reader support • Document Printer 1 imprinting on the Kodak i800 Series Scanners. • Simultaneous output of color and bi-tonal images (i820 and i840 scanners only) • SurePath paper...
User Guide
Page 6
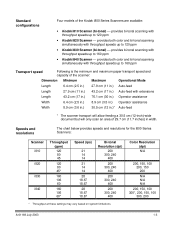
... speeds up to 160 ppm • Kodak i840 Scanner provides both color and bi-tonal scanning simultaneously with throughput speeds up to 160 ppm Transport speed Following is the minimum and maximum paper transport speed and capacity of the scanner: Dimension Minimum Maximum Operational Mode Length 6.4 cm (2.5 in.) 27.9 cm (11 in.) Auto-feed Length 27.9 cm (11 in.) 43...
... speeds up to 160 ppm • Kodak i840 Scanner provides both color and bi-tonal scanning simultaneously with throughput speeds up to 160 ppm Transport speed Following is the minimum and maximum paper transport speed and capacity of the scanner: Dimension Minimum Maximum Operational Mode Length 6.4 cm (2.5 in.) 27.9 cm (11 in.) Auto-feed Length 27.9 cm (11 in.) 43...
User Guide
Page 12
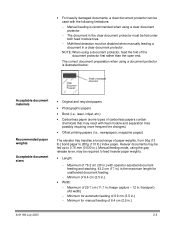
... changes) • Offset printing papers (i.e., newspapers, magazine pages) The elevator tray handles a broad range of 8.9 cm (3.5 in.) - Minimum of 29.7 cm (11.7 in./image capture - 12 in./transport) (A3 width) - Minimum for automatic feeding of paper weights, from 50g (13 lb.) bond paper to 200g (110 lb.) index paper. Minimum for manual feeding of the document protector first rather than the open end. The document in the clear document...
... changes) • Offset printing papers (i.e., newspapers, magazine pages) The elevator tray handles a broad range of 8.9 cm (3.5 in.) - Minimum of 29.7 cm (11.7 in./image capture - 12 in./transport) (A3 width) - Minimum for automatic feeding of paper weights, from 50g (13 lb.) bond paper to 200g (110 lb.) index paper. Minimum for manual feeding of the document protector first rather than the open end. The document in the clear document...

User Guide
Page 18
...; Performing a self-test or extended self-test − Running in count-only mode − Performing a print test − Performing a patch test • Using the Setting menu: − Changing the alarm volume − Changing the display contrast − Changing the SCSI ID − Changing the SCSI termination − Setting the elevator tray position • Calibrating the scanner • Jogging the transport • Programmable key assignments A-61169 July...
...; Performing a self-test or extended self-test − Running in count-only mode − Performing a print test − Performing a patch test • Using the Setting menu: − Changing the alarm volume − Changing the display contrast − Changing the SCSI ID − Changing the SCSI termination − Setting the elevator tray position • Calibrating the scanner • Jogging the transport • Programmable key assignments A-61169 July...

User Guide
Page 23
.... 6. The page count will be displayed. 3-6 A-61169 July 2003 Use the down arrow to count the number of documents entering the scanner without actually scanning. Select the Diagnostics Settings menu icon. 2. Performing a self-test or extended self-test You can perform a self-test or an extended self-test on the display. The scanner will run in count-only mode: 1. Running in the elevator tray...
.... 6. The page count will be displayed. 3-6 A-61169 July 2003 Use the down arrow to count the number of documents entering the scanner without actually scanning. Select the Diagnostics Settings menu icon. 2. Performing a self-test or extended self-test You can perform a self-test or an extended self-test on the display. The scanner will run in count-only mode: 1. Running in the elevator tray...
User Guide
Page 26
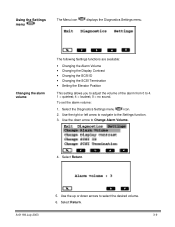
Select the Diagnostics Settings menu icon. 2. Using the Settings menu The Menu icon displays the Diagnostics Settings menu. A-61169 July 2003 5. Changing the alarm volume The following Settings functions are available: • Changing the Alarm Volume • Changing the Display Contrast • Changing the SCSI ID • Changing the SCSI Termination • Setting the Elevator Position This setting allows you to adjust the volume of the alarm from 0 to...
Select the Diagnostics Settings menu icon. 2. Using the Settings menu The Menu icon displays the Diagnostics Settings menu. A-61169 July 2003 5. Changing the alarm volume The following Settings functions are available: • Changing the Alarm Volume • Changing the Display Contrast • Changing the SCSI ID • Changing the SCSI Termination • Setting the Elevator Position This setting allows you to adjust the volume of the alarm from 0 to...
User Guide
Page 54
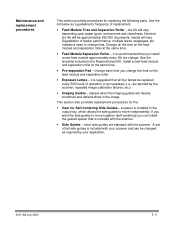
... separation roller at the same time. • Pre-separation Pad - See the checklist included in the output tray, which allows the side guides to change . change each time you install a new feed module approximately every 5th tire change tires. Nominal tire life will be replaced every 500 hours of feeder performance, multiple feeds, stoppages, etc. Use the list below as required by the scanner, repeated image calibration failures...
... separation roller at the same time. • Pre-separation Pad - See the checklist included in the output tray, which allows the side guides to change . change each time you install a new feed module approximately every 5th tire change tires. Nominal tire life will be replaced every 500 hours of feeder performance, multiple feeds, stoppages, etc. Use the list below as required by the scanner, repeated image calibration failures...
User Guide
Page 60
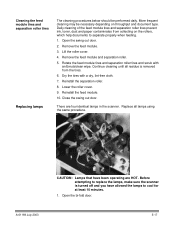
... the rollers, which help documents to separate properly when feeding. 1. There are HOT. Before attempting to cool for at least 10 minutes. 1. Reinstall the separation roller. 8. Lower the roller cover. 9. Open the bi-fold door. 5-17 Continue cleaning until all lamps using the same procedure. Lift the roller cover. 4. A-61169 July 2003 CAUTION: Lamps that have allowed the lamps to replace the lamps, make sure the scanner is removed from...
... the rollers, which help documents to separate properly when feeding. 1. There are HOT. Before attempting to cool for at least 10 minutes. 1. Reinstall the separation roller. 8. Lower the roller cover. 9. Open the bi-fold door. 5-17 Continue cleaning until all lamps using the same procedure. Lift the roller cover. 4. A-61169 July 2003 CAUTION: Lamps that have allowed the lamps to replace the lamps, make sure the scanner is removed from...
User Guide
Page 66
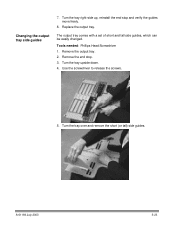
Tools needed: Phillips Head Screwdriver 1. Turn the tray upside down. 4. The output tray comes with a set of short and tall side guides, which can be easily changed. Remove the end stop and verify the guides move freely. 8. A-61169 July 2003 5-23 Use the screwdriver to release the screws. 5. Turn the tray over and remove the short (or tall) side guides. Remove the output tray. 2. Turn the tray right-side up, reinstall the end stop . 3. Changing the output tray side guides 7. Replace the output tray.
Tools needed: Phillips Head Screwdriver 1. Turn the tray upside down. 4. The output tray comes with a set of short and tall side guides, which can be easily changed. Remove the end stop and verify the guides move freely. 8. A-61169 July 2003 5-23 Use the screwdriver to release the screws. 5. Turn the tray over and remove the short (or tall) side guides. Remove the output tray. 2. Turn the tray right-side up, reinstall the end stop . 3. Changing the output tray side guides 7. Replace the output tray.
User Guide
Page 68
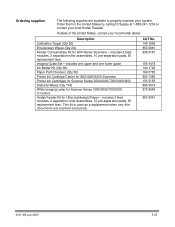
... Kodak Reseller. Ordering supplies The following supplies are scanned exclusively. includes 2 feed modules, 2 separation roller assemblies, 10 pre-separation pads, 50 replacement tires Imaging Guide Set - includes one upper and one lower guide Ink Blotter Kit (Qty 60) Paper Path Cleaners (Qty 50) Printer Ink Cartridge Carrier for i800/3000/4000 Scanners Printer Ink Cartridges for Scanner Series 3000/4000/7000/9000/i800 Staticide Wipes (Qty 144) White Imaging Lamp...
... Kodak Reseller. Ordering supplies The following supplies are scanned exclusively. includes 2 feed modules, 2 separation roller assemblies, 10 pre-separation pads, 50 replacement tires Imaging Guide Set - includes one upper and one lower guide Ink Blotter Kit (Qty 60) Paper Path Cleaners (Qty 50) Printer Ink Cartridge Carrier for i800/3000/4000 Scanners Printer Ink Cartridges for Scanner Series 3000/4000/7000/9000/i800 Staticide Wipes (Qty 144) White Imaging Lamp...
User Guide
Page 69
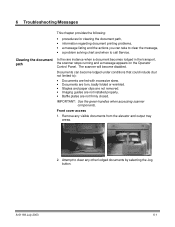
...; Imaging guides are not installed properly. • Baffle plates are not firmly closed. Attempt to call Service. A-61169 July 2003 6-1 Front cover access 1. Remove any other lodged documents by selecting the Jog button. IMPORTANT: Use the green handles when accessing scanner components. Clearing the document path In the rare instance when a document becomes lodged in the transport, the scanner stops running and a message appears on the Operator Control Panel. Documents...
...; Imaging guides are not installed properly. • Baffle plates are not firmly closed. Attempt to call Service. A-61169 July 2003 6-1 Front cover access 1. Remove any other lodged documents by selecting the Jog button. IMPORTANT: Use the green handles when accessing scanner components. Clearing the document path In the rare instance when a document becomes lodged in the transport, the scanner stops running and a message appears on the Operator Control Panel. Documents...
User Guide
Page 74
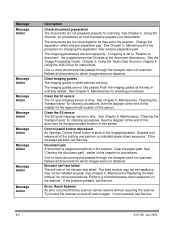
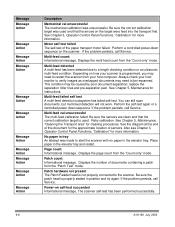
... chapter for instructions. See Chapter 5, Maintenance "Replacing the feed module" for cleaning procedures. Perform a controlled power-down sequence. Error; Message Message Action Message Action Message Action Message Action Message Action Message Action Message Action Message Action Description Check document preparation The documents are not fully seated. See Chapter 2, Using the Scanner, for scanning. Clear the paper path. See Chapter 5, Maintenance for the procedure for cleaning procedures. See Chapter 5, Maintenance, for changing the separation roller and pre...
... chapter for instructions. See Chapter 5, Maintenance "Replacing the feed module" for cleaning procedures. Perform a controlled power-down sequence. Error; Message Message Action Message Action Message Action Message Action Message Action Message Action Message Action Message Action Description Check document preparation The documents are not fully seated. See Chapter 2, Using the Scanner, for scanning. Clear the paper path. See Chapter 5, Maintenance for the procedure for cleaning procedures. See Chapter 5, Maintenance, for changing the separation roller and pre...

User Guide
Page 75
... the paper feeder failed. See Chapter 3, Operator Control Panel Function's for cleaning procedures. When the buffer is no firmware in the buffer. Clean the imaging guides and retry calibration. Interlocks are closed Informational message. Check to make sure that passed through the transport were not scanned. Not all documents for the front camera was attempted before scanning is not closed and clear the error by pressing the Return arrow (left button...
... the paper feeder failed. See Chapter 3, Operator Control Panel Function's for cleaning procedures. When the buffer is no firmware in the buffer. Clean the imaging guides and retry calibration. Interlocks are closed Informational message. Check to make sure that passed through the transport were not scanned. Not all documents for the front camera was attempted before scanning is not closed and clear the error by pressing the Return arrow (left button...
User Guide
Page 76
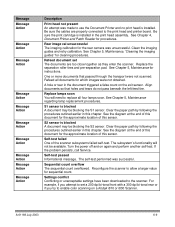
...multi-feed calibration failed. Power-on the scanner. Multi-feed detected A multi-feed has been detected due to restart the scanner from the "Count only" mode. Multi-feed failed self test A multi-feed detection subsystem has failed self-test. If the problem persists, call Service. See Chapter 5, Maintenance for more information. Also see Chapter 3, Operator Control Panel Functions, "Calibration" for instructions. Displays the number of sensors. If the problem persists, call Service. If the problem persists, call Service. Page count: Informational message...
...multi-feed calibration failed. Power-on the scanner. Multi-feed detected A multi-feed has been detected due to restart the scanner from the "Count only" mode. Multi-feed failed self test A multi-feed detection subsystem has failed self-test. If the problem persists, call Service. See Chapter 5, Maintenance for more information. Also see Chapter 3, Operator Control Panel Functions, "Calibration" for instructions. Displays the number of sensors. If the problem persists, call Service. If the problem persists, call Service. Page count: Informational message...
User Guide
Page 77
See Chapter 5, Maintenance, "Cleaning the imaging guides" for the approximate location of this document for procedures. Align documents so that passed through the transport were not scanned. See Chapter 5, Maintenance regarding lamp replacement procedures. See the diagram at the end of this chapter. If the problem persists, call Service. Message Message Action Message Action Message Action Message Action Message Action Message Action Message Action Message Action Message Action Message Action Description Print head not present An...
See Chapter 5, Maintenance, "Cleaning the imaging guides" for the approximate location of this document for procedures. Align documents so that passed through the transport were not scanned. See Chapter 5, Maintenance regarding lamp replacement procedures. See the diagram at the end of this chapter. If the problem persists, call Service. Message Message Action Message Action Message Action Message Action Message Action Message Action Message Action Message Action Message Action Message Action Description Print head not present An...

User Guide
Page 79
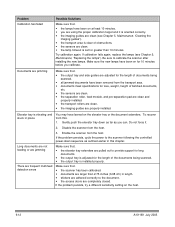
... 3, Operator Control Panel Functions, "Calibrating the Scanner"). • the imaging guides are clean (see Chapter 5, Maintenance, "Replacing the lamps". Make sure that the new lamps have been on for at least 10 minutes before you calibrate. A-61169 July 2003 6-11 Problem solving chart Use the chart below as a guide to check possible solutions to calibrate the scanner after installing the new lamps. Problem Scanner does not power on (Control Panel is not illuminated) The scanner will not scan/feed documents Image quality...
... 3, Operator Control Panel Functions, "Calibrating the Scanner"). • the imaging guides are clean (see Chapter 5, Maintenance, "Replacing the lamps". Make sure that the new lamps have been on for at least 10 minutes before you calibrate. A-61169 July 2003 6-11 Problem solving chart Use the chart below as a guide to check possible solutions to calibrate the scanner after installing the new lamps. Problem Scanner does not power on (Control Panel is not illuminated) The scanner will not scan/feed documents Image quality...
User Guide
Page 80
... sensors are clean. • the separation roller, feed module, and pre-separation pad are clean and properly installed. • the transport rollers are clean. • the imaging guides are pulled out to the scanner following the controlled power-down as far as outlined earlier in this : 1. Elevator tray is set for the length of documents being scanned. • the output tray is clear of the documents being scanned. • all jammed documents have...
... sensors are clean. • the separation roller, feed module, and pre-separation pad are clean and properly installed. • the transport rollers are clean. • the imaging guides are pulled out to the scanner following the controlled power-down as far as outlined earlier in this : 1. Elevator tray is set for the length of documents being scanned. • the output tray is clear of the documents being scanned. • all jammed documents have...
User Guide
Page 81
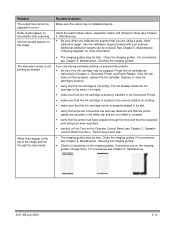
... documents after scanning Vertical streaks appear on the imaging guides. Clean the imaging guides. Clean the feed module rollers, separation rollers and transport rollers (see Chapter 5, Maintenance, "Cleaning the imaging guides". • Check for scratches on the image Possible Solutions Make sure the output tray is not printing as instructed in Chapter 4, Document Printer and Patch Reader. Use the calibration target provided with your scanner. If scratches are having problems printing on the imaging guides, change them. A-61169 July 2003 6-13 Clean the imaging guides...
... documents after scanning Vertical streaks appear on the imaging guides. Clean the imaging guides. Clean the feed module rollers, separation rollers and transport rollers (see Chapter 5, Maintenance, "Cleaning the imaging guides". • Check for scratches on the image Possible Solutions Make sure the output tray is not printing as instructed in Chapter 4, Document Printer and Patch Reader. Use the calibration target provided with your scanner. If scratches are having problems printing on the imaging guides, change them. A-61169 July 2003 6-13 Clean the imaging guides...


