
User Guide
Page 4
...; provides complete maintenance procedures for the i800 Scanner, including replacement procedures for the Kodak i800 Series Scanners. A-61169 July 2003 1-1 This chapter also instructs how to clear a document jam. Chapter 1, Introduction provides general information about the i800 Series Scanners including a product description, features and benefits, specifications, an overview of the icons found on and...
...; provides complete maintenance procedures for the i800 Scanner, including replacement procedures for the Kodak i800 Series Scanners. A-61169 July 2003 1-1 This chapter also instructs how to clear a document jam. Chapter 1, Introduction provides general information about the i800 Series Scanners including a product description, features and benefits, specifications, an overview of the icons found on and...
User Guide
Page 7
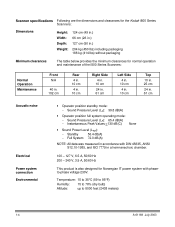
...;C (59 to 95°F) Humidity: 15 to 76% (dry bulb) Altitude: up to 8000 feet (2438 meters) 1-4 A-61169 July 2003 Scanner specifications Following are the dimensions and clearances for the Kodak i800 Series Scanners: Dimensions Height: Width: Depth: Weight: 124 cm (49 in.) 66 cm (26 in.) 127 cm (50 in.) 204 kg (450...
...;C (59 to 95°F) Humidity: 15 to 76% (dry bulb) Altitude: up to 8000 feet (2438 meters) 1-4 A-61169 July 2003 Scanner specifications Following are the dimensions and clearances for the Kodak i800 Series Scanners: Dimensions Height: Width: Depth: Weight: 124 cm (49 in.) 66 cm (26 in.) 127 cm (50 in.) 204 kg (450...
User Guide
Page 11
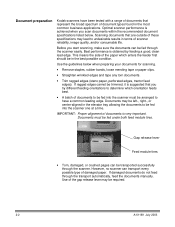
... Use the guidelines below . If ragged edges cannot be trimmed, it is achieved when you scan documents within the recommended document specifications listed below when preparing your documents for scanning. • Remove staples, rubber bands, loose mending tape or paper clips. &#... Straighten wrinkled edges and tape any torn documents. • Trim ragged edges (steno paper, perforated edges, tractor feed edges). Document preparation Kodak scanners have a common leading edge. Documents may be left-, right-, or center-aligned in terms of the paper which orientation feeds best. &#...
... Use the guidelines below . If ragged edges cannot be trimmed, it is achieved when you scan documents within the recommended document specifications listed below when preparing your documents for scanning. • Remove staples, rubber bands, loose mending tape or paper clips. &#... Straighten wrinkled edges and tape any torn documents. • Trim ragged edges (steno paper, perforated edges, tractor feed edges). Document preparation Kodak scanners have a common leading edge. Documents may be left-, right-, or center-aligned in terms of the paper which orientation feeds best. &#...
User Guide
Page 25
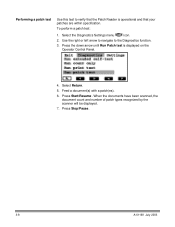
... the right or left arrow to navigate to verify that your patches are within specification. Press Stop/Pause. 3-8 A-61169 July 2003 When the documents have been scanned, the document count and number of patch types recognized by the scanner will be displayed. 7. Press the down arrow until Run Patch test is operational...
... the right or left arrow to navigate to verify that your patches are within specification. Press Stop/Pause. 3-8 A-61169 July 2003 When the documents have been scanned, the document count and number of patch types recognized by the scanner will be displayed. 7. Press the down arrow until Run Patch test is operational...

User Guide
Page 79
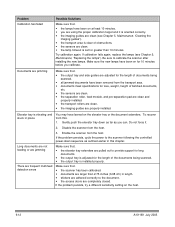
...see Chapter 3, Operator Control Panel Functions, "Calibrating the Scanner"). • the imaging guides are making contact with the feed module. • for thicker documents, press the gap release lever during feeding. • the documents meet specifications for greater than 10 minutes. Make sure that: &#...). • the power switch is set for signs of batched documents, etc. • you may encounter when using the Kodak i800 Series Scanners. A-61169 July 2003 6-11 Be sure to problems you check the feed module and separation roller for greater than 10 minutes....
...see Chapter 3, Operator Control Panel Functions, "Calibrating the Scanner"). • the imaging guides are making contact with the feed module. • for thicker documents, press the gap release lever during feeding. • the documents meet specifications for greater than 10 minutes. Make sure that: &#...). • the power switch is set for signs of batched documents, etc. • you may encounter when using the Kodak i800 Series Scanners. A-61169 July 2003 6-11 Be sure to problems you check the feed module and separation roller for greater than 10 minutes....
User Guide
Page 80
...documents being scanned. • the output tray is oriented correctly. • the imaging guides are pulled out to calibrate the scanner after installing the new lamps. Do not force it is installed properly. Documents are jamming Make sure that : • the... tray extenders are clean (see Chapter 5, Maintenance, "Replacing the lamps"). Try calibration again. Enable the scanner from the host. 3. To recover from the transport area. • documents meet specifications for the length of batched documents, etc. • the sensors are clean. • the separation ...
...documents being scanned. • the output tray is oriented correctly. • the imaging guides are pulled out to calibrate the scanner after installing the new lamps. Do not force it is installed properly. Documents are jamming Make sure that : • the... tray extenders are clean (see Chapter 5, Maintenance, "Replacing the lamps"). Try calibration again. Enable the scanner from the host. 3. To recover from the transport area. • documents meet specifications for the length of batched documents, etc. • the sensors are clean. • the separation ...
User Guide
Page 2
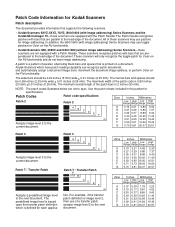
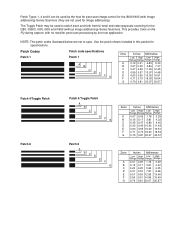
... be 0.20 inches (5 mm) wide + 0.01 inches (0.25 mm). Use the patch sheets included in this packet for Kodak Scanners Patch description This document provides information that are not to spec. Patch Codes Patch code specifications Zone Inches Millimetres Patch 2 Patch 2 Low High Low High Range Range Range Range A B C D E F A 0.19 0.21 4.83 5.33...
... be 0.20 inches (5 mm) wide + 0.01 inches (0.25 mm). Use the patch sheets included in this packet for Kodak Scanners Patch description This document provides information that are not to spec. Patch Codes Patch code specifications Zone Inches Millimetres Patch 2 Patch 2 Low High Low High Range Range Range Range A B C D E F A 0.19 0.21 4.83 5.33...
User Guide
Page 3
... for the i280, 3590C, i600, i800 and i1800 (without image addressing) Series Scanners. NOTE: The patch codes illustrated below are not used for image addressing). Use the patch sheets included in this packet for specifications. Patch Codes Patch 1 Patch code specifications Patch 1 Zone A B C D E F G Inches Millimetres Low High Low High Range Range Range Range...
... for the i280, 3590C, i600, i800 and i1800 (without image addressing) Series Scanners. NOTE: The patch codes illustrated below are not used for image addressing). Use the patch sheets included in this packet for specifications. Patch Codes Patch 1 Patch code specifications Patch 1 Zone A B C D E F G Inches Millimetres Low High Low High Range Range Range Range...
User Guide
Page 6
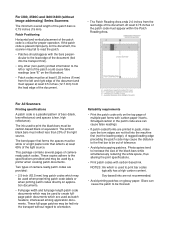
...patches on glossy paper. Photocopiers tend to increase the size of the black bars while simultaneously reducing the white space, thus altering the print specifications. • Print patch codes with the bars perpendicular to the lead edge of the light source. NOTES: Ink which are provided: &#...8226; 2.5-inch (62.5 mm) long patch codes which may be used as batch headers; For All Scanners Printing specifications A patch code is critical for proper operation. These full-page patches may be used to create fullpage patch documents which is used by ...
...patches on glossy paper. Photocopiers tend to increase the size of the black bars while simultaneously reducing the white space, thus altering the print specifications. • Print patch codes with the bars perpendicular to the lead edge of the light source. NOTES: Ink which are provided: &#...8226; 2.5-inch (62.5 mm) long patch codes which may be used as batch headers; For All Scanners Printing specifications A patch code is critical for proper operation. These full-page patches may be used to create fullpage patch documents which is used by ...
