
User Guide
Page 2
... User Precautions Users and their own expense. United States This equipment has been tested and found to comply with the instruction manual, may cause harmful interference to radio communications. Operation of this product may be required to correct the interference at their employer... need to observe the common sense precautions applicable to the operation of the Kodak i800 Series Scanners or any machinery. CAUTION: Hot surface, avoid contact POZOR: DIKKAT: CAUTION: Horký povrch -- These limits are not ...
... User Precautions Users and their own expense. United States This equipment has been tested and found to comply with the instruction manual, may cause harmful interference to radio communications. Operation of this product may be required to correct the interference at their employer... need to observe the common sense precautions applicable to the operation of the Kodak i800 Series Scanners or any machinery. CAUTION: Hot surface, avoid contact POZOR: DIKKAT: CAUTION: Horký povrch -- These limits are not ...
User Guide
Page 10
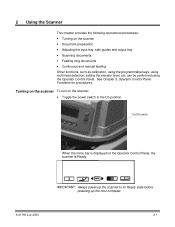
... following operational procedures: • Turning on the scanner • Document preparation • Adjusting the input tray, side guides and output tray • Scanning documents • Feeding long documents • Continuous and manual feeding Other functions, such as calibration, using the... programmable keys, using the Operator Control Panel. IMPORTANT: Always power-up the scanner to the On position. A-61169 July 2003 2-1 See Chapter 3, ...
... following operational procedures: • Turning on the scanner • Document preparation • Adjusting the input tray, side guides and output tray • Scanning documents • Feeding long documents • Continuous and manual feeding Other functions, such as calibration, using the... programmable keys, using the Operator Control Panel. IMPORTANT: Always power-up the scanner to the On position. A-61169 July 2003 2-1 See Chapter 3, ...
User Guide
Page 11
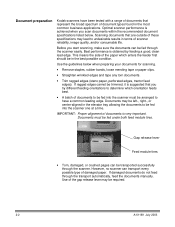
... types found in terms of damaged paper. Documents must be arranged to be fed into the scanner must be fed through the transport automatically, feed the documents manually. Gap release lever Feed module tires • Torn, damaged, or crushed pages can transport every... ragged edges (steno paper, perforated edges, tractor feed edges). Document preparation Kodak scanners have a common leading edge. If ragged edges cannot be fed into the scanner one at a time. Optimal scanner performance is suggested that represent the broad spectrum of documents to undesirable results ...
... types found in terms of damaged paper. Documents must be arranged to be fed into the scanner must be fed through the transport automatically, feed the documents manually. Gap release lever Feed module tires • Torn, damaged, or crushed pages can transport every... ragged edges (steno paper, perforated edges, tractor feed edges). Document preparation Kodak scanners have a common leading edge. If ragged edges cannot be fed into the scanner one at a time. Optimal scanner performance is suggested that represent the broad spectrum of documents to undesirable results ...
User Guide
Page 12
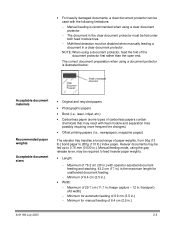
...elevator tray handles a broad range of paper weights, from 50g (13 lb.) bond paper to 200g (110 lb.) index paper. Minimum for manual feeding of 6.4 cm (2.5 in .) A-61169 July 2003 2-3 The document in .). Maximum of 76.2 cm (30 in.) with operator-...; Carbonless paper (some types of 8.9 cm (3.5 in a clear document protector. Multi-feed detection must be disabled when manually feeding a document in .) - Manual feeding mode, using a clear document protector. - Manual feeding is recommended when using the gap release lever, may react with the following limitations: -
...elevator tray handles a broad range of paper weights, from 50g (13 lb.) bond paper to 200g (110 lb.) index paper. Minimum for manual feeding of 6.4 cm (2.5 in .) A-61169 July 2003 2-3 The document in .). Maximum of 76.2 cm (30 in.) with operator-...; Carbonless paper (some types of 8.9 cm (3.5 in a clear document protector. Multi-feed detection must be disabled when manually feeding a document in .) - Manual feeding mode, using a clear document protector. - Manual feeding is recommended when using the gap release lever, may react with the following limitations: -
User Guide
Page 16
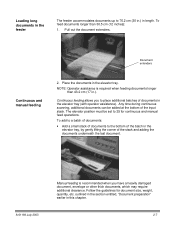
...add to a batch of documents: • Add a small stack of documents to place additional batches of the input stack. A-61169 July 2003 Manual feeding is required when feeding documents longer than 30.5 cm (12 inches): 1. To feed documents longer than 43.2 cm (17 in.). outlined in...The feeder accommodates documents up to 25 for document size, weight, quantity, etc. Follow the guidelines for continuous and manual feed operations. Document extenders Continuous and manual feeding 2. NOTE: Operator assistance is recommended when you to the bottom of the batch in the elevator tray, by...
...add to a batch of documents: • Add a small stack of documents to place additional batches of the input stack. A-61169 July 2003 Manual feeding is required when feeding documents longer than 30.5 cm (12 inches): 1. To feed documents longer than 43.2 cm (17 in.). outlined in...The feeder accommodates documents up to 25 for document size, weight, quantity, etc. Follow the guidelines for continuous and manual feed operations. Document extenders Continuous and manual feeding 2. NOTE: Operator assistance is recommended when you to the bottom of the batch in the elevator tray, by...
User Guide
Page 29
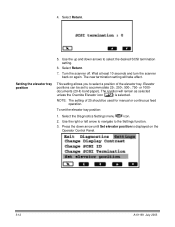
... should be set the elevator tray position: 1. Use the up and down arrow until Set elevator position is selected. Elevator positions can be used for manual or continuous feed operation. Select Return. 7. The position will take effect. Use the right or left arrow to navigate to accommodate 25-, 250-, 500-, ... of the elevator tray. To set to the Settings function. 3. Select the Diagnostics Settings menu icon. 2. Wait at least 10 seconds and turn the scanner back on the Operator Control Panel. 3-12 A-61169 July 2003 or 1000documents (20-lb bond paper).
... should be set the elevator tray position: 1. Use the up and down arrow until Set elevator position is selected. Elevator positions can be used for manual or continuous feed operation. Select Return. 7. The position will take effect. Use the right or left arrow to navigate to accommodate 25-, 250-, 500-, ... of the elevator tray. To set to the Settings function. 3. Select the Diagnostics Settings menu icon. 2. Wait at least 10 seconds and turn the scanner back on the Operator Control Panel. 3-12 A-61169 July 2003 or 1000documents (20-lb bond paper).
User Guide
Page 34
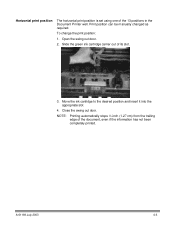
... slot 4. Horizontal print position The horizontal print position is set using one of the 13 positions in the Document Printer well. Print position can be manually changed as required. Open the swing out door. 2. Close the swing out door.
... slot 4. Horizontal print position The horizontal print position is set using one of the 13 positions in the Document Printer well. Print position can be manually changed as required. Open the swing out door. 2. Close the swing out door.

