
User Guide
Page 2
... connection 1-7 2 Getting Started 2-1 Site specifications 2-1 System requirements 2-1 Registering your scanner 2-1 Making connections 2-2 Installing the IEEE-1394 card in the host computer 2-2 Installing the Kodak Driver software 2-2 Installing the FireWire cable 2-2 Attaching the power cord 2-3 Powering up the host computer 2-3 Scanner components 2-3 3 Using the Scanner 3-1 Turning the scanner on and off 3-1 Starting and stopping scanning 3-1 Manually pausing and resuming the scanner 3-2 Automatically pausing and resuming the scanner 3-2 Manually ending scanning 3-2 Document...
... connection 1-7 2 Getting Started 2-1 Site specifications 2-1 System requirements 2-1 Registering your scanner 2-1 Making connections 2-2 Installing the IEEE-1394 card in the host computer 2-2 Installing the Kodak Driver software 2-2 Installing the FireWire cable 2-2 Attaching the power cord 2-3 Powering up the host computer 2-3 Scanner components 2-3 3 Using the Scanner 3-1 Turning the scanner on and off 3-1 Starting and stopping scanning 3-1 Manually pausing and resuming the scanner 3-2 Automatically pausing and resuming the scanner 3-2 Manually ending scanning 3-2 Document...
User Guide
Page 3
... Feeding documents using multi-feed detection 3-9 Automatic feeding 3-9 Continuous feeding 3-10 Manual feeding 3-10 Feeding documents that require special handling 3-11 Calibrating the scanner 3-11 Image calibration 3-12 Ultrasonics calibration 3-15 4 The Enhanced Printer 4-1 Overview 4-1 Printer specifications 4-2 Accessing the Enhanced Printer 4-3 Changing the printer position 4-4 Replacing the ink cartridge 4-4 Replacing the blotter strips 4-6 Replacing the ink cartridge carrier 4-7 5 Maintenance 5-1 Cleaning frequency chart 5-2 Cleaning tools and materials 5-2 Supplies...
... Feeding documents using multi-feed detection 3-9 Automatic feeding 3-9 Continuous feeding 3-10 Manual feeding 3-10 Feeding documents that require special handling 3-11 Calibrating the scanner 3-11 Image calibration 3-12 Ultrasonics calibration 3-15 4 The Enhanced Printer 4-1 Overview 4-1 Printer specifications 4-2 Accessing the Enhanced Printer 4-3 Changing the printer position 4-4 Replacing the ink cartridge 4-4 Replacing the blotter strips 4-6 Replacing the ink cartridge carrier 4-7 5 Maintenance 5-1 Cleaning frequency chart 5-2 Cleaning tools and materials 5-2 Supplies...
User Guide
Page 4
.../i700 Series Scanners, including replacement procedures for clearing a document jam and a listing of the LED indicators, a problem solving chart, procedures for the feed module, separation roller and imaging guides. provides a description of internal and external scanner components. Chapter 4, Using the Enhanced Printer - Chapter 6, Troubleshooting - Appendix B, Specifications - provides a description of error messages. The information in this guide is for scanning, document feeder and output tray adjustments, scanner calibration and how to support the Kodak i600...
.../i700 Series Scanners, including replacement procedures for clearing a document jam and a listing of the LED indicators, a problem solving chart, procedures for the feed module, separation roller and imaging guides. provides a description of internal and external scanner components. Chapter 4, Using the Enhanced Printer - Chapter 6, Troubleshooting - Appendix B, Specifications - provides a description of error messages. The information in this guide is for scanning, document feeder and output tray adjustments, scanner calibration and how to support the Kodak i600...

User Guide
Page 5
... Kodak i700 Series Scanners, Firmware Version 2.1.1 (or higher). • Fast elevator - Scanner models New features • Kodak i610 Scanner is a desktop duplex black and white and grayscale scanner with an automatic document feeder that runs at 80 pages per minute which includes an enhanced printer. • Kodak i620 Scanner is a desktop duplex color scanner with an automatic document feeder that runs at 80 pages per minute which includes an enhanced printer. • Kodak i640 Scanner is a desktop duplex color scanner with an automatic document feeder...
... Kodak i700 Series Scanners, Firmware Version 2.1.1 (or higher). • Fast elevator - Scanner models New features • Kodak i610 Scanner is a desktop duplex black and white and grayscale scanner with an automatic document feeder that runs at 80 pages per minute which includes an enhanced printer. • Kodak i620 Scanner is a desktop duplex color scanner with an automatic document feeder that runs at 80 pages per minute which includes an enhanced printer. • Kodak i640 Scanner is a desktop duplex color scanner with an automatic document feeder...
User Guide
Page 6
.... • Handles a broad range of paper weights and sizes. • Easy installation. • ISIS and TWAIN device drivers are included on content (i700 Series Scanners only), color, black and white and grayscale deskew, auto-crop, automatic color detection, aggressive cropping, error diffusion, toggle patch, autocolor balancing (auto-white balancing) to ensure good color balance after calibration, and more. • Easily replaceable feed module and separation roller. • 300 dpi at the...
.... • Handles a broad range of paper weights and sizes. • Easy installation. • ISIS and TWAIN device drivers are included on content (i700 Series Scanners only), color, black and white and grayscale deskew, auto-crop, automatic color detection, aggressive cropping, error diffusion, toggle patch, autocolor balancing (auto-white balancing) to ensure good color balance after calibration, and more. • Easily replaceable feed module and separation roller. • 300 dpi at the...
User Guide
Page 9
... statements United States Japan Users and their practices and make compliance with these precautions a part of the job description for operation of decayed performance, call Service for replacement. Use appropriate precautions when relocating the scanner. • Do not wear loose clothing, unbuttoned sleeves, etc. • Do not wear loose jewelry, bracelets, bulky rings, long necklaces, etc. • Hair length should review...
... statements United States Japan Users and their practices and make compliance with these precautions a part of the job description for operation of decayed performance, call Service for replacement. Use appropriate precautions when relocating the scanner. • Do not wear loose clothing, unbuttoned sleeves, etc. • Do not wear loose jewelry, bracelets, bulky rings, long necklaces, etc. • Hair length should review...
User Guide
Page 11
... more information about Kodak's service and support options, contact your scanner so Kodak can register your continuous scanning. Microsoft Windows XP SP3 (32-bit) - For more information about the scanner specifications, refer to obtain the rated throughput. • Intel PC (or compatible) with firmware and hardware updates as they become available. Microsoft Windows Vista (32-bit) - For i700 Series Scanners only: Microsoft Windows 7 (64-bit) Registering your scanner A-61500 May...
... more information about Kodak's service and support options, contact your scanner so Kodak can register your continuous scanning. Microsoft Windows XP SP3 (32-bit) - For more information about the scanner specifications, refer to obtain the rated throughput. • Intel PC (or compatible) with firmware and hardware updates as they become available. Microsoft Windows Vista (32-bit) - For i700 Series Scanners only: Microsoft Windows 7 (64-bit) Registering your scanner A-61500 May...
User Guide
Page 12
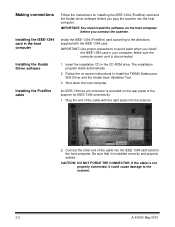
... computer. If the cable is disconnected. 1. Make sure the computer power cord is not properly connected, it is provided on the host computer before you plug the scanner into the host computer. Plug the end of the cable with the IEEE-1394 card. IMPORTANT: You must install the software on the rear panel of the cable into the scanner. 2. The installation program starts automatically. 2. An IEEE-1394...
... computer. If the cable is disconnected. 1. Make sure the computer power cord is not properly connected, it is provided on the host computer before you plug the scanner into the host computer. Plug the end of the cable with the IEEE-1394 card. IMPORTANT: You must install the software on the rear panel of the cable into the scanner. 2. The installation program starts automatically. 2. An IEEE-1394...
User Guide
Page 14
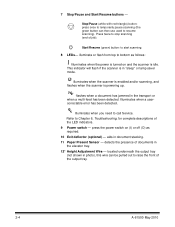
... (optional) - Illuminates when you need to start scanning. 8 LEDs- This indicator will flash if the scanner is powering up. illuminate or flash from top to resume scanning). Illuminates when a usercorrectable error has been detected. located underneath the output tray (not shown in the elevator tray. 12* Height Adjustment Wire - 7 Stop/Pause and Start/Resume buttons - Start/Resume (green) button: to call Service. flashes when a document has jammed in document stacking. 11 Paper Present Sensor -
... (optional) - Illuminates when you need to start scanning. 8 LEDs- This indicator will flash if the scanner is powering up. illuminate or flash from top to resume scanning). Illuminates when a usercorrectable error has been detected. located underneath the output tray (not shown in the elevator tray. 12* Height Adjustment Wire - 7 Stop/Pause and Start/Resume buttons - Start/Resume (green) button: to call Service. flashes when a document has jammed in document stacking. 11 Paper Present Sensor -
User Guide
Page 27
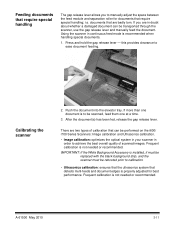
... between the feed module and separation roller for best performance. IMPORTANT: If the White Background Accessory is installed, it must be replaced with the black background strip, and the scanner must be rebooted prior to achieve the best overall quality of scanned images. i.e. Using the scanner in order to calibration. • Ultrasonics calibration: ensures that the ultrasonics system that detects multi-feeds and document edges...
... between the feed module and separation roller for best performance. IMPORTANT: If the White Background Accessory is installed, it must be replaced with the black background strip, and the scanner must be rebooted prior to achieve the best overall quality of scanned images. i.e. Using the scanner in order to calibration. • Ultrasonics calibration: ensures that the ultrasonics system that detects multi-feeds and document edges...
User Guide
Page 32
... or disabled for each page scanned, such as batch name or operator) and dynamic information (i.e., information that the software allows you to enter can be sent to the printer. The capture software application controls static fields; NOTES: • Clean the scanner's paper path components daily when using the Enhanced Printer. The printer can be configured to powering on the Enhanced Printer can be found in that the document print string...
... or disabled for each page scanned, such as batch name or operator) and dynamic information (i.e., information that the software allows you to enter can be sent to the printer. The capture software application controls static fields; NOTES: • Clean the scanner's paper path components daily when using the Enhanced Printer. The printer can be configured to powering on the Enhanced Printer can be found in that the document print string...
User Guide
Page 57
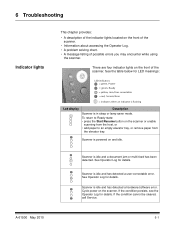
... the indicator lights located on the scanner or enable scanning from the host, or • add paper to Ready state: • press the Start/Resume button on the front of the scanner. • Information about accessing the Operator Log. • A problem solving chart. • A message listing of the scanner. See Operator Log for LED meanings: LED indicators = green, Power = green, Ready = yellow, Jam/User correctable = red, Service/Error = indicates when...
... the indicator lights located on the scanner or enable scanning from the host, or • add paper to Ready state: • press the Start/Resume button on the front of the scanner. • Information about accessing the Operator Log. • A problem solving chart. • A message listing of the scanner. See Operator Log for LED meanings: LED indicators = green, Power = green, Ready = yellow, Jam/User correctable = red, Service/Error = indicates when...
User Guide
Page 63
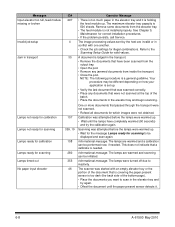
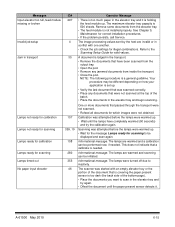
... document counter. A-61500 May 2010 6-7 The scanner was unable to find the document edges to calibrate the scanner again. The front image path has been successfully calibrated. 109 • Calibrate the scanner when the current batch of paper in the printer carrier. See Chapter 3, "Calibrating the Scanner". • If the problem persists, call Service. 111 Informational message. Messages Clean upper imaging guide Document count exceeded maximum value Document too dark to deskew Document too long Front calibration failed...
... document counter. A-61500 May 2010 6-7 The scanner was unable to find the document edges to calibrate the scanner again. The front image path has been successfully calibrated. 109 • Calibrate the scanner when the current batch of paper in the printer carrier. See Chapter 3, "Calibrating the Scanner". • If the problem persists, call Service. 111 Informational message. Messages Clean upper imaging guide Document count exceeded maximum value Document too dark to deskew Document too long Front calibration failed...
User Guide
Page 64
... broken Invalid job setup Jam in transport Lamps not ready for calibration Lamps not ready for scanning Lamps ready for calibration Lamps ready for scanning Lamps timed out No paper input elevator ID# Operator Message 297 • There is too much paper in the elevator tray and it . 6-8 A-61500 May 2010 NOTE: The following procedure is 500 sheets. The lamps were turned off due to the Scanning Setup Guide for scanning to scan in the...
... broken Invalid job setup Jam in transport Lamps not ready for calibration Lamps not ready for scanning Lamps ready for calibration Lamps ready for scanning Lamps timed out No paper input elevator ID# Operator Message 297 • There is too much paper in the elevator tray and it . 6-8 A-61500 May 2010 NOTE: The following procedure is 500 sheets. The lamps were turned off due to the Scanning Setup Guide for scanning to scan in the...
User Guide
Page 65
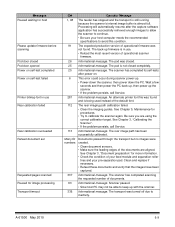
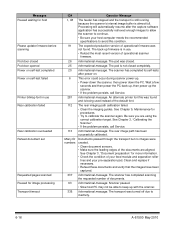
.... See Chapter 5, Maintenance for more information. • Check the condition of the default font. 112 The rear imaging path calibration failed. • Clean the imaging guides. The back-up with the scanner. 336 Informational message. Processing will automatically resume after power-on self-test failed Printer bitmap font in use Rear calibration failed Rear calibration succeeded Refeed document set Requested pages scanned Paused for image processing Transport timeout ID# Operator Message 1, 48 The feeder has stopped and the...
.... See Chapter 5, Maintenance for more information. • Check the condition of the default font. 112 The rear imaging path calibration failed. • Clean the imaging guides. The back-up with the scanner. 336 Informational message. Processing will automatically resume after power-on self-test failed Printer bitmap font in use Rear calibration failed Rear calibration succeeded Refeed document set Requested pages scanned Paused for image processing Transport timeout ID# Operator Message 1, 48 The feeder has stopped and the...
User Guide
Page 67
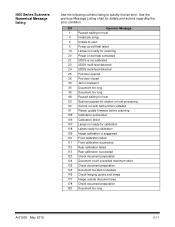
... job setup 5 Unable to scan 6 Power up self-test failed 19 Lamps not ready for scanning 20 Power on self-test completed 21 UDDS is suggested 110 Front calibration failed 111 Front calibration succeeded 112 Rear calibration failed 113 Rear calibration succeeded 123 Check document preparation 124 Document count exceeded maximum value 135 Check document preparation 143 Document too dark to quickly find an error. Use the previous Message Listing chart for calibration 109 Image calibration is not calibrated 23 UDDS multi-feed...
... job setup 5 Unable to scan 6 Power up self-test failed 19 Lamps not ready for scanning 20 Power on self-test completed 21 UDDS is suggested 110 Front calibration failed 111 Front calibration succeeded 112 Rear calibration failed 113 Rear calibration succeeded 123 Check document preparation 124 Document count exceeded maximum value 135 Check document preparation 143 Document too dark to quickly find an error. Use the previous Message Listing chart for calibration 109 Image calibration is not calibrated 23 UDDS multi-feed...
User Guide
Page 70
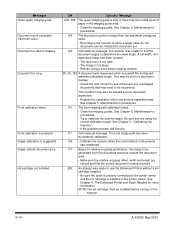
... document set. 143 Informational message. This may also be a small piece of paper in the printer carrier. See Chapter 5, Maintenance for procedures. 124 The document counter is properly connected to be installed before turning on relative cropping parameters, the image to be generated from this document would be outside document area Ink cartridge not installed ID# Operator Message 293, 304 The upper imaging guide is dirty or there may need...
... document set. 143 Informational message. This may also be a small piece of paper in the printer carrier. See Chapter 5, Maintenance for procedures. 124 The document counter is properly connected to be installed before turning on relative cropping parameters, the image to be generated from this document would be outside document area Ink cartridge not installed ID# Operator Message 293, 304 The upper imaging guide is dirty or there may need...
User Guide
Page 71
... output tray. • Open the pod. • Remove any documents that were not scanned at the top of the bottom page). • Place the documents you want to inactivity. Informational message. Messages Input elevator too full, feed module missing or broken Invalid job setup Jam in transport Lamps not ready for calibration Lamps not ready for scanning Lamps ready for calibration Lamps ready for scanning Lamps timed out No paper input elevator ID# Operator Message...
... output tray. • Open the pod. • Remove any documents that were not scanned at the top of the bottom page). • Place the documents you want to inactivity. Informational message. Messages Input elevator too full, feed module missing or broken Invalid job setup Jam in transport Lamps not ready for calibration Lamps not ready for scanning Lamps ready for calibration Lamps ready for scanning Lamps timed out No paper input elevator ID# Operator Message...
User Guide
Page 72
... specifications to keep up the scanner. • If the problem persists, call Service. 113 Informational message. Wait a few seconds and then power the PC back up, then power up with the scanner. 336 Informational message. The scanner has completed scanning the requested number of operational firmware was closed. 25 Informational message. Processing will automatically resume after power-on self-test failed Printer bitmap font in use Rear calibration failed Rear calibration succeeded Refeed document set...
... specifications to keep up the scanner. • If the problem persists, call Service. 113 Informational message. Wait a few seconds and then power the PC back up, then power up with the scanner. 336 Informational message. The scanner has completed scanning the requested number of operational firmware was closed. 25 Informational message. Processing will automatically resume after power-on self-test failed Printer bitmap font in use Rear calibration failed Rear calibration succeeded Refeed document set...
User Guide
Page 76
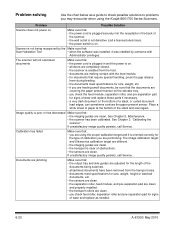
... check the feed module, separation roller, and pre-separation pad for the type of wear and replace these parts if necessary. • a very dark document on . See Chapter 3, "Calibrating the scanner". Place a white sheet of paper at the bottom of obstructions. • the sensors are clean. If unsatisfactory image quality persists, call Service. See Chapter 5, Maintenance. • the scanner has been calibrated. Calibration has failed Make sure that : • the power cord...
... check the feed module, separation roller, and pre-separation pad for the type of wear and replace these parts if necessary. • a very dark document on . See Chapter 3, "Calibrating the scanner". Place a white sheet of paper at the bottom of obstructions. • the sensors are clean. If unsatisfactory image quality persists, call Service. See Chapter 5, Maintenance. • the scanner has been calibrated. Calibration has failed Make sure that : • the power cord...


