
User Guide
Page 15
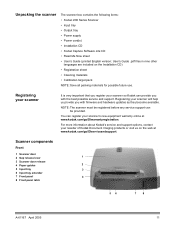
...Calibration target pack NOTE: Save all packing materials for possible future use. Scanner components Front 1 Scanner door 2 Gap release lever 1 3 Scanner door release 4 Paper guides 2 5 Input tray 3 6 Input tray extender 7 Front panel 4 8 Front panel latch 56 7 8 A-61167 April 2005 11 Registering your scanner's new equipment warranty online at www.kodak....com/go /DIwarrantyregistration. NOTE: The scanner must be registered before any service support can provide you register your reseller of Kodak Document Imaging ...
...Calibration target pack NOTE: Save all packing materials for possible future use. Scanner components Front 1 Scanner door 2 Gap release lever 1 3 Scanner door release 4 Paper guides 2 5 Input tray 3 6 Input tray extender 7 Front panel 4 8 Front panel latch 56 7 8 A-61167 April 2005 11 Registering your scanner's new equipment warranty online at www.kodak....com/go /DIwarrantyregistration. NOTE: The scanner must be registered before any service support can provide you register your reseller of Kodak Document Imaging ...

User Guide
Page 33
... the 29.7 cm (11.7 in this section are for three minutes. 2. Click OK. The Image Chain Calibration dialog box appears. 3. Calibration begins. Frequent calibration is included with your scanner in the scanner ADF. NOTE: The screens shown in .) square calibration target (CAT No. 131 7304) that is not needed or recommended. A confirmation box appears when the ADF...
... the 29.7 cm (11.7 in this section are for three minutes. 2. Click OK. The Image Chain Calibration dialog box appears. 3. Calibration begins. Frequent calibration is included with your scanner in the scanner ADF. NOTE: The screens shown in .) square calibration target (CAT No. 131 7304) that is not needed or recommended. A confirmation box appears when the ADF...

User Guide
Page 36
To ensure that the calibration target is ready to detect the scanner. 6. Wait until the scanner light is delivering the best image: • Clean the scanner. Here are some things to consider when scanning in color: • The difference in a "print on demand" environment... computer. 5. Power down the computer. 2. The scanner is now ready to the IEEE-1394 port on what surrounds it. • The characteristics and condition of a document can affect color perception. • The appearance of the scanned document. • Computer displays and printer output can vary...
To ensure that the calibration target is ready to detect the scanner. 6. Wait until the scanner light is delivering the best image: • Clean the scanner. Here are some things to consider when scanning in color: • The difference in a "print on demand" environment... computer. 5. Power down the computer. 2. The scanner is now ready to the IEEE-1394 port on what surrounds it. • The characteristics and condition of a document can affect color perception. • The appearance of the scanned document. • Computer displays and printer output can vary...
User Guide
Page 37
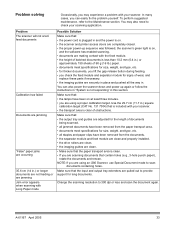
...guides are adjusted for signs of obstructions. A-61167 April 2005 33 Problem The scanner will not scan/ feed documents Calibration has failed Documents are jamming "False" paper jams are occurring 35.6 cm (14 in.) or longer documents are not feeding or are jamming Jam error appears when scanning with the ...8226; the proper power-up sequence was followed, the scanner's green light is plugged in this section. NOTE: If you are pulled out to provide support for size, weight, and type, etc. • all the way in .) square calibration target (CAT No. 131 7304) that the input and output...
...guides are adjusted for signs of obstructions. A-61167 April 2005 33 Problem The scanner will not scan/ feed documents Calibration has failed Documents are jamming "False" paper jams are occurring 35.6 cm (14 in.) or longer documents are not feeding or are jamming Jam error appears when scanning with the ...8226; the proper power-up sequence was followed, the scanner's green light is plugged in this section. NOTE: If you are pulled out to provide support for size, weight, and type, etc. • all the way in .) square calibration target (CAT No. 131 7304) that the input and output...

User Guide
Page 63
.... D-4 A-61167 April 2005 NOTES: You must calibrate the ADF before you can calibrate the flatbed. Frequent calibration is included with your scanner in order to warm up for the TWAIN driver. Your screens may be different. 1. Click OK. Place the calibration target in .) square calibration target (CAT. A message appears. 4. Click on Calibrate in this section are for three minutes...
.... D-4 A-61167 April 2005 NOTES: You must calibrate the ADF before you can calibrate the flatbed. Frequent calibration is included with your scanner in order to warm up for the TWAIN driver. Your screens may be different. 1. Click OK. Place the calibration target in .) square calibration target (CAT. A message appears. 4. Click on Calibrate in this section are for three minutes...

User Guide
Page 64
... 8. A message appears when the ADF calibration has finished. 6. Position the calibration target with the corner aligned with a Staticide Wipe. 3. Close the flatbed cover. 11. Open the flatbed cover. 2. If power is interrupted while you are using the flatbed, the scanner camera may lessen the quality of your ...dust which may not be in its home position. A message appears when the flatbed calibration has finished. Cleaning the flatbed After a power failure 12. Click OK. Use Staticide Wipes for Kodak Scanners (CAT No. 896 5519) to its home position. Wipe the platen glass with ...
... 8. A message appears when the ADF calibration has finished. 6. Position the calibration target with the corner aligned with a Staticide Wipe. 3. Close the flatbed cover. 11. Open the flatbed cover. 2. If power is interrupted while you are using the flatbed, the scanner camera may lessen the quality of your ...dust which may not be in its home position. A message appears when the flatbed calibration has finished. Cleaning the flatbed After a power failure 12. Click OK. Use Staticide Wipes for Kodak Scanners (CAT No. 896 5519) to its home position. Wipe the platen glass with ...


