User Guide
Page 2
... power cord 10 Connecting the USB cable 11 Attaching the input and output trays 11 Turning on the scanner and finalizing Kodak Driver Software installation . . 12 Installing application software (Windows operating systems only 12 Scanner components 13 Front view 13 Inside view 14 Side views 15 3 Using the Scanner 16 Turning the scanner on and off 16 Adjusting the input and output trays 16 Tray extenders and side guides 17 Adjusting the output tray 18 Start and stop scanning 19 Document...
... power cord 10 Connecting the USB cable 11 Attaching the input and output trays 11 Turning on the scanner and finalizing Kodak Driver Software installation . . 12 Installing application software (Windows operating systems only 12 Scanner components 13 Front view 13 Inside view 14 Side views 15 3 Using the Scanner 16 Turning the scanner on and off 16 Adjusting the input and output trays 16 Tray extenders and side guides 17 Adjusting the output tray 18 Start and stop scanning 19 Document...
User Guide
Page 3
...box 23 Scan To settings 24 Scan As settings 26 Configuring function numbers 27 Custom destinations 29 Smart touch edit window 30 Using function numbers 31 Scanning your documents 32 Automatic feeding 32 Continuous feeding 33 Manual feeding 33 Damaged documents 33 4 Document Printing 34 Printer specifications 35 Installing/Replacing the ink cartridge 36 Enhanced Printer 37 Document Printer 39 Changing print positions 41 Changing the print position 41 Replacing the ink blotter strips 42 Supplies 43 Problem solving 44 5 Maintenance 45 Supplies and consumables 46 Cleaning...
...box 23 Scan To settings 24 Scan As settings 26 Configuring function numbers 27 Custom destinations 29 Smart touch edit window 30 Using function numbers 31 Scanning your documents 32 Automatic feeding 32 Continuous feeding 33 Manual feeding 33 Damaged documents 33 4 Document Printing 34 Printer specifications 35 Installing/Replacing the ink cartridge 36 Enhanced Printer 37 Document Printer 39 Changing print positions 41 Changing the print position 41 Replacing the ink blotter strips 42 Supplies 43 Problem solving 44 5 Maintenance 45 Supplies and consumables 46 Cleaning...
User Guide
Page 5
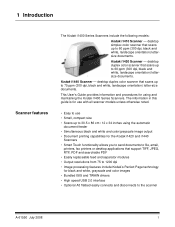
... documents. desktop duplex color scanner that scans up to the scanner A-61550 July 2008 1 desktop simplex color scanner that support TIFF, JPEG, RTF, PDF and searchable PDF • Easily replaceable feed and separator modules • Output resolutions from 75 to 1200 dpi • Image processing features include Kodak's Perfect Page technology for black and white, grayscale and color images • Bundled ISIS and TWAIN drivers • High speed USB 2.0 interface • Optional A3 flatbed easily connects...
... documents. desktop duplex color scanner that scans up to the scanner A-61550 July 2008 1 desktop simplex color scanner that support TIFF, JPEG, RTF, PDF and searchable PDF • Easily replaceable feed and separator modules • Output resolutions from 75 to 1200 dpi • Image processing features include Kodak's Perfect Page technology for black and white, grayscale and color images • Bundled ISIS and TWAIN drivers • High speed USB 2.0 interface • Optional A3 flatbed easily connects...
User Guide
Page 7
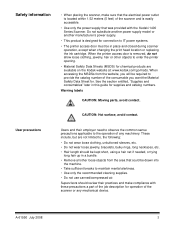
... review their employer need to observe the common sense precautions applicable to maintain mental alertness. • Use only the recommended cleaning supplies. • Do not use canned/compressed air. See the section entitled, "Supplies and consumables" later in place and closed during scanner operation, except when changing the print head location or replacing the ink cartridge. Do not substitute another power supply model or another manufacturer's power supply...
... review their employer need to observe the common sense precautions applicable to maintain mental alertness. • Use only the recommended cleaning supplies. • Do not use canned/compressed air. See the section entitled, "Supplies and consumables" later in place and closed during scanner operation, except when changing the print head location or replacing the ink cartridge. Do not substitute another power supply model or another manufacturer's power supply...

User Guide
Page 8
Environmental information European Union EMC statements United States • The Kodak i1400 Series Scanners are designed to meet worldwide environmental requirements. • Guidelines are available for the disposal of the product, they must be used in a particular installation. This equipment generates, uses, and can be determined by turning the equipment off and on, the user is connected. • Consult the dealer...
Environmental information European Union EMC statements United States • The Kodak i1400 Series Scanners are designed to meet worldwide environmental requirements. • Guidelines are available for the disposal of the product, they must be used in a particular installation. This equipment generates, uses, and can be determined by turning the equipment off and on, the user is connected. • Consult the dealer...
User Guide
Page 10
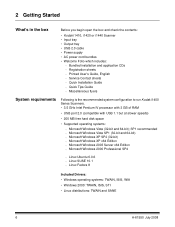
... 2008 SP1 recommended - Bundled installation and application CDs - Quick Tips Guide - Microsoft Windows XP x64 Edition - Microsoft Windows XP SP2 (32-bit) - Linux SUSE 10.1 - Quick Installation Guide - Microsoft Windows Vista (32-bit and 64-bit); 2 Getting Started What's in the box Before you begin open the box and check the contents: • Kodak i1410, i1420 or i1440 Scanner • Input tray • Output tray • USB 2.0 cable • Power supply • AC power cord bundles • Welcome Folio...
... 2008 SP1 recommended - Bundled installation and application CDs - Quick Tips Guide - Microsoft Windows XP x64 Edition - Microsoft Windows XP SP2 (32-bit) - Linux SUSE 10.1 - Quick Installation Guide - Microsoft Windows Vista (32-bit and 64-bit); 2 Getting Started What's in the box Before you begin open the box and check the contents: • Kodak i1410, i1420 or i1440 Scanner • Input tray • Output tray • USB 2.0 cable • Power supply • AC power cord bundles • Welcome Folio...
User Guide
Page 11
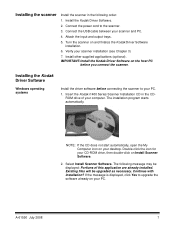
... output trays. 5. Verify your CD-ROM drive, then double-click on your PC. 1. Turn the scanner on the host PC before connecting the scanner to the scanner. 3. Installing the Kodak Driver Software Windows operating systems Install the driver software before you connect the scanner. NOTE: If the CD does not start automatically, open the My Computer icon on Install Scanner Software. 2. Connect the power cord to your desktop. Insert the Kodak i1400 Series Scanner Installation CD in the following message may be upgraded as...
... output trays. 5. Verify your CD-ROM drive, then double-click on your PC. 1. Turn the scanner on the host PC before connecting the scanner to the scanner. 3. Installing the Kodak Driver Software Windows operating systems Install the driver software before you connect the scanner. NOTE: If the CD does not start automatically, open the My Computer icon on Install Scanner Software. 2. Connect the power cord to your desktop. Insert the Kodak i1400 Series Scanner Installation CD in the following message may be upgraded as...
User Guide
Page 13
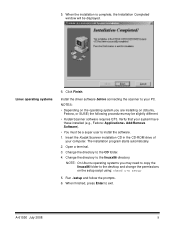
.... Install the driver software before connecting the scanner to exit. A-61550 July 2008 9 NOTES: • Depending on the setup script using: chmod u+x setup 5. When finished, press Enter to your PC. When the installation is complete, the Installation Completed window will be a super user to the desktop and change the permissions on the operating system you may be slightly different. • Kodak Scanner software requires QT3. Open a terminal. 3. Change the...
.... Install the driver software before connecting the scanner to exit. A-61550 July 2008 9 NOTES: • Depending on the setup script using: chmod u+x setup 5. When finished, press Enter to your PC. When the installation is complete, the Installation Completed window will be a super user to the desktop and change the permissions on the operating system you may be slightly different. • Kodak Scanner software requires QT3. Open a terminal. 3. Change the...
User Guide
Page 14
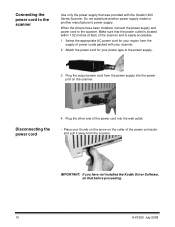
... installed the Kodak Driver Software, do that was provided with your power type to the scanner. IMPORTANT: If you have been installed, connect the power supply and power cord to the power supply. 3. Do not substitute another power supply model or another manufacturer's power supply. Select the appropriate AC power cord for your scanner. 2. Disconnecting the power cord 4. Attach the power cord for your thumb on the arrow on the scanner. Plug the output power cord from the scanner. Connecting the power cord...
... installed the Kodak Driver Software, do that was provided with your power type to the scanner. IMPORTANT: If you have been installed, connect the power supply and power cord to the power supply. 3. Do not substitute another power supply model or another manufacturer's power supply. Select the appropriate AC power cord for your scanner. 2. Disconnecting the power cord 4. Attach the power cord for your thumb on the arrow on the scanner. Plug the output power cord from the scanner. Connecting the power cord...
User Guide
Page 24
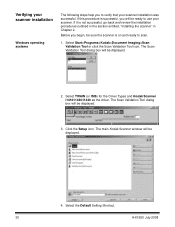
... use your scanner. Click the Setup icon. Select TWAIN (or ISIS) for the Driver Types and Kodak Scanner i1410/i1420/i1440 as the driver. The main Kodak Scanner window will be displayed. 4. The Scan Validation Tool dialog box will be displayed. 2. Select the Default Setting Shortcut. 20 A-61550 July 2008 Verifying your scanner installation Windows operating systems The following steps help you to scan. 1. If this procedure is not successful, go back and review the installation...
... use your scanner. Click the Setup icon. Select TWAIN (or ISIS) for the Driver Types and Kodak Scanner i1410/i1420/i1440 as the driver. The main Kodak Scanner window will be displayed. 4. The Scan Validation Tool dialog box will be displayed. 2. Select the Default Setting Shortcut. 20 A-61550 July 2008 Verifying your scanner installation Windows operating systems The following steps help you to scan. 1. If this procedure is not successful, go back and review the installation...
User Guide
Page 25
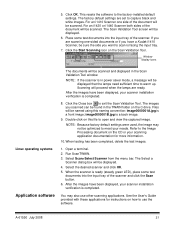
... in power saver mode, a message will be optimized to use other scanning applications. When the scanner is a back image. 9. A-61550 July 2008 21 The Scan Validation Tool screen will be displayed. 6. This resets the software to exit the Scan Validation Tool. For an i1410 Scanner one -sided documents or if you have a Kodak i1410 Scanner, be scanned and displayed in the Scan Validation Tool window. Scanning will be displayed that the lamps need sufficient time to capture black...
... in power saver mode, a message will be optimized to use other scanning applications. When the scanner is a back image. 9. A-61550 July 2008 21 The Scan Validation Tool screen will be displayed. 6. This resets the software to exit the Scan Validation Tool. For an i1410 Scanner one -sided documents or if you have a Kodak i1410 Scanner, be scanned and displayed in the Scan Validation Tool window. Scanning will be displayed that the lamps need sufficient time to capture black...

User Guide
Page 28
... to saving/emailing/printing: if selected, the scanned images will be displayed in an Edit window to create it in the location specified in the Folder path. • Application: creates an electronic file from the scanned documents and saves it . • PDF - allows you to select a different printer or different set the print options. NOTE: If you to select the printer and set of the operating system that is checked. Settings...
... to saving/emailing/printing: if selected, the scanned images will be displayed in an Edit window to create it in the location specified in the Folder path. • Application: creates an electronic file from the scanned documents and saves it . • PDF - allows you to select a different printer or different set the print options. NOTE: If you to select the printer and set of the operating system that is checked. Settings...

User Guide
Page 29
... scanned images or click Browse to locate the folder. Searchable or RTF as the File Type, the OCR Setup dialog box will be displayed. • Select the language for the second PDF file created, etc. File Name Prefix: when images are scanned, they are scanned, allowing you choose to the beginning of each time the function is saved as PDF files, the software automatically assigns the date and sequence number...
... scanned images or click Browse to locate the folder. Searchable or RTF as the File Type, the OCR Setup dialog box will be displayed. • Select the language for the second PDF file created, etc. File Name Prefix: when images are scanned, they are scanned, allowing you choose to the beginning of each time the function is saved as PDF files, the software automatically assigns the date and sequence number...

User Guide
Page 32
... other function numbers by entering the text in the File name prefix field. 8. If you are scanning by selecting the Settings button on the Configuration dialog box. 9. If desired, select a different Setting Shortcut based on the type of document you want to change your own file name for the file, select the Name file prior to saving check box on the main Kodak Scanner window. 10. 6. By default your documents will...
... other function numbers by entering the text in the File name prefix field. 8. If you are scanning by selecting the Settings button on the Configuration dialog box. 9. If desired, select a different Setting Shortcut based on the type of document you want to change your own file name for the file, select the Name file prior to saving check box on the main Kodak Scanner window. 10. 6. By default your documents will...
User Guide
Page 38
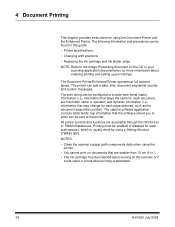
..., time, document sequential counter, and custom messages. Printing must be enabled or disabled for more information about enabling printing and setting up print strings. The Document Printer/Enhanced Printer operates at full scanner speed. All printer controls and functions are smaller than 10 cm (4 in.). • The ink cartridge must be installed before turning on the scanner, or it could result in this guide: • Printer specifications. • Changing print positions. • Replacing the...
..., time, document sequential counter, and custom messages. Printing must be enabled or disabled for more information about enabling printing and setting up print strings. The Document Printer/Enhanced Printer operates at full scanner speed. All printer controls and functions are smaller than 10 cm (4 in.). • The ink cartridge must be installed before turning on the scanner, or it could result in this guide: • Printer specifications. • Changing print positions. • Replacing the...

User Guide
Page 50
Supplies/Consumables Kodak Feeder Consumables Kit for i1400 Series Scanners Kodak Extra-Large Feeder Consumables Kit for i1400 Series Scanners Kodak Imaging Guide Set for i1400 Series Scanners (1 upper guide, 1 lower guide) Document Printer: Printer Ink Cartridges (10) Document Printer: Kodak Printer Ink Blotters (60) Document Printer: Kodak Printer Ink Cartridge Carrier Enhanced Printer: Black Ink Cartridges (HP C6602A) Enhanced Printer: Red Ink Cartridge (HP C6602R) Enhanced Printer: Ink Cartridge Carrier Staticide Wipes for more information. Refer to ambient temperature before ...
Supplies/Consumables Kodak Feeder Consumables Kit for i1400 Series Scanners Kodak Extra-Large Feeder Consumables Kit for i1400 Series Scanners Kodak Imaging Guide Set for i1400 Series Scanners (1 upper guide, 1 lower guide) Document Printer: Printer Ink Cartridges (10) Document Printer: Kodak Printer Ink Blotters (60) Document Printer: Kodak Printer Ink Cartridge Carrier Enhanced Printer: Black Ink Cartridges (HP C6602A) Enhanced Printer: Red Ink Cartridge (HP C6602R) Enhanced Printer: Ink Cartridge Carrier Staticide Wipes for more information. Refer to ambient temperature before ...
User Guide
Page 68
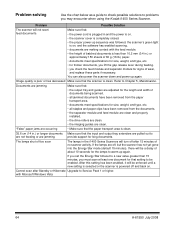
... i1400 Series Scanners will be a delay of documents being scanned. • all jammed documents have been removed from the documents. • the separator module and feed module are clean and properly installed. • the drive rollers are clean. • the imaging guides are off, but the scanner has not yet gone into the Energy Star mode (default 15 minutes), there will not scan/ feed documents Make sure that the input and output tray...
... i1400 Series Scanners will be a delay of documents being scanned. • all jammed documents have been removed from the documents. • the separator module and feed module are clean and properly installed. • the drive rollers are clean. • the imaging guides are off, but the scanner has not yet gone into the Energy Star mode (default 15 minutes), there will not scan/ feed documents Make sure that the input and output tray...

User Guide
Page 70
... the message. 2. Select System>Administration>SELinux Management. 3. The SELinux Administration screen will remain a steady red until your root/superuser password. Select Permissive from the System Default Enforcing mode dropdown list. 5. Solution: The LED will be captured in the "Solution" below: Solution: Before checking cable connections and performing the power down list. 6. Issue: The LED on the scanner is red even though the scanner is larger than the number of images...
... the message. 2. Select System>Administration>SELinux Management. 3. The SELinux Administration screen will remain a steady red until your root/superuser password. Select Permissive from the System Default Enforcing mode dropdown list. 5. Solution: The LED will be captured in the "Solution" below: Solution: Before checking cable connections and performing the power down list. 6. Issue: The LED on the scanner is red even though the scanner is larger than the number of images...
User Guide
Page 73
... original box and packing materials for issues related to shipping damage. All products should have regarding proper installation, operation and maintenance of service programs to support its Limited Warranty. How to obtain Limited Warranty service Kodak Scanners are supplied with Kodak's current Packaging and Shipping Guidelines. PRIOR TO SEEKING SERVICE, THE END USER MUST BACK-UP ANY DATA OR FILES THAT MAY BECOME DAMAGED OR LOST. A Kodak Scanner represents...
... original box and packing materials for issues related to shipping damage. All products should have regarding proper installation, operation and maintenance of service programs to support its Limited Warranty. How to obtain Limited Warranty service Kodak Scanners are supplied with Kodak's current Packaging and Shipping Guidelines. PRIOR TO SEEKING SERVICE, THE END USER MUST BACK-UP ANY DATA OR FILES THAT MAY BECOME DAMAGED OR LOST. A Kodak Scanner represents...

User Guide
Page 74
... on specific failed or broken Kodak Scanner. and 5 p.m. The AUR provides advance replacement on service areas, visit our website at: www.Kodak.com/go/docimaging. Shipment of the above excluded parts or services are required, they originally purchased the Kodak Scanner for their hourly rates and at the end user's own expense and risk. The box and packaging in which include power cord, documentation, etc.) not covered...
... on specific failed or broken Kodak Scanner. and 5 p.m. The AUR provides advance replacement on service areas, visit our website at: www.Kodak.com/go/docimaging. Shipment of the above excluded parts or services are required, they originally purchased the Kodak Scanner for their hourly rates and at the end user's own expense and risk. The box and packaging in which include power cord, documentation, etc.) not covered...


