
User's Guide
Page 7
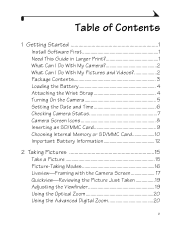
... Started 1 Install Software First 1 Need This Guide in Larger Print 1 What Can I Do With My Camera 2 What Can I Do With My Pictures and Videos 2 Package Contents 3 Loading the Battery 4 Attaching the Wrist Strap 4 Turning On the Camera 5 Setting the Date and Time 6 Checking Camera Status 7 Camera Screen Icons 8 ... Battery Information 12 2 Taking Pictures 15 Take a Picture 15 Picture-Taking Modes 16 Liveview-Framing with the Camera Screen 17 Quickview-Reviewing the Picture Just Taken 19 Adjusting the Viewfinder 19 Using the Optical Zoom 20 Using the Advanced Digital Zoom 20 v
... Started 1 Install Software First 1 Need This Guide in Larger Print 1 What Can I Do With My Camera 2 What Can I Do With My Pictures and Videos 2 Package Contents 3 Loading the Battery 4 Attaching the Wrist Strap 4 Turning On the Camera 5 Setting the Date and Time 6 Checking Camera Status 7 Camera Screen Icons 8 ... Battery Information 12 2 Taking Pictures 15 Take a Picture 15 Picture-Taking Modes 16 Liveview-Framing with the Camera Screen 17 Quickview-Reviewing the Picture Just Taken 19 Adjusting the Viewfinder 19 Using the Optical Zoom 20 Using the Advanced Digital Zoom 20 v

User's Guide
Page 10
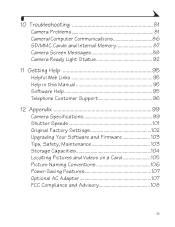
Setting Video Out 63 Selecting a Language 63 Formatting Internal Memory or SD/MMC Card 64 Viewing Camera Information 64 7 Installing the Software 65 Minimum system requirements 65 Install the Software 66 8 Connecting Camera to Computer 69 Transferring Pictures With the USB Cable 69 Printing Pictures from Your Computer 70 Printing From an Optional SD/MMC...
Setting Video Out 63 Selecting a Language 63 Formatting Internal Memory or SD/MMC Card 64 Viewing Camera Information 64 7 Installing the Software 65 Minimum system requirements 65 Install the Software 66 8 Connecting Camera to Computer 69 Transferring Pictures With the USB Cable 69 Printing Pictures from Your Computer 70 Printing From an Optional SD/MMC...
User's Guide
Page 11
... Status 92 11 Getting Help 95 Helpful Web Links 95 Help in this Manual 95 Software Help 95 Telephone Customer Support 96 12 Appendix 99 Camera Specifications 99 Shutter Speeds 101 Original Factory Settings 102 Upgrading Your Software and Firmware 103 Tips, Safety, Maintenance 103 Storage Capacities 104 Locating Pictures and Videos on...
... Status 92 11 Getting Help 95 Helpful Web Links 95 Help in this Manual 95 Software Help 95 Telephone Customer Support 96 12 Appendix 99 Camera Specifications 99 Shutter Speeds 101 Original Factory Settings 102 Upgrading Your Software and Firmware 103 Tips, Safety, Maintenance 103 Storage Capacities 104 Locating Pictures and Videos on...

User's Guide
Page 13
... of this User's Guide: 1 Visit www.kodak.com/go/cx6445support. 2 Navigate to the Manuals section. 3 Click View as usual. 1 On Mac OS X: ! From the File menu, select Page Setup. ! Failure to do so may cause the software to Page. Need This Guide in Larger Print...In the Print window, select Fit to load incorrectly. From the File menu, select Print. ! 1 Getting Started Install Software First Install the software from the Kodak EasyShare software CD before connecting the camera (or camera dock) to open the User's Guide. 4 On a Windows OS-based computer or Mac OS 8.6 or 9.x: ! Change...
... of this User's Guide: 1 Visit www.kodak.com/go/cx6445support. 2 Navigate to the Manuals section. 3 Click View as usual. 1 On Mac OS X: ! From the File menu, select Page Setup. ! Failure to do so may cause the software to Page. Need This Guide in Larger Print...In the Print window, select Fit to load incorrectly. From the File menu, select Print. ! 1 Getting Started Install Software First Install the software from the Kodak EasyShare software CD before connecting the camera (or camera dock) to open the User's Guide. 4 On a Windows OS-based computer or Mac OS 8.6 or 9.x: ! Change...

User's Guide
Page 14
.... Or purchase an optional Kodak multimedia card (MMC) or a secure digital (SD) card and: ! Chapter 1 What Can I Do With My Pictures and Videos? Review -Display, protect, and delete pictures and videos; Set Up -Customize your capabilities. What Can I Do With My Camera? For details, click the Help button in the Kodak EasyShare software. Capture Videos with...
.... Or purchase an optional Kodak multimedia card (MMC) or a secure digital (SD) card and: ! Chapter 1 What Can I Do With My Pictures and Videos? Review -Display, protect, and delete pictures and videos; Set Up -Customize your capabilities. What Can I Do With My Camera? For details, click the Help button in the Kodak EasyShare software. Capture Videos with...

User's Guide
Page 15
Chapter 1 Package Contents 1 4 2 5 3 1 Camera 2 Custom insert (for camera dock, see page 72) 3 CRV3 battery (non-rechargeable) 4 USB cable 5 Audio/Video cable (for viewing pictures and videos on television) Not shown: User's Guide, Quick Start Guide, wrist strap, Kodak EasyShare software CD. (In some countries, the User's Guide is provided on a CD.) Contents may change without notice. 3
Chapter 1 Package Contents 1 4 2 5 3 1 Camera 2 Custom insert (for camera dock, see page 72) 3 CRV3 battery (non-rechargeable) 4 USB cable 5 Audio/Video cable (for viewing pictures and videos on television) Not shown: User's Guide, Quick Start Guide, wrist strap, Kodak EasyShare software CD. (In some countries, the User's Guide is provided on a CD.) Contents may change without notice. 3
User's Guide
Page 18
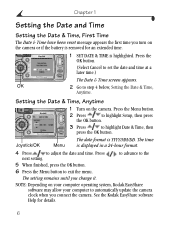
See the Kodak EasyShare software Help for an extended time. delete share EasyShare CX6445 OK 1 SET DATE & TIME is YYYY/MM/DD. to advance to the NOTE: Depending on your computer operating system, Kodak EasyShare software may allow your computer to adjust the date and time. The time is removed for details....to highlight Date & Time, then press the OK button. The date format is highlighted. The setting remains until you turn on the camera. Chapter 1 Setting the Date and Time Setting the Date & Time, First Time The Date & Time have been reset message appears ...
See the Kodak EasyShare software Help for an extended time. delete share EasyShare CX6445 OK 1 SET DATE & TIME is YYYY/MM/DD. to advance to the NOTE: Depending on your computer operating system, Kodak EasyShare software may allow your computer to adjust the date and time. The time is removed for details....to highlight Date & Time, then press the OK button. The date format is highlighted. The setting remains until you turn on the camera. Chapter 1 Setting the Date and Time Setting the Date & Time, First Time The Date & Time have been reset message appears ...

User's Guide
Page 47
... Menu button. 2 Highlight Set Album , then press the OK button. 3 Press to the camera's internal memory. To remove all the pictures you take are noted with those album names. See Kodak EasyShare software Help for Album Names Use the Set Album (Still) feature to more than one album. Chapter... 2 Pre-tagging for details. First-On Your Computer Use Kodak EasyShare software, V 3.0 or higher, to create album names on your computer, then copy up to 32 album names to highlight an album name, ...
... Menu button. 2 Highlight Set Album , then press the OK button. 3 Press to the camera's internal memory. To remove all the pictures you take are noted with those album names. See Kodak EasyShare software Help for Album Names Use the Set Album (Still) feature to more than one album. Chapter... 2 Pre-tagging for details. First-On Your Computer Use Kodak EasyShare software, V 3.0 or higher, to create album names on your computer, then copy up to 32 album names to highlight an album name, ...

User's Guide
Page 48
... Date Stamp setting to exit the menu. If you change it . See the Kodak EasyShare software Help for details. This setting remains until you transfer the tagged pictures to your computer, the Kodak EasyShare software opens and categorizes your pictures. 1 Make sure the camera clock is selected. 6 Press the Menu button to Your Computer When you change...
... Date Stamp setting to exit the menu. If you change it . See the Kodak EasyShare software Help for details. This setting remains until you transfer the tagged pictures to your computer, the Kodak EasyShare software opens and categorizes your pictures. 1 Make sure the camera clock is selected. 6 Press the Menu button to Your Computer When you change...

User's Guide
Page 54
...than one album. To remove all the videos you take videos. Your selections are saved. See Kodak EasyShare software Help for details. 42 See the Kodak EasyShare software Help for details. Second-On Your Camera 1 In Video mode, press the Menu button. 2 Highlight Set Album , then press the... OK button. 3 Press to the camera's internal memory. If you turn on Liveview, your album selection is ...
...than one album. To remove all the videos you take videos. Your selections are saved. See Kodak EasyShare software Help for details. 42 See the Kodak EasyShare software Help for details. Second-On Your Camera 1 In Video mode, press the Menu button. 2 Highlight Set Album , then press the... OK button. 3 Press to the camera's internal memory. If you turn on Liveview, your album selection is ...

User's Guide
Page 62
...then press OK. 4 Press to scroll through the pictures. Your selections are saved. 7 Press the Menu button to return to the camera's internal memory. See Kodak EasyShare software Help for each album. The album name appears with album names. A plus (+) after the album name means the picture was added to...4 Tagging Pictures/Videos for Albums Use the Album feature in Review mode to tag the pictures and videos in your camera with the picture. First-On Your Computer Use Kodak EasyShare software, V 3.0 or higher, to create album names on your computer, then copy up to 32 album names to Review...
...then press OK. 4 Press to scroll through the pictures. Your selections are saved. 7 Press the Menu button to return to the camera's internal memory. See Kodak EasyShare software Help for each album. The album name appears with album names. A plus (+) after the album name means the picture was added to...4 Tagging Pictures/Videos for Albums Use the Album feature in Review mode to tag the pictures and videos in your camera with the picture. First-On Your Computer Use Kodak EasyShare software, V 3.0 or higher, to create album names on your computer, then copy up to 32 album names to Review...

User's Guide
Page 63
...OK button. To save battery power, use an optional Kodak AC adapter, 3-volt (see page 52. See Kodak EasyShare software Help for 5 seconds. Chapter 4 EasyShare software opens and categorizes your pictures and videos on any ...external device, see page 107). To scroll through the seconds quickly, press and hold . 3 Press the OK button. Running a Slide Show Use the Slide Show to highlight Begin Show, then press the OK button. Then the camera...
...OK button. To save battery power, use an optional Kodak AC adapter, 3-volt (see page 52. See Kodak EasyShare software Help for 5 seconds. Chapter 4 EasyShare software opens and categorizes your pictures and videos on any ...external device, see page 107). To scroll through the seconds quickly, press and hold . 3 Press the OK button. Running a Slide Show Use the Slide Show to highlight Begin Show, then press the OK button. Then the camera...

User's Guide
Page 68
Chapter 5 Tagging Pictures for that picture. EasyShare CX The Print icon appears in the storage location, highlight Cancel Prints, then press the OK ... other pictures. Zero removes the tag for Printing 1 Press the Share button. For details on printing from your computer, the Kodak EasyShare software print screen opens. The default quantity is applied to exit the menu. * To tag all pictures in the status area. Print... press to change the default, see page 70. 56 Cancel Prints is not available in the Kodak EasyShare software. Keep the print quantity as described above.
Chapter 5 Tagging Pictures for that picture. EasyShare CX The Print icon appears in the storage location, highlight Cancel Prints, then press the OK ... other pictures. Zero removes the tag for Printing 1 Press the Share button. For details on printing from your computer, the Kodak EasyShare software print screen opens. The default quantity is applied to exit the menu. * To tag all pictures in the status area. Print... press to change the default, see page 70. 56 Cancel Prints is not available in the Kodak EasyShare software. Keep the print quantity as described above.

User's Guide
Page 69
... you specified. The email icon area. Second-Tag On Your Camera 1 Press the Share button. To remove all email selections, highlight Clear All. 5 Press to scroll through the pictures. appears in the Kodak EasyShare software. 57 Chapter 5 Tagging Pictures and Videos for each address. To...the pictures to more than one address, repeat step 3 for Emailing First-On Your Computer Use Kodak EasyShare software to create an email address book on your computer, the Kodak EasyShare software email screen opens and lets you send the pictures and videos to your computer. Your selections ...
... you specified. The email icon area. Second-Tag On Your Camera 1 Press the Share button. To remove all email selections, highlight Clear All. 5 Press to scroll through the pictures. appears in the Kodak EasyShare software. 57 Chapter 5 Tagging Pictures and Videos for each address. To...the pictures to more than one address, repeat step 3 for Emailing First-On Your Computer Use Kodak EasyShare software to create an email address book on your computer, the Kodak EasyShare software email screen opens and lets you send the pictures and videos to your computer. Your selections ...

User's Guide
Page 70
... button to highlight Favorite press the OK button. For details, click the Help button in the Kodak EasyShare software for details on creating address books, and printing, emailing, and organizing tagged pictures on your computer, you can use Kodak EasyShare software to retrieve, organize, and label them by subject, date, event, or any category you choose... Favorite pictures and videos to your computer. 58 Chapter 5 Tagging Pictures and Videos as Favorites 1 Press the Share button. Click the Help button in the Kodak EasyShare software. Need Help?
... button to highlight Favorite press the OK button. For details, click the Help button in the Kodak EasyShare software for details on creating address books, and printing, emailing, and organizing tagged pictures on your computer, you can use Kodak EasyShare software to retrieve, organize, and label them by subject, date, event, or any category you choose... Favorite pictures and videos to your computer. 58 Chapter 5 Tagging Pictures and Videos as Favorites 1 Press the Share button. Click the Help button in the Kodak EasyShare software. Need Help?

User's Guide
Page 77
...x 600 pixels ! CD-ROM drive ! Available USB port ! Minimum system requirements Windows OS-based computers Macintosh computers ! or ! 7 Installing the Software This product was designed and manufactured to existing industry standards as of colors recommended) NOTE: Mac OS 8.6 and 9.x do not support the Share button... functions, 65 Future hardware and operating systems may or may not support this Kodak product. Color monitor, 1024 x 768 pixels (16-bit or 24-bit recommended) (thousands or millions of this product and future ...
...x 600 pixels ! CD-ROM drive ! Available USB port ! Minimum system requirements Windows OS-based computers Macintosh computers ! or ! 7 Installing the Software This product was designed and manufactured to existing industry standards as of colors recommended) NOTE: Mac OS 8.6 and 9.x do not support the Share button... functions, 65 Future hardware and operating systems may or may not support this Kodak product. Color monitor, 1024 x 768 pixels (16-bit or 24-bit recommended) (thousands or millions of this product and future ...

User's Guide
Page 78
Install the Software For information on the software applications included on the Kodak EasyShare software CD, click the Help button in the Kodak EasyShare software. NOTE: Computers with Windows 2000, Windows XP Pro, or Mac OS X operating systems need administrator privileges to the computer. CAUTION: Install the software from the Kodak EasyShare software CD before connecting the camera or optional camera dock to install the...
Install the Software For information on the software applications included on the Kodak EasyShare software CD, click the Help button in the Kodak EasyShare software. NOTE: Computers with Windows 2000, Windows XP Pro, or Mac OS X operating systems need administrator privileges to the computer. CAUTION: Install the software from the Kodak EasyShare software CD before connecting the camera or optional camera dock to install the...

User's Guide
Page 79
...OS-based computers-select Complete to install the software. ! See the anti-virus software manual for details. 67 Mac OS X-follow the on your computer (including anti-virus software). 2 Place the Kodak EasyShare software CD into the CD-ROM drive. 3 Load the software: Windows OS-based computer-if the install ...contains the CD. You must be connected to install. ! If you receive information regarding software updates and registers some of the products included with the camera. To register later, visit www.kodak.com/go/register. 5 Restart the computer. Mac OS X-double-click the CD icon on...
...OS-based computers-select Complete to install the software. ! See the anti-virus software manual for details. 67 Mac OS X-follow the on your computer (including anti-virus software). 2 Place the Kodak EasyShare software CD into the CD-ROM drive. 3 Load the software: Windows OS-based computer-if the install ...contains the CD. You must be connected to install. ! If you receive information regarding software updates and registers some of the products included with the camera. To register later, visit www.kodak.com/go/register. 5 Restart the computer. Mac OS X-double-click the CD icon on...

User's Guide
Page 81
... the labeled USB port on the camera. 4 Turn on the camera. The (optional) Kodak EasyShare printer dock 6000. See your computer user's guide for connecting with the camera dock. ! The software prompts you through the transfer process. 69 The (included) USB cable. ! 8 Connecting Camera to Computer CAUTION: Install Kodak EasyShare software before connecting the camera or optional dock to load incorrectly...
... the labeled USB port on the camera. 4 Turn on the camera. The (optional) Kodak EasyShare printer dock 6000. See your computer user's guide for connecting with the camera dock. ! The software prompts you through the transfer process. 69 The (included) USB cable. ! 8 Connecting Camera to Computer CAUTION: Install Kodak EasyShare software before connecting the camera or optional dock to load incorrectly...

User's Guide
Page 82
Automatically print tagged pictures when you insert your camera to the Kodak EasyShare printer dock 6000 and print directly-without using a computer. Print With or Without a Computer Dock your card into a printer with family and friends...., and share them delivered to your computer, click the Help button in the Kodak EasyShare software. Make prints at a dealer of the many online print services offered in the Kodak EasyShare software. You can also use a Kodak multi-card reader or Kodak SD multimedia card reader-writer to your pictures. Edit, enhance, and add borders...
Automatically print tagged pictures when you insert your camera to the Kodak EasyShare printer dock 6000 and print directly-without using a computer. Print With or Without a Computer Dock your card into a printer with family and friends...., and share them delivered to your computer, click the Help button in the Kodak EasyShare software. Make prints at a dealer of the many online print services offered in the Kodak EasyShare software. You can also use a Kodak multi-card reader or Kodak SD multimedia card reader-writer to your pictures. Edit, enhance, and add borders...


