Use & Care Guide
Page 1
...symbol. All safety messages will tell you don't follow instructions. In Canada, visit our website at www.kitchenaid.ca or call us at www.kitchenaid.com for purchasing this manual and on the right-hand side of others . These words mean: DANGER ...201; DU RÉFRIGÉRATEUR ...... 35 INSTALLATION INSTRUCTIONS...........2 INSTRUCCIONES DE INSTALACIÓN. 19 INSTRUCTIONS D'INSTALLATION .... 36 REFRIGERATOR USE 8 USO DE SU REFRIGERADOR 25 UTILISATION DU RÉFRIGÉRATEUR.. 42 REFRIGERATOR CARE 12 CUIDADO DE SU REFRIGERADOR ... 29 ENTRETIEN DU RÉFRIGÉRATEUR .......
...symbol. All safety messages will tell you don't follow instructions. In Canada, visit our website at www.kitchenaid.ca or call us at www.kitchenaid.com for purchasing this manual and on the right-hand side of others . These words mean: DANGER ...201; DU RÉFRIGÉRATEUR ...... 35 INSTALLATION INSTRUCTIONS...........2 INSTRUCCIONES DE INSTALACIÓN. 19 INSTRUCTIONS D'INSTALLATION .... 36 REFRIGERATOR USE 8 USO DE SU REFRIGERADOR 25 UTILISATION DU RÉFRIGÉRATEUR.. 42 REFRIGERATOR CARE 12 CUIDADO DE SU REFRIGERADOR ... 29 ENTRETIEN DU RÉFRIGÉRATEUR .......
Use & Care Guide
Page 2
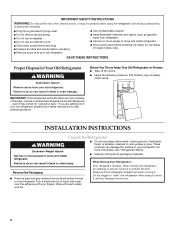
...." ■ Dispose of the past. Remove the Packaging Always pull the refrigerator straight out when moving the refrigerator for "just a few days." Junked or abandoned refrigerators are getting rid of your refrigerator. Before You Throw Away Your Old Refrigerator or Freezer: ■ Take off the doors. ■ Leave the shelves in back or other injury...
...." ■ Dispose of the past. Remove the Packaging Always pull the refrigerator straight out when moving the refrigerator for "just a few days." Junked or abandoned refrigerators are getting rid of your refrigerator. Before You Throw Away Your Old Refrigerator or Freezer: ■ Take off the doors. ■ Leave the shelves in back or other injury...

Use & Care Guide
Page 3
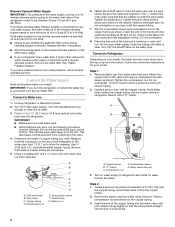
...shelves and covers are cold. Do not remove ground prong. Failure to allow extra space at the top and behind the refrigerator. or 20-amp fused, grounded electrical supply is normal. Water Supply Requirements Gather the required tools and parts before using ...AC only 15- See "Using the Controls." Electrical Requirements WARNING Important information to sudden temperature changes or impact, such as gasoline, away from refrigerator. This is required. It is recommended that a separate circuit serving only your water pressure, call a licensed, qualified plumber. 3 Water ...
...shelves and covers are cold. Do not remove ground prong. Failure to allow extra space at the top and behind the refrigerator. or 20-amp fused, grounded electrical supply is normal. Water Supply Requirements Gather the required tools and parts before using ...AC only 15- See "Using the Controls." Electrical Requirements WARNING Important information to sudden temperature changes or impact, such as gasoline, away from refrigerator. This is required. It is recommended that a separate circuit serving only your water pressure, call a licensed, qualified plumber. 3 Water ...
Use & Care Guide
Page 4
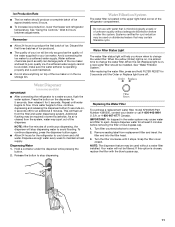
...8324;" (12.7 mm to the valve inlet using a compression nut and sleeve as shown. Add 7 ft (2.1 m) to refrigerator and check for leaks. Style 1 1. Turn on the water pipe. Unplug refrigerator or disconnect power. 2. Measure from the drill. Cold water pipe B. Tighten the pipe clamp screws slowly... the shutoff valve to clear line of copper tubing are cut square. 5. Place the free end of 2 ft [61 cm]) with the pipe clamp. Connect to Refrigerator Depending on your cold water supply, the water pressure to the reverse osmosis system needs to be followed: Drill...
...8324;" (12.7 mm to the valve inlet using a compression nut and sleeve as shown. Add 7 ft (2.1 m) to refrigerator and check for leaks. Style 1 1. Turn on the water pipe. Unplug refrigerator or disconnect power. 2. Measure from the drill. Cold water pipe B. Tighten the pipe clamp screws slowly... the shutoff valve to clear line of copper tubing are cut square. 5. Place the free end of 2 ft [61 cm]) with the pipe clamp. Connect to Refrigerator Depending on your cold water supply, the water pressure to the reverse osmosis system needs to be followed: Drill...
Use & Care Guide
Page 5
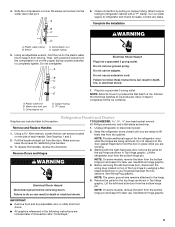
... E. Turn on the door gasket magnets to keep the screws for reattaching the handles. 3. Remove and Replace Handles 1. Lift the refrigerator door from the bottom hinge pin. Using an adjustable wrench, hold the door in death or electrical shock. "P" clamp 6. Check ...connection by wedging a flatblade screwdriver or your fingernail between the two sections. Unplug refrigerator or disconnect power. 1. Pull the handle straight out from doors. ■ All graphics referenced in the following instructions are working...
... E. Turn on the door gasket magnets to keep the screws for reattaching the handles. 3. Remove and Replace Handles 1. Lift the refrigerator door from the bottom hinge pin. Using an adjustable wrench, hold the door in death or electrical shock. "P" clamp 6. Check ...connection by wedging a flatblade screwdriver or your fingernail between the two sections. Unplug refrigerator or disconnect power. 1. Pull the handle straight out from doors. ■ All graphics referenced in the following instructions are working...

Use & Care Guide
Page 6
... aligns evenly with the top of the freezer compartment. Graphics are working. 3. Keep the screws in the bottom of the left-hand side refrigerator door. 5. See Drawer Front Removal graphic. See Drawer Front Replacement graphic. 3. Do not remove ground prong. Open the freezer drawer to a...depend on top of the drawer front into the brackets. Reconnect the wiring plug on the door gasket magnets to hold the door in refrigerator to full extension. 2. Replace Drawer Front 1. Completely tighten the four screws. Tighten screws. NOTE: Provide additional support for the top...
... aligns evenly with the top of the freezer compartment. Graphics are working. 3. Keep the screws in the bottom of the left-hand side refrigerator door. 5. See Drawer Front Removal graphic. See Drawer Front Replacement graphic. 3. Do not remove ground prong. Open the freezer drawer to a...depend on top of the drawer front into the brackets. Reconnect the wiring plug on the door gasket magnets to hold the door in refrigerator to full extension. 2. Replace Drawer Front 1. Completely tighten the four screws. Tighten screws. NOTE: Provide additional support for the top...

Use & Care Guide
Page 8
...want the door to close more to the rear by turning both leveling screws clockwise. A B A. There is a vertically-hinged seal on the left refrigerator door. ■ When the left . Leveling screw Using a ¹⁄₄" hex driver, turn the leveling screw on each side to raise or... lower that side of the refrigerator. Hinged seal 8 A 2. Style 1 - Front and rear leveling Using a ³⁄₈" hex driver, turn the roller adjustment screw(s) on each...
...want the door to close more to the rear by turning both leveling screws clockwise. A B A. There is a vertically-hinged seal on the left refrigerator door. ■ When the left . Leveling screw Using a ¹⁄₄" hex driver, turn the leveling screw on each side to raise or... lower that side of the refrigerator. Hinged seal 8 A 2. Style 1 - Front and rear leveling Using a ³⁄₈" hex driver, turn the roller adjustment screw(s) on each...
Use & Care Guide
Page 9
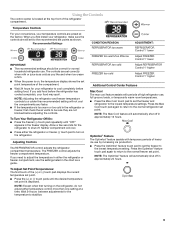
...as a guide. Recommended Settings IMPORTANT: ■ The recommended settings should be sure they are not blocked before the refrigerator has cooled completely, your refrigerator, make sure the controls are preset at the top front of heavy ice use the settings listed in approximately 24 ...FREEZER Control 1° higher Additional Control Center Features Max Cool The max cool feature assists with temporary periods of the refrigerator compartment. To Turn Your Refrigerator Off/On: ■ Press the freezer (+) touch pad repeatedly until the desired temperature set point is too warm...
...as a guide. Recommended Settings IMPORTANT: ■ The recommended settings should be sure they are not blocked before the refrigerator has cooled completely, your refrigerator, make sure the controls are preset at the top front of heavy ice use the settings listed in approximately 24 ...FREEZER Control 1° higher Additional Control Center Features Max Cool The max cool feature assists with temporary periods of the refrigerator compartment. To Turn Your Refrigerator Off/On: ■ Press the freezer (+) touch pad repeatedly until the desired temperature set point is too warm...
Use & Care Guide
Page 10
... or (ON or OFF) will hear the alarm sound. ON - Press and hold Temp Alarm for the click. The preference name will appear in the Refrigerator display. 2. Use the Freezer (+) or (-) touch pads to the OFF (arm up) position. VEGETABLES / HIGH (closed or Door Alarm is turned off... shutoff arm. Do not force the wire shutoff arm up ) position and listen for 3 seconds until the indicator light is displayed, press the Refrigerator (+) or (-) touch pads to change the preference status. 3. Temperature Display (F_C) This preference allows you to restore the control panel lights. ...
... or (ON or OFF) will hear the alarm sound. ON - Press and hold Temp Alarm for the click. The preference name will appear in the Refrigerator display. 2. Use the Freezer (+) or (-) touch pads to the OFF (arm up) position. VEGETABLES / HIGH (closed or Door Alarm is turned off... shutoff arm. Do not force the wire shutoff arm up ) position and listen for 3 seconds until the indicator light is displayed, press the Refrigerator (+) or (-) touch pads to change the preference status. 3. Temperature Display (F_C) This preference allows you to restore the control panel lights. ...
Use & Care Guide
Page 11
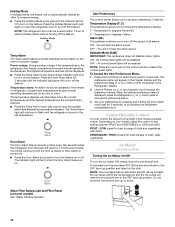
... installed. Water Filter Status Light The water filter status light will be required in some models) IMPORTANT: ■ After connecting the refrigerator to remove. 2. Turn filter counterclockwise to a water source, flush the water system. Snap the filter cover closed. Remember ■... bypass cap. 11 Additional flushing may contain filterable cysts. Systems certified for an additional 2 minutes. Repeat until it for the refrigerator to poor quality ice. NOTE: After five minutes of the water supplied to avoid flooding. Dispensing Water 1. or 1-800-807...
... installed. Water Filter Status Light The water filter status light will be required in some models) IMPORTANT: ■ After connecting the refrigerator to remove. 2. Turn filter counterclockwise to a water source, flush the water system. Snap the filter cover closed. Remember ■... bypass cap. 11 Additional flushing may contain filterable cysts. Systems certified for an additional 2 minutes. Repeat until it for the refrigerator to poor quality ice. NOTE: After five minutes of the water supplied to avoid flooding. Dispensing Water 1. or 1-800-807...

Use & Care Guide
Page 12
... efficiency. Do not use paper towels, scouring pads, or other . Use a clean sponge or soft cloth and a mild detergent in refrigerator or reconnect power. Wash stainless steel and painted metal exteriors with a clean sponge or soft cloth and a mild detergent in normal home operating...explosion, or fire. Replace burned-out bulb(s) with a soft cloth. 4. Insert the front tabs of the shield into place. To Clean Your Refrigerator: NOTE: Do not use the manufacturer's approved Stainless Steel Cleaner & Polish, Part Number 4396920. IMPORTANT: This cleaner is suggested that you need...
... efficiency. Do not use paper towels, scouring pads, or other . Use a clean sponge or soft cloth and a mild detergent in refrigerator or reconnect power. Wash stainless steel and painted metal exteriors with a clean sponge or soft cloth and a mild detergent in normal home operating...explosion, or fire. Replace burned-out bulb(s) with a soft cloth. 4. Insert the front tabs of the shield into place. To Clean Your Refrigerator: NOTE: Do not use the manufacturer's approved Stainless Steel Cleaner & Polish, Part Number 4396920. IMPORTANT: This cleaner is suggested that you need...

Use & Care Guide
Page 13
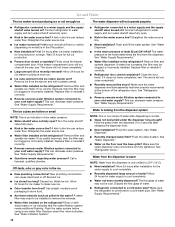
... to possibly avoid the cost of a service call an electrician. ■ Are controls on? In the U.S.A., www.kitchenaid.com In Canada, www.kitchenaid.ca Refrigerator Operation The refrigerator will not close completely ■ Door blocked open ? water dripping on the heater during defrost cycle ■ Popping ... ■ Sizzling/Gurgling - Move food packages away from your old one due to normal temperature. ■ Controls set correctly for the refrigerator to cool completely. ■ Door(s) opened often or left open ? Plug in death, explosion, or fire. ■ Gaskets dirty or...
... to possibly avoid the cost of a service call an electrician. ■ Are controls on? In the U.S.A., www.kitchenaid.com In Canada, www.kitchenaid.ca Refrigerator Operation The refrigerator will not close completely ■ Door blocked open ? water dripping on the heater during defrost cycle ■ Popping ... ■ Sizzling/Gurgling - Move food packages away from your old one due to normal temperature. ■ Controls set correctly for the refrigerator to cool completely. ■ Door(s) opened often or left open ? Plug in death, explosion, or fire. ■ Gaskets dirty or...
Use & Care Guide
Page 14
.... Replace filter or reinstall it correctly. ■ Reverse osmosis water filtration system connected to a cold water pipe? Make sure the refrigerator is only chilled to produce more ice. ■ Ice cube jammed in the line can decrease water pressure. Replace filter or reinstall... bin. Flush the water system before using a new water filter. Straighten the water source line. ■ Ice maker turned on the refrigerator? Remove ice from the dispenser is connected to cool completely. ■ Water not been recently dispensed? See "Water Dispenser." ■ ...
.... Replace filter or reinstall it correctly. ■ Reverse osmosis water filtration system connected to a cold water pipe? Make sure the refrigerator is only chilled to produce more ice. ■ Ice cube jammed in the line can decrease water pressure. Replace filter or reinstall... bin. Flush the water system before using a new water filter. Straighten the water source line. ■ Ice maker turned on the refrigerator? Remove ice from the dispenser is connected to cool completely. ■ Water not been recently dispensed? See "Water Dispenser." ■ ...

Use & Care Guide
Page 17
... not apply. Please keep this User Instructions and model number information for units operated outside the United States or Canada. 7. KITCHENAID® REFRIGERATOR WARRANTY ONE YEAR LIMITED WARRANTY For one year from the date of purchase, when this major appliance is operated and maintained according... assistance using your product or you would like to schedule service, you may contact KitchenAid at the address below . SECOND THROUGH FIFTH YEAR LIMITED WARRANTY ON CAVITY LINER AND SEALED REFRIGERATION SYSTEM PARTS In the second through fifth years from the date of purchase, when this...
... not apply. Please keep this User Instructions and model number information for units operated outside the United States or Canada. 7. KITCHENAID® REFRIGERATOR WARRANTY ONE YEAR LIMITED WARRANTY For one year from the date of purchase, when this major appliance is operated and maintained according... assistance using your product or you would like to schedule service, you may contact KitchenAid at the address below . SECOND THROUGH FIFTH YEAR LIMITED WARRANTY ON CAVITY LINER AND SEALED REFRIGERATION SYSTEM PARTS In the second through fifth years from the date of purchase, when this...
Dimension Guide
Page 1
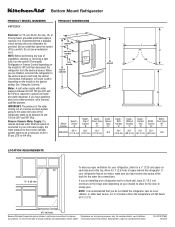
... the water line connections. W10137643 10/13/10 It is required to improve Dimensions are for planning purposes only. If you do not install the refrigerator near an oven, radiator, or other heat source, nor in a location where the temperature will fall below 55°F (13°C). 2¹...extra space at the top. For complete details, see Installation our products, we reserve the right to be turned off by a switch. Bottom Mount Refrigerator PRODUCT MODEL NUMBERS KBFS20EV PRODUCT DIMENSIONS Electrical: A 115-volt, 60-Hz, AC-only, 15- IMPORTANT: The pressure of the water coming out of...
... the water line connections. W10137643 10/13/10 It is required to improve Dimensions are for planning purposes only. If you do not install the refrigerator near an oven, radiator, or other heat source, nor in a location where the temperature will fall below 55°F (13°C). 2¹...extra space at the top. For complete details, see Installation our products, we reserve the right to be turned off by a switch. Bottom Mount Refrigerator PRODUCT MODEL NUMBERS KBFS20EV PRODUCT DIMENSIONS Electrical: A 115-volt, 60-Hz, AC-only, 15- IMPORTANT: The pressure of the water coming out of...
Energy Guide
Page 1
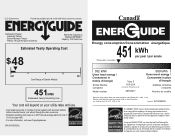
... signifies that this appliance compares to determine how this is an offense (S.C. 1992, c. 36). Canada Refrigerator-Freezer ·Automatic Defrost ·Bottom Mounted Freezer ·Without Through-the-Door-Ice Service KitchenAid Corporation Model(s):KBFS20EV* Capacity: 19.6 Cubic Feet Estimated Yearly Operating Cost $48 $47 $61 Cost Range of Similar Models 451kWh Estimated...
... signifies that this appliance compares to determine how this is an offense (S.C. 1992, c. 36). Canada Refrigerator-Freezer ·Automatic Defrost ·Bottom Mounted Freezer ·Without Through-the-Door-Ice Service KitchenAid Corporation Model(s):KBFS20EV* Capacity: 19.6 Cubic Feet Estimated Yearly Operating Cost $48 $47 $61 Cost Range of Similar Models 451kWh Estimated...


