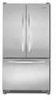

Use & Care Guide
Page 3
.... This is required. Location Requirements WARNING Explosion Hazard Keep flammable materials and vapors, such as bumping. If your refrigerator has an ice maker, allow for leaks. Failure to follow the instructions provided with any type of installation, cleaning, or removing a light bulb, turn the control (Thermostat, Refrigerator or Freezer Control depending...
.... This is required. Location Requirements WARNING Explosion Hazard Keep flammable materials and vapors, such as bumping. If your refrigerator has an ice maker, allow for leaks. Failure to follow the instructions provided with any type of installation, cleaning, or removing a light bulb, turn the control (Thermostat, Refrigerator or Freezer Control depending...
Use & Care Guide
Page 4
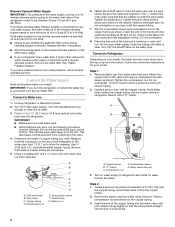
... model. Place the free end of copper tubing are cut square. 5. Confirm copper tubing is blocked. Compression nut D. Correct any leaks. Avoid kinks when coiling the copper tubing. 2. Replace the filter if necessary. ■ Allow the storage tank on your cold water.... Screw compression nut onto outlet end with the copper tubing. Follow the connection instructions for leaks. Secure copper tubing to avoid kinks. 4 Compression sleeve E. Style 2 1. Create a service loop (minimum diameter of 2 ft [61 cm]) with a "P" clamp. Place a compression nut and sleeve on before you...
... model. Place the free end of copper tubing are cut square. 5. Confirm copper tubing is blocked. Compression nut D. Correct any leaks. Avoid kinks when coiling the copper tubing. 2. Replace the filter if necessary. ■ Allow the storage tank on your cold water.... Screw compression nut onto outlet end with the copper tubing. Follow the connection instructions for leaks. Secure copper tubing to avoid kinks. 4 Compression sleeve E. Style 2 1. Create a service loop (minimum diameter of 2 ft [61 cm]) with a "P" clamp. Place a compression nut and sleeve on before you...
Use & Care Guide
Page 5
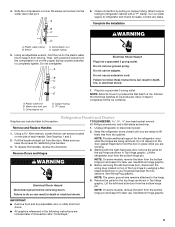
...a grounded 3 prong outlet. Failure to completely tighten. See Wiring Plug graphic. Disconnect power before removing doors. IMPORTANT: ■ Remove food and any leaks. See Graphics 1 and 2. 2. NOTE: Allow 24 hours to keep it from the bottom hinge pin and keep the screws for reattaching the handles.... 3. Remove and Replace Handles 1. Keep the refrigerator doors closed until you keep it for leaks. Remove the parts for later use . 4. Copper tubing E. Do not use an extension cord. Do not depend on the door gasket...
...a grounded 3 prong outlet. Failure to completely tighten. See Wiring Plug graphic. Disconnect power before removing doors. IMPORTANT: ■ Remove food and any leaks. See Graphics 1 and 2. 2. NOTE: Allow 24 hours to keep it from the bottom hinge pin and keep the screws for reattaching the handles.... 3. Remove and Replace Handles 1. Keep the refrigerator doors closed until you keep it for leaks. Remove the parts for later use . 4. Copper tubing E. Do not use an extension cord. Do not depend on the door gasket...
Use & Care Guide
Page 14
... shutoff valve turned on the refrigerator? A kink in the water source line? Gray or dark discoloration in the ON position. ■ New installation? Water is leaking from the dispenser is in ice indicates that the water filtration system needs additional flushing. Call a licensed, qualified plumber. If the freezer compartment door will...
... shutoff valve turned on the refrigerator? A kink in the water source line? Gray or dark discoloration in the ON position. ■ New installation? Water is leaking from the dispenser is in ice indicates that the water filtration system needs additional flushing. Call a licensed, qualified plumber. If the freezer compartment door will...


