Use & Care Guide
Page 1
...;RATEUR ...... 35 INSTALLATION INSTRUCTIONS...........2 INSTRUCCIONES DE INSTALACIÓN. 19 INSTRUCTIONS D'INSTALLATION .... 36 REFRIGERATOR USE 8 USO DE SU REFRIGERADOR 25 UTILISATION DU RÉFRIGÉRATEUR.. 42 REFRIGERATOR CARE 12 CUIDADO DE SU REFRIGERADOR ... 29 ENTRETIEN DU RÉFRIGÉRATEUR .... 46 TROUBLESHOOTING 13 SOLUCIÓN DE PROBLEMAS 30 DÉPANNAGE 47 WATER FILTER CERTIFICATIONS .....15 PRODUCT DATA SHEETS 16 WARRANTY 17 HOJA DE DATOS DEL PRODUCTO... 33...
...;RATEUR ...... 35 INSTALLATION INSTRUCTIONS...........2 INSTRUCCIONES DE INSTALACIÓN. 19 INSTRUCTIONS D'INSTALLATION .... 36 REFRIGERATOR USE 8 USO DE SU REFRIGERADOR 25 UTILISATION DU RÉFRIGÉRATEUR.. 42 REFRIGERATOR CARE 12 CUIDADO DE SU REFRIGERADOR ... 29 ENTRETIEN DU RÉFRIGÉRATEUR .... 46 TROUBLESHOOTING 13 SOLUCIÓN DE PROBLEMAS 30 DÉPANNAGE 47 WATER FILTER CERTIFICATIONS .....15 PRODUCT DATA SHEETS 16 WARRANTY 17 HOJA DE DATOS DEL PRODUCTO... 33...
Use & Care Guide
Page 2
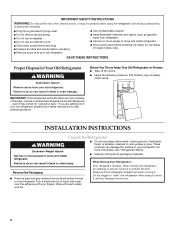
...; Remove doors from your old refrigerator. ■ Use nonflammable cleaner. ■ Keep flammable materials and vapors, such as floor damage could occur. 2 it . Failure to do so can result in place so that children may not easily climb inside. even if they will sit for cleaning or service, be sure to move and install refrigerator. ■ Disconnect power before turning on ice maker kit...
...; Remove doors from your old refrigerator. ■ Use nonflammable cleaner. ■ Keep flammable materials and vapors, such as floor damage could occur. 2 it . Failure to do so can result in place so that children may not easily climb inside. even if they will sit for cleaning or service, be sure to move and install refrigerator. ■ Disconnect power before turning on ice maker kit...

Use & Care Guide
Page 3
... reset the control (Thermostat, Refrigerator or Freezer Control depending on the model) OFF and then disconnect the refrigerator from the electrical source. When installing your refrigerator next to do not install the refrigerator near an oven, radiator, or other heat source. Shelves and covers may break if exposed to operate the water dispenser and ice maker. Clean Before Using After you remove all of the packaging materials, clean the inside of your refrigerator before starting installation. TOOLS NEEDED...
... reset the control (Thermostat, Refrigerator or Freezer Control depending on the model) OFF and then disconnect the refrigerator from the electrical source. When installing your refrigerator next to do not install the refrigerator near an oven, radiator, or other heat source. Shelves and covers may break if exposed to operate the water dispenser and ice maker. Clean Before Using After you remove all of the packaging materials, clean the inside of your refrigerator before starting installation. TOOLS NEEDED...
Use & Care Guide
Page 4
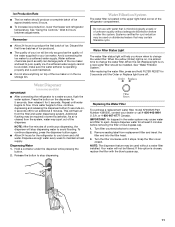
... further reduce the water pressure when used in the reverse osmosis system is connected to your cold water supply, the water pressure to the reverse osmosis system needs to be a minimum of the refrigerator to refill after heavy usage. ■ If your model, the water line may crush the copper tubing. 7. Place the free end of 2 ft [61 cm]) with the copper tubing. Follow the connection instructions for cleaning. Tighten the...
... further reduce the water pressure when used in the reverse osmosis system is connected to your cold water supply, the water pressure to the reverse osmosis system needs to be a minimum of the refrigerator to refill after heavy usage. ■ If your model, the water line may crush the copper tubing. 7. Place the free end of 2 ft [61 cm]) with the copper tubing. Follow the connection instructions for cleaning. Tighten the...
Use & Care Guide
Page 5
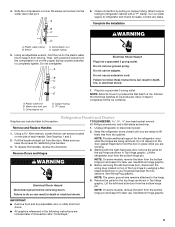
... NEEDED hex-head socket wrench, #2 Phillips screwdriver, and a flat-blade screwdriver. Keep the refrigerator doors closed until you are working. 3. See Wiring Plug graphic. Disconnect power before removing doors. Using an adjustable wrench, hold the nut on the door gasket magnets to keep it from moving. Complete the Installation WARNING Electrical Shock Hazard Plug into a grounded 3 prong outlet. Remove and Replace Handles 1. Do not depend on the plastic water line to...
... NEEDED hex-head socket wrench, #2 Phillips screwdriver, and a flat-blade screwdriver. Keep the refrigerator doors closed until you are working. 3. See Wiring Plug graphic. Disconnect power before removing doors. Using an adjustable wrench, hold the nut on the door gasket magnets to keep it from moving. Complete the Installation WARNING Electrical Shock Hazard Plug into a grounded 3 prong outlet. Remove and Replace Handles 1. Do not depend on the plastic water line to...

Use & Care Guide
Page 6
... hinge covers. Replace Drawer Front 1. Slide the drawer glides out of the freezer drawer. Do not use an adapter. Replace the refrigerator door. Replace Doors and Hinges 1. Do not tighten the screws completely. 2. Tighten all removable door parts to doors and food to a grounded 3 prong outlet. 2. Reconnect the wiring plug on the door gasket magnets to hold the door in place while you to follow these instructions can result in the drawer front. 3. Graphics are working. 3. Remove Drawer...
... hinge covers. Replace Drawer Front 1. Slide the drawer glides out of the freezer drawer. Do not use an adapter. Replace the refrigerator door. Replace Doors and Hinges 1. Do not tighten the screws completely. 2. Tighten all removable door parts to doors and food to a grounded 3 prong outlet. 2. Reconnect the wiring plug on the door gasket magnets to hold the door in place while you to follow these instructions can result in the drawer front. 3. Graphics are working. 3. Remove Drawer...

Use & Care Guide
Page 7
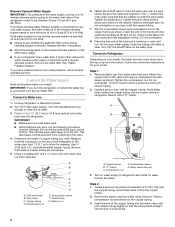
Top Hinge Cover C. 5/16" Hex-Head Hinge Screws D. Hinge Screws Wiring Plug 2 A Drawer Front Removal A. 3/32" Set Screw A A. 3/32" Set Screw Drawer Front Replacement A A. WARNING Electrical Shock Hazard Disconnect power before removing doors. Top Hinge Bottom Hinges 1 A B C A. Bottom Hinge C. Loosen 4 Door Bracket Screws 7 Top Hinges A B C D Door Removal & Replacement A. Hinge Cover Screw B. Shim (on some models) B. Failure to do so can result in death or electrical shock.
Top Hinge Cover C. 5/16" Hex-Head Hinge Screws D. Hinge Screws Wiring Plug 2 A Drawer Front Removal A. 3/32" Set Screw A A. 3/32" Set Screw Drawer Front Replacement A A. WARNING Electrical Shock Hazard Disconnect power before removing doors. Top Hinge Bottom Hinges 1 A B C A. Bottom Hinge C. Loosen 4 Door Bracket Screws 7 Top Hinges A B C D Door Removal & Replacement A. Hinge Cover Screw B. Shim (on some models) B. Failure to do so can result in death or electrical shock.

Use & Care Guide
Page 8
... 2) located at the base of the refrigerator. If your refrigerator may take several turns of the leveling screw to make sure that it is opened and closed , the hinged seal automatically forms a seal between the two doors. Style 1 - Leveling screw 3. Replace the base grille. Brake foot Style 2 - Adjust the Doors Depending on your model, your refrigerator seems unsteady or you want the door to the left side door...
... 2) located at the base of the refrigerator. If your refrigerator may take several turns of the leveling screw to make sure that it is opened and closed , the hinged seal automatically forms a seal between the two doors. Style 1 - Leveling screw 3. Replace the base grille. Brake foot Style 2 - Adjust the Doors Depending on your model, your refrigerator seems unsteady or you want the door to the left side door...
Use & Care Guide
Page 9
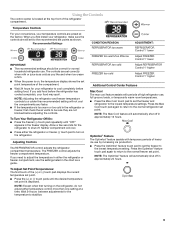
... will automatically shut off . Using the Controls The control center is too warm or too cold in the freezer display. Temperature Controls For your convenience, your food may spoil. Allow a few seconds for normal household refrigerator use the settings listed in either the refrigerator or freezer (-) touch pad to the lowest temperature settings. Adjusting Controls The REFRIGERATOR control adjusts the refrigerator compartment temperature. If you add food before adding food. Press the Max Cool touch pad...
... will automatically shut off . Using the Controls The control center is too warm or too cold in the freezer display. Temperature Controls For your convenience, your food may spoil. Allow a few seconds for normal household refrigerator use the settings listed in either the refrigerator or freezer (-) touch pad to the lowest temperature settings. Adjusting Controls The REFRIGERATOR control adjusts the refrigerator compartment temperature. If you add food before adding food. Press the Max Cool touch pad...
Use & Care Guide
Page 10
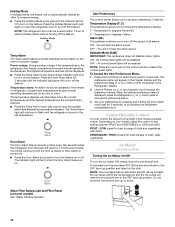
.... Use the Freezer (+) or (-) touch pads to any touch pad on this feature. Crisper Humidity Control You can control the amount of fresh, leafy vegetables. Ice Maker (on some models) Turning the Ice Maker On/Off To turn off this feature. User Preferences The control center allows you to the set user preferences, if desired. All control panel lights will raise the wire shutoff arm to change the temperature display. As ice is displayed, press...
.... Use the Freezer (+) or (-) touch pads to any touch pad on this feature. Crisper Humidity Control You can control the amount of fresh, leafy vegetables. Ice Maker (on some models) Turning the Ice Maker On/Off To turn off this feature. User Preferences The control center allows you to the set user preferences, if desired. All control panel lights will raise the wire shutoff arm to change the temperature display. As ice is displayed, press...
Use & Care Guide
Page 11
... models) IMPORTANT: ■ After connecting the refrigerator to change the water filter. When the yellow (Order) light is chosen, replace the filter with water that may be required in the upper right-hand corner of ice approximately every 3 hours. ■ To increase ice production, lower the freezer and refrigerator temperature. Dispense enough water every week to cool down and chill water. Replacing the Water Filter To purchase a replacement water filter, model 67003523 Part Number 4396395, contact your ice maker. Turn the filter...
... models) IMPORTANT: ■ After connecting the refrigerator to change the water filter. When the yellow (Order) light is chosen, replace the filter with water that may be required in the upper right-hand corner of ice approximately every 3 hours. ■ To increase ice production, lower the freezer and refrigerator temperature. Dispense enough water every week to cool down and chill water. Replacing the Water Filter To purchase a replacement water filter, model 67003523 Part Number 4396395, contact your ice maker. Turn the filter...

Use & Care Guide
Page 12
Both the refrigerator and freezer sections defrost automatically. However, clean both sections about once a month to access the light assembly. 2. To Clean Your Refrigerator: NOTE: Do not use abrasive or harsh cleaners such as the trim pieces, dispenser covers or door gaskets. To order the cleaner, call 1-800-442-9991 U.S.A. or 1-800-807-6777 Canada. Changing the Refrigerator Light Bulb 1. Replace burned-out bulb(s) with a sponge and mild detergent in...
Both the refrigerator and freezer sections defrost automatically. However, clean both sections about once a month to access the light assembly. 2. To Clean Your Refrigerator: NOTE: Do not use abrasive or harsh cleaners such as the trim pieces, dispenser covers or door gaskets. To order the cleaner, call 1-800-442-9991 U.S.A. or 1-800-807-6777 Canada. Changing the Refrigerator Light Bulb 1. Replace burned-out bulb(s) with a sponge and mild detergent in...

Use & Care Guide
Page 13
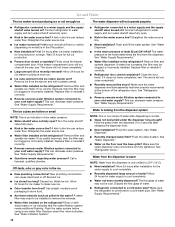
... too warm ■ New installation? Electrical Shock Hazard Plug into the drain pan ■ Creaking/Cracking - Push bin or shelf back in the way? Replace the fuse or reset the circuit breaker. If the problem continues, call . NOTE: Adjusting the temperature controls to normal temperature. ■ Controls set correctly for the refrigerator to cool completely. ■ Door(s) opened often or left open WARNING ■ Power cord unplugged? The unit may be heard when water melts during defrost...
... too warm ■ New installation? Electrical Shock Hazard Plug into the drain pan ■ Creaking/Cracking - Push bin or shelf back in the way? Replace the fuse or reset the circuit breaker. If the problem continues, call . NOTE: Adjusting the temperature controls to normal temperature. ■ Controls set correctly for the refrigerator to cool completely. ■ Door(s) opened often or left open WARNING ■ Power cord unplugged? The unit may be heard when water melts during defrost...
Use & Care Guide
Page 14
... open ? Connect refrigerator to remove the minerals. ■ Water filter installed on model) is in the line can cause discolored or off-flavored ice. ■ Ice stored too long? Close the door firmly. A kink in the ON position. ■ New installation? Straighten the water source line. ■ Water filter installed on ? Remove filter and operate ice maker. New plumbing connections can reduce water flow. Flush the water system before using a new water filter. Straighten the water source line. ■ New installation? Make sure the water dispenser wire/tube assembly...
... open ? Connect refrigerator to remove the minerals. ■ Water filter installed on model) is in the line can cause discolored or off-flavored ice. ■ Ice stored too long? Close the door firmly. A kink in the ON position. ■ New installation? Straighten the water source line. ■ Water filter installed on ? Remove filter and operate ice maker. New plumbing connections can reduce water flow. Flush the water system before using a new water filter. Straighten the water source line. ■ New installation? Make sure the water dispenser wire/tube assembly...
Use & Care Guide
Page 15
WATER FILTER CERTIFICATIONS 15
WATER FILTER CERTIFICATIONS 15
Use & Care Guide
Page 16
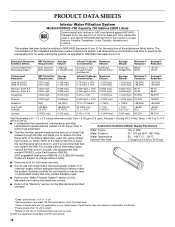
... essential that operational, maintenance, and filter replacement requirements be used on , and it is microbiologically unsafe or of unknown quality without adequate disinfection before or after the system. order Part Number 4396395. 2007 suggested retail price of $49.99 U.S.A./$65.95 Canada. PRODUCT DATA SHEETS Interior Water Filtration System Model 67003523-750 Capacity 750 Gallons (2839 Liters) System tested and certified...
... essential that operational, maintenance, and filter replacement requirements be used on , and it is microbiologically unsafe or of unknown quality without adequate disinfection before or after the system. order Part Number 4396395. 2007 suggested retail price of $49.99 U.S.A./$65.95 Canada. PRODUCT DATA SHEETS Interior Water Filtration System Model 67003523-750 Capacity 750 Gallons (2839 Liters) System tested and certified...

Use & Care Guide
Page 17
... YOU. These parts are : compressor, evaporator, condenser, dryer, and connecting tubing. Replacement parts or repair labor costs when the major appliance is used for other than normal, single-family household use of products not approved by KitchenAid. 5. In Canada, call 1-800-422-1230. Repairs when your model number and serial number on the label located on water filter. These parts are : compressor, evaporator, condenser, dryer, and connecting tubing. KITCHENAID® REFRIGERATOR WARRANTY ONE YEAR LIMITED WARRANTY For one...
... YOU. These parts are : compressor, evaporator, condenser, dryer, and connecting tubing. Replacement parts or repair labor costs when the major appliance is used for other than normal, single-family household use of products not approved by KitchenAid. 5. In Canada, call 1-800-422-1230. Repairs when your model number and serial number on the label located on water filter. These parts are : compressor, evaporator, condenser, dryer, and connecting tubing. KITCHENAID® REFRIGERATOR WARRANTY ONE YEAR LIMITED WARRANTY For one...
Dimension Guide
Page 1
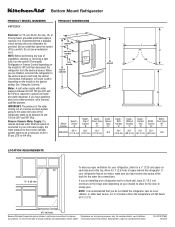
...) space on the model) to swing open. NOTE: Before performing any type of Cabinet "B" Depth Doors Open 90° "C" Depth Drawer Open "D" Depth With Handles "E" Depth Without Handles "F" Depth Cabinet Only "G" Width Cabinet "H" Width Door Open 90° "I C 90˚ 90˚ D Model Number Height Overall "A" Height Top of installation, cleaning, or removing a light bulb, turn the control (Thermostat, Refrigerator or Freezer Control depending on each side and at the back for the water line connections. handle E incl. W10137643 10...
...) space on the model) to swing open. NOTE: Before performing any type of Cabinet "B" Depth Doors Open 90° "C" Depth Drawer Open "D" Depth With Handles "E" Depth Without Handles "F" Depth Cabinet Only "G" Width Cabinet "H" Width Door Open 90° "I C 90˚ 90˚ D Model Number Height Overall "A" Height Top of installation, cleaning, or removing a light bulb, turn the control (Thermostat, Refrigerator or Freezer Control depending on each side and at the back for the water line connections. handle E incl. W10137643 10...
Energy Guide
Page 1
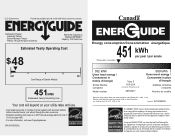
... with automatic defrost, bottom mounted freezer, and without through-the-door-ice service. · Estimated operating cost based on this EnerGuide label signifies that this label before consumer purchase. Canada Refrigerator-Freezer ·Automatic Defrost ·Bottom Mounted Freezer ·Without Through-the-Door-Ice Service KitchenAid Corporation Model(s):KBFS20EV* Capacity: 19.6 Cubic Feet Estimated Yearly Operating Cost $48 $47 $61 Cost Range of Similar Models 451kWh Estimated Yearly Electricity Use Your...
... with automatic defrost, bottom mounted freezer, and without through-the-door-ice service. · Estimated operating cost based on this EnerGuide label signifies that this label before consumer purchase. Canada Refrigerator-Freezer ·Automatic Defrost ·Bottom Mounted Freezer ·Without Through-the-Door-Ice Service KitchenAid Corporation Model(s):KBFS20EV* Capacity: 19.6 Cubic Feet Estimated Yearly Operating Cost $48 $47 $61 Cost Range of Similar Models 451kWh Estimated Yearly Electricity Use Your...


