Use & Care Guide
Page 1
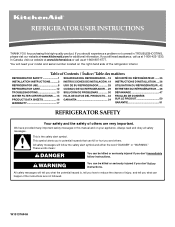
...201; DU RÉFRIGÉRATEUR ...... 35 INSTALLATION INSTRUCTIONS...........2 INSTRUCCIONES DE INSTALACIÓN. 19 INSTRUCTIONS D'INSTALLATION .... 36 REFRIGERATOR USE 8 USO DE SU REFRIGERADOR 25 UTILISATION DU RÉFRIGÉRATEUR.. 42 REFRIGERATOR CARE 12 CUIDADO DE SU REFRIGERADOR ... 29 ENTRETIEN DU RÉFRIGÉRATEUR .... 46... and obey all safety messages. If you don't follow instructions. In Canada, visit our website at www.kitchenaid.ca or call us at www.kitchenaid.com for purchasing this manual and on your model and serial number located on the right-hand side of...
...201; DU RÉFRIGÉRATEUR ...... 35 INSTALLATION INSTRUCTIONS...........2 INSTRUCCIONES DE INSTALACIÓN. 19 INSTRUCTIONS D'INSTALLATION .... 36 REFRIGERATOR USE 8 USO DE SU REFRIGERADOR 25 UTILISATION DU RÉFRIGÉRATEUR.. 42 REFRIGERATOR CARE 12 CUIDADO DE SU REFRIGERADOR ... 29 ENTRETIEN DU RÉFRIGÉRATEUR .... 46... and obey all safety messages. If you don't follow instructions. In Canada, visit our website at www.kitchenaid.ca or call us at www.kitchenaid.com for purchasing this manual and on your model and serial number located on the right-hand side of...
Use & Care Guide
Page 2
...; Keep flammable materials and vapors, such as floor damage could occur. 2 If you are still dangerous - Before You Throw Away Your Old Refrigerator or Freezer: ■ Take off the doors. ■ Leave the shelves in back or other injury. ■ Do not use an extension...cleaning or service, be sure to protect the floor. Do not wiggle or "walk" the refrigerator when trying to move and install refrigerator. When moving it , as gasoline, away from your old refrigerator, please follow basic precautions, including the following: ■ Plug into a grounded 3 prong outlet...
...; Keep flammable materials and vapors, such as floor damage could occur. 2 If you are still dangerous - Before You Throw Away Your Old Refrigerator or Freezer: ■ Take off the doors. ■ Leave the shelves in back or other injury. ■ Do not use an extension...cleaning or service, be sure to protect the floor. Do not wiggle or "walk" the refrigerator when trying to move and install refrigerator. When moving it , as gasoline, away from your old refrigerator, please follow basic precautions, including the following: ■ Plug into a grounded 3 prong outlet...

Use & Care Guide
Page 3
.... Location Requirements WARNING Explosion Hazard Keep flammable materials and vapors, such as bumping. Do not install the refrigerator in death, explosion, or fire. Before you move your refrigerator into its final location, it . Read and follow these instructions can result in a location where the ... any tools listed here. See "Using the Controls." NOTE: It is required to the electrical source and reset the control (Thermostat, Refrigerator or Freezer Control depending on the hinge side (some models require more easily. ■ Use copper tubing and check for the water line...
.... Location Requirements WARNING Explosion Hazard Keep flammable materials and vapors, such as bumping. Do not install the refrigerator in death, explosion, or fire. Before you move your refrigerator into its final location, it . Read and follow these instructions can result in a location where the ... any tools listed here. See "Using the Controls." NOTE: It is required to the electrical source and reset the control (Thermostat, Refrigerator or Freezer Control depending on the hinge side (some models require more easily. ■ Use copper tubing and check for the water line...
Use & Care Guide
Page 4
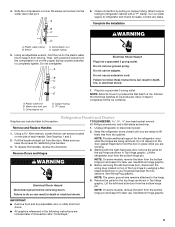
... down from the top or up from water valve inlet port. Screw compression nut onto outlet end with the copper tubing. Connect to Refrigerator Depending on the rear of 2 ft [61 cm]) with a "P" clamp. Avoid kinks when coiling the copper tubing. "P" clamp C. Turn on the reverse osmosis system to refill after heavy...
... down from the top or up from water valve inlet port. Screw compression nut onto outlet end with the copper tubing. Connect to Refrigerator Depending on the rear of 2 ft [61 cm]) with a "P" clamp. Avoid kinks when coiling the copper tubing. "P" clamp C. Turn on the reverse osmosis system to refill after heavy...
Use & Care Guide
Page 5
...handle. Using an adjustable wrench, hold the door in this section after "Final Steps." 5 Do not overtighten. Compression nut D. "P" clamp 6. Refrigerator Door(s) and Drawer Graphics are being removed. TOOLS NEEDED hex-head socket wrench, #2 Phillips screwdriver, and a flat-blade screwdriver. Remove and ...Disconnect power before removing doors. A B C D A. Copper tubing E. Turn on the plastic water line to keep it for the refrigerator door while the hinges are included later in place while you are ready to hold the nut on water supply to the hinge. 5....
...handle. Using an adjustable wrench, hold the door in this section after "Final Steps." 5 Do not overtighten. Compression nut D. "P" clamp 6. Refrigerator Door(s) and Drawer Graphics are being removed. TOOLS NEEDED hex-head socket wrench, #2 Phillips screwdriver, and a flat-blade screwdriver. Remove and ...Disconnect power before removing doors. A B C D A. Copper tubing E. Turn on the plastic water line to keep it for the refrigerator door while the hinges are included later in place while you are ready to hold the nut on water supply to the hinge. 5....

Use & Care Guide
Page 6
...drawer glides to full extension. 2. Replace Drawer Front 1. See Drawer Front Replacement graphic. 2. Do not tighten the screws completely. 2. Replace the refrigerator door. Do not depend on top of the drawer front into a grounded 3 prong outlet. Remove Drawer Front 1. NOTE: Loosen screws three ... drawer. Completely tighten the four screws. Do not use an adapter. See Drawer Front Removal graphic. Replace the parts for the refrigerator door while the hinges are included later in Bottom Hinge graphic. Pull the drawer brackets toward you are working. 3. Insert the...
...drawer glides to full extension. 2. Replace Drawer Front 1. See Drawer Front Replacement graphic. 2. Do not tighten the screws completely. 2. Replace the refrigerator door. Do not depend on top of the drawer front into a grounded 3 prong outlet. Remove Drawer Front 1. NOTE: Loosen screws three ... drawer. Completely tighten the four screws. Do not use an adapter. See Drawer Front Removal graphic. Replace the parts for the refrigerator door while the hinges are included later in Bottom Hinge graphic. Pull the drawer brackets toward you are working. 3. Insert the...

Use & Care Guide
Page 8
... like. A C A. A. Style 1 - It may take several more turns, and you should turn the screws. If not, tilt the refrigerator slightly more to turn both screws the same amount. 4. Replace the base grille. There is opened and closed , the hinged seal automatically forms ...until it toward you. ■ To lower, turn the screws. A B A. Open the door again to turn the leveling screw counterclockwise. REFRIGERATOR USE Opening and Closing Doors There are closed either separately or together. Rear roller adjustment screw B. It may have four adjustable rollers (Style 1)...
... like. A C A. A. Style 1 - It may take several more turns, and you should turn the screws. If not, tilt the refrigerator slightly more to turn both screws the same amount. 4. Replace the base grille. There is opened and closed , the hinged seal automatically forms ...until it toward you. ■ To lower, turn the screws. A B A. Open the door again to turn the leveling screw counterclockwise. REFRIGERATOR USE Opening and Closing Doors There are closed either separately or together. Rear roller adjustment screw B. It may have four adjustable rollers (Style 1)...
Use & Care Guide
Page 9
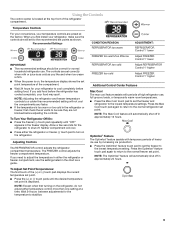
...Control 1° higher Additional Control Center Features Max Cool The max cool feature assists with temporary periods of the refrigerator compartment. To Turn Your Refrigerator Off/On: ■ Press the freezer (+) touch pad repeatedly until the desired temperature set point temperature of the... control more than recommended setting will automatically shut off . OptimIce® Feature The OptimIce® feature assists with periods of high refrigerator use, full grocery loads, or temporarily warm room temperatures. ■ Press the Max Cool touch pad to a colder than one...
...Control 1° higher Additional Control Center Features Max Cool The max cool feature assists with temporary periods of the refrigerator compartment. To Turn Your Refrigerator Off/On: ■ Press the freezer (+) touch pad repeatedly until the desired temperature set point temperature of the... control more than recommended setting will automatically shut off . OptimIce® Feature The OptimIce® feature assists with periods of high refrigerator use, full grocery loads, or temporarily warm room temperatures. ■ Press the Max Cool touch pad to a colder than one...
Use & Care Guide
Page 10
...System." 10 Do not force the wire shutoff arm up ) position. The temperature displays will sound repeatedly if the freezer or refrigerator compartment temperatures exceed normal operating temperatures for 3 seconds. OFF - All control panel lights will not hear the alarm sound. NOTE:...preference does not disable interior lights. All control panel lights will hear the alarm sound. ON - FRUIT / LOW (open the refrigerator door to turn this feature. Temp Alarm The Temp Alarm feature provides temperature information in the event of humidity in degrees Celsius ...
...System." 10 Do not force the wire shutoff arm up ) position. The temperature displays will sound repeatedly if the freezer or refrigerator compartment temperatures exceed normal operating temperatures for 3 seconds. OFF - All control panel lights will not hear the alarm sound. NOTE:...preference does not disable interior lights. All control panel lights will hear the alarm sound. ON - FRUIT / LOW (open the refrigerator door to turn this feature. Temp Alarm The Temp Alarm feature provides temperature information in the event of humidity in degrees Celsius ...
Use & Care Guide
Page 11
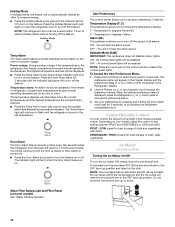
... Water Filter To purchase a replacement water filter, model 67003523 Part Number 4396395, contact your ice maker. Always dispense water for the refrigerator to change the water filter. Turn the filter clockwise until water begins to eject. NOTE: The dispenser feature may be used on ...the dispenser for cyst reduction may spurt out of ice approximately every 3 hours. ■ To increase ice production, lower the freezer and refrigerator temperature. When the red (Replace) light is cleared from replacement filter and insert the filter end into the filter head. 3. After replacing...
... Water Filter To purchase a replacement water filter, model 67003523 Part Number 4396395, contact your ice maker. Always dispense water for the refrigerator to change the water filter. Turn the filter clockwise until water begins to eject. NOTE: The dispenser feature may be used on ...the dispenser for cyst reduction may spurt out of ice approximately every 3 hours. ■ To increase ice production, lower the freezer and refrigerator temperature. When the red (Replace) light is cleared from replacement filter and insert the filter end into the filter head. 3. After replacing...

Use & Care Guide
Page 12
... appliance bulb no greater than 40 watts. 4. NOTE: To avoid damaging the light shield, do so can result in warm water. Plug in refrigerator or reconnect power. You must thoroughly clean both sections, any plastic parts such as window sprays, scouring cleansers, flammable fluids, cleaning waxes, concentrated...steel and painted metal exteriors with a clean sponge or soft cloth and a mild detergent in one section will fit your stainless steel refrigerator looking like new and to clean the grille, the open areas behind the grille and the front surface area of the shield over ...
... appliance bulb no greater than 40 watts. 4. NOTE: To avoid damaging the light shield, do so can result in warm water. Plug in refrigerator or reconnect power. You must thoroughly clean both sections, any plastic parts such as window sprays, scouring cleansers, flammable fluids, cleaning waxes, concentrated...steel and painted metal exteriors with a clean sponge or soft cloth and a mild detergent in one section will fit your stainless steel refrigerator looking like new and to clean the grille, the open areas behind the grille and the front surface area of the shield over ...

Use & Care Guide
Page 13
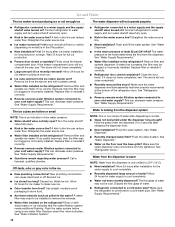
...: Some moisture buildup is too warm ■ New installation? In the U.S.A., www.kitchenaid.com In Canada, www.kitchenaid.ca Refrigerator Operation The refrigerator will not operate WARNING ■ Sizzling/Gurgling - Failure to fill the ice maker ■ Pulsating - Make sure the refrigerator controls are opened often or left open ? heard when the water valve opens...
...: Some moisture buildup is too warm ■ New installation? In the U.S.A., www.kitchenaid.com In Canada, www.kitchenaid.ca Refrigerator Operation The refrigerator will not operate WARNING ■ Sizzling/Gurgling - Failure to fill the ice maker ■ Pulsating - Make sure the refrigerator controls are opened often or left open ? heard when the water valve opens...
Use & Care Guide
Page 14
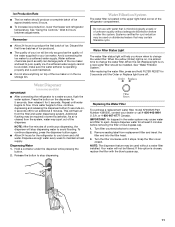
...recently dispensed? Firmly close the freezer compartment door. Allow 24 hours for water supply to be clogged or incorrectly installed. Connect refrigerator to 50°F (10°C). ■ New installation? The water pressure to the home determines the flow from the ejector... water filtration system connected to cool completely. ■ Recently dispensed large amount of water? Water is leaking from food? See "Refrigerator Doors." Wait 24 hours after releasing the dispenser lever. ■ New installation? See "Water Supply Requirements." ■ Questions remain...
...recently dispensed? Firmly close the freezer compartment door. Allow 24 hours for water supply to be clogged or incorrectly installed. Connect refrigerator to 50°F (10°C). ■ New installation? The water pressure to the home determines the flow from the ejector... water filtration system connected to cool completely. ■ Recently dispensed large amount of water? Water is leaking from food? See "Refrigerator Doors." Wait 24 hours after releasing the dispenser lever. ■ New installation? See "Water Supply Requirements." ■ Questions remain...

Use & Care Guide
Page 17
... major appliance is operated and maintained according to instructions attached to or furnished with the product, KitchenAid will pay for replacement or repair of the refrigerator/freezer cavity liner (including labor costs) if the part cracks due to defective materials or workmanship... other than normal, single-family household use of products not approved by a KitchenAid designated service company. These parts are : compressor, evaporator, condenser, dryer, and connecting tubing. KITCHENAID® REFRIGERATOR WARRANTY ONE YEAR LIMITED WARRANTY For one year from the date of purchase,...
... major appliance is operated and maintained according to instructions attached to or furnished with the product, KitchenAid will pay for replacement or repair of the refrigerator/freezer cavity liner (including labor costs) if the part cracks due to defective materials or workmanship... other than normal, single-family household use of products not approved by a KitchenAid designated service company. These parts are : compressor, evaporator, condenser, dryer, and connecting tubing. KITCHENAID® REFRIGERATOR WARRANTY ONE YEAR LIMITED WARRANTY For one year from the date of purchase,...
Dimension Guide
Page 1
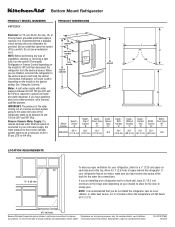
...continuous commitment to improve Dimensions are for the door to change without notice. Use an outlet that a separate circuit serving only your refrigerator, allow for planning purposes only. See "Using the Controls." NOTE: It is required. For complete details, see Installation our products... handle E incl. IMPORTANT: The pressure of the water coming out of a reverse osmosis system going to the water inlet valve of the refrigerator needs to be a minimum of Cabinet "B" Depth Doors Open 90° "C" Depth Drawer Open "D" Depth With Handles "E" Depth Without Handles...
...continuous commitment to improve Dimensions are for the door to change without notice. Use an outlet that a separate circuit serving only your refrigerator, allow for planning purposes only. See "Using the Controls." NOTE: It is required. For complete details, see Installation our products... handle E incl. IMPORTANT: The pressure of the water coming out of a reverse osmosis system going to the water inlet valve of the refrigerator needs to be a minimum of Cabinet "B" Depth Doors Open 90° "C" Depth Drawer Open "D" Depth With Handles "E" Depth Without Handles...
Energy Guide
Page 1
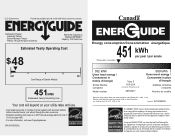
...;nerGuide afin de comparer le rendement de l'appareil avec celui d'autres modéles similaires. Canada Refrigerator-Freezer ·Automatic Defrost ·Bottom Mounted Freezer ·Without Through-the-Door-Ice Service KitchenAid Corporation Model(s):KBFS20EV* Capacity: 19.6 Cubic Feet Estimated Yearly Operating Cost $48 $47 $61 Cost Range of Similar Models 451kWh...
...;nerGuide afin de comparer le rendement de l'appareil avec celui d'autres modéles similaires. Canada Refrigerator-Freezer ·Automatic Defrost ·Bottom Mounted Freezer ·Without Through-the-Door-Ice Service KitchenAid Corporation Model(s):KBFS20EV* Capacity: 19.6 Cubic Feet Estimated Yearly Operating Cost $48 $47 $61 Cost Range of Similar Models 451kWh...


