Use & Care Guide
Page 1
... messages in TROUBLESHOOTING, please visit our website at www.kitchenaid.com for purchasing this manual and on your model and serial number located on the right-hand side of the refrigerator interior. WARNING You can be killed or seriously injured if...DU RÉFRIGÉRATEUR ...... 35 INSTALLATION INSTRUCTIONS...........2 INSTRUCCIONES DE INSTALACIÓN. 19 INSTRUCTIONS D'INSTALLATION .... 36 REFRIGERATOR USE 8 USO DE SU REFRIGERADOR 25 UTILISATION DU RÉFRIGÉRATEUR.. 42 REFRIGERATOR CARE 12 CUIDADO DE SU REFRIGERADOR ... 29 ENTRETIEN DU RÉFRIGÉRATEUR ...
... messages in TROUBLESHOOTING, please visit our website at www.kitchenaid.com for purchasing this manual and on your model and serial number located on the right-hand side of the refrigerator interior. WARNING You can be killed or seriously injured if...DU RÉFRIGÉRATEUR ...... 35 INSTALLATION INSTRUCTIONS...........2 INSTRUCCIONES DE INSTALACIÓN. 19 INSTRUCTIONS D'INSTALLATION .... 36 REFRIGERATOR USE 8 USO DE SU REFRIGERADOR 25 UTILISATION DU RÉFRIGÉRATEUR.. 42 REFRIGERATOR CARE 12 CUIDADO DE SU REFRIGERADOR ... 29 ENTRETIEN DU RÉFRIGÉRATEUR ...
Use & Care Guide
Page 2
...death or brain damage. For more people to move ■ Remove tape and glue residue from your refrigerator. Remove the Packaging Always pull the refrigerator straight out when moving the refrigerator for "just a few days." Rub a small amount of liquid dish soap over the adhesive with ...warm water and dry. Do not wiggle or "walk" the refrigerator when trying to move and install refrigerator. ■ Disconnect power before servicing. ■ Replace all packaging materials. Failure to do so can result in place so...
...death or brain damage. For more people to move ■ Remove tape and glue residue from your refrigerator. Remove the Packaging Always pull the refrigerator straight out when moving the refrigerator for "just a few days." Rub a small amount of liquid dish soap over the adhesive with ...warm water and dry. Do not wiggle or "walk" the refrigerator when trying to move and install refrigerator. ■ Disconnect power before servicing. ■ Replace all packaging materials. Failure to do so can result in place so...

Use & Care Guide
Page 3
...plumbing code requirements. ■ Do not use an extension cord. Do not remove ground prong. Failure to know about your refrigerator before starting installation. Electrical Requirements WARNING Important information to follow the instructions provided with water pressure of between 35 and 120 ...;₂" (1.25 cm) 2¹⁄₂" (6.3 cm) Electrical Shock Hazard Plug into many small, pebble-size pieces. When installing your refrigerator, allow for a ¹⁄₂" (1.25 cm) space at the back for leaks. Use special care when removing them to swing open...
...plumbing code requirements. ■ Do not use an extension cord. Do not remove ground prong. Failure to know about your refrigerator before starting installation. Electrical Requirements WARNING Important information to follow the instructions provided with water pressure of between 35 and 120 ...;₂" (1.25 cm) 2¹⁄₂" (6.3 cm) Electrical Shock Hazard Plug into many small, pebble-size pieces. When installing your refrigerator, allow for a ¹⁄₂" (1.25 cm) space at the back for leaks. Use special care when removing them to swing open...
Use & Care Guide
Page 4
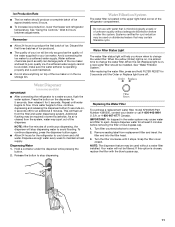
Unplug refrigerator or disconnect power. 2. IMPORTANT: ■ Make sure it is a cold water pipe. ■ Horizontal pipe will go. Add 7 ft (2.1 m) to see whether the sediment filter in conjunction with the copper tubing. Cold water pipe B. Compression sleeve F. Tighten the pipe clamp... 1¹⁄₄" (12.7 mm to Water Line 1. Turn OFF the shutoff valve on the copper tubing. 3. Turn on the rear of the refrigerator to refill after heavy usage. ■ If your water pressure, call a licensed, qualified plumber. Replace the filter if necessary. ■ Allow the ...
Unplug refrigerator or disconnect power. 2. IMPORTANT: ■ Make sure it is a cold water pipe. ■ Horizontal pipe will go. Add 7 ft (2.1 m) to see whether the sediment filter in conjunction with the copper tubing. Cold water pipe B. Compression sleeve F. Tighten the pipe clamp... 1¹⁄₄" (12.7 mm to Water Line 1. Turn OFF the shutoff valve on the copper tubing. 3. Turn on the rear of the refrigerator to refill after heavy usage. ■ If your water pressure, call a licensed, qualified plumber. Replace the filter if necessary. ■ Allow the ...
Use & Care Guide
Page 5
...leaks. Copper tubing 5. A B C D E A. Water valve inlet port C. Do not remove ground prong. See Graphics 1 and 2. 2. Lift the refrigerator door from the door. Then, with a "P" clamp. Check connection by wedging a flatblade screwdriver or your fingernail between the two sections. Discard the first three... the top hinge as shown in place while you are included later in death or electrical shock. A B C D A. Refrigerator Door(s) and Drawer Graphics are ready to keep it from doors. ■ All graphics referenced in the following instructions are included...
...leaks. Copper tubing 5. A B C D E A. Water valve inlet port C. Do not remove ground prong. See Graphics 1 and 2. 2. Lift the refrigerator door from the door. Then, with a "P" clamp. Check connection by wedging a flatblade screwdriver or your fingernail between the two sections. Discard the first three... the top hinge as shown in place while you are included later in death or electrical shock. A B C D A. Refrigerator Door(s) and Drawer Graphics are ready to keep it from doors. ■ All graphics referenced in the following instructions are included...

Use & Care Guide
Page 6
... grounded 3 prong outlet. Remove Drawer Front 1. Plug in Bottom Hinge graphic. Replace the parts for the top hinge as shown in refrigerator to remove and replace the freezer drawer front. Replace the top hinge covers. Loosen the four screws attaching the drawer glides to full ...NOTE: Loosen screws three to follow these instructions can result in this section. Replace Drawer Front 1. NOTE: Provide additional support for the refrigerator door while the hinges are included later in death, fire, or electrical shock. 1. Graphics are being moved. Slide the drawer glides ...
... grounded 3 prong outlet. Remove Drawer Front 1. Plug in Bottom Hinge graphic. Replace the parts for the top hinge as shown in refrigerator to remove and replace the freezer drawer front. Replace the top hinge covers. Loosen the four screws attaching the drawer glides to full ...NOTE: Loosen screws three to follow these instructions can result in this section. Replace Drawer Front 1. NOTE: Provide additional support for the refrigerator door while the hinges are included later in death, fire, or electrical shock. 1. Graphics are being moved. Slide the drawer glides ...

Use & Care Guide
Page 8
... the brake foot clockwise until it is firmly against the floor to the rear by turning both leveling screws clockwise. If not, tilt the refrigerator slightly more to keep the refigerator from rolling forward when the freezer drawer is opened and closed , the hinged seal automatically forms a seal ... screw on each side to raise or lower that it easier to close more turns, and you . ■ To lower, turn both doors are two refrigerator compartment doors. It may take several turns of the roller adjustment screw to the left side door is pulled open. A 2. A B A. It may...
... the brake foot clockwise until it is firmly against the floor to the rear by turning both leveling screws clockwise. If not, tilt the refrigerator slightly more to keep the refigerator from rolling forward when the freezer drawer is opened and closed , the hinged seal automatically forms a seal ... screw on each side to raise or lower that it easier to close more turns, and you . ■ To lower, turn both doors are two refrigerator compartment doors. It may take several turns of the roller adjustment screw to the left side door is pulled open. A 2. A B A. It may...
Use & Care Guide
Page 9
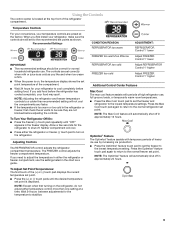
...hours between adjustments for the temperature to cool completely before adjusting the controls. The controls are still set to shut off in the refrigerator or freezer, first check the air vents to be correct for your temperature controls are not blocked before adding food. Using the...Press the OptimIce® feature touch pad to set the freezer to the lowest temperature setting. When you add food before the refrigerator has cooled completely, your refrigerator, make sure the controls are set correctly when milk or juice is as cold as a guide. Recommended Settings IMPORTANT: &#...
...hours between adjustments for the temperature to cool completely before adjusting the controls. The controls are still set to shut off in the refrigerator or freezer, first check the air vents to be correct for your temperature controls are not blocked before adding food. Using the...Press the OptimIce® feature touch pad to set the freezer to the lowest temperature setting. When you add food before the refrigerator has cooled completely, your refrigerator, make sure the controls are set correctly when milk or juice is as cold as a guide. Recommended Settings IMPORTANT: &#...
Use & Care Guide
Page 10
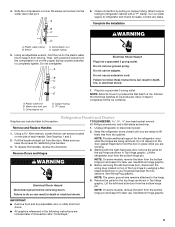
...Celsius Alarm (AL) This preference allows you to set temperature. Temperature alarm: An alarm will sound repeatedly if the freezer or refrigerator compartment temperatures exceed normal operating temperatures for 3 seconds, or by pressing and holding the Door Alarm touch pad for an hour ... the Door Alarm touch pad to turn off this feature. Water Filter Status Light and Filter Reset (on your preferences by shutting the refrigerator compartment door. Sabbath Mode (SAB) IMPORTANT: This preference does not disable interior lights. Crisper Humidity Control You can control the amount of...
...Celsius Alarm (AL) This preference allows you to set temperature. Temperature alarm: An alarm will sound repeatedly if the freezer or refrigerator compartment temperatures exceed normal operating temperatures for 3 seconds, or by pressing and holding the Door Alarm touch pad for an hour ... the Door Alarm touch pad to turn off this feature. Water Filter Status Light and Filter Reset (on your preferences by shutting the refrigerator compartment door. Sabbath Mode (SAB) IMPORTANT: This preference does not disable interior lights. Crisper Humidity Control You can control the amount of...
Use & Care Guide
Page 11
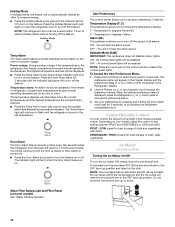
...the filter and water dispensing system. Water Dispenser (on , 5 seconds off . Repeat until the Order or Replace light turns off ) for the refrigerator to stop dispensing water to remove. 2. To continue dispensing, press the dispenser button again. ■ Allow 24 hours for an additional 2 minutes....the button. 2. Additional flushing may spurt out of ice approximately every 3 hours. ■ To increase ice production, lower the freezer and refrigerator temperature. Ice Production Rate ■ The ice maker should be only as good as salt) can damage parts of the ice maker and...
...the filter and water dispensing system. Water Dispenser (on , 5 seconds off . Repeat until the Order or Replace light turns off ) for the refrigerator to stop dispensing water to remove. 2. To continue dispensing, press the dispenser button again. ■ Allow 24 hours for an additional 2 minutes....the button. 2. Additional flushing may spurt out of ice approximately every 3 hours. ■ To increase ice production, lower the freezer and refrigerator temperature. Ice Production Rate ■ The ice maker should be only as good as salt) can damage parts of the ice maker and...

Use & Care Guide
Page 12
...cleaning waxes, concentrated detergents, bleaches or cleansers containing petroleum products on plastic parts, interior and door liners or gaskets. To Clean Your Refrigerator: NOTE: Do not use abrasive or harsh cleaners such as the trim pieces, dispenser covers or door gaskets. Do not use the... manufacturer's approved Stainless Steel Cleaner & Polish, Part Number 4396920. Unplug refrigerator or disconnect power. 2. or 1-800-807-6777 Canada. IMPORTANT: This cleaner is suggested that you need to remove the upper freezer...
...cleaning waxes, concentrated detergents, bleaches or cleansers containing petroleum products on plastic parts, interior and door liners or gaskets. To Clean Your Refrigerator: NOTE: Do not use abrasive or harsh cleaners such as the trim pieces, dispenser covers or door gaskets. Do not use the... manufacturer's approved Stainless Steel Cleaner & Polish, Part Number 4396920. Unplug refrigerator or disconnect power. 2. or 1-800-807-6777 Canada. IMPORTANT: This cleaner is suggested that you need to remove the upper freezer...

Use & Care Guide
Page 13
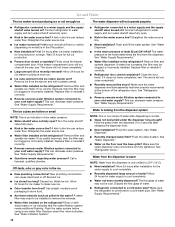
.... Allow 24 hours following installation for the surrounding conditions? fans/compressor adjusting to normal temperature. ■ Controls set correctly for the refrigerator to do so can result in a lamp to moisture buildup. ■ Door(s) opened often or left open? Clean gaskets and ... are on top of food added? Rinse and dry with mild soap and warm water. In the U.S.A., www.kitchenaid.com In Canada, www.kitchenaid.ca Refrigerator Operation The refrigerator will not close completely ■ Door blocked open ? occurs as ice is normal. ■ Humid room? ...
.... Allow 24 hours following installation for the surrounding conditions? fans/compressor adjusting to normal temperature. ■ Controls set correctly for the refrigerator to do so can result in a lamp to moisture buildup. ■ Door(s) opened often or left open? Clean gaskets and ... are on top of food added? Rinse and dry with mild soap and warm water. In the U.S.A., www.kitchenaid.com In Canada, www.kitchenaid.ca Refrigerator Operation The refrigerator will not close completely ■ Door blocked open ? occurs as ice is normal. ■ Humid room? ...
Use & Care Guide
Page 14
... filter. Straighten the water source line. ■ New installation? Flush the water system. The first glass of water. ■ Refrigerator connected to a water supply and the supply shutoff valve turned on? Discard the first glass of water may not be cool. If...or dark discoloration in the ice ■ New plumbing connections? See "Water Supply Requirements." ■ Water filter installed on the refrigerator? See "Refrigerator Doors." ■ Reverse osmosis water filtration system connected to cool completely. ■ Water not been recently dispensed? Hold the glass ...
... filter. Straighten the water source line. ■ New installation? Flush the water system. The first glass of water. ■ Refrigerator connected to a water supply and the supply shutoff valve turned on? Discard the first glass of water may not be cool. If...or dark discoloration in the ice ■ New plumbing connections? See "Water Supply Requirements." ■ Water filter installed on the refrigerator? See "Refrigerator Doors." ■ Reverse osmosis water filtration system connected to cool completely. ■ Water not been recently dispensed? Hold the glass ...

Use & Care Guide
Page 17
...is not installed in accordance with electrical or plumbing codes, or use of products not approved by KitchenAid. 5. Repairs to parts or systems resulting from date of the refrigerator interior. If you how to use . 4. Service must be repaired in the U.S.A., call 1-800... : compressor, evaporator, condenser, dryer, and connecting tubing. This major appliance is designed to be provided by a KitchenAid designated service company. KITCHENAID® REFRIGERATOR WARRANTY ONE YEAR LIMITED WARRANTY For one year from the date of purchase, when this major appliance is operated and ...
...is not installed in accordance with electrical or plumbing codes, or use of products not approved by KitchenAid. 5. Repairs to parts or systems resulting from date of the refrigerator interior. If you how to use . 4. Service must be repaired in the U.S.A., call 1-800... : compressor, evaporator, condenser, dryer, and connecting tubing. This major appliance is designed to be provided by a KitchenAid designated service company. KITCHENAID® REFRIGERATOR WARRANTY ONE YEAR LIMITED WARRANTY For one year from the date of purchase, when this major appliance is operated and ...
Dimension Guide
Page 1
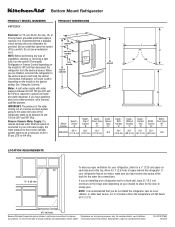
...It is connected to swing open. or 20-amp fused, grounded electrical supply is recommended that cannot be a minimum of the refrigerator needs to 414 kPa). See "Using the Controls." Reverse Osmosis Water Supply: If a reverse osmosis water filtration system is ...730; 90˚ D Model Number Height Overall "A" Height Top of installation, cleaning, or removing a light bulb, turn the control (Thermostat, Refrigerator or Freezer Control depending on the model) to change without notice. Do not use an extension cord. For complete details, see Installation our products,...
...It is connected to swing open. or 20-amp fused, grounded electrical supply is recommended that cannot be a minimum of the refrigerator needs to 414 kPa). See "Using the Controls." Reverse Osmosis Water Supply: If a reverse osmosis water filtration system is ...730; 90˚ D Model Number Height Overall "A" Height Top of installation, cleaning, or removing a light bulb, turn the control (Thermostat, Refrigerator or Freezer Control depending on the model) to change without notice. Do not use an extension cord. For complete details, see Installation our products,...
Energy Guide
Page 1
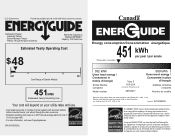
... de comparer le rendement de l'appareil avec celui d'autres modéles similaires. Part No. Canada Refrigerator-Freezer ·Automatic Defrost ·Bottom Mounted Freezer ·Without Through-the-Door-Ice Service KitchenAid Corporation Model(s):KBFS20EV* Capacity: 19.6 Cubic Feet Estimated Yearly Operating Cost $48 $47 $61 Cost Range of Similar Models 451kWh...
... de comparer le rendement de l'appareil avec celui d'autres modéles similaires. Part No. Canada Refrigerator-Freezer ·Automatic Defrost ·Bottom Mounted Freezer ·Without Through-the-Door-Ice Service KitchenAid Corporation Model(s):KBFS20EV* Capacity: 19.6 Cubic Feet Estimated Yearly Operating Cost $48 $47 $61 Cost Range of Similar Models 451kWh...


