Instruction Manual
Page 1
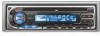
KDC-205 KDC-205CR KDC-105 CD-RECEIVER INSTRUCTION MANUAL AMPLI-TUNER-LECTEUR DE CD MODE D'EMPLOI REPRODUCTOR DE DISCOS COMPACTOS RECEPTOR DE FM/AM MANUAL DE INSTRUCCIONES RECEPTOR DE CD MANUAL DE INSTRUÇÕES Take the time to the model and serial numbers whenever you obtain the ..., in the spaces designated on the product. For your new CD-receiver. Model KDC-205, KDC-205CR, KDC-105 Serial number © B64-2670-00 / 00 (KN) Familiarity with installation and operation procedures will help you call upon your KENWOOD dealer for information or service on the warranty card, and in...
KDC-205 KDC-205CR KDC-105 CD-RECEIVER INSTRUCTION MANUAL AMPLI-TUNER-LECTEUR DE CD MODE D'EMPLOI REPRODUCTOR DE DISCOS COMPACTOS RECEPTOR DE FM/AM MANUAL DE INSTRUCCIONES RECEPTOR DE CD MANUAL DE INSTRUÇÕES Take the time to the model and serial numbers whenever you obtain the ..., in the spaces designated on the product. For your new CD-receiver. Model KDC-205, KDC-205CR, KDC-105 Serial number © B64-2670-00 / 00 (KN) Familiarity with installation and operation procedures will help you call upon your KENWOOD dealer for information or service on the warranty card, and in...

Instruction Manual
Page 6
... Press the [SRC] button. Source required Tuner CD Standby (Illumination only mode) Display "TUnE" "CD" "STBY" SYSTEM Q indicator Clock display LOUD indicator Volume Increasing Volume Press the [u] button. Each time the button is pressed the Attenuator turns ON or OFF. English General features Release button (KDC-205/KDC-205CR only) ud LOUD AME AUTO AUD OFF...
... Press the [SRC] button. Source required Tuner CD Standby (Illumination only mode) Display "TUnE" "CD" "STBY" SYSTEM Q indicator Clock display LOUD indicator Volume Increasing Volume Press the [u] button. Each time the button is pressed the Attenuator turns ON or OFF. English General features Release button (KDC-205/KDC-205CR only) ud LOUD AME AUTO AUD OFF...
Instruction Manual
Page 8
.... Adjusting Clock 1 Select the clock display Press the [CLK] button. 2 Enter clock adjustment mode Press the [ADJ] button for at least 2 seconds. Function of the KDC-205/KDC-205CR DSI (Disabled System Indicator) A red indicator will blink on the unit after the faceplate is removed, warning potential thieves. 1 Turn the power OFF Press the...
.... Adjusting Clock 1 Select the clock display Press the [CLK] button. 2 Enter clock adjustment mode Press the [ADJ] button for at least 2 seconds. Function of the KDC-205/KDC-205CR DSI (Disabled System Indicator) A red indicator will blink on the unit after the faceplate is removed, warning potential thieves. 1 Turn the power OFF Press the...
Instruction Manual
Page 9
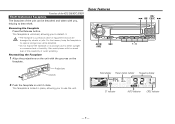
... RDM REP 1 - 6 CLK ADJ Band display Preset station number Frequency display 2 Push the faceplate in place, allowing you to detach it clicks. Function of the KDC-205/KDC-205CR Theft Deterrent Faceplate The faceplate of the unit can be detached and taken with you, helping to direct sunlight or excessive heat or humidity.
... RDM REP 1 - 6 CLK ADJ Band display Preset station number Frequency display 2 Push the faceplate in place, allowing you to detach it clicks. Function of the KDC-205/KDC-205CR Theft Deterrent Faceplate The faceplate of the unit can be detached and taken with you, helping to direct sunlight or excessive heat or humidity.
Instruction Manual
Page 13
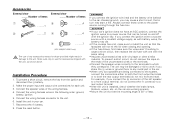
... both the front output terminals or to the power source running through the fuse box. 2CAUTION • If your car. 7. on the ends of items 1 3 .........4 .........1 2 .........2 4 .........4 5 .........1 (KDC-205/KDC-205CR only) The use the accessories shipped with the unit, as with battery wires, the battery may be turned on and off with vinyl tape or...
... both the front output terminals or to the power source running through the fuse box. 2CAUTION • If your car. 7. on the ends of items 1 3 .........4 .........1 2 .........2 4 .........4 5 .........1 (KDC-205/KDC-205CR only) The use the accessories shipped with the unit, as with battery wires, the battery may be turned on and off with vinyl tape or...
Instruction Manual
Page 15
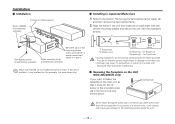
... "Removing the hard rubber frame" (page 16) and then remove the hard rubber frame. 2 Align the holes in the unit (two locations on the Unit (KDC-205/205CR only) If you screw it in another hole, it will contact and may malfunction (for those provided. If the unit is installed securely in place.
... "Removing the hard rubber frame" (page 16) and then remove the hard rubber frame. 2 Align the holes in the unit (two locations on the Unit (KDC-205/205CR only) If you screw it in another hole, it will contact and may malfunction (for those provided. If the unit is installed securely in place.
Instruction Manual
Page 19
... 40 dB AM tuner section Frequency range (10 kHz space 530 kHz - 1700 kHz Usable sensitivity (S/N = 20dB 28 dBµ (25 µV) CD player section Laser diode GaAlAs Digital filter (D/A 8 Times Over Sampling D/A Converter 1 Bit Spindle speed 500 - 200 rpm (CLV) Wow & Flutter Below Measurable... without notice. Specifications Specifications subject to Noise ratio (1 kHz 93 dB Dynamic range 93 dB Channel separation 85 dB Audio section Maximum output power KDC-205 50 W x 4 KDC-205CR/105 45 W x 4 Full Bandwidth Power (at less than 1% THD 22 W x 4 Tone action Bass 100 Hz ±10 dB...
... 40 dB AM tuner section Frequency range (10 kHz space 530 kHz - 1700 kHz Usable sensitivity (S/N = 20dB 28 dBµ (25 µV) CD player section Laser diode GaAlAs Digital filter (D/A 8 Times Over Sampling D/A Converter 1 Bit Spindle speed 500 - 200 rpm (CLV) Wow & Flutter Below Measurable... without notice. Specifications Specifications subject to Noise ratio (1 kHz 93 dB Dynamic range 93 dB Channel separation 85 dB Audio section Maximum output power KDC-205 50 W x 4 KDC-205CR/105 45 W x 4 Full Bandwidth Power (at less than 1% THD 22 W x 4 Tone action Bass 100 Hz ±10 dB...


