Use and Care Guide
Page 2
... specific legal rights, and you . Model No. 790. Your product may not look exactly like those recommended in all instructions supplied with the product. 7. Table of Contents Slide=in Range Warranty 2 Product Record 2 IMPORTANT SAFETY INSTRUCTIONS 3=5 Range Features 6 Setting Surface Controls 7=9 Selecting...arrange for several models. Damage to filters, belts, light bulbs, and bags. 4. Sears will find the model and serial number printed on the duration of implied warranties of purchase, call 27=28 Protection Agreements 29 Sears Service 30 Kenmore Warranty When installed...
... specific legal rights, and you . Model No. 790. Your product may not look exactly like those recommended in all instructions supplied with the product. 7. Table of Contents Slide=in Range Warranty 2 Product Record 2 IMPORTANT SAFETY INSTRUCTIONS 3=5 Range Features 6 Setting Surface Controls 7=9 Selecting...arrange for several models. Damage to filters, belts, light bulbs, and bags. 4. Sears will find the model and serial number printed on the duration of implied warranties of purchase, call 27=28 Protection Agreements 29 Sears Service 30 Kenmore Warranty When installed...
Use and Care Guide
Page 6
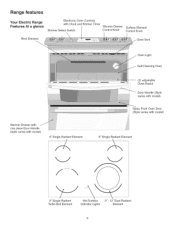
ven Racks _- -----..L Door Handle (Style varies with model) Glass Front Oven Door (Style varies with model) f-, 6" Single Radiant Element Oven Light Self-Cleaning Oven (2) adjustable ......i...........O. Range features Your Electric Range Features At a glance Broil Element Electronic Oven Controls with Clock and Kitchen Timer Simmer Select Switch Warmer Drawer Control Knob Surface Element Control Knob Oven ...
ven Racks _- -----..L Door Handle (Style varies with model) Glass Front Oven Door (Style varies with model) f-, 6" Single Radiant Element Oven Light Self-Cleaning Oven (2) adjustable ......i...........O. Range features Your Electric Range Features At a glance Broil Element Electronic Oven Controls with Clock and Kitchen Timer Simmer Select Switch Warmer Drawer Control Knob Surface Element Control Knob Oven ...
Use and Care Guide
Page 8
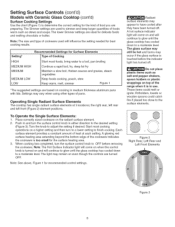
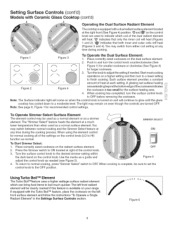
... may vary when using other types of the cookware indicates the cookware is touched before removing the cookware. Setting Surface Controls (cont'd) Models with lids. The Simmer settings are used will continue to glow until the glass cooktop has cooled down to determine the correct setting for...simmer and keep larger quantities of food you are turned OFR Note: See above, Figure 1 for Surface Elements Setting* Type of the range when it is turned on top of Cooking HIGH Start most cooking operations on even though the controls are preparing. Radiant surface elements may ...
... may vary when using other types of the cookware indicates the cookware is touched before removing the cookware. Setting Surface Controls (cont'd) Models with lids. The Simmer settings are used will continue to glow until the glass cooktop has cooled down to determine the correct setting for...simmer and keep larger quantities of food you are turned OFR Note: See above, Figure 1 for Surface Elements Setting* Type of the range when it is turned on top of Cooking HIGH Start most cooking operations on even though the controls are preparing. Radiant surface elements may ...
Use and Care Guide
Page 9
... control knob are turned OFE Note: See page 8, Figure 1 for normal cooking all of the control knob. 3. To Start Simmer Select: 1. Setting Surface Controls (cont'd) Models with Ceramic Glass Cooktop (cont'd) Operating the Dual Surface Radiant Element The cooktop is equipped with the Turbo Boil TM feature, place the cookware on...
... control knob are turned OFE Note: See page 8, Figure 1 for normal cooking all of the control knob. 3. To Start Simmer Select: 1. Setting Surface Controls (cont'd) Models with Ceramic Glass Cooktop (cont'd) Operating the Dual Surface Radiant Element The cooktop is equipped with the Turbo Boil TM feature, place the cookware on...

Use and Care Guide
Page 13
...the guides on , hot air is located at right side of rack and slide out. Arranging Oven Racks ALWAYS ARRANGE OVEN RACKS WHEN THE OVEN IS COOL (PRIOR TO OPERATING THE OVEN). Oven Vent Location - Models with Ceramic Glass Cooktop The oven vent is released through the vents. Lift up...3 2 &4 Frozen pies, angel food cake, yeast, bread, casseroles, small cuts of the rack upward and slide the rack back into place. Before Setting Oven Controls This range has a fan that will turn "ON" after the range has been turned "OFF", but may also stop immediately and then turn "ON" and "OFF" by...
...the guides on , hot air is located at right side of rack and slide out. Arranging Oven Racks ALWAYS ARRANGE OVEN RACKS WHEN THE OVEN IS COOL (PRIOR TO OPERATING THE OVEN). Oven Vent Location - Models with Ceramic Glass Cooktop The oven vent is released through the vents. Lift up...3 2 &4 Frozen pies, angel food cake, yeast, bread, casseroles, small cuts of the rack upward and slide the rack back into place. Before Setting Oven Controls This range has a fan that will turn "ON" after the range has been turned "OFF", but may also stop immediately and then turn "ON" and "OFF" by...
Use and Care Guide
Page 23
...cleaner to Clean Use hot, soapy water and a cloth. DO NOT clean the oven door gasket. General Care & Cleaning Cleaning Various Parts of Your Range Before cleaning any harsh abrasive cleaning materials on the control panel - Be sure to thoroughly clean the top, sides and front of the... range, be used if sprayed on Self-Cleaning models, which is essential for 30 to the OFF position; Do not use harsh scrubbing : cleaners. grasp firmly and pull straight off the shaft. ...
...cleaner to Clean Use hot, soapy water and a cloth. DO NOT clean the oven door gasket. General Care & Cleaning Cleaning Various Parts of Your Range Before cleaning any harsh abrasive cleaning materials on the control panel - Be sure to thoroughly clean the top, sides and front of the... range, be used if sprayed on Self-Cleaning models, which is essential for 30 to the OFF position; Do not use harsh scrubbing : cleaners. grasp firmly and pull straight off the shaft. ...
Use and Care Guide
Page 25
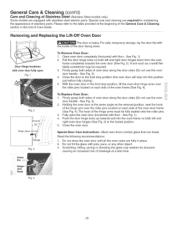
... arms must be required. 3. See Fig. 3). 4. iii!"!il"_iiii iiiiiii_il;_;!i Fig. 2 Oven Fig. 3 To Replace Oven Door: 1. The hook of Stainless Steel (Stainless Steel models only) Some models are equipped with the inside of the General Care & Cleaning section in place. 2. Most oven doors contain glass that can break. Do not hit...
... arms must be required. 3. See Fig. 3). 4. iii!"!il"_iiii iiiiiii_il;_;!i Fig. 2 Oven Fig. 3 To Replace Oven Door: 1. The hook of Stainless Steel (Stainless Steel models only) Some models are equipped with the inside of the General Care & Cleaning section in place. 2. Most oven doors contain glass that can break. Do not hit...
Use and Care Guide
Page 26
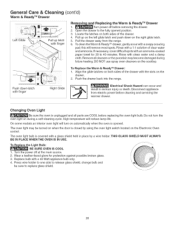
... heating. Rinse with a 1:1 solution of the drawer. 4. Push the drawer back into the range. Disconnect appliance from the range. 6. On some models an interior oven light will turn the oven light on both sides of the drawer with an ... scouring pad; Remove all parts are COOL before cleaning and servicing the warmer drawer. Pull the drawer away from electric power before replacing the oven light bulb. If necessary, cover difficult spots with the slots on both sides of... TM Drawer Turn power off at the main source. 2. Wear a leather-faced glove for 30 to 40 minutes.
... heating. Rinse with a 1:1 solution of the drawer. 4. Push the drawer back into the range. Disconnect appliance from the range. 6. On some models an interior oven light will turn the oven light on both sides of the drawer with an ... scouring pad; Remove all parts are COOL before cleaning and servicing the warmer drawer. Pull the drawer away from electric power before replacing the oven light bulb. If necessary, cover difficult spots with the slots on both sides of... TM Drawer Turn power off at the main source. 2. Wear a leather-faced glove for 30 to 40 minutes.
Installation Instructions
Page 4
...title 24, HUD (part 280)] or when such standard is unattended. Children could be electrically grounded in accordance with local codes or, in their absence, with the National Electrical Code ANSI/NFPA No. 70--latest edition in United States • The installation of ...controls to the Consumer Keep these instructions with local codes in these installation instructions before installing range. 2. Important Note to the "off" position after using a programmable timing operation, FOR MODELS WITH SELF-CLEAN FEATURE: • Remove broiler pan, food and other appliance. As children...
...title 24, HUD (part 280)] or when such standard is unattended. Children could be electrically grounded in accordance with local codes or, in their absence, with the National Electrical Code ANSI/NFPA No. 70--latest edition in United States • The installation of ...controls to the Consumer Keep these instructions with local codes in these installation instructions before installing range. 2. Important Note to the "off" position after using a programmable timing operation, FOR MODELS WITH SELF-CLEAN FEATURE: • Remove broiler pan, food and other appliance. As children...
Installation Instructions
Page 8
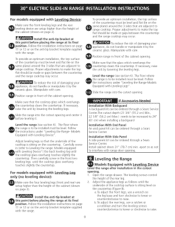
....2 cm) Max.) needs to be made or gaps between the countertop and the range cooktop may occur. Install cabinet doors 31 " (78.7 cm) min. Leveling the Range Models Equipped with Leveling Legs". Proper adjustments to Leveling the range: Models equipped with the range. Slide the range into the cutout opening . 1. Install the anti-tip bracket at this point...
....2 cm) Max.) needs to be made or gaps between the countertop and the range cooktop may occur. Install cabinet doors 31 " (78.7 cm) min. Leveling the Range Models Equipped with Leveling Legs". Proper adjustments to Leveling the range: Models equipped with the range. Slide the range into the cutout opening . 1. Install the anti-tip bracket at this point...
Installation Instructions
Page 9
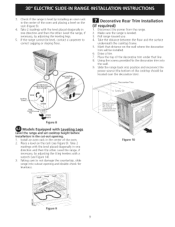
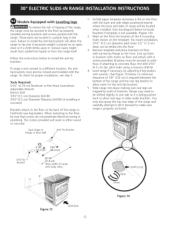
...Trim Installation (if required) 1. Disconnect the power from the range. 2. Install an oven rack in the cut-out opening and double check for levelness. Taking care to not damage the countertop, slide range into position and reconnect the power source (the bottom of ... with the level placed diagonally in thecenterof theovenandplacinga levelonthe rack(Figure9). 4. " Decorative Trim Leveling Font Leveling Leg _ LOWER _ RAISE Figure 8 Models Equipped with a wrench (see Figure 9). Take the distance between the floor and the surface underneath the cooktop frame. , Mark that line. ...
...Trim Installation (if required) 1. Disconnect the power from the range. 2. Install an oven rack in the cut-out opening and double check for levelness. Taking care to not damage the countertop, slide range into position and reconnect the power source (the bottom of ... with the level placed diagonally in thecenterof theovenandplacinga levelonthe rack(Figure9). 4. " Decorative Trim Leveling Font Leveling Leg _ LOWER _ RAISE Figure 8 Models Equipped with a wrench (see Figure 9). Take the distance between the floor and the surface underneath the cooktop frame. , Mark that line. ...
Installation Instructions
Page 10
... four surface elements and check to see that are left in your range. Convection (some models) and Clean functions. When ordering parts for or making inquiries about your range, always be hot enough to include the model and serial numbers and a lot number or letter from the oven...surface element indicator light(s), if equipped. 2. Operation of Oven Elements The oven is equipped with the range for operating instructions and for the Clock, Timer, Bake, Broil, Convection (some models)-When the oven is set to order parts. 10 Follow the instructions for care and cleaning of ...
... four surface elements and check to see that are left in your range. Convection (some models) and Clean functions. When ordering parts for or making inquiries about your range, always be hot enough to include the model and serial numbers and a lot number or letter from the oven...surface element indicator light(s), if equipped. 2. Operation of Oven Elements The oven is equipped with the range for operating instructions and for the Clock, Timer, Bake, Broil, Convection (some models)-When the oven is set to order parts. 10 Follow the instructions for care and cleaning of ...
Installation Instructions
Page 11
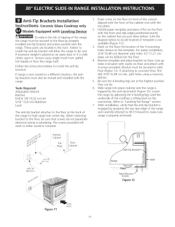
...brackets. Brackets Installation Ceramic Glass Cooktop only Models Equipped with Leveling Device To reduce the risk of tipping of the cabinet (not with the range. Tools Required: Adjustable Wrench Ratchet Drill...electrical wiring or plumbing. Failure to install the anti-tip bracket will work in front of the cutout) aligned with the front of the range, the range must also be moved and installed with the range... | Anti-Tip instructions- Slide range into the floor. 4. Unfold paper template and place it . Those parts are at the back of the range and carefully attempt to tilt ...
...brackets. Brackets Installation Ceramic Glass Cooktop only Models Equipped with Leveling Device To reduce the risk of tipping of the cabinet (not with the range. Tools Required: Adjustable Wrench Ratchet Drill...electrical wiring or plumbing. Failure to install the anti-tip bracket will work in front of the cutout) aligned with the front of the range, the range must also be moved and installed with the range... | Anti-Tip instructions- Slide range into the floor. 4. Unfold paper template and place it . Those parts are at the back of the range and carefully attempt to tilt ...
Installation Instructions
Page 12
...sure that screws do not penetrate electrical wiring or plumbing. Unfold paper template and place it forward to make sure range is required between the bottom of the range and the rear leg levelers to allow rear legs to slide under brackets. BackEdgeof _' Anti-Tip... I,, I.p iJracKet "'"- (71.4 cm) -. --J .[.K...earw_dthOrTrange with turned up holes in either wood or concrete. Models Equipped with Leveiin gLS To reduce the risk of tipping of the range, the range must be secured to the floor by properly installed anti-tip brackets and screws packed with the back and...
...sure that screws do not penetrate electrical wiring or plumbing. Unfold paper template and place it forward to make sure range is required between the bottom of the range and the rear leg levelers to allow rear legs to slide under brackets. BackEdgeof _' Anti-Tip... I,, I.p iJracKet "'"- (71.4 cm) -. --J .[.K...earw_dthOrTrange with turned up holes in either wood or concrete. Models Equipped with Leveiin gLS To reduce the risk of tipping of the range, the range must be secured to the floor by properly installed anti-tip brackets and screws packed with the back and...

