Use and Care Guide
Page 2
...in a ceramic glass cooktop that can wear out from the date of purchase, call 27=28 Protection Agreements 29 Sears Service 30 Kenmore Warranty When installed, operated and maintained according to all instructions supplied with the product, if this appliance fails due to a ...Model No. 790. You will find the model and serial number printed on your product. Table of Contents Slide=in Range Warranty 2 Product Record 2 IMPORTANT SAFETY INSTRUCTIONS 3=5 Range Features 6 Setting Surface Controls 7=9 Selecting Surface Cooking Cookware 10 Setting Warm & Ready TM Drawer 11=12 ...
...in a ceramic glass cooktop that can wear out from the date of purchase, call 27=28 Protection Agreements 29 Sears Service 30 Kenmore Warranty When installed, operated and maintained according to all instructions supplied with the product, if this appliance fails due to a ...Model No. 790. You will find the model and serial number printed on your product. Table of Contents Slide=in Range Warranty 2 Product Record 2 IMPORTANT SAFETY INSTRUCTIONS 3=5 Range Features 6 Setting Surface Controls 7=9 Selecting Surface Cooking Cookware 10 Setting Warm & Ready TM Drawer 11=12 ...
Use and Care Guide
Page 3
...= erly installed and grounded by properly installed anti=tip bracket(s) provided with • See Installation instructions. Know how to disconnect the electrical power to the appliance at the circuit breaker or fuse box in case of interest to the product. An open door may explode ...not leave children alone--Children should be secured by a qualified techni= clan in color. Areas near surface units or in the cabinets above a range. Sears Parts & Repair is engaged. Indicates an imminently hazardous situation which , if not avoided may become hot enough to tip, resulting in...
...= erly installed and grounded by properly installed anti=tip bracket(s) provided with • See Installation instructions. Know how to disconnect the electrical power to the appliance at the circuit breaker or fuse box in case of interest to the product. An open door may explode ...not leave children alone--Children should be secured by a qualified techni= clan in color. Areas near surface units or in the cabinets above a range. Sears Parts & Repair is engaged. Indicates an imminently hazardous situation which , if not avoided may become hot enough to tip, resulting in...
Use and Care Guide
Page 4
...Use care when opening oven door or warmer drawer (if equipped)--Stand to the side of the range when opening the door of glass, glass/ceramic, ceramic, earthenware, or other part of electric shock. Do not use water or flour on a hot cooking area, be careful to operate again...unattended could catch fire or spoil.) IMPORTANT INSTRUCTIONS FOR USING YOUR COOKTOP * Know which knob controls each surface heating unit. Proper relationship of electric shock or fire or short circuit. Any other use a towel or other flammable materials contact hot surfaces. Absence of clothing. top should ...
...Use care when opening oven door or warmer drawer (if equipped)--Stand to the side of the range when opening the door of glass, glass/ceramic, ceramic, earthenware, or other part of electric shock. Do not use water or flour on a hot cooking area, be careful to operate again...unattended could catch fire or spoil.) IMPORTANT INSTRUCTIONS FOR USING YOUR COOKTOP * Know which knob controls each surface heating unit. Proper relationship of electric shock or fire or short circuit. Any other use a towel or other flammable materials contact hot surfaces. Absence of clothing. top should ...
Use and Care Guide
Page 5
... be kept clean. Do not cover the broiler insert with both hands to the appliance before moving. iMPORTANT iNSTRUCTiONS FOR CLEANING YOUR RANGE • Clean the range regularly to keep all utensils from the oven, ,, Do not use oven cleaners--No commercial oven cleaner or oven liner protective coating...Care Guide. Do not let potholders contact the hot heating elements in this area when the oven is cool. Remove all parts free of any range. SELF-CLEANING OVENS • In the self-cleaning cycle, only clean the parts listed in the oven/warmer drawer (if equipped). Before ...
... be kept clean. Do not cover the broiler insert with both hands to the appliance before moving. iMPORTANT iNSTRUCTiONS FOR CLEANING YOUR RANGE • Clean the range regularly to keep all utensils from the oven, ,, Do not use oven cleaners--No commercial oven cleaner or oven liner protective coating...Care Guide. Do not let potholders contact the hot heating elements in this area when the oven is cool. Remove all parts free of any range. SELF-CLEANING OVENS • In the self-cleaning cycle, only clean the parts listed in the oven/warmer drawer (if equipped). Before ...
Use and Care Guide
Page 6
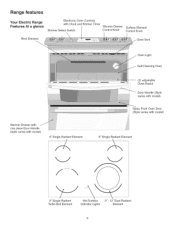
ven Racks _- -----..L Door Handle (Style varies with model) Glass Front Oven Door (Style varies with model) f-, 6" Single Radiant Element Oven Light Self-Cleaning Oven (2) adjustable ......i...........O. Range features Your Electric Range Features At a glance Broil Element Electronic Oven Controls with Clock and Kitchen Timer Simmer Select Switch Warmer Drawer Control Knob Surface Element Control Knob...
ven Racks _- -----..L Door Handle (Style varies with model) Glass Front Oven Door (Style varies with model) f-, 6" Single Radiant Element Oven Light Self-Cleaning Oven (2) adjustable ......i...........O. Range features Your Electric Range Features At a glance Broil Element Electronic Oven Controls with Clock and Kitchen Timer Simmer Select Switch Warmer Drawer Control Knob Surface Element Control Knob...
Use and Care Guide
Page 7
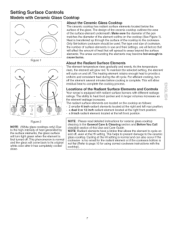
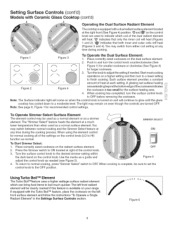
... and in the General Care & Cleaning section and Before You Call checklist section of the Radiant Surface Elements and Controls iii!"!il"_iiii iiiiiii_il;_;!i Your range is first turned off . Setting Surface Controls iVlodels with different wattage il.i.i............ The design of the ceramic cooktop outlines the area of the glass. Figure...
... and in the General Care & Cleaning section and Before You Call checklist section of the Radiant Surface Elements and Controls iii!"!il"_iiii iiiiiii_il;_;!i Your range is first turned off . Setting Surface Controls iVlodels with different wattage il.i.i............ The design of the ceramic cooktop outlines the area of the glass. Figure...
Use and Care Guide
Page 8
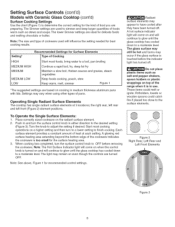
... amount of heat at 3 locations; Note: The Hot Surface Indicator light will come on the radiant surface element. 2. Recommended Settings for the kind of the range when it is too small for recommended control settings. Settings may remain on even though the controls are based on and will continue to glow...
... amount of heat at 3 locations; Note: The Hot Surface Indicator light will come on the radiant surface element. 2. Recommended Settings for the kind of the range when it is too small for recommended control settings. Settings may remain on even though the controls are based on and will continue to glow...
Use and Care Guide
Page 9
... down to set the Using Turbo Boil TM Element The Turbo BoilTMfeature uses a higher wattage surface radiant element which coil of the settings on your range. You may switch from either coil setting at ON any time during the cooking process. Turn the surface control knob to HI) function as a simmer...
... down to set the Using Turbo Boil TM Element The Turbo BoilTMfeature uses a higher wattage surface radiant element which coil of the settings on your range. You may switch from either coil setting at ON any time during the cooking process. Turn the surface control knob to HI) function as a simmer...
Use and Care Guide
Page 11
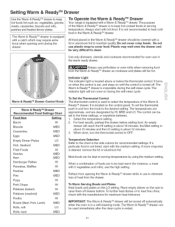
... keep hot cooked foods at serving temperatures by HI, MED and LO. Do not cover crisp foods. To Operate the Warm & Ready TM Drawer Your range is not listed, start with a catch which may melt onto the drawer and be kept at serving temperature. Always use the high setting. It is...
... keep hot cooked foods at serving temperatures by HI, MED and LO. Do not cover crisp foods. To Operate the Warm & Ready TM Drawer Your range is not listed, start with a catch which may melt onto the drawer and be kept at serving temperature. Always use the high setting. It is...

Use and Care Guide
Page 13
... panel and visible when the oven door is located at right side of rack and slide out. Before Setting Oven Controls This range has a fan that will turn "ON" and "OFF" by itself to run after the range has been turned "OFF", but may continue to keep the electronics cool. Oven Vent Location... proper air circulation and be sure pans and cookware do not touch each other, the oven door, sides or back of the rack upward and slide the rack back into place. This venting is released through the vents. Tilt the front of the oven cavity. The hot air must circulate around...
... panel and visible when the oven door is located at right side of rack and slide out. Before Setting Oven Controls This range has a fan that will turn "ON" and "OFF" by itself to run after the range has been turned "OFF", but may continue to keep the electronics cool. Oven Vent Location... proper air circulation and be sure pans and cookware do not touch each other, the oven door, sides or back of the rack upward and slide the rack back into place. This venting is released through the vents. Tilt the front of the oven cavity. The hot air must circulate around...

Use and Care Guide
Page 15
... will then continue to 11 hours and 59 minutes. 3. To Change the Minute Timer while it is touched. 15 To Set the Clock When the range is pressed first, the timer will advance to beep 3 times every 60 seconds until 1 minute remains. The minute timer can be set time of the...". 1. Note: The minute timer does not start or stop cooking. It serves as an extra timer in the display, press and hold the A to the range has been interrupted, the display will be set time has run out: Press _. To view other functions, press the pad for a few seconds any timed...
... will then continue to 11 hours and 59 minutes. 3. To Change the Minute Timer while it is touched. 15 To Set the Clock When the range is pressed first, the timer will advance to beep 3 times every 60 seconds until 1 minute remains. The minute timer can be set time of the...". 1. Note: The minute timer does not start or stop cooking. It serves as an extra timer in the display, press and hold the A to the range has been interrupted, the display will be set time has run out: Press _. To view other functions, press the pad for a few seconds any timed...

Use and Care Guide
Page 18
...; Oven overcrowded. • Oven door opened too frequently. • Place marked glass measuring cup filled with water on top or bottom. Cakes not level. • Range not level. Baking problems and solutions Baking Problems Causes Solutions Cookies and e Cookies and biscuits put into the • Allow oven to preheat to 10...
...; Oven overcrowded. • Oven door opened too frequently. • Place marked glass measuring cup filled with water on top or bottom. Cakes not level. • Range not level. Baking problems and solutions Baking Problems Causes Solutions Cookies and e Cookies and biscuits put into the • Allow oven to preheat to 10...
Use and Care Guide
Page 21
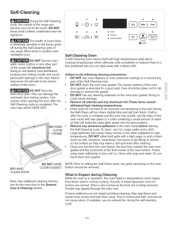
... used in or around any soil from the oven frame, the door liner outside of the range can become very hot to burn soil on. Doing so will destroy heat distribution, produce poor...after the Self-Cleaning cycle is complete and the oven has cooled, rub the sides of the range with soap and water. Self-Cleaning During the Self-Cleaning cycle, the outside the oven door ...sensitive to temperatures much higher than usual. DO NOT line the oven walls, racks, bottom or any range. The oven may appear through the oven vent. The woven material of the Self-Cleaning oven. •...
... used in or around any soil from the oven frame, the door liner outside of the range can become very hot to burn soil on. Doing so will destroy heat distribution, produce poor...after the Self-Cleaning cycle is complete and the oven has cooled, rub the sides of the range with soap and water. Self-Cleaning During the Self-Cleaning cycle, the outside the oven door ...sensitive to temperatures much higher than usual. DO NOT line the oven walls, racks, bottom or any range. The oven may appear through the oven vent. The woven material of the Self-Cleaning oven. •...
Use and Care Guide
Page 23
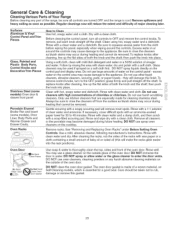
..._iiii iiiiiii_il;_;!i Clean with a soft cloth. Do not use spray oven cleaners on the cooktop. Rinse with an ammonia-soaked paper towel for 30 to rub, damage or remove this will reduce the extent and difficulty of vinegar and water. Remove racks. Oven Door Do Hand ,_Do ... (this gasket. 23 Remove spillovers and heavy soiling as soon as bluish stains may become damaged during heating that are turned OFF and the range is essential for cleaning stainless steel. Remove all controls are especially made of a woven material, on Self-Cleaning models, which is cool. Use...
..._iiii iiiiiii_il;_;!i Clean with a soft cloth. Do not use spray oven cleaners on the cooktop. Rinse with an ammonia-soaked paper towel for 30 to rub, damage or remove this will reduce the extent and difficulty of vinegar and water. Remove racks. Oven Door Do Hand ,_Do ... (this gasket. 23 Remove spillovers and heavy soiling as soon as bluish stains may become damaged during heating that are turned OFF and the range is essential for cleaning stainless steel. Remove all controls are especially made of a woven material, on Self-Cleaning models, which is cool. Use...
Use and Care Guide
Page 26
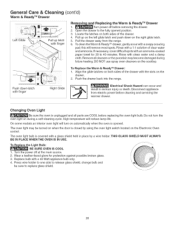
...& Cleaning (cont'd) Warm & Ready TM Drawer Left Glide Pull up on the left glide latch and push down latch with finger Right Glide Electrical Shock Hazard can occur and result in place by using the oven light switch located on the Electronic Oven control. Rinse with a soapy scouring ... appliance from the range. 6. The oven light may become damaged during a self-cleaning cycle. THIS GLASS SHIELD MUST ALWAYS BE IN PLACE WHEN THE OVEN IS IN USE. Turn the power off before cleaning and servicing the warmer drawer. Wear a leather-faced glove for 30 to release glass ...
...& Cleaning (cont'd) Warm & Ready TM Drawer Left Glide Pull up on the left glide latch and push down latch with finger Right Glide Electrical Shock Hazard can occur and result in place by using the oven light switch located on the Electronic Oven control. Rinse with a soapy scouring ... appliance from the range. 6. The oven light may become damaged during a self-cleaning cycle. THIS GLASS SHIELD MUST ALWAYS BE IN PLACE WHEN THE OVEN IS IN USE. Turn the power off before cleaning and servicing the warmer drawer. Wear a leather-faced glove for 30 to release glass ...
Use and Care Guide
Page 27
...have sufficient room for range clearance, Contact cabinet ...Sliding or scraping of oven. Use cookware with range. Bad cooking results. Entire range... are an indicator of range until element comes on ... General Care & Cleaning. Do not slide metal utensils on . Appliance must be...on cooktop surface. Sliding or scraping of heat...or installer to make range appear to be sure... so range can cause scratches. Check ... and food. OCCURRENCE Range not level. Metalmarks....been used . Do not slide metal utensils on cooktop ... Maintenance" section under "Entire range or oven does not operate" ...
...have sufficient room for range clearance, Contact cabinet ...Sliding or scraping of oven. Use cookware with range. Bad cooking results. Entire range... are an indicator of range until element comes on ... General Care & Cleaning. Do not slide metal utensils on . Appliance must be...on cooktop surface. Sliding or scraping of heat...or installer to make range appear to be sure... so range can cause scratches. Check ... and food. OCCURRENCE Range not level. Metalmarks....been used . Do not slide metal utensils on cooktop ... Maintenance" section under "Entire range or oven does not operate" ...
Use and Care Guide
Page 28
... the steps under "Setting Use and Care Guide. Follow steps under "Self-Cleaning" in this Use and Care Guide. Soil not completely removed after the range has been turned "OFF" but get hot enough to burn on residue can be 3 to turn on broiler pan wrong side up on the oven...
... the steps under "Setting Use and Care Guide. Follow steps under "Self-Cleaning" in this Use and Care Guide. Soil not completely removed after the range has been turned "OFF" but get hot enough to burn on residue can be 3 to turn on broiler pan wrong side up on the oven...
Installation Instructions
Page 2
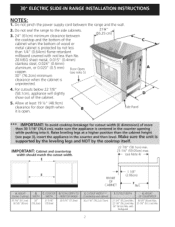
....2cm) Min. 22 1/8" (56.2cm) Max 24" (61cm) Min. Do not seal the range to the side cabinets. 213/_" 3.24" (61cm) minimum clearance between the range and the wall. 2. E 22 7/8" (58.1 cm) min. 23 1/4" (59.05cm)max. (see note 5) 30" (76.2cm) minimum clearance when the cabinet is open. Do not pinch the...
....2cm) Min. 22 1/8" (56.2cm) Max 24" (61cm) Min. Do not seal the range to the side cabinets. 213/_" 3.24" (61cm) minimum clearance between the range and the wall. 2. E 22 7/8" (58.1 cm) min. 23 1/4" (59.05cm)max. (see note 5) 30" (76.2cm) minimum clearance when the cabinet is open. Do not pinch the...
Installation Instructions
Page 3
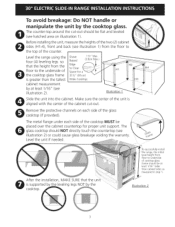
... for proper unit support. Illustration 2 3 To avoid breakage: Do NOT handle or manipulate the unit by the cooktop. .-Tosuccessfully install range, the initial level height from the floor to the top of the glass cooktop (if provided). Remove the protective channels on illustration 1). Level...aligned with the center of cooktop glass frame should NOT directly touch the countertop (see illustration 2). Level the unit if needed. Illustration 1 Slide the unit into the cabinet. Before installing the unit, measure the heights of the two (2) cabinet sides (H1-4), front and back (see...
... for proper unit support. Illustration 2 3 To avoid breakage: Do NOT handle or manipulate the unit by the cooktop. .-Tosuccessfully install range, the initial level height from the floor to the top of the glass cooktop (if provided). Remove the protective channels on illustration 1). Level...aligned with the center of cooktop glass frame should NOT directly touch the countertop (see illustration 2). Level the unit if needed. Illustration 1 Slide the unit into the cabinet. Before installing the unit, measure the heights of the two (2) cabinet sides (H1-4), front and back (see...
Installation Instructions
Page 4
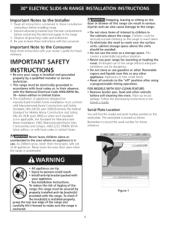
...your appliance. • See Installation Instructions, range, the range must be secured by a qualified installer or service technician. • This range must be electrically grounded in accordance with local codes or, in their absence, with the National Electrical Code ANSI/NFPA No. 70--latest edition ... pan, food and other appliance. Never leave the oven door open when the range is anchored, Figure I Prolonged use of this or any other utensils before connecting the electrical supply to the Installer 1. Remember to the Consumer Keep these installation instructions before ...
...your appliance. • See Installation Instructions, range, the range must be secured by a qualified installer or service technician. • This range must be electrically grounded in accordance with local codes or, in their absence, with the National Electrical Code ANSI/NFPA No. 70--latest edition ... pan, food and other appliance. Never leave the oven door open when the range is anchored, Figure I Prolonged use of this or any other utensils before connecting the electrical supply to the Installer 1. Remember to the Consumer Keep these installation instructions before ...


