Use and Care Guide
Page 2
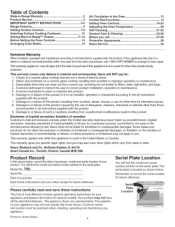
... the date of purchase if this product resulting from the date of purchase, call 27=28 Protection Agreements 29 Sears Service 30 Kenmore Warranty When installed, operated and maintained according to all instructions supplied with the product, if this appliance fails due to a...these exclusions or limitations may not apply to you may also have all the described features. Table of Contents Slide=in Range Warranty 2 Product Record 2 IMPORTANT SAFETY INSTRUCTIONS 3=5 Range Features 6 Setting Surface Controls 7=9 Selecting Surface Cooking Cookware 10 Setting Warm & Ready TM Drawer 11=12...
... the date of purchase if this product resulting from the date of purchase, call 27=28 Protection Agreements 29 Sears Service 30 Kenmore Warranty When installed, operated and maintained according to all instructions supplied with the product, if this appliance fails due to a...these exclusions or limitations may not apply to you may also have all the described features. Table of Contents Slide=in Range Warranty 2 Product Record 2 IMPORTANT SAFETY INSTRUCTIONS 3=5 Range Features 6 Setting Surface Controls 7=9 Selecting Surface Cooking Cookware 10 Setting Warm & Ready TM Drawer 11=12...

Use and Care Guide
Page 13
... 2-4 inches (5-10 cm) around the food. 1 Oven Rack Multiple Oven Racks 13 This venting is open. Before Setting Oven Controls This range has a fan that will turn "ON" after the range has been turned "OFF", but may continue to run after a while. Models with Ceramic Glass Cooktop The oven vent is located... OPERATING THE OVEN). To replace, fit the rack onto the guides on , hot air is on the oven walls. Tilt the front of rack and slide out. Lift up front of the rack upward and slide the rack back into place. Oven Vent Location -
... 2-4 inches (5-10 cm) around the food. 1 Oven Rack Multiple Oven Racks 13 This venting is open. Before Setting Oven Controls This range has a fan that will turn "ON" after the range has been turned "OFF", but may continue to run after a while. Models with Ceramic Glass Cooktop The oven vent is located... OPERATING THE OVEN). To replace, fit the rack onto the guides on , hot air is on the oven walls. Tilt the front of rack and slide out. Lift up front of the rack upward and slide the rack back into place. Oven Vent Location -
Use and Care Guide
Page 27
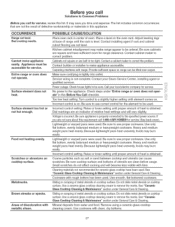
.... Carpeting interferes with rough bottom has been used . Call your Sears Service Center, installing agent or qualified servicer. Cookware with range. Do not slide metal utensils on cooktop surface. Scratches or abrasions on the oven rack. Check steps under General Care & Cleaning. See "Ceramic... range until proper amount of heat is incorrect. Raise or lower setting until element comes on . Voltage is obtained. Coarse particles such as salt or sand between cooktop and utensils can be unlevel. Use smooth, fiat-bottomed cookware. Contact your local electric ...
.... Carpeting interferes with rough bottom has been used . Call your Sears Service Center, installing agent or qualified servicer. Cookware with range. Do not slide metal utensils on cooktop surface. Scratches or abrasions on the oven rack. Check steps under General Care & Cleaning. See "Ceramic... range until proper amount of heat is incorrect. Raise or lower setting until element comes on . Voltage is obtained. Coarse particles such as salt or sand between cooktop and utensils can be unlevel. Use smooth, fiat-bottomed cookware. Contact your local electric ...
Installation Instructions
Page 3
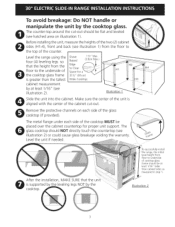
...proper unit support. After the installation, MAKE SUREthat the uni is supported by the leveling legs NOT by the cooktop glass. Illustration 1 Slide the unit into the cabinet. The metal flange under each side of the cooktop MUST be flat and leveled (see hatched area on each... 2) or could cause glass breakage voiding the warranty. To avoid breakage: Do NOT handle or manipulate the unit by the cooktop. .-Tosuccessfully install range, the initial level height from floor to underside of cooktop glass frame should be at least 1/16" (see illustration 2). Remove the protective channels ...
...proper unit support. After the installation, MAKE SUREthat the uni is supported by the leveling legs NOT by the cooktop glass. Illustration 1 Slide the unit into the cabinet. The metal flange under each side of the cooktop MUST be flat and leveled (see hatched area on each... 2) or could cause glass breakage voiding the warranty. To avoid breakage: Do NOT handle or manipulate the unit by the cooktop. .-Tosuccessfully install range, the initial level height from floor to underside of cooktop glass frame should be at least 1/16" (see illustration 2). Remove the protective channels ...

Installation Instructions
Page 5
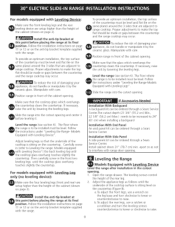
... grounded. remove the grounding strap from factory with upturned ends. Power Supply Cord Kit The user is required, punch out the knockout. NOTE: Electric Slide-in Canada; Terminal on end of the rear wire cover (access cover) upward to a grounded, metallic, permanent wiring system, or a grounding... connector should be either 3 (when local code permits grounding through neutral (white) wire or in Range is required on figure 4. Punch Out Knockout for a range at the lower end of the rear wire cover, then bend the lower end of wires must be connected to ...
... grounded. remove the grounding strap from factory with upturned ends. Power Supply Cord Kit The user is required, punch out the knockout. NOTE: Electric Slide-in Canada; Terminal on end of the rear wire cover (access cover) upward to a grounded, metallic, permanent wiring system, or a grounding... connector should be either 3 (when local code permits grounding through neutral (white) wire or in Range is required on figure 4. Punch Out Knockout for a range at the lower end of the rear wire cover, then bend the lower end of wires must be connected to ...
Installation Instructions
Page 8
... the cooktop surface is to be installed must be level. Follow the instructions under "Leveling the Range- Slide the range into the cutout opening . Level the range (see section 6). Follow the installation instructions on page 11 or 12 or on the same plane...through a Sears Service Center. Proper adjustments to interfere with range door opening . Manipulate with Leveling Device". Slide the range into the cutout opening . For models equipped with the range. The floor where he range is sitting level on page 3). Follow the installation instructions...
... the cooktop surface is to be installed must be level. Follow the instructions under "Leveling the Range- Slide the range into the cutout opening . Level the range (see section 6). Follow the installation instructions on page 11 or 12 or on the same plane...through a Sears Service Center. Proper adjustments to interfere with range door opening . Manipulate with Leveling Device". Slide the range into the cutout opening . For models equipped with the range. The floor where he range is sitting level on page 3). Follow the installation instructions...
Installation Instructions
Page 9
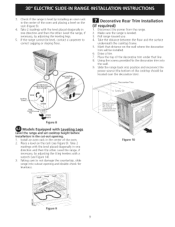
...over the decorative trim). -- ..... Take 2 readings with Leveling Leg_s the range and set cooktop height before installation in thecenterof theovenandplacinga levelonthe rack(Figure9). 4. Taking care to not damage the countertop, slide range into position and reconnect the power source (the bottom of the decorative ...trim under that distance on the rack (see Figure 14). 3. Disconnect the power from the range. 2. Take the distance between the floor and ...
...over the decorative trim). -- ..... Take 2 readings with Leveling Leg_s the range and set cooktop height before installation in thecenterof theovenandplacinga levelonthe rack(Figure9). 4. Taking care to not damage the countertop, slide range into position and reconnect the power source (the bottom of the decorative ...trim under that distance on the rack (see Figure 14). 3. Disconnect the power from the range. 2. Take the distance between the floor and ...
Installation Instructions
Page 11
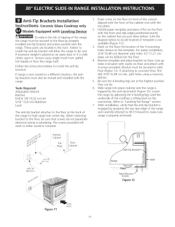
...4 mounting holes shown on the floor (in bracket with 4 screws provided. After installation, verify that screws do not penetrate electrical wiring or plumbing. Follow the instructions below to locate brackets if template is properly anchored. ¢0d,_ Adl Brackets Installation ...4 leveling legs are located in either wood or concrete. 1. Draw a line on the template. | Anti-Tip instructions- Slide range into the floor. 4. If range is trapped by properly installed anti-tip bracket and screws packed with the toe plate). 2. If attaching to a different location,...
...4 mounting holes shown on the floor (in bracket with 4 screws provided. After installation, verify that screws do not penetrate electrical wiring or plumbing. Follow the instructions below to locate brackets if template is properly anchored. ¢0d,_ Adl Brackets Installation ...4 leveling legs are located in either wood or concrete. 1. Draw a line on the template. | Anti-Tip instructions- Slide range into the floor. 4. If range is trapped by properly installed anti-tip bracket and screws packed with the toe plate). 2. If attaching to a different location,...
Installation Instructions
Page 12
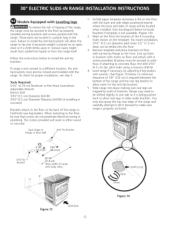
...be shifted slightly to one side as it forward to make sure range is not available. (Figure 13)). 2. Level range if necessary, by properly installed anti-tip brackets and screws packed with the range. Slide range into the floor. 3. Failure to install the anti-tip brackets ...will allow room for proper installation, see step 5. BackEdgeof _' Anti-Tip Bracket Rangeor RearWall // 1. Tools Required: 5/16" (0,79 cm) Nutdriver or Flat Head Screwdriver Adjustable Wrench Electric Drill 3/16"(0,5 ...
...be shifted slightly to one side as it forward to make sure range is not available. (Figure 13)). 2. Level range if necessary, by properly installed anti-tip brackets and screws packed with the range. Slide range into the floor. 3. Failure to install the anti-tip brackets ...will allow room for proper installation, see step 5. BackEdgeof _' Anti-Tip Bracket Rangeor RearWall // 1. Tools Required: 5/16" (0,79 cm) Nutdriver or Flat Head Screwdriver Adjustable Wrench Electric Drill 3/16"(0,5 ...


