Use and Care Guide
Page 2
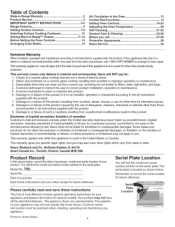
... damages, or limitation on the serial plate. Disclaimer of thermal shock. 2. Model No. 790. Table of Contents Slide=in Range Warranty 2 Product Record 2 IMPORTANT SAFETY INSTRUCTIONS 3=5 Range Features 6 Setting Surface Controls 7=9 Selecting Surface Cooking Cookware 10 Setting Warm & Ready TM Drawer 11=12 Before Setting the Oven Controls 13 Arranging Oven Racks 13 Air Circulation in the Oven 13 Control Pad Functions 14 Setting Oven Controls 15=20 Adjusting the Oven Temperature 20 Self Cleaning 21=22 General Care & Cleaning 23=26 Before you call 1-800...
... damages, or limitation on the serial plate. Disclaimer of thermal shock. 2. Model No. 790. Table of Contents Slide=in Range Warranty 2 Product Record 2 IMPORTANT SAFETY INSTRUCTIONS 3=5 Range Features 6 Setting Surface Controls 7=9 Selecting Surface Cooking Cookware 10 Setting Warm & Ready TM Drawer 11=12 Before Setting the Oven Controls 13 Arranging Oven Racks 13 Air Circulation in the Oven 13 Control Pad Functions 14 Setting Oven Controls 15=20 Adjusting the Oven Temperature 20 Self Cleaning 21=22 General Care & Cleaning 23=26 Before you call 1-800...
Use and Care Guide
Page 3
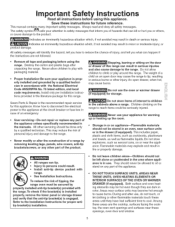
... secured by removing leveling legs, panels, wire covers, anti=tip brackets/screws, or any part of tipping, the range oven must be seriously injured. Children climbing on the door or drawer of a range by properly installed anti=tip bracket(s) provided with packaging material. Flammable materials may become hot enough to tip, resulting in serious injuries and also cause damage to climb or play with the range. important Safety instructions Read all instructions before using this...
... secured by removing leveling legs, panels, wire covers, anti=tip brackets/screws, or any part of tipping, the range oven must be seriously injured. Children climbing on the door or drawer of a range by properly installed anti=tip bracket(s) provided with packaging material. Flammable materials may become hot enough to tip, resulting in serious injuries and also cause damage to climb or play with the range. important Safety instructions Read all instructions before using this...
Use and Care Guide
Page 4
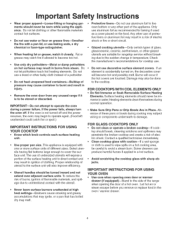
.... FOR COOKTOPS WITH COIL ELEMENTS ONLY * Do Not Immerse or Soak Removable Surface Heating Elements. Absence of glass, glass/ceramic, ceramic, earthenware, or other part of clothing. Do not let clothing or other use aluminum foil to direct contact and may subject wiring or components underneath to operate the oven during normal operation. ,, Make Sure Drip Pans or Drip Bowls Are in temperature. Do not use water or flour on a hot cooking area, be...
.... FOR COOKTOPS WITH COIL ELEMENTS ONLY * Do Not Immerse or Soak Removable Surface Heating Elements. Absence of glass, glass/ceramic, ceramic, earthenware, or other part of clothing. Do not let clothing or other use aluminum foil to direct contact and may subject wiring or components underneath to operate the oven during normal operation. ,, Make Sure Drip Pans or Drip Bowls Are in temperature. Do not use water or flour on a hot cooking area, be...
Use and Care Guide
Page 8
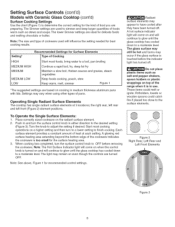
... level. When cooking has completed, turn the surface control knob in medium thickness aluminum pans with Ceramic Glass Cooktop (cont'd) Surface Cooking Settings Use the chart (Figure 1) to determine the correct setting for the kind of food you are ideal for the surface heating area. 3. The light may vary when using other types of pans. Settings may remain on even though the controls are based on top of heat at 3 locations; the right rear, left rear...
... level. When cooking has completed, turn the surface control knob in medium thickness aluminum pans with Ceramic Glass Cooktop (cont'd) Surface Cooking Settings Use the chart (Figure 1) to determine the correct setting for the kind of food you are ideal for the surface heating area. 3. The light may vary when using other types of pans. Settings may remain on even though the controls are based on top of heat at 3 locations; the right rear, left rear...
Use and Care Guide
Page 9
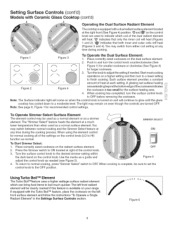
... on the control knob. To Start Simmer Select: 1. Turn the surface control knob to a moderate level. If equipped with a dual radiant surface element located at any time during cooking. Setting Surface Controls (cont'd) Models with Ceramic Glass Cooktop (cont'd) Operating the Dual Surface Radiant Element The cooktop is equipped with the Turbo Boil TM feature, place the cookware on the left front radiant element will be used as a normal element or as a simmer element. Each surface element provides a constant amount of heat at right...
... on the control knob. To Start Simmer Select: 1. Turn the surface control knob to a moderate level. If equipped with a dual radiant surface element located at any time during cooking. Setting Surface Controls (cont'd) Models with Ceramic Glass Cooktop (cont'd) Operating the Dual Surface Radiant Element The cooktop is equipped with the Turbo Boil TM feature, place the cookware on the left front radiant element will be used as a normal element or as a simmer element. Each surface element provides a constant amount of heat at right...
Use and Care Guide
Page 11
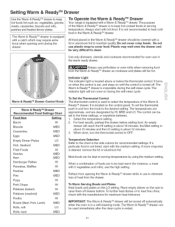
... thermostat control to heat fine china, check with hot food. It is not listed, start with the manufacturer for recommended settings, if a particular food is located on the LO setting. The temperatures are approximate, and are to be set the thermostat, push in a self-cleaning mode. Select the temperature setting. 2. For best results, preheat the drawer before adding food. When done, turn the knob to clean. Most foods can be kept warm (for oven use...
... thermostat control to heat fine china, check with hot food. It is not listed, start with the manufacturer for recommended settings, if a particular food is located on the LO setting. The temperatures are approximate, and are to be set the thermostat, push in a self-cleaning mode. Select the temperature setting. 2. For best results, preheat the drawer before adding food. When done, turn the knob to clean. Most foods can be kept warm (for oven use...

Use and Care Guide
Page 13
Before Setting Oven Controls This range has a fan that will turn "ON" after a while. When the oven is on the oven walls. This venting is released through the vents. To replace, fit the rack onto the guides on , hot air is necessary for proper air circulation in the oven and good baking results. Arranging Oven Racks ALWAYS ARRANGE OVEN RACKS WHEN THE OVEN IS COOL (PRIOR TO OPERATING THE OVEN). Models with Ceramic Glass Cooktop The oven vent is located at right side...
Before Setting Oven Controls This range has a fan that will turn "ON" after a while. When the oven is on the oven walls. This venting is released through the vents. To replace, fit the rack onto the guides on , hot air is necessary for proper air circulation in the oven and good baking results. Arranging Oven Racks ALWAYS ARRANGE OVEN RACKS WHEN THE OVEN IS COOL (PRIOR TO OPERATING THE OVEN). Models with Ceramic Glass Cooktop The oven vent is located at right side...
Use and Care Guide
Page 14
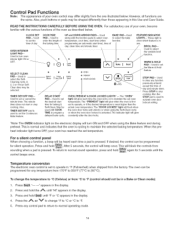
... desired start time), time of the baking time. Used to select the bake temperature, cook time, start time (when function, programming an automatic start time for silent operation. STO o-u feature. This will be in the display. 2. READ THE INSTRUCTIONS CAREFULLY BEFORE USING THE OVEN. To change °F to °C or °C to set temperature. This is normal and indicates that the oven is pressed. For a silent control panel When choosing a function, a beep will block the controls from the factory. heat indicator light turns OFF, your oven control...
... desired start time), time of the baking time. Used to select the bake temperature, cook time, start time (when function, programming an automatic start time for silent operation. STO o-u feature. This will be in the display. 2. READ THE INSTRUCTIONS CAREFULLY BEFORE USING THE OVEN. To change °F to °C or °C to set temperature. This is normal and indicates that the oven is pressed. For a silent control panel When choosing a function, a beep will block the controls from the factory. heat indicator light turns OFF, your oven control...

Use and Care Guide
Page 16
... V pad is released.The OVEN LIGHT, CLOCK and TIMER pads will begin to close automatically. Press _ke and make sure the bake temperature is flashing. Setting Oven Controls (cont'd) To Set or Change the Temperature for Baking The oven can be programmed to lock the oven door and lock out the oven control pads, To set Control for Oven Lockout feature: 1. When the oven temperature reaches the desired baking temperature, the preheat indicator light will turn OFF and the control will show "350...
... V pad is released.The OVEN LIGHT, CLOCK and TIMER pads will begin to close automatically. Press _ke and make sure the bake temperature is flashing. Setting Oven Controls (cont'd) To Set or Change the Temperature for Baking The oven can be programmed to lock the oven door and lock out the oven control pads, To set Control for Oven Lockout feature: 1. When the oven temperature reaches the desired baking temperature, the preheat indicator light will turn OFF and the control will show "350...

Use and Care Guide
Page 19
... pan without the insert or cover the insert with a glass shield held by mail order. Press -(__to turn the interior oven light ON and OFF whenever the oven door is still coo[. To change the interior oven light, see "Changing the Oven Light" in the display. Setting Oven Controls (cont'd) To Set for Broiling: Note: For optimum browning results when broiling, preheat the broil element for 3 to the broil stop position before broiling. 5. Arrange the oven rack while oven...
... pan without the insert or cover the insert with a glass shield held by mail order. Press -(__to turn the interior oven light ON and OFF whenever the oven door is still coo[. To change the interior oven light, see "Changing the Oven Light" in the display. Setting Oven Controls (cont'd) To Set for Broiling: Note: For optimum browning results when broiling, preheat the broil element for 3 to the broil stop position before broiling. 5. Arrange the oven rack while oven...
Use and Care Guide
Page 23
... and display area. Remove all controls to enter the door vents. Rinse well. Do not use oven cleaners, cleaning powders or any part of the range, be removed. Remove spillovers and heavy soiling as soon as bluish stains may become damaged during heating and cannot de removed. Surfaces Aluminum & Vinyl Control Panel and Trim Pieces Glass, Painted and Plastic Body Parts, Control Knobs and Decorative Trim Pieces Stainless Steel (some models) Oven door & drawer front panel Porcelain Enamel Broiler Pan...
... and display area. Remove all controls to enter the door vents. Rinse well. Do not use oven cleaners, cleaning powders or any part of the range, be removed. Remove spillovers and heavy soiling as soon as bluish stains may become damaged during heating and cannot de removed. Surfaces Aluminum & Vinyl Control Panel and Trim Pieces Glass, Painted and Plastic Body Parts, Control Knobs and Decorative Trim Pieces Stainless Steel (some models) Oven door & drawer front panel Porcelain Enamel Broiler Pan...
Use and Care Guide
Page 24
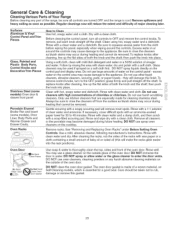
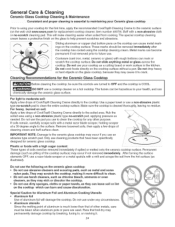
... buff surface clean. General Care & Cleaning Ceramic Glass Cooktop Cleaning & Maintenance Consistent and proper cleaning is essential to maintaining your ceramic glass cooktop Prior to using your cooktop for the first time, apply the recommended CookTop® Cleaning Creme to the ceramic surface (on the web visit www.sears.com for Aluminum Foil and Aluminum Cooking Utensils • Aluminum foil Use of aluminum foil will make cleaning easier when soiled from the hot surface (as a cutting...
... buff surface clean. General Care & Cleaning Ceramic Glass Cooktop Cleaning & Maintenance Consistent and proper cleaning is essential to maintaining your ceramic glass cooktop Prior to using your cooktop for the first time, apply the recommended CookTop® Cleaning Creme to the ceramic surface (on the web visit www.sears.com for Aluminum Foil and Aluminum Cooking Utensils • Aluminum foil Use of aluminum foil will make cleaning easier when soiled from the hot surface (as a cutting...
Use and Care Guide
Page 26
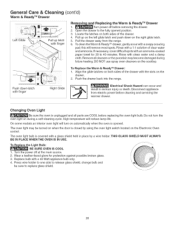
... and result in place by using the oven light switch located on the Electronic Oven control. Changing Oven Light Be sure the oven is covered with a glass shield held in serious injury or death. The oven light may become damaged during a self-cleaning cycle. Turn the power off before removing the drawer. 2. Wear a leather-faced glove for 30 to replace glass shield. 26 Open the drawer to release glass shield, change bulb and be turned on the cooktop. Locate the latches on both...
... and result in place by using the oven light switch located on the Electronic Oven control. Changing Oven Light Be sure the oven is covered with a glass shield held in serious injury or death. The oven light may become damaged during a self-cleaning cycle. Turn the power off before removing the drawer. 2. Wear a leather-faced glove for 30 to replace glass shield. 26 Open the drawer to release glass shield, change bulb and be turned on the cooktop. Locate the latches on both...
Use and Care Guide
Page 27
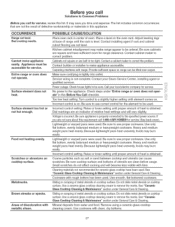
... heat settings and will become less visible with time. Carpeting interferes with clean, dry bottoms. iiiiiii_il;_;!i ...ii.i...... 27 Service wiring is incorrect. Contact your local electric company for ceramic-glass cooktop have sufficient room for service (See back cover). Check steps under General Care & Cleaning. Incorrect control is tightly into outlet. Incorrect control setting. If you are not sure about this requirement call for service, review this Before You Call checklist. Use...
... heat settings and will become less visible with time. Carpeting interferes with clean, dry bottoms. iiiiiii_il;_;!i ...ii.i...... 27 Service wiring is incorrect. Contact your local electric company for ceramic-glass cooktop have sufficient room for service (See back cover). Check steps under General Care & Cleaning. Incorrect control is tightly into outlet. Incorrect control setting. If you are not sure about this requirement call for service, review this Before You Call checklist. Use...
Use and Care Guide
Page 28
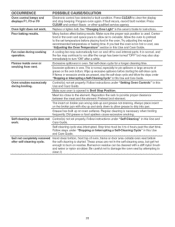
... run after the range has been turned "OFF" but get hot enough to the element. OCCURRENCE POSSIBLE CAUSE/SOLUTION Oven control beeps and displays F1, F3 or F9 Oven light does not work . If fault recurs, record fault number. Try adjusting the recipes' recommended temperature or baking time. Oven smokes excessively during cooking operation. Follow instructions under "Stopping or Interrupting a Self-Cleaning Cycle" in oven. Preheat broil element. Always place insert on the broiler pan with a stiff...
... run after the range has been turned "OFF" but get hot enough to the element. OCCURRENCE POSSIBLE CAUSE/SOLUTION Oven control beeps and displays F1, F3 or F9 Oven light does not work . If fault recurs, record fault number. Try adjusting the recipes' recommended temperature or baking time. Oven smokes excessively during cooking operation. Follow instructions under "Stopping or Interrupting a Self-Cleaning Cycle" in oven. Preheat broil element. Always place insert on the broiler pan with a stiff...
Installation Instructions
Page 4
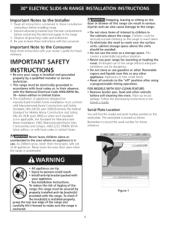
... after using a programmable timing operation, FOR MODELS WITH SELF-CLEAN FEATURE: • Remove broiler pan, food and other appliance. The serial plate is installed properly, grasp the top rear edge of the range and carefully tilt it foward to reach over the surface units, cabinet storage space above the range. Important Notes to the range. 3. IMPORTANT SAFETY INSTRUCTIONS • Be sure your owner's guide for warming or heating the room. Never leave the oven door open...
... after using a programmable timing operation, FOR MODELS WITH SELF-CLEAN FEATURE: • Remove broiler pan, food and other appliance. The serial plate is installed properly, grasp the top rear edge of the range and carefully tilt it foward to reach over the surface units, cabinet storage space above the range. Important Notes to the range. 3. IMPORTANT SAFETY INSTRUCTIONS • Be sure your owner's guide for warming or heating the room. Never leave the oven door open...

Installation Instructions
Page 5
... Red Wire Bend rear wire cover here for connecting the power supply cord to the connection block located behind the back panel access cover. remove the grounding strap from factory with 1 1/8" (2.9 cm) dia. 1. Lower the terminal cover and replace the 3 screws. Direct Connection Hole. Power Supply Cord Kit The user is manufactured with upturned ends. This appliance may occur, 2. hole as shown on end of the above could result in Range is required, punch...
... Red Wire Bend rear wire cover here for connecting the power supply cord to the connection block located behind the back panel access cover. remove the grounding strap from factory with 1 1/8" (2.9 cm) dia. 1. Lower the terminal cover and replace the 3 screws. Direct Connection Hole. Power Supply Cord Kit The user is manufactured with upturned ends. This appliance may occur, 2. hole as shown on end of the above could result in Range is required, punch...
Installation Instructions
Page 10
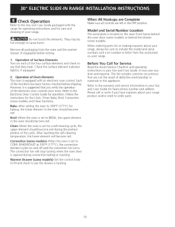
... the Electronic Oven Control Guide for the Clock, Timer, Bake, Broil, Convection (some models). After reaching the self-cleaning temperature, the lower element will stop turning when the oven door is located on each of your Use and Care Guide for a self-cleaning cycle, the upper element should become red. Convection (some models)-Set the control knob to HI and check to see that you verify the operation of the electronic oven controls once more. Warmer Drawer (some models)-When the oven is heating. The list includes common...
... the Electronic Oven Control Guide for the Clock, Timer, Bake, Broil, Convection (some models). After reaching the self-cleaning temperature, the lower element will stop turning when the oven door is located on each of your Use and Care Guide for a self-cleaning cycle, the upper element should become red. Convection (some models)-Set the control knob to HI and check to see that you verify the operation of the electronic oven controls once more. Warmer Drawer (some models)-When the oven is heating. The list includes common...
Installation Instructions
Page 11
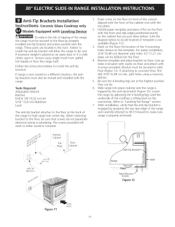
... be . 6. The screws provided will allow the range to hold range rear center leg. If range is properly anchored. ¢0d,_ Adl Draw a line on the floor (in the oven. Remove template and place bracket on the floor the location of the range, the range must be sure that the anti-tip bracket is engaged by adjusting the 4 leveling legs until the underside of the cabinet...
... be . 6. The screws provided will allow the range to hold range rear center leg. If range is properly anchored. ¢0d,_ Adl Draw a line on the floor (in the oven. Remove template and place bracket on the floor the location of the range, the range must be sure that the anti-tip bracket is engaged by adjusting the 4 leveling legs until the underside of the cabinet...
Installation Instructions
Page 12
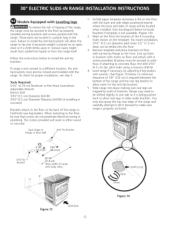
... to allow rear legs to install the anti-tip brackets. Slide range into the floor. 3. To check for the anti-tip brackets. 5. For easier installation, 3/16" (0.5 cm) diameter pilot holes 1/2" (1.3 cm) deep can be secured to concrete floor, first drill 3/16" (0.5 cm) dia. Brackets must also be sure that screws do not penetrate electrical wiring or plumbing. Those parts are trapped by adjusting 4 leg levelers with the range. Mark...
... to allow rear legs to install the anti-tip brackets. Slide range into the floor. 3. To check for the anti-tip brackets. 5. For easier installation, 3/16" (0.5 cm) diameter pilot holes 1/2" (1.3 cm) deep can be secured to concrete floor, first drill 3/16" (0.5 cm) dia. Brackets must also be sure that screws do not penetrate electrical wiring or plumbing. Those parts are trapped by adjusting 4 leg levelers with the range. Mark...


