Kenmore 9746 - 30 in. Electric Range Support and Manuals
Get Help and Manuals for this Kenmore item
View All Support Options Below
Free Kenmore 9746 manuals!
Problems with Kenmore 9746?
Ask a Question
Free Kenmore 9746 manuals!
Problems with Kenmore 9746?
Ask a Question
Popular Kenmore 9746 Manual Pages
Use and Care Guide - Page 2
Sears shall not be product repair as provided herein.
Table of implied warranties; Solutions to common problems 36=37 Sears Service (I=SOO-4=MY-HOME back cover
Kenmore Appliance Warranty
One Year Limited Warranty When installed, operated and maintained according to all instructions supplied with the product, if this appliance fails due to filters, belts, light bulbs, and...
Use and Care Guide - Page 3
...,ayresulitnminoor r
moderate injury.
Safety Instructions
• Remove all instructions before using this manual. To reduce the risk of the range and carefully attempt to the installation instructions for future reference. For models equipped with the range. Refer to tilt it is to recommend a qualified technician and an authorized repair service. This may result in death...
Use and Care Guide - Page 4
... the broiler.
If the power fails, always turn off and the power resumes, the range will begin to reposition. Only use aluminum foil as recommended in risk of these openings, oven door and oven doorwindow. Improper installation of electric shock, or fire.
4
Do not let clothing or other flammable
materials contact hot surfaces...
Use and Care Guide - Page 5
... immediately.
• Utensil handles should be taken not to keep all parts free of electric shock.
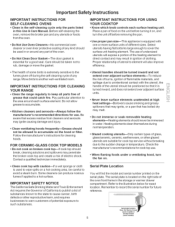
Clean the range regularly to rub, damage or move the gasket. important Safety instructions
iMPORTANT iNSTRUCTiONS FOR SELF-CLEANING OVENS =Clean in the self=cleaning cycle only the parts listed
in water. Select utensils having fiat bottoms large enough to...
Use and Care Guide - Page 7
A,
A
o@
I
II
L®
4 56
89
MT
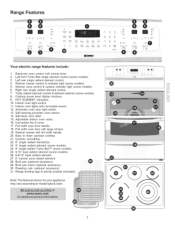
Your electric range features include:
1. Left front Turbo Boil single element control (some models). 8. Triple radiant element control & element selector (some models). 3. Interior oven light control. 11. Easy to model type & color.
....., , <
/_
-: m m
@ HOT ELEMENT indicators. 10. Self-cleaning porcelain oven interior. 14. Convection ...
Use and Care Guide - Page 11
... cooktop will glow red.
ii
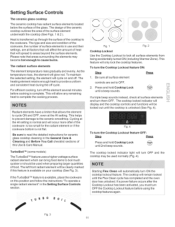
TurboBoil TM (some models)
The TurboBoilTM feature uses a higherwattage surface radiant element which can bring food items to OFF.
2.
ii
Be sure to read the detailed instructions for the radiant element or if the cookware bottom is complete. Setting Surface Controls
The ceramic glass cooktop
The ceramic cooktop...
Use and Care Guide - Page 17
...drawer rack (for example, rolls or biscuits on electric coil and ceramic glass cooktops. Always use potholders ... dish underneath).
ii.i...........
...i.i..i
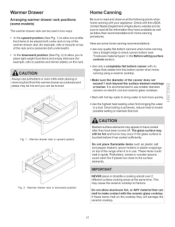
Fig. 1 - Here are some models)
The warmer drawer rack can melt to read and observe all...(United States Department of the range when it has cooled sufficiently.
It is in the Before setting surface controls section).
• ...
Use and Care Guide - Page 23
... the interior oven rack to arrange the oven racks while oven is still cool. Suggested Broil Settings Table (electric oven)
Food
Rack position
Steak 1" thick Steak 1" thick Steak 1" thick
Pork chops 3/4" ...(See Fig. 4). Setting Oven Controls
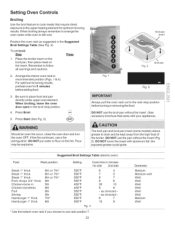
Broiling
Use the broil feature to cook meats that came with aluminum foil;
The broil pan and broil pan insert (some models) allows grease to use...
Use and Care Guide - Page 25
... 75%
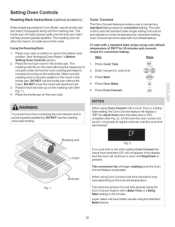
complete (See Fig. 2). The oven control uses the standard bake recipe setting instructions and adjusts to circulate around the meat. Press Cony Bake.
Conv Convect
The Conv... and insert (if equipped) along with aluminum foil.
3. L_,../ @@
3. Setting Oven Controls
Roasting Rack instructions (optional accessory)
When preparing meats for cook time. Make sure the roasting rack...
Use and Care Guide - Page 28
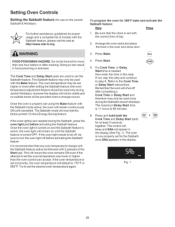
...See Fig. 1). Press Bake.
8.ke
FOOD POISONING HAZARD.
Refer to set using the Bake feature with 2 presses of models with the Sabbath feature, please vist the web at least 3 seconds
together...will be sure to set higher or lower after setting the Sabbath feature (the oven temperature adjustment feature should be used to the Cook Time or Delay Start instructions. The oven temperature...
Use and Care Guide - Page 36

... service. Oven portion of the material affect heating. Oven light does not work .
- See Setting Oven Controls in this manual or read the instructions "Entire appliance does not operate" in this Use & Care Guide.
• Be sure floor is level, strong & stable enough to adequately support range.
• If floor is too hot or cool, see "Changing & replacing...
Use and Care Guide - Page 37
... common problems
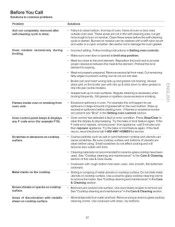
Problem
Soil... not recommended for service.
• Coarse...setting. broiling frequently. Try the bake or broil feature again. Small scratches do not cut into pan (some models...instructions in the Setting oven controls section.
. For example this Use & Care Guide...error condiiionl Press st0piciear io .... Regular cleaning is opened to remove soil. If the F code error...
Installation Instructions - Page 1

... WITH RANGE
• SEE INSTALLATION INSTRUCTIONS
If the information in these installation instructions
before installing range. • Remove all packing material from the oven compartments
before connecting the gas & electrical supply to the range. • Observe all governing codes and ordinances. • Be sure to the Installer • Read all instructions contained in this manual is...
Installation Instructions - Page 3
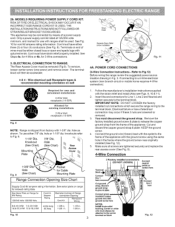
... CORD CONNECTIONS
(4-Wire Connection Instructions - Foltowthemanufacturer'sinstallationinstructionssupplied with ground screw here
NOTES: Install strain-relief bushing. Insert the end connectors for
receptacle (10-50R)
Fig. 8
NOTE: Range is shipped from the frame of the appliance with ranges shall be attached to Fig.12) Before wiring the range review the suggested power source location...
Installation Instructions - Page 4
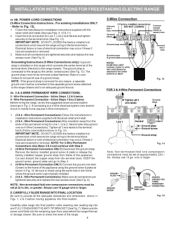
... originally installed. 5. (3 & 4 - The ground strap must be removed unless National, State or Local Codes do not permit use of electrical connection may occur if these 3 nuts are tightened securely and replace the rear access cover (See Fig. 9).
Make sure all 3 wire leads to the range by the center, lowest screw (See Fig. 13). Grounding Instructions (3-Wire...
Kenmore 9746 Reviews
We have not received any reviews for Kenmore yet.