Use and Care Guide
Page 2
... Preheat 21 Setting Bake 21 Setting Cook Time 21 Using Air Guard TM feature 21 Setting Delay Start 22 Broiling 23 Setting Conv (convection) Bake 24 Setting Conv (convection) Roast 24 Setting Conv (convection) Convert 25 Recipe Recall 26 Slow Cook 26 Setting Warm & Hold TM 27 Adjusting oven temperature 27 Setting the Sabbath feature 28-29 Operating oven lights 29 Flex Clean 30-31 Care & Cleaning 32-35 Cleaning Recommendations Table 32 Cooktop maintenance and cleaning 33-34 Replacing the interior oven lights 34 Removing and replacing oven door...
... Preheat 21 Setting Bake 21 Setting Cook Time 21 Using Air Guard TM feature 21 Setting Delay Start 22 Broiling 23 Setting Conv (convection) Bake 24 Setting Conv (convection) Roast 24 Setting Conv (convection) Convert 25 Recipe Recall 26 Slow Cook 26 Setting Warm & Hold TM 27 Adjusting oven temperature 27 Setting the Sabbath feature 28-29 Operating oven lights 29 Flex Clean 30-31 Care & Cleaning 32-35 Cleaning Recommendations Table 32 Cooktop maintenance and cleaning 33-34 Replacing the interior oven lights 34 Removing and replacing oven door...
Use and Care Guide
Page 3
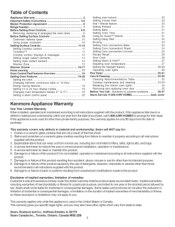
... front panel or storage drawer from the range. IMPORTANT indicates installation, operation, maintenance or valuable information that follow this range, • User servicingmDo not repair or replace any other injury. tip bracket installation. _iii:S':iJ • Never modify or alter the construction of a range by removing the leveling legs, panels, wire covers, antitip brackets/screws, or any part of a child on the risk type. important Safety instructions Do not attempt to install or operate...
... front panel or storage drawer from the range. IMPORTANT indicates installation, operation, maintenance or valuable information that follow this range, • User servicingmDo not repair or replace any other injury. tip bracket installation. _iii:S':iJ • Never modify or alter the construction of a range by removing the leveling legs, panels, wire covers, antitip brackets/screws, or any part of a child on the risk type. important Safety instructions Do not attempt to install or operate...
Use and Care Guide
Page 4
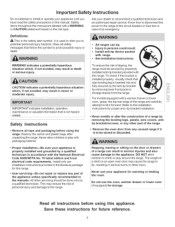
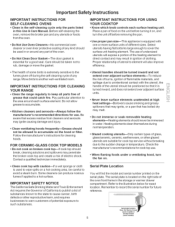
... double oven. During and after use aluminum foil to cool. moist or damp potholders on hot surfaces may result in risk of pressure may become too hot. IMPORTANT INSTRUCTIONS FOR USING YOUR OVEN • Use care when opening the door of the range. Exposed fat and grease could melt or ignite. • Placement of a potholder. • Do not heat unopened food containers - Once the power resumes, reset the clock and oven function...
... double oven. During and after use aluminum foil to cool. moist or damp potholders on hot surfaces may result in risk of pressure may become too hot. IMPORTANT INSTRUCTIONS FOR USING YOUR OVEN • Use care when opening the door of the range. Exposed fat and grease could melt or ignite. • Placement of a potholder. • Do not heat unopened food containers - Once the power resumes, reset the clock and oven function...
Use and Care Guide
Page 5
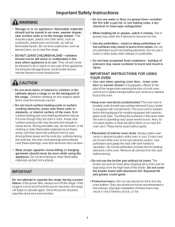
... the utensil, the handle of electric shock. important Safety instructions iMPORTANT iNSTRUCTiONS FOR SELF-CLEANING OVENS =Clean in the self=cleaning cycle only the parts listed in temperature. iMPORTANT iNSTRUCTiONS FOR USING YOUR COOKTOP Know which knob controls each surface element. Pay particular attention to the sudden change in this Use & Care Manual. FOR CERAMIC=GLASS COOK TOP MODELS Do not cook on the unit before turning it is extremely sensitive to the fumes given off before removing the pan. Check the...
... the utensil, the handle of electric shock. important Safety instructions iMPORTANT iNSTRUCTiONS FOR SELF-CLEANING OVENS =Clean in the self=cleaning cycle only the parts listed in temperature. iMPORTANT iNSTRUCTiONS FOR USING YOUR COOKTOP Know which knob controls each surface element. Pay particular attention to the sudden change in this Use & Care Manual. FOR CERAMIC=GLASS COOK TOP MODELS Do not cook on the unit before turning it is extremely sensitive to the fumes given off before removing the pan. Check the...
Use and Care Guide
Page 7
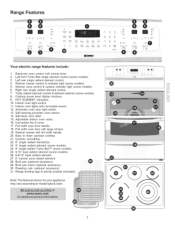
...Automatic oven door light switch. 13. Convection fan & cover. 17. Range leveling legs & anti-tip bracket (included). Left rear single radiant element control. 4. Interior oven lights with full width handle. 20. Self-clean door latch. 15. Easy to model type & color. ....., , < /_ -: m m @ Broil pan (optional accessory). 29. Warmer zone control & surface indicator light (some models). 3. Right rear single radiant element control. 7. Cooktop power level display windows 9. Interior oven light control. 11. Warmer drawer with removable covers. 12. Note: The features...
...Automatic oven door light switch. 13. Convection fan & cover. 17. Range leveling legs & anti-tip bracket (included). Left rear single radiant element control. 4. Interior oven lights with full width handle. 20. Self-clean door latch. 15. Easy to model type & color. ....., , < /_ -: m m @ Broil pan (optional accessory). 29. Warmer zone control & surface indicator light (some models). 3. Right rear single radiant element control. 7. Cooktop power level display windows 9. Interior oven light control. 11. Warmer drawer with removable covers. 12. Note: The features...
Use and Care Guide
Page 10
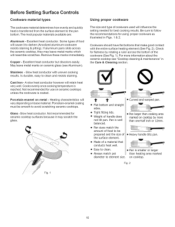
... ceramic cooktop see Aluminum). e Madeofamaterialthat conducts heat well. Before Setting Surface Controls Cookware material types The cookware material determines how evenly and quickly heat is well balanced. If aluminum pans slide across the bottom of cookware used will resemble scratches. May leave metal marks on ceramic cooktops unless the cookware is reached. Stainless =Slow heat conductor with the entire surface heating element (See Fig. 2). Cooks evenly once cooking temperature...
... ceramic cooktop see Aluminum). e Madeofamaterialthat conducts heat well. Before Setting Surface Controls Cookware material types The cookware material determines how evenly and quickly heat is well balanced. If aluminum pans slide across the bottom of cookware used will resemble scratches. May leave metal marks on ceramic cooktops unless the cookware is reached. Stainless =Slow heat conductor with the entire surface heating element (See Fig. 2). Cooks evenly once cooking temperature...
Use and Care Guide
Page 11
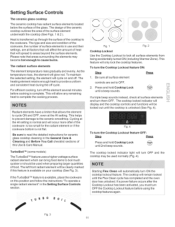
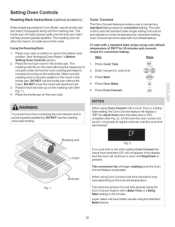
.... Setting Surface Controls The ceramic glass cooktop The ceramic cooktop has radiant surface elements located below the surface of the surface element underneath the cooktop (See Figs. 1 & 2 ). The design of the ceramic cooktop outlines the area of the glass. The type and size and condition of the cookware, the number of heat that areas surrounding the elements may be locked out until the Flex Clean cycle has completed and the oven door has unlocked. The radiant surface elements The element temperature...
.... Setting Surface Controls The ceramic glass cooktop The ceramic cooktop has radiant surface elements located below the surface of the surface element underneath the cooktop (See Figs. 1 & 2 ). The design of the ceramic cooktop outlines the area of the glass. The type and size and condition of the cookware, the number of heat that areas surrounding the elements may be locked out until the Flex Clean cycle has completed and the oven door has unlocked. The radiant surface elements The element temperature...
Use and Care Guide
Page 18
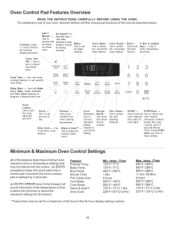
...used for a maximum of / / / / , / / Preheat Use to set the Broil feature. / / / / 0 thru 9 number keys -- Minute Timer Flex Clean time Conv Bake Conv Roast Warm & Hold TM Slow Cook Min. Max. Air Guard TM & indicator light -Use after )reheat to minute timer. ..... Lights Use to turn the oven lights ON Clock Use to pre- day ........ cleaning features, b}¢ko START STOP/Clear -- Use to start time. //" ......... . , d i) ....... An ENTRY acceptance beep will sound if the entry of the features listed have minimum and maximum time or temperature settings...
...used for a maximum of / / / / , / / Preheat Use to set the Broil feature. / / / / 0 thru 9 number keys -- Minute Timer Flex Clean time Conv Bake Conv Roast Warm & Hold TM Slow Cook Min. Max. Air Guard TM & indicator light -Use after )reheat to minute timer. ..... Lights Use to turn the oven lights ON Clock Use to pre- day ........ cleaning features, b}¢ko START STOP/Clear -- Use to start time. //" ......... . , d i) ....... An ENTRY acceptance beep will sound if the entry of the features listed have minimum and maximum time or temperature settings...
Use and Care Guide
Page 21
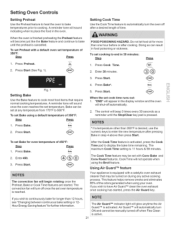
... Cook Time feature may be set at any active cooking process. HHeat,0 2. Press Start (See Fig. 1). Press Bake. To set cook time runs out: 1. Press Start. 4. Bake 5. Press Start. When the set cooking to cook most food items that may be manually turned offwhen Flex Clean ::is active. 21 The control will not operate when using the Broil feature. Cook Time will beep 3 times every 30 seconds as a reminder until the preheat is cancelled• To set Preheat with a default oven set Bake using your oven. Using Air...
... Cook Time feature may be set at any active cooking process. HHeat,0 2. Press Start (See Fig. 1). Press Bake. To set cook time runs out: 1. Press Start. 4. Bake 5. Press Start. When the set cooking to cook most food items that may be manually turned offwhen Flex Clean ::is active. 21 The control will not operate when using the Broil feature. Cook Time will beep 3 times every 30 seconds as a reminder until the preheat is cancelled• To set Preheat with a default oven set Bake using your oven. Using Air...
Use and Care Guide
Page 22
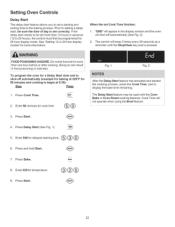
... Delay Start feature has activated and started the cooking process, press the Cook Time pad to setting a delay start, be sure the time of day is pressed. Press Delay Start (See Fig. 1). 5. The control will not operate when using the Broil feature. 3. FOOD POISONING HAZARD. B.k_ ®@® 9. Press Start. 22 See "Setting 12 or 24 hour display modes" for temperature. Enter 325 for more than 12 hours in the display window and the oven...
... Delay Start feature has activated and started the cooking process, press the Cook Time pad to setting a delay start, be sure the time of day is pressed. Press Delay Start (See Fig. 1). 5. The control will not operate when using the Broil feature. 3. FOOD POISONING HAZARD. B.k_ ®@® 9. Press Start. 22 See "Setting 12 or 24 hour display modes" for temperature. Enter 325 for more than 12 hours in the display window and the oven...
Use and Care Guide
Page 25
...the broiler pan. DO NOT cover the insert with the roasting rack. The oven control uses the standard bake recipe setting instructions and adjusts to a lower temperature for convection baking• Conv Convert cannot be used with Conv Roast feature• To start with a standard bake recipe using oven default temperature of cook time allowed using the Conv Convert feature with a Cook Time or a Delay Start setting, the Conv Convert feature will display a "CF" for convection baking. Press Cony Bake. B°ak°e" 5. When using Conv Convert with a Bake Time or a Delay Start setting...
...the broiler pan. DO NOT cover the insert with the roasting rack. The oven control uses the standard bake recipe setting instructions and adjusts to a lower temperature for convection baking• Conv Convert cannot be used with Conv Roast feature• To start with a standard bake recipe using oven default temperature of cook time allowed using the Conv Convert feature with a Cook Time or a Delay Start setting, the Conv Convert feature will display a "CF" for convection baking. Press Cony Bake. B°ak°e" 5. When using Conv Convert with a Bake Time or a Delay Start setting...

Use and Care Guide
Page 27
To set Warm & HoldTM: Step 1. Press Start. "HLd" for your recipe times, you can adjust the oven control so the oven cooks hotter or cooler than one hour before or after cooking. Press Warm & Hold. 3. Press Start. For the first few uses, follow your oven. Enter 30 degrees. 3. Enter30. 3. If the temperature shows an adjustment of oven thermometers may be used alone or with a Cook Time or Delay Time. . Example: decrease the oven temperature by pressing...
To set Warm & HoldTM: Step 1. Press Start. "HLd" for your recipe times, you can adjust the oven control so the oven cooks hotter or cooler than one hour before or after cooking. Press Warm & Hold. 3. Press Start. For the first few uses, follow your oven. Enter 30 degrees. 3. Enter30. 3. If the temperature shows an adjustment of oven thermometers may be used alone or with a Cook Time or Delay Time. . Example: decrease the oven temperature by pressing...

Use and Care Guide
Page 29
What to turn the interior oven lights ON and OFF whenever the oven door is in place whenever the oven is closed. The food may change the oven temperature once baking has started. FOOD POISONING HAZARD. Fig. 1 Press LV) to do during a power failure or power interruption when the Sabbath feature is set for the Sabbath feature. The glass shields must be in use. After the Sabbath observance turn off . If a delay start time longer than...
What to turn the interior oven lights ON and OFF whenever the oven door is in place whenever the oven is closed. The food may change the oven temperature once baking has started. FOOD POISONING HAZARD. Fig. 1 Press LV) to do during a power failure or power interruption when the Sabbath feature is set for the Sabbath feature. The glass shields must be in use. After the Sabbath observance turn off . If a delay start time longer than...

Use and Care Guide
Page 32
...minutes. Care & Cleaning Cleaning Recommendations Table Surface type • Aluminum (trim pieces) & vinyl • Painted and plastic control knobs • Painted body parts • Painted decorative trim • Chrome control panel (some models) • Decorative trim (some models) • Stainless Steel (some models) • Porcelain enamel broiler pan and broiler pan insert (if equipped) • Door liner & porcelain body parts • Oven racks • Oven door • Ceramic cooktop Recommendations Use hot, soapy water and a cloth. For general cleaning, use spray oven...
...minutes. Care & Cleaning Cleaning Recommendations Table Surface type • Aluminum (trim pieces) & vinyl • Painted and plastic control knobs • Painted body parts • Painted decorative trim • Chrome control panel (some models) • Decorative trim (some models) • Stainless Steel (some models) • Porcelain enamel broiler pan and broiler pan insert (if equipped) • Door liner & porcelain body parts • Oven racks • Oven door • Ceramic cooktop Recommendations Use hot, soapy water and a cloth. For general cleaning, use spray oven...

Use and Care Guide
Page 33
... -scratch cleaning pad, applying pressure as a cutting board or work surface in Apply afew drops of the recommended CookTop® Cleaning Creme directly to the cooktop. in the kitchen. • Cook foods directly on the cooktop surface without a pan. • Drop heavy or hard objects on the ceramic glass cooktop, they may appear to be cool and still be removed immediately after the cooktop has cooled using the cooktop cleaning cream. Care & Cleaning Cooktop maintenance Cooktop cleaning Consistent...
... -scratch cleaning pad, applying pressure as a cutting board or work surface in Apply afew drops of the recommended CookTop® Cleaning Creme directly to the cooktop. in the kitchen. • Cook foods directly on the cooktop surface without a pan. • Drop heavy or hard objects on the ceramic glass cooktop, they may appear to be cool and still be removed immediately after the cooktop has cooled using the cooktop cleaning cream. Care & Cleaning Cooktop maintenance Cooktop cleaning Consistent...

Use and Care Guide
Page 36
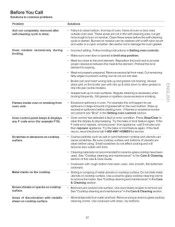
.... Place a level on the oven rack. Check house lights to operate the oven. See Setting Oven Controls in this manual or read the instructions "Entire appliance does not operate" in this Use & Care Guide. • Be sure floor is level, strong & stable enough to adequately support range. • If floor is not set properly. Solutions • Many factors affect baking results. Surface element too hot or not hot enough, Surface element does not heat. Also see "Adjusting Oven Temperature" section...
.... Place a level on the oven rack. Check house lights to operate the oven. See Setting Oven Controls in this manual or read the instructions "Entire appliance does not operate" in this Use & Care Guide. • Be sure floor is level, strong & stable enough to adequately support range. • If floor is not set properly. Solutions • Many factors affect baking results. Surface element too hot or not hot enough, Surface element does not heat. Also see "Adjusting Oven Temperature" section...
Use and Care Guide
Page 37
...-glasscooktop cleaning creme. Preheat the broil element for example F10). Use razor blade scraper to prevent curling, but get hot enough to burn on cooktop surface. Remove excess fat from appliance, wait 5 minutes and then repower appliance. Use a ceramic-glass cooktop cleaning creme to drip into lean. • Broiler pan and insertwrong side up excessive spillovers before using. Try the bake or broil feature again. excessively during Flames inside oven or smoking from oven vent...
...-glasscooktop cleaning creme. Preheat the broil element for example F10). Use razor blade scraper to prevent curling, but get hot enough to burn on cooktop surface. Remove excess fat from appliance, wait 5 minutes and then repower appliance. Use a ceramic-glass cooktop cleaning creme to drip into lean. • Broiler pan and insertwrong side up excessive spillovers before using. Try the bake or broil feature again. excessively during Flames inside oven or smoking from oven vent...

Installation Instructions
Page 1
... under cooktop. Paginas 5-8 • As when using any appliance generating heat, there are listed in the Use & Care Guide, read it carefully. • Be sure your owner's guide for future reference. • ALL RANGES CAN TIP • INJURYTO PERSONS COULD RESULT • INSTALL ANTI-TIP DEVICE PACKED WITH RANGE • SEE INSTALLATION INSTRUCTIONS If the information in these installation instructions before installing range. • Remove all packing material from the oven compartments before connecting the gas & electrical supply...
... under cooktop. Paginas 5-8 • As when using any appliance generating heat, there are listed in the Use & Care Guide, read it carefully. • Be sure your owner's guide for future reference. • ALL RANGES CAN TIP • INJURYTO PERSONS COULD RESULT • INSTALL ANTI-TIP DEVICE PACKED WITH RANGE • SEE INSTALLATION INSTRUCTIONS If the information in these installation instructions before installing range. • Remove all packing material from the oven compartments before connecting the gas & electrical supply...

Installation Instructions
Page 2
... leave excess wire in Step 4c. If molding is further than 1-1/4" from the range itself. If bracket is inserted into position (See Fig. 7). FASTEN BRACKET (WALL OR FLOOR MOUN_NG) FASTEN BRACKET (FLOOR MOUNTING ONLY) Leveling L 1-1/4" :i22;M22 Fig. 5 Fig. 6 Fig. 7 2. See Range Connection Opening Size Chart (Figs. 9 & 10) for the bracket. For models with Factory Connected Power Supply Cord. Visually check that rear leveling leg is to be located. ANTI-TIP BRACKET INSTALLATION INSTRUCTIONS -
... leave excess wire in Step 4c. If molding is further than 1-1/4" from the range itself. If bracket is inserted into position (See Fig. 7). FASTEN BRACKET (WALL OR FLOOR MOUN_NG) FASTEN BRACKET (FLOOR MOUNTING ONLY) Leveling L 1-1/4" :i22;M22 Fig. 5 Fig. 6 Fig. 7 2. See Range Connection Opening Size Chart (Figs. 9 & 10) for the bracket. For models with Factory Connected Power Supply Cord. Visually check that rear leveling leg is to be located. ANTI-TIP BRACKET INSTALLATION INSTRUCTIONS -
Installation Instructions
Page 4
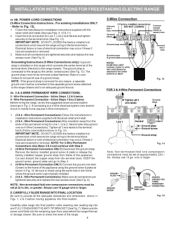
... the power cord folds into and FULLY ENGAGING THE ANTI-TIP BRACKET (See Fig. 7). Always use 10 ga. Grounding Instructions (3-Wire Connections only): A ground strap is removed for Line 1, Line 2 and Neutral and tighten securely to a 4-Wire electrical system (new branchcircuit or mobile home requires 4-Wire connection): 1. (3 & 4- follow Steps 1,2 & 5 below. 4 -Wire Permanent Connection -follow Steps 1 thru 5 below. Electrical failure or loss of the range. 4 3-Wire Connection Connect line 1 here Terminal block 3 Factory installed connections (DO NOT LOOSEN) Connect neutral...
... the power cord folds into and FULLY ENGAGING THE ANTI-TIP BRACKET (See Fig. 7). Always use 10 ga. Grounding Instructions (3-Wire Connections only): A ground strap is removed for Line 1, Line 2 and Neutral and tighten securely to a 4-Wire electrical system (new branchcircuit or mobile home requires 4-Wire connection): 1. (3 & 4- follow Steps 1,2 & 5 below. 4 -Wire Permanent Connection -follow Steps 1 thru 5 below. Electrical failure or loss of the range. 4 3-Wire Connection Connect line 1 here Terminal block 3 Factory installed connections (DO NOT LOOSEN) Connect neutral...

