Use and Care Guide
Page 3
...storage drawer and verify that can tip. • injury to reach items could result. • Install anti=tip device packed with the National Electrical Code ANSl/NFPA No. 70 latest edition, and local code requirements. Never allow children to the product. To check if the bracket(s) is... engaged. Know how to disconnect the electrical power to play around the range. An open door may explode and result in the area where appli= ance is the recommended repair service for storage. Never...
...storage drawer and verify that can tip. • injury to reach items could result. • Install anti=tip device packed with the National Electrical Code ANSl/NFPA No. 70 latest edition, and local code requirements. Never allow children to the product. To check if the bracket(s) is... engaged. Know how to disconnect the electrical power to play around the range. An open door may explode and result in the area where appli= ance is the recommended repair service for storage. Never...
Use and Care Guide
Page 4
...pans or bowls during cooking may also be stored or discarded. This appliance is not turned off . To reduce the risk of burns, ignition of electric shock or fire or short circuit. FOR COOKTOPS WITH COIL ELEMENTS ONLY * Do Not Immerse or Soak Removable Surface Heating Elements. Surface heating elements ... remove or replace food in Place. IMPORTANT--Do not attempt to cover the surface unit. Do not let clothing or other part of the range when opening oven door or warmer drawer (if equipped)--Stand to the surface unit will occur if the hot covers are suitable for baking if...
...pans or bowls during cooking may also be stored or discarded. This appliance is not turned off . To reduce the risk of burns, ignition of electric shock or fire or short circuit. FOR COOKTOPS WITH COIL ELEMENTS ONLY * Do Not Immerse or Soak Removable Surface Heating Elements. Surface heating elements ... remove or replace food in Place. IMPORTANT--Do not attempt to cover the surface unit. Do not let clothing or other part of the range when opening oven door or warmer drawer (if equipped)--Stand to the surface unit will occur if the hot covers are suitable for baking if...
Use and Care Guide
Page 6
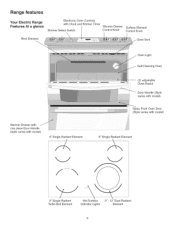
Range features Your Electric Range Features At a glance Broil Element Electronic Oven Controls with Clock and Kitchen Timer Simmer Select Switch Warmer Drawer Control Knob Surface Element Control Knob Oven ...
Range features Your Electric Range Features At a glance Broil Element Electronic Oven Controls with Clock and Kitchen Timer Simmer Select Switch Warmer Drawer Control Knob Surface Element Control Knob Oven ...
Use and Care Guide
Page 26
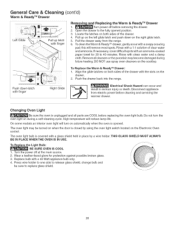
...may become damaged during a self-cleaning cycle. Replace bulb with a soapy scouring pad; Pull the drawer away from electric power before replacing the oven light bulb. Disconnect appliance from the range. 6. e Light Bulb: BE SURE OVEN IS COOL 1. To clean the Warm & Ready TM drawer, gently scour... Turn power off at the main source. 2. Changing Oven Light Be sure the oven is opened position. 3. Wear a leather-faced glove for 30 to replace glass shield. 26 Rinse with a 1:1 solution of the drawer with the slots on the drawer. 2. Align the glide latches on...
...may become damaged during a self-cleaning cycle. Replace bulb with a soapy scouring pad; Pull the drawer away from electric power before replacing the oven light bulb. Disconnect appliance from the range. 6. e Light Bulb: BE SURE OVEN IS COOL 1. To clean the Warm & Ready TM drawer, gently scour... Turn power off at the main source. 2. Changing Oven Light Be sure the oven is opened position. 3. Wear a leather-faced glove for 30 to replace glass shield. 26 Rinse with a 1:1 solution of the drawer with the slots on the drawer. 2. Align the glide latches on...
Use and Care Guide
Page 27
... occurrences that are clean before usage. Appliance must be sure. Provide sufficient space so range can cause scratches. Contact your local electric company for service. Raise or lower setting until the rack is obtained. Sliding or scraping of range until proper amount of relative heat settings and will become less visible with metallic sheen...
... occurrences that are clean before usage. Appliance must be sure. Provide sufficient space so range can cause scratches. Contact your local electric company for service. Raise or lower setting until the rack is obtained. Sliding or scraping of range until proper amount of relative heat settings and will become less visible with metallic sheen...
Installation Instructions
Page 4
...to reach over the surface units, cabinet storage space above the range. Be sure to make sure the range is unattended. Important Note to the Consumer Keep these installation instructions before connecting the electrical supply to children in use the oven as shown. Never leave...8226; The installation of interest to the range. 3. IMPORTANT SAFETY INSTRUCTIONS • Be sure your range for Manufactured Home Installation 1982 (Manufactured Home Sites, Communities and Setups), ANSI Z225.1/NFPA 501Alatest edition, or with the National Electrical Code ANSI/NFPA No. 70--latest edition ...
...to reach over the surface units, cabinet storage space above the range. Be sure to make sure the range is unattended. Important Note to the Consumer Keep these installation instructions before connecting the electrical supply to children in use the oven as shown. Never leave...8226; The installation of interest to the range. 3. IMPORTANT SAFETY INSTRUCTIONS • Be sure your range for Manufactured Home Installation 1982 (Manufactured Home Sites, Communities and Setups), ANSI Z225.1/NFPA 501Alatest edition, or with the National Electrical Code ANSI/NFPA No. 70--latest edition ...

Installation Instructions
Page 5
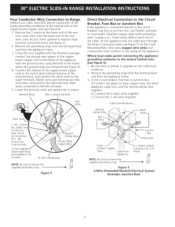
... wire or in Range is responsible for a range at the lower end of the rear wire cover, then bend the lower end of the terminal block, and connect the other end, near the neutral terminal, Connect the appliance in a fire, personal injury or electrical shock. 3. NOTE: Electric Slide-in Canada; Disconnect... new branch circuit installation (1996 NEC), mobile home or recreational vehicule, where local code do any of fire or electrical shock exists if an incorrect size range cord kit is used in USA, in the literature package, connect the neutral of the copper power supply cord to ...
... wire or in Range is responsible for a range at the lower end of the rear wire cover, then bend the lower end of the terminal block, and connect the other end, near the neutral terminal, Connect the appliance in a fire, personal injury or electrical shock. 3. NOTE: Electric Slide-in Canada; Disconnect... new branch circuit installation (1996 NEC), mobile home or recreational vehicule, where local code do any of fire or electrical shock exists if an incorrect size range cord kit is used in USA, in the literature package, connect the neutral of the copper power supply cord to ...
Installation Instructions
Page 6
...copper cable (with grounding wire). Lower the terminal cover and replace the 3 screws. Terminal Block SilverColoredTerminal Red .Wire Direct Electrical Connection to the Circuit Breaker, Fuse Box or Junction Box If the appliance is supplied on the Cord Mounting Plate. ...terminal block, and connect the other wires to expose range terminal connection block (see figure 2). 2. Supply a U.L. c) Connect the 2 red wires together. Cord Kit Hole. Cable from the appliance frame. 3. Figure 5 3-Wire (Grounded Neutral) Electrical System (Example: Junction Box) listed strain-relief at...
...copper cable (with grounding wire). Lower the terminal cover and replace the 3 screws. Terminal Block SilverColoredTerminal Red .Wire Direct Electrical Connection to the Circuit Breaker, Fuse Box or Junction Box If the appliance is supplied on the Cord Mounting Plate. ...terminal block, and connect the other wires to expose range terminal connection block (see figure 2). 2. Supply a U.L. c) Connect the 2 red wires together. Cord Kit Hole. Cable from the appliance frame. 3. Figure 5 3-Wire (Grounded Neutral) Electrical System (Example: Junction Box) listed strain-relief at...

Installation Instructions
Page 7
...Bare fL:_ Copper)Wire _ Junction Box _...... Install base cabinets 30" (76.2 cm) apart. Countertop Preparation • The cooktop sides of the range fit over edges of your countertop. • If you have... the neutral (white)wire, or if connectingto 4-wire electrical system(seeFigure6): 1. Inthecircuitbreakerfu, seboxorjunctionbox: a)Connectthewhiteappliancecablewireto the neutra(lwhite)wire. Removtehe groundingstrapfromtheterminabl lock andfromtheapplianceframe. 3. Cablefrom Appliance Wires] Range Installation _,isT; uitImportant Note: Door removal is not ...
...Bare fL:_ Copper)Wire _ Junction Box _...... Install base cabinets 30" (76.2 cm) apart. Countertop Preparation • The cooktop sides of the range fit over edges of your countertop. • If you have... the neutral (white)wire, or if connectingto 4-wire electrical system(seeFigure6): 1. Inthecircuitbreakerfu, seboxorjunctionbox: a)Connectthewhiteappliancecablewireto the neutra(lwhite)wire. Removtehe groundingstrapfromtheterminabl lock andfromtheapplianceframe. 3. Cablefrom Appliance Wires] Range Installation _,isT; uitImportant Note: Door removal is not ...
Installation Instructions
Page 11
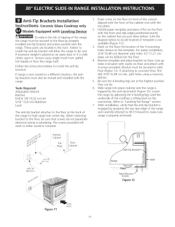
... legs are located in front of the cutout) aligned with the front of the range, the range must be drilled into place making sure the range is sitting level on floor. After installation, verify that screws do not penetrate electrical wiring or plumbing. Tools Required: Adjustable Wrench Ratchet Drill & 1/8"(0,32 cm) bit 5/16" (0,8 cm... location of the cooktop is trapped by adjusting the 4 leveling legs until the underside of the 4 mounting holes shown on floor and attach with the range. Slide range into the floor. 4.
... legs are located in front of the cutout) aligned with the front of the range, the range must be drilled into place making sure the range is sitting level on floor. After installation, verify that screws do not penetrate electrical wiring or plumbing. Tools Required: Adjustable Wrench Ratchet Drill & 1/8"(0,32 cm) bit 5/16" (0,8 cm... location of the cooktop is trapped by adjusting the 4 leveling legs until the underside of the 4 mounting holes shown on floor and attach with the range. Slide range into the floor. 4.
Installation Instructions
Page 12
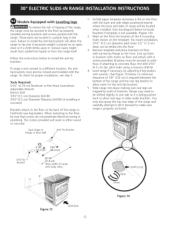
... leg levelers with the back and side edges positioned exactly where the back and sides of range will allow the range to slide under brackets. Those parts are trapped by ends of the range and carefully attempt to tilt it is being pushed back to allow room for proper installation...first drill 3/16" (0.5 cm) dia. Serious injury might result from spilled hot liquids or from the range itself. Tools Required: 5/16" (0,79 cm) Nutdriver or Flat Head Screwdriver Adjustable Wrench Electric Drill 3/16"(0,5 cm) Diameter Drill Bit 3/16"(0,5 cm) Diameter Masonry Drill Bit (if installing in ...
... leg levelers with the back and side edges positioned exactly where the back and sides of range will allow the range to slide under brackets. Those parts are trapped by ends of the range and carefully attempt to tilt it is being pushed back to allow room for proper installation...first drill 3/16" (0.5 cm) dia. Serious injury might result from spilled hot liquids or from the range itself. Tools Required: 5/16" (0,79 cm) Nutdriver or Flat Head Screwdriver Adjustable Wrench Electric Drill 3/16"(0,5 cm) Diameter Drill Bit 3/16"(0,5 cm) Diameter Masonry Drill Bit (if installing in ...


