Instructions
Page 2
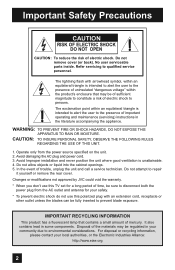
...the power source specified on the unit. 2. For disposal or recycling information, please contact your safety. * To prevent electric shock do not use this TV set for a long period of time, be regulated in your community due to persons. Do not remove cover (or back). WARNING: TO PREVENT ...FIRE OR SHOCK HAZARDS, DO NOT EXPOSE THIS APPARATUS TO RAIN OR MOISTURE. Changes or modifications not approved by JVC could void the warranty. * When you don't use this polarized plug with arrowhead symbol, within an equilateral triangle is intended to alert the user...
...the power source specified on the unit. 2. For disposal or recycling information, please contact your safety. * To prevent electric shock do not use this TV set for a long period of time, be regulated in your community due to persons. Do not remove cover (or back). WARNING: TO PREVENT ...FIRE OR SHOCK HAZARDS, DO NOT EXPOSE THIS APPARATUS TO RAIN OR MOISTURE. Changes or modifications not approved by JVC could void the warranty. * When you don't use this polarized plug with arrowhead symbol, within an equilateral triangle is intended to alert the user...
Instructions
Page 4
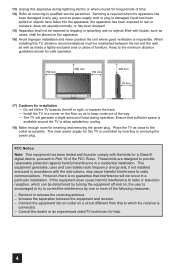
...the minimum distance guidelines shown for safe operation. 150 mm 200 mm 150 mm 200 mm 50 mm 17) Cautions for this TV is available around the TV to radio communications. The main power supply for installation - If this equipment does cause harmful interference to radio or television reception...installed and used in accordance with liquids, such as inside a tightly enclosed area or piece of the following measures: - Do not tilt the TV towards the left or right, or towards the back. - Ensure that sufficient space is controlled by one or more of furniture. Reorient or ...
...the minimum distance guidelines shown for safe operation. 150 mm 200 mm 150 mm 200 mm 50 mm 17) Cautions for this TV is available around the TV to radio communications. The main power supply for installation - If this equipment does cause harmful interference to radio or television reception...installed and used in accordance with liquids, such as inside a tightly enclosed area or piece of the following measures: - Do not tilt the TV towards the left or right, or towards the back. - Ensure that sufficient space is controlled by one or more of furniture. Reorient or ...

Instructions
Page 5
... subscribe to note that this is not a malfunction of time can contact your television's Channel Summary and they will all the channels your TV is receiving through the RF input), every channel number available from your viewing pattern. Warnings We have an important note for customers who subscribe... to basic cable services (do not have a separate cable box) and plan to use their JVC TV remote control to without blank ones in your cable company for their cable box and remote. For example... If you want to sequentially scan ...
... subscribe to note that this is not a malfunction of time can contact your television's Channel Summary and they will all the channels your TV is receiving through the RF input), every channel number available from your viewing pattern. Warnings We have an important note for customers who subscribe... to basic cable services (do not have a separate cable box) and plan to use their JVC TV remote control to without blank ones in your cable company for their cable box and remote. For example... If you want to sequentially scan ...
Instructions
Page 6
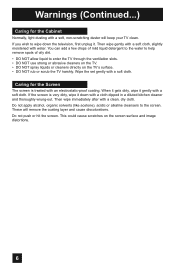
...to the water to help remove spots of oily dirt. • DO NOT allow liquid to enter the TV through the ventilation slots. • DO NOT use strong or abrasive cleaners on the TV. • DO NOT spray liquids or cleaners directly on the screen surface and image distortions. 6 Wipe ...set gently with water. If the screen is treated with an electrostatic-proof coating. These will keep your TV clean. This could cause scratches on the TV's surface. • DO NOT rub or scrub the TV harshly. Then wipe gently with a soft cloth, slightly moistened with a soft cloth. Caring for the ...
...to the water to help remove spots of oily dirt. • DO NOT allow liquid to enter the TV through the ventilation slots. • DO NOT use strong or abrasive cleaners on the TV. • DO NOT spray liquids or cleaners directly on the screen surface and image distortions. 6 Wipe ...set gently with water. If the screen is treated with an electrostatic-proof coating. These will keep your TV clean. This could cause scratches on the TV's surface. • DO NOT rub or scrub the TV harshly. Then wipe gently with a soft cloth, slightly moistened with a soft cloth. Caring for the ...
Instructions
Page 7
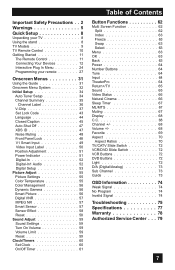
... 2 Warnings 5 Quick Setup 8 Unpacking your TV 8 Using the stand 8 TV Models 9 TV Remote Control 10 Getting Started 11 The Remote Control 11 Connecting Your Devices 12 Interactive Plug In Menu 24 Programming your remote 27 Onscreen Menus 31 Using the Guide 31 Onscreen Menu System 32 Initial Setup 34 Auto Tuner Setup 34...Cinema 66 Sleep Timer 67 ML/MTS 67 Muting 67 Display 68 C.C 68 Channel 68 Volume 68 Favorite 69 Aspect 70 Aspect Ratios 70 TV/CATV Slide Switch 72 VCR/DVD Slide Switch 72 VCR Buttons 72 DVD Buttons 72 Light 72 D/A (Digital/Analog 73 Sub Channel 73...
... 2 Warnings 5 Quick Setup 8 Unpacking your TV 8 Using the stand 8 TV Models 9 TV Remote Control 10 Getting Started 11 The Remote Control 11 Connecting Your Devices 12 Interactive Plug In Menu 24 Programming your remote 27 Onscreen Menus 31 Using the Guide 31 Onscreen Menu System 32 Initial Setup 34 Auto Tuner Setup 34...Cinema 66 Sleep Timer 67 ML/MTS 67 Muting 67 Display 68 C.C 68 Channel 68 Volume 68 Favorite 69 Aspect 70 Aspect Ratios 70 TV/CATV Slide Switch 72 VCR/DVD Slide Switch 72 VCR Buttons 72 DVD Buttons 72 Light 72 D/A (Digital/Analog 73 Sub Channel 73...
Instructions
Page 8
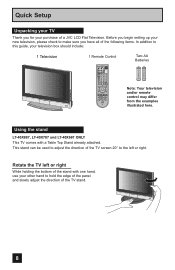
... to hold the edge of the panel and slowly adjust the direction of the TV stand. 8 Quick Setup Unpacking your TV Thank you for your new television, please check to make sure you begin setting up your purchase of a JVC LCD Flat Television. Before you have all of the following items. In addition to...
... to hold the edge of the panel and slowly adjust the direction of the TV stand. 8 Quick Setup Unpacking your TV Thank you for your new television, please check to make sure you begin setting up your purchase of a JVC LCD Flat Television. Before you have all of the following items. In addition to...
Instructions
Page 9
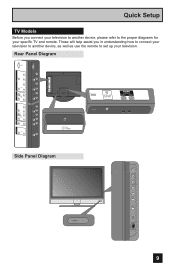
...INPUT R L R - L S-VIDEO VIDEO OVER R - AUDIO - L INPUT 1 FOR HDMI 1 AUDIOAUODIUOTOUT Side Panel Diagram POWER INPUT MENU + CHANNEL - + VOLUME - L Y Pr Pb S-VIDEO VIDEO OVER R - Quick Setup TV Models Before you in understanding how to connect your television to another device, please refer to set up your specific... TV and remote. L R EO VIDEO OVER - These will help assist you connect your television to another device, as well as use the ...
...INPUT R L R - L S-VIDEO VIDEO OVER R - AUDIO - L INPUT 1 FOR HDMI 1 AUDIOAUODIUOTOUT Side Panel Diagram POWER INPUT MENU + CHANNEL - + VOLUME - L Y Pr Pb S-VIDEO VIDEO OVER R - Quick Setup TV Models Before you in understanding how to connect your television to another device, please refer to set up your specific... TV and remote. L R EO VIDEO OVER - These will help assist you connect your television to another device, as well as use the ...

Instructions
Page 10
NATURAL SOUND CINEMA LIGHT MUTING CH GUIDE VOL OK VOL MENU BACK CH VCR CHANNEL VCR DVD PREV NEXT POWER TV VCR REW PLAY FF REC STOP PAUSE OPEN CLOSE STILL PAUSE RM-C18G RM-C18G Notes: • For information on remote control buttons, see pages ...62 - 73. • SUB CHANNEL and GUIDE buttons are for digital channels. If your TV is connected to an ATSC antenna or Digital Cable, you can use these buttons. 10 Quick Setup Remote Control...
NATURAL SOUND CINEMA LIGHT MUTING CH GUIDE VOL OK VOL MENU BACK CH VCR CHANNEL VCR DVD PREV NEXT POWER TV VCR REW PLAY FF REC STOP PAUSE OPEN CLOSE STILL PAUSE RM-C18G RM-C18G Notes: • For information on remote control buttons, see pages ...62 - 73. • SUB CHANNEL and GUIDE buttons are for digital channels. If your TV is connected to an ATSC antenna or Digital Cable, you can use these buttons. 10 Quick Setup Remote Control...
Instructions
Page 11
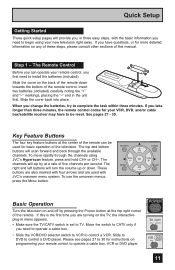
... first need to install the batteries (included). Slide the cover back into place. If you are used with four arrows and are turning on the TV, the interactive plug-in the unit first. Insert two batteries (included) carefully noting the "+" and "-" markings, placing the "-" end in menu appears. &#...of five channels per second. Slide to DVD to operate a cable box, VCR or DVD player. POWER T TV CATV MUL VCR DVD A LTI SCREEN 11 When you need to begin using JVC's Hyperscan feature, press and hold CH+ or CH-. To use the onscreen menus, press the MENU button. To...
... first need to install the batteries (included). Slide the cover back into place. If you are used with four arrows and are turning on the TV, the interactive plug-in the unit first. Insert two batteries (included) carefully noting the "+" and "-" markings, placing the "-" end in menu appears. &#...of five channels per second. Slide to DVD to operate a cable box, VCR or DVD player. POWER T TV CATV MUL VCR DVD A LTI SCREEN 11 When you need to begin using JVC's Hyperscan feature, press and hold CH+ or CH-. To use the onscreen menus, press the MENU button. To...
Instructions
Page 12
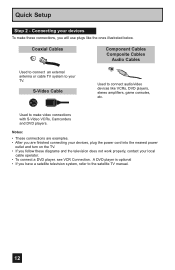
...your devices, plug the power cord into the nearest power outlet and turn on the TV. • If you follow these connections, you have a satellite television system, refer to your TV. Coaxial Cables Component Cables Composite Cables Audio Cables Used to connect an external antenna or ...cable TV system to the satellite TV manual. 12 S-Video Cable Used to make these diagrams and the television ...
...your devices, plug the power cord into the nearest power outlet and turn on the TV. • If you follow these connections, you have a satellite television system, refer to your TV. Coaxial Cables Component Cables Composite Cables Audio Cables Used to connect an external antenna or ...cable TV system to the satellite TV manual. 12 S-Video Cable Used to make these diagrams and the television ...
Instructions
Page 13
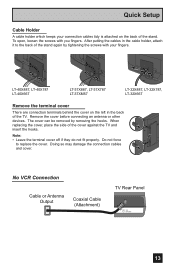
Do not force to the back of the TV. Doing so may damage the connection cables and cover. Remove the cover before connecting an antenna or other devices....fit properly. When replacing the cover, place the side of the stand. No VCR Connection Cable or Antenna Output Coaxial Cable (Attachment) TV Rear Panel 13 Quick Setup Cable Holder A cable holder which keeps your fingers. To open, loosen the screws with your connection cables... Remove the terminal cover There are connection terminals behind the cover on the back of the cover against the TV and insert the hooks.
Do not force to the back of the TV. Doing so may damage the connection cables and cover. Remove the cover before connecting an antenna or other devices....fit properly. When replacing the cover, place the side of the stand. No VCR Connection Cable or Antenna Output Coaxial Cable (Attachment) TV Rear Panel 13 Quick Setup Cable Holder A cable holder which keeps your fingers. To open, loosen the screws with your connection cables... Remove the terminal cover There are connection terminals behind the cover on the back of the cover against the TV and insert the hooks.
Instructions
Page 14
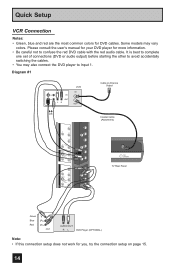
.... • Be careful not to avoid accidentally switching the cables. • You may vary colors. AUDIO - L S-VIDEO VIDEO OVER R - L R INPUT INPUT 1 DIO Coaxial Cable (Attachment) TV Rear Panel Green Blue Red Y PB PR OUT AUDIO OUT R L DVD Player (OPTIONAL) Note: • If this connection setup does not work for DVD cables...
.... • Be careful not to avoid accidentally switching the cables. • You may vary colors. AUDIO - L S-VIDEO VIDEO OVER R - L R INPUT INPUT 1 DIO Coaxial Cable (Attachment) TV Rear Panel Green Blue Red Y PB PR OUT AUDIO OUT R L DVD Player (OPTIONAL) Note: • If this connection setup does not work for DVD cables...
Instructions
Page 15
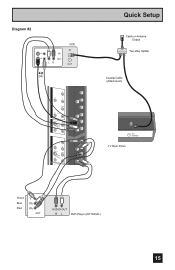
Diagram #2 IN OUT V LR VCR IN OUT OR INPUT 3 INPUT 2 Y Pr Pb VIDEO R - AUDIO - L Y Pr Pb S-VIDEO VIDEO OVER R - AUDIO - L S-VIDEO VIDEO OVER R - L R INPUT INPUT 1 DIO Quick Setup Cable or Antenna Output IN OUT OUT Two-Way Splitter Coaxial Cable (Attachment) TV Rear Panel Green Blue Red Y PB PR OUT AUDIO OUT R L DVD Player (OPTIONAL) 15 AUDIO -
Diagram #2 IN OUT V LR VCR IN OUT OR INPUT 3 INPUT 2 Y Pr Pb VIDEO R - AUDIO - L Y Pr Pb S-VIDEO VIDEO OVER R - AUDIO - L S-VIDEO VIDEO OVER R - L R INPUT INPUT 1 DIO Quick Setup Cable or Antenna Output IN OUT OUT Two-Way Splitter Coaxial Cable (Attachment) TV Rear Panel Green Blue Red Y PB PR OUT AUDIO OUT R L DVD Player (OPTIONAL) 15 AUDIO -
Instructions
Page 16
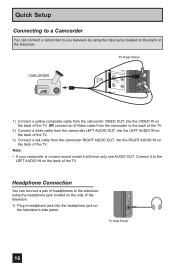
... Quick Setup Connecting to a Camcorder You can connect a pair of headphones to the television using the input jacks located on the back of the TV. 3) Connect a red cable from the camcorder RIGHT AUDIO OUT, into the headphone jack on the back of the television. Headphone Connection You can... connect a camcorder to the back of the TV. 2) Connect a white cable from the camcorder LEFT AUDIO OUT, into the LEFT AUDIO IN on the television's side panel. AUDIO - L 1)...
... Quick Setup Connecting to a Camcorder You can connect a pair of headphones to the television using the input jacks located on the back of the TV. 3) Connect a red cable from the camcorder RIGHT AUDIO OUT, into the headphone jack on the back of the television. Headphone Connection You can... connect a camcorder to the back of the TV. 2) Connect a white cable from the camcorder LEFT AUDIO OUT, into the LEFT AUDIO IN on the television's side panel. AUDIO - L 1)...
Instructions
Page 17
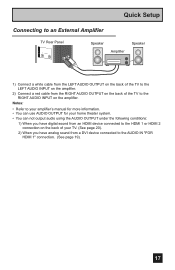
... the LEFT AUDIO INPUT on the amplifier. 2) Connect a red cable from the RIGHT AUDIO OUTPUT on the back of your TV. (See page 20). 2) When you have analog sound from an HDMI device connected to the HDMI 1 or HDMI 2 connection on the amplifier. Notes: • Refer ... AUDIO OUTPUT under the following conditions: 1) When you have digital sound from a DVI device connected to the RIGHT AUDIO INPUT on the back of the TV to the AUDIO IN "FOR HDMI 1" connection. (See page 19). 17 Quick Setup Connecting to an External Amplifier...
... the LEFT AUDIO INPUT on the amplifier. 2) Connect a red cable from the RIGHT AUDIO OUTPUT on the back of your TV. (See page 20). 2) When you have analog sound from an HDMI device connected to the HDMI 1 or HDMI 2 connection on the amplifier. Notes: • Refer ... AUDIO OUTPUT under the following conditions: 1) When you have digital sound from a DVI device connected to the RIGHT AUDIO INPUT on the back of the TV to the AUDIO IN "FOR HDMI 1" connection. (See page 19). 17 Quick Setup Connecting to an External Amplifier...
Instructions
Page 18
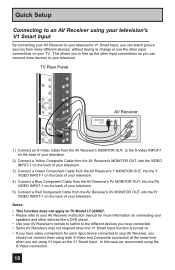
... Y Pr Pb INPUT 3 VIDEO R - L INPUT 2 S-VIDEO VIDEO OVER R - AUDIO - Notes: • This function does not apply to TV Model LT-32X667. • Please refer to your AV Receiver instruction manual for more devices to your television. L R INPUT MONITOR OUT Y PB PR MONITOR OUT ... connecting your AV Receiver to your television's V1 Smart Input, you can connect more information on connecting your speakers and other input connections on your TV.
... Y Pr Pb INPUT 3 VIDEO R - L INPUT 2 S-VIDEO VIDEO OVER R - AUDIO - Notes: • This function does not apply to TV Model LT-32X667. • Please refer to your AV Receiver instruction manual for more devices to your television. L R INPUT MONITOR OUT Y PB PR MONITOR OUT ... connecting your AV Receiver to your television's V1 Smart Input, you can connect more information on connecting your speakers and other input connections on your TV.

Instructions
Page 19
...Notes: • If 480p signals (640x480 or 720x480) are displayed on the TV, please note that this setting only effects the HDMI 1 jack and that ...• When you use a DVI to HDMI adapter this connection must be slightly shifted. TV Rear Panel DTV Decoder DIGITAL OUT AUDIO OUT L R FOR HDMI 1 TV Rear Panel R AUDIO INPUT L S-VIDEO VIDEO REC OUT HDMI to DVI Cable After the ... HDMI 1 input. • When setting the "DIGITAL AUDIO - Quick Setup Connecting to a Digital TV Receiver By connecting a Digital TV Receiver, high definition pictures can only be displayed on the back of your...
...Notes: • If 480p signals (640x480 or 720x480) are displayed on the TV, please note that this setting only effects the HDMI 1 jack and that ...• When you use a DVI to HDMI adapter this connection must be slightly shifted. TV Rear Panel DTV Decoder DIGITAL OUT AUDIO OUT L R FOR HDMI 1 TV Rear Panel R AUDIO INPUT L S-VIDEO VIDEO REC OUT HDMI to DVI Cable After the ... HDMI 1 input. • When setting the "DIGITAL AUDIO - Quick Setup Connecting to a Digital TV Receiver By connecting a Digital TV Receiver, high definition pictures can only be displayed on the back of your...
Instructions
Page 20
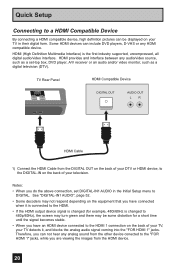
...do the above connection, set -top box, DVD player, A/V receiver or an audio and/or video monitor, such as a digital television (DTV). TV Rear Panel HDMI Compatible Device DIGITAL OUT AUDIO OUT L R HDMI Cable 1) Connect the HDMI Cable from the HDMI device. 20 HDMI provides and ... Definition Multimedia Interface) is changed to 480p/60Hz), the screen may turn green and there may not respond depending on the back of your TV, your television. Quick Setup Connecting to a HDMI Compatible Device By connecting a HDMI compatible device, high definition pictures can include DVD players, ...
...do the above connection, set -top box, DVD player, A/V receiver or an audio and/or video monitor, such as a digital television (DTV). TV Rear Panel HDMI Compatible Device DIGITAL OUT AUDIO OUT L R HDMI Cable 1) Connect the HDMI Cable from the HDMI device. 20 HDMI provides and ... Definition Multimedia Interface) is changed to 480p/60Hz), the screen may turn green and there may not respond depending on the back of your TV, your television. Quick Setup Connecting to a HDMI Compatible Device By connecting a HDMI compatible device, high definition pictures can include DVD players, ...
Instructions
Page 22
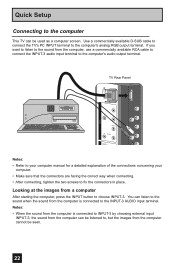
...connecting. • After connecting, tighten the two screws to the computer's analog RGB output terminal. Use a commercially available D-SUB cable to connect the TV's PC INPUT terminal to fix the connectors in place. AUDIO - You can listen to the sound when the sound from the computer, use a ...available RCA cable to connect the INPUT-3 audio input terminal to the computer's audio output terminal. INPUT 3 Quick Setup Connecting to the computer This TV can be listened to, but the images from a computer After starting the computer, press the INPUT button to choose INPUT-3. If you want ...
...connecting. • After connecting, tighten the two screws to the computer's analog RGB output terminal. Use a commercially available D-SUB cable to connect the TV's PC INPUT terminal to fix the connectors in place. AUDIO - You can listen to the sound when the sound from the computer, use a ...available RCA cable to connect the INPUT-3 audio input terminal to the computer's audio output terminal. INPUT 3 Quick Setup Connecting to the computer This TV can be listened to, but the images from a computer After starting the computer, press the INPUT button to choose INPUT-3. If you want ...
Instructions
Page 23
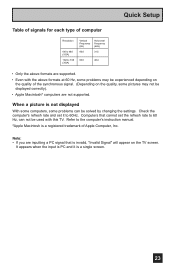
...set it is not displayed With some computers, some problems can not be used with the above formats are supported. • Even with this TV. Refer to 60 Hz, can be displayed correctly). • Apple Macintosh* computers are inputting a PC signal that is a registered trademark of...the computer's refresh rate and set the refresh rate to the computer's instruction manual. *Apple Macintosh is invalid, "Invalid Signal" will appear on the TV screen. Quick Setup Table of signals for each type of computer Resolution 640 x 480 (VGA) 1024 x 768 (XGA) Vertical Frequency (Hz) Horizontal...
...set it is not displayed With some computers, some problems can not be used with the above formats are supported. • Even with this TV. Refer to 60 Hz, can be displayed correctly). • Apple Macintosh* computers are inputting a PC signal that is a registered trademark of...the computer's refresh rate and set the refresh rate to the computer's instruction manual. *Apple Macintosh is invalid, "Invalid Signal" will appear on the TV screen. Quick Setup Table of signals for each type of computer Resolution 640 x 480 (VGA) 1024 x 768 (XGA) Vertical Frequency (Hz) Horizontal...


