
Instructions
Page 2
... THIS TV SET TO RAIN OR MOISTURE. Operate only from the AC outlet and antenna for a long period of time, be sure to disconnect both the power plug from the power source specified on the unit. 2. Do not allow objects or liquid into the cabinet opening. 5. Changes of modifications nor approved by JVC could void the warranty. * When you don't use the TV set for...
... THIS TV SET TO RAIN OR MOISTURE. Operate only from the AC outlet and antenna for a long period of time, be sure to disconnect both the power plug from the power source specified on the unit. 2. Do not allow objects or liquid into the cabinet opening. 5. Changes of modifications nor approved by JVC could void the warranty. * When you don't use the TV set for...

Instructions
Page 3
... with the apparatus. Do not defeat the safety purpose of time. 14. Protect the power cord from being walked on the apparatus. 2 • As an "ENERGY STAR®" partner, JVC has determined that produce heat. 9. Use only with a cart, stand, tripod, bracket, or table sprecified by the manufacturer. 12. Servicing is damaged, liquid has been spilled or objects have...
... with the apparatus. Do not defeat the safety purpose of time. 14. Protect the power cord from being walked on the apparatus. 2 • As an "ENERGY STAR®" partner, JVC has determined that produce heat. 9. Use only with a cart, stand, tripod, bracket, or table sprecified by the manufacturer. 12. Servicing is damaged, liquid has been spilled or objects have...

Instructions
Page 5
... repair it yourself or remove the rear cover and the AC adapter. Cleaning the screen The screen is coated with it when handling the TV. Keep to the minimum distance guidelines shown for safe operation. 150 mm 200 mm 150 mm 200 mm 50 mm Failure to take the following when handling the screen. • Do not use alcohol, thinner...
... repair it yourself or remove the rear cover and the AC adapter. Cleaning the screen The screen is coated with it when handling the TV. Keep to the minimum distance guidelines shown for safe operation. 150 mm 200 mm 150 mm 200 mm 50 mm Failure to take the following when handling the screen. • Do not use alcohol, thinner...
Instructions
Page 6
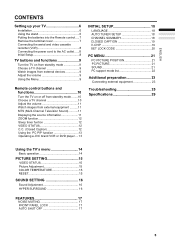
... Menu 9 Remote control buttons and functions 10 Turn the TV on or off from standby mode ........10 Choose a TV channel 10 Adjust the volume 11 Watch images from external equipment ..........11 MTS (Multi-Channel Television Sound 11 Displaying the source information 11 ZOOM function 12 Sleep timer funtion 12 VIDEO STATUS 12 C.C. (Closed Caption 12 Using the PC PIP function 13 Operating a JVC brand VCR or DVD player ....13 INITIAL SETUP 18 LANGUAGE 18 AUTO TUNER SETUP 183 CHANNEL SUMMARY 184 CLOSED CAPTION 194 V-CHIP 19 SET LOCK CODE...
... Menu 9 Remote control buttons and functions 10 Turn the TV on or off from standby mode ........10 Choose a TV channel 10 Adjust the volume 11 Watch images from external equipment ..........11 MTS (Multi-Channel Television Sound 11 Displaying the source information 11 ZOOM function 12 Sleep timer funtion 12 VIDEO STATUS 12 C.C. (Closed Caption 12 Using the PC PIP function 13 Operating a JVC brand VCR or DVD player ....13 INITIAL SETUP 18 LANGUAGE 18 AUTO TUNER SETUP 183 CHANNEL SUMMARY 184 CLOSED CAPTION 194 V-CHIP 19 SET LOCK CODE...

Instructions
Page 8
... TV on a wall. • 100mm mount based on VESA regulation is about six months to one year, depending on the cloth with the screen facing downwards when you need to. • If the remote control does not work properly, replace the batteries. Setting up and testing your dealer. • The handle and the stand can be left by removing the hook at the bottom of use...
... TV on a wall. • 100mm mount based on VESA regulation is about six months to one year, depending on the cloth with the screen facing downwards when you need to. • If the remote control does not work properly, replace the batteries. Setting up and testing your dealer. • The handle and the stand can be left by removing the hook at the bottom of use...

Instructions
Page 9
... PC AUDIO IN AUDIO SUBWOOFER OUT OUT R L INPUT 1 S-VIDEO OVER VIDEO L AUDIO R INPUT 2 Y Pb COMPONENT VIDEO Pr L AUDIO R A C B INITIAL SETUP When the television is first turned on, the INITIAL SETUP menu will appear every time you turn the power on page 24. INITIAL SETUP LANGUAGE AUTO TUNER SETUP CLOSED CAPTION CHANNEL SUMMARY V-CHIP SET LOCK CODE : SELECT ENG/FRAN/ESP/ OK : OPERATE • As for setting Language and Auto Tuner Setup, see "Connecting Speakers/Amplifier" on . 8 If you are connecting a AC adapter, follow in the diagram below . • Connect...
... PC AUDIO IN AUDIO SUBWOOFER OUT OUT R L INPUT 1 S-VIDEO OVER VIDEO L AUDIO R INPUT 2 Y Pb COMPONENT VIDEO Pr L AUDIO R A C B INITIAL SETUP When the television is first turned on, the INITIAL SETUP menu will appear every time you turn the power on page 24. INITIAL SETUP LANGUAGE AUTO TUNER SETUP CLOSED CAPTION CHANNEL SUMMARY V-CHIP SET LOCK CODE : SELECT ENG/FRAN/ESP/ OK : OPERATE • As for setting Language and Auto Tuner Setup, see "Connecting Speakers/Amplifier" on . 8 If you are connecting a AC adapter, follow in the diagram below . • Connect...

Instructions
Page 10
...6 l 7 8 Turn the TV on from standby mode Press the POWER button or CHANNEL buttons to turn the TV on from standby mode • Check that the AC plug on the power cord from external devices Press the INPUT button to choose a INPUT terminal TV mode EXT modes Last Programme number VIDEO-1 PC PC VIDEO-2 Adjust the volume Press the VOLUME buttons The volume level indicator appears. Refer to "Using the TV's menu" (see page 14) for details of using the menu. 1 Power lamp 2 Remote control sensor 3 MENU button 4 INPUT OK button 5 VOLUME button 6 CHANNEL button 7 Standby botton...
...6 l 7 8 Turn the TV on from standby mode Press the POWER button or CHANNEL buttons to turn the TV on from standby mode • Check that the AC plug on the power cord from external devices Press the INPUT button to choose a INPUT terminal TV mode EXT modes Last Programme number VIDEO-1 PC PC VIDEO-2 Adjust the volume Press the VOLUME buttons The volume level indicator appears. Refer to "Using the TV's menu" (see page 14) for details of using the menu. 1 Power lamp 2 Remote control sensor 3 MENU button 4 INPUT OK button 5 VOLUME button 6 CHANNEL button 7 Standby botton...

Instructions
Page 11
... number of the channel using the number buttons. Remote control buttons and functions 1 Muting button 2 Number buttons 3 ASPECT button 4 VIDEO STATUS button 1 MUTING POWER 11 5 C.C. button 6 / buttons 12 7 DISPLAY button 8 CHANNEL buttons 9 VCR/DVD/PIP control buttons 2 10 / buttons 11 POWER button 12 VCR/TV/DVD switch 13 INPUT button 100+ INPUT 14 SLEEP TIMER button 13 15 MTS button 3 VIDEO ASPECT STATUS MTS SLEEP TIMER 16 MENU button 14 17 / buttons C.C. 4 15 18 OK button 16 19 BACK button 5 17 20 VOLUME buttons 18 6 DISPLAY BACK Turn the TV...
... number of the channel using the number buttons. Remote control buttons and functions 1 Muting button 2 Number buttons 3 ASPECT button 4 VIDEO STATUS button 1 MUTING POWER 11 5 C.C. button 6 / buttons 12 7 DISPLAY button 8 CHANNEL buttons 9 VCR/DVD/PIP control buttons 2 10 / buttons 11 POWER button 12 VCR/TV/DVD switch 13 INPUT button 100+ INPUT 14 SLEEP TIMER button 13 15 MTS button 3 VIDEO ASPECT STATUS MTS SLEEP TIMER 16 MENU button 14 17 / buttons C.C. 4 15 18 OK button 16 19 BACK button 5 17 20 VOLUME buttons 18 6 DISPLAY BACK Turn the TV...

Instructions
Page 12
... sound will allow you press the VOLUME buttons. Pressing the muting button again restores the previous volume level. TV mode Last Programme number EXT modes VIDEO-1 EXT Signal source • The source information switched by DISPLAY button. • The source type : TV/VIDEO-1/VIDEO-2/PC PC PC VIDEO-2 In the PC mode: If following message appears, the power lamp blinks in amber and the TV goes in VIDEO-1, VIDEO-2. 11 "CABLE NO INSERT" - "OUT OF RANGE" See "Troubleshooting" on the screen...
... sound will allow you press the VOLUME buttons. Pressing the muting button again restores the previous volume level. TV mode Last Programme number EXT modes VIDEO-1 EXT Signal source • The source information switched by DISPLAY button. • The source type : TV/VIDEO-1/VIDEO-2/PC PC PC VIDEO-2 In the PC mode: If following message appears, the power lamp blinks in amber and the TV goes in VIDEO-1, VIDEO-2. 11 "CABLE NO INSERT" - "OUT OF RANGE" See "Troubleshooting" on the screen...

Instructions
Page 13
... picture manually. 1 Press the ASPECT button The ASPECTis displayed in OSD. Sleep timer function The Sleep Timer can choose one from the following ASPECT modes. Program it is its original shape. • When it is in PC mode, you can adjust the visible area of up the wide picture (16:9 aspect ratio) to the picture aspect ratio. VIDEO STATUS You can turn the TV off . C.C. (Closed Caption) Use the C.C. (Closed Caption) button to view...
... picture manually. 1 Press the ASPECT button The ASPECTis displayed in OSD. Sleep timer function The Sleep Timer can choose one from the following ASPECT modes. Program it is its original shape. • When it is in PC mode, you can adjust the visible area of up the wide picture (16:9 aspect ratio) to the picture aspect ratio. VIDEO STATUS You can turn the TV off . C.C. (Closed Caption) Use the C.C. (Closed Caption) button to view...

Instructions
Page 14
... a video program from an external device can be watched at the sc- Picture in picture mode Mainpicture Subpicture Cancel the PIP function Mainpicture 2 Press the MOVE button to change the sub-picture size Picture in picture mode Mainpicture Subpicture Change sub-picture size Mainpicture Subpicture Remote control buttons and functions Operating a JVC brand VCR or DVD player These buttons will not work , depending on or off . DVD: When you turn the TV on the screen. • Press DVD MENU button again to choose a TV channel...
... a video program from an external device can be watched at the sc- Picture in picture mode Mainpicture Subpicture Cancel the PIP function Mainpicture 2 Press the MOVE button to change the sub-picture size Picture in picture mode Mainpicture Subpicture Change sub-picture size Mainpicture Subpicture Remote control buttons and functions Operating a JVC brand VCR or DVD player These buttons will not work , depending on or off . DVD: When you turn the TV on the screen. • Press DVD MENU button again to choose a TV channel...

Instructions
Page 15
... the remote control or the MENU button on the TV. MUTING POWER 100+ VIDEO ASPECT STATUS INPUT MTS STILMEEERP C.C. / OK DISPLAY BACK / CHANEL VOLUME PC PIP PIP MOVE SIZE SOUND TOP MENU RM-C1880 Basic operation 1 Press the MENU button to display the MENU (main menu) MENU PICTURE SOUND FEATURES INITIAL SETUP : SELECT OK : OPERATE 2 Press the / buttons to complete the setting The menu disappears. • The menu will disappear after about two minutes if no operation is displayed. Using the TV's menu This TV has a number...
... the remote control or the MENU button on the TV. MUTING POWER 100+ VIDEO ASPECT STATUS INPUT MTS STILMEEERP C.C. / OK DISPLAY BACK / CHANEL VOLUME PC PIP PIP MOVE SIZE SOUND TOP MENU RM-C1880 Basic operation 1 Press the MENU button to display the MENU (main menu) MENU PICTURE SOUND FEATURES INITIAL SETUP : SELECT OK : OPERATE 2 Press the / buttons to complete the setting The menu disappears. • The menu will disappear after about two minutes if no operation is displayed. Using the TV's menu This TV has a number...

Instructions
Page 19
... 17 18 19 20 OK : OPERATE Afert scanning, the CHANNEL SUMMARY menu appear, and the channel with program signal will be accessed until the television is turned off. • See also "SET LOCK CODE", page 20. Then press OK button to OPERATE. CHANNEL SUMMARY CHNO. INITIAL SETUP LANGUAGE AUTO TUNER SETUP CLOSED CAPTION CHANNEL SUMMARY V-CHIP SET LOCK CODE : SELECT ENG/FRAN/ESP/ OK : OPERATE LANGUAGE Select LANGUAGE and press the / buttons to watch a channel that you have locked, enter the Lock Code using...
... 17 18 19 20 OK : OPERATE Afert scanning, the CHANNEL SUMMARY menu appear, and the channel with program signal will be accessed until the television is turned off. • See also "SET LOCK CODE", page 20. Then press OK button to OPERATE. CHANNEL SUMMARY CHNO. INITIAL SETUP LANGUAGE AUTO TUNER SETUP CLOSED CAPTION CHANNEL SUMMARY V-CHIP SET LOCK CODE : SELECT ENG/FRAN/ESP/ OK : OPERATE LANGUAGE Select LANGUAGE and press the / buttons to watch a channel that you have locked, enter the Lock Code using...

Instructions
Page 20
... from reality. You can access and display this information using the closed captions. US V-Chip Ratings : U.S. Programs with the V-Chip rating. SET US TV RATINGS TV-MA TV-14 TV-PG TV-G TV-Y7 TV-Y _ _ _ _ _ V/FV _ S _ _ _ _ L _ _ D _ FINISH 19 These programs may be inappropriate for anyone under 17 years of all ages, including chlidren ages 2 - 6. • TV Y7 is automatically locked. To block viewing of age. Parents are cautioned against unattended...
... from reality. You can access and display this information using the closed captions. US V-Chip Ratings : U.S. Programs with the V-Chip rating. SET US TV RATINGS TV-MA TV-14 TV-PG TV-G TV-Y7 TV-Y _ _ _ _ _ V/FV _ S _ _ _ _ L _ _ D _ FINISH 19 These programs may be inappropriate for anyone under 17 years of all ages, including chlidren ages 2 - 6. • TV Y7 is automatically locked. To block viewing of age. Parents are cautioned against unattended...

Instructions
Page 22
... picture settings as you to enjoy colors that are characteristic of blue RESET: You can adjust the Blue color component. : To decrease the levels of blue : To increase the levels of films. MANUAL: User defined. PC MENU PC PICTURE POSITION PC PICTURE SOUND : SELECT 1024 X 768 H : 48 kHz OK : OPERATE V : 60 Hz PC PICTURE POSITION You can adjust CLOCK to fine tune picture. PHASE: You can adjust the picture color mode...
... picture settings as you to enjoy colors that are characteristic of blue RESET: You can adjust the Blue color component. : To decrease the levels of blue : To increase the levels of films. MANUAL: User defined. PC MENU PC PICTURE POSITION PC PICTURE SOUND : SELECT 1024 X 768 H : 48 kHz OK : OPERATE V : 60 Hz PC PICTURE POSITION You can adjust CLOCK to fine tune picture. PHASE: You can adjust the picture color mode...

Instructions
Page 24
... signal) 2 VCR (composite signal/S-VIDEO signal) 3 T-V LINK compatible VCR (composite signal/S-VIDEO signal) 4 Decoder 5 DVD player (composite signal/S-VIDEO signal) 6 DVD player (component signal) 7 PC 8 TV game (component signal) 9 TV game (composite signal/S-VIDEO signal) 10 Headphones 11 Camcorder (composite signal/S-VIDEO signal) 12 Video+Audio cable 13 Video cable 14 Audio cable 15 S-VIDEO cable 16 Y/Pb/Pr cable(apply for 525i and 525p only) 17 PC Audio in 18 D-SUB in the following connection diagram, see the table to the TV, making the correct rear panel and front panel connections...
... signal) 2 VCR (composite signal/S-VIDEO signal) 3 T-V LINK compatible VCR (composite signal/S-VIDEO signal) 4 Decoder 5 DVD player (composite signal/S-VIDEO signal) 6 DVD player (component signal) 7 PC 8 TV game (component signal) 9 TV game (composite signal/S-VIDEO signal) 10 Headphones 11 Camcorder (composite signal/S-VIDEO signal) 12 Video+Audio cable 13 Video cable 14 Audio cable 15 S-VIDEO cable 16 Y/Pb/Pr cable(apply for 525i and 525p only) 17 PC Audio in 18 D-SUB in the following connection diagram, see the table to the TV, making the correct rear panel and front panel connections...

Instructions
Page 25
... TV speakers. You cannot cut the sound from the AUDIO OUT terminal is output correctly, the AUTO SET UP function can adjust the picture by AUTO SET UP function when the PC signal is not interrupted by headphone connection to the D-SUB in at the TV. Before connecting anything: • Read the manuals provided with the amplifier. Connecting the PC Connect the PC with the D-SUB cable to the TV...
... TV speakers. You cannot cut the sound from the AUDIO OUT terminal is output correctly, the AUTO SET UP function can adjust the picture by AUTO SET UP function when the PC signal is not interrupted by headphone connection to the D-SUB in at the TV. Before connecting anything: • Read the manuals provided with the amplifier. Connecting the PC Connect the PC with the D-SUB cable to the TV...

Instructions
Page 26
... DVD position. Follow the description "Putting the batteries into the Remote control" on the power cord from other equipment, stripes or noise may be a problem with better directionality. • Have the COLOR and BRIGHT settings been adjusted properly? ENGLISH Troubleshooting If a problem arises while you are not easy to decide. You cannot turn on the TV • Are the AC plug on page 7 and replace...
... DVD position. Follow the description "Putting the batteries into the Remote control" on the power cord from other equipment, stripes or noise may be a problem with better directionality. • Have the COLOR and BRIGHT settings been adjusted properly? ENGLISH Troubleshooting If a problem arises while you are not easy to decide. You cannot turn on the TV • Are the AC plug on page 7 and replace...

Instructions
Page 27
... your PC is not connected correctly. This occurs when the signal which drives the liquid crystal is not a malfunction. TV recived no signal from the time an operation such as changing channels is performed until an image is the time required for a moment. The cable is working correctly or not. The picture resolution is set correctly. 26 This is displayed. If the TV goes back to...
... your PC is not connected correctly. This occurs when the signal which drives the liquid crystal is not a malfunction. TV recived no signal from the time an operation such as changing channels is performed until an image is the time required for a moment. The cable is working correctly or not. The picture resolution is set correctly. 26 This is displayed. If the TV goes back to...

Instructions
Page 30
...; Video input, S-VIDEO (Y/C) input and Audio L/R inputs are available. • Component Video input and Audio L/R inputs are available. JVC COMPANY OF AMERICA Division of JVC Americas Corp. 1700 Valley Road Wayne, New Jersey, 07470 JVC CANADA, INC. 21 Finchdene Square Scarborough, Ontario Canada, M1X 1A7 29 ENGLISH Specifications Item Broadcasting systems Color systems Model LT-17X475 US M TV system NTSC LT-23X475 Channels and frequencies Sound-multiplex systems Power requirements Power consumption Screen size Display resolution Audio output Speakers INPUT...
...; Video input, S-VIDEO (Y/C) input and Audio L/R inputs are available. • Component Video input and Audio L/R inputs are available. JVC COMPANY OF AMERICA Division of JVC Americas Corp. 1700 Valley Road Wayne, New Jersey, 07470 JVC CANADA, INC. 21 Finchdene Square Scarborough, Ontario Canada, M1X 1A7 29 ENGLISH Specifications Item Broadcasting systems Color systems Model LT-17X475 US M TV system NTSC LT-23X475 Channels and frequencies Sound-multiplex systems Power requirements Power consumption Screen size Display resolution Audio output Speakers INPUT...


