Instructions
Page 2
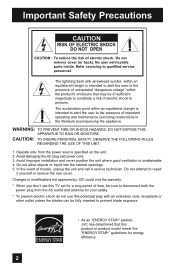
... or other outlet unless the blades can be fully inserted to prevent blade exposure. • As an "ENERGY STAR®" partner, JVC has determined that may be sure to the presence of important operating and maintenance (servicing) instructions in the literature accompanying the appliance. The...persons. In the event of electric shock. No user serviceable parts inside. Changes or modifications not approved by JVC could void the warranty. * When you don't use this TV set for energy efficiency. 2 Do not attempt to qualified service personnel. Do not allow objects or liquid into ...
... or other outlet unless the blades can be fully inserted to prevent blade exposure. • As an "ENERGY STAR®" partner, JVC has determined that may be sure to the presence of important operating and maintenance (servicing) instructions in the literature accompanying the appliance. The...persons. In the event of electric shock. No user serviceable parts inside. Changes or modifications not approved by JVC could void the warranty. * When you don't use this TV set for energy efficiency. 2 Do not attempt to qualified service personnel. Do not allow objects or liquid into ...

Instructions
Page 4
... for long periods of time. 14) Refer all the LED lamps are not lit. 13) Unplug this TV is controlled by inserting or removing the power plug. 19) Batteries shall not be maintained between the set and the wall, as well as inside a tightly enclosed area or piece of furniture. The... TV will generate a slight amount of the way. - The main power supply for installation - Place the TV as close to the minimum distance guidelines shown for safe...
... for long periods of time. 14) Refer all the LED lamps are not lit. 13) Unplug this TV is controlled by inserting or removing the power plug. 19) Batteries shall not be maintained between the set and the wall, as well as inside a tightly enclosed area or piece of furniture. The... TV will generate a slight amount of the way. - The main power supply for installation - Place the TV as close to the minimum distance guidelines shown for safe...
Instructions
Page 6
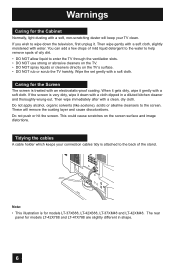
...wipe immediately after with an electrostatic-proof coating. Do not push or hit the screen. This could cause scratches on the TV's surface. • DO NOT rub or scrub the TV harshly. Note: • This illustration is attached to wipe down with a cloth dipped in shape. 6 The rear ...slightly different in a diluted kitchen cleaner and thoroughly wrung-out. Wipe the set gently with a soft cloth. When it gets dirty, wipe it . These will keep your connection cables tidy is for models LT-37X688, LT-42X688, LT-37XM48 and LT-42XM48. You can add a few drops of mild liquid detergent to ...
...wipe immediately after with an electrostatic-proof coating. Do not push or hit the screen. This could cause scratches on the TV's surface. • DO NOT rub or scrub the TV harshly. Note: • This illustration is attached to wipe down with a cloth dipped in shape. 6 The rear ...slightly different in a diluted kitchen cleaner and thoroughly wrung-out. Wipe the set gently with a soft cloth. When it gets dirty, wipe it . These will keep your connection cables tidy is for models LT-37X688, LT-42X688, LT-37XM48 and LT-42XM48. You can add a few drops of mild liquid detergent to ...
Instructions
Page 9
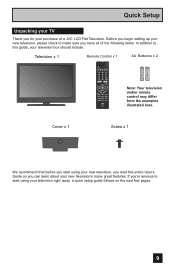
...you 're anxious to this entire User's Guide so you for your purchase of a JVC LCD Flat Television. VOL + MUTING OK AVORITE DVR STATUS SOUND VIDEO ASPECT GUIDE SUB CH TV/VCR C.C. Before you begin setting up your new television, please check to make sure you have all of the following items.... In addition to start using your television right away, a quick setup guide follows on the next few pages. 9 Quick Setup Unpacking your TV Thank you ...
...you 're anxious to this entire User's Guide so you for your purchase of a JVC LCD Flat Television. VOL + MUTING OK AVORITE DVR STATUS SOUND VIDEO ASPECT GUIDE SUB CH TV/VCR C.C. Before you begin setting up your new television, please check to make sure you have all of the following items.... In addition to start using your television right away, a quick setup guide follows on the next few pages. 9 Quick Setup Unpacking your TV Thank you ...
Instructions
Page 10
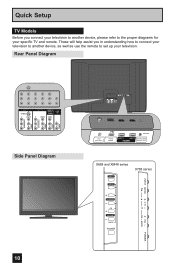
... 2 DIGITAL AUDIO OPTICAL OUT X688 and XM48 series INPUT X788 series MENU INPUT MENU C H CHANNEL OK VOLUME BACK POWER VOL OK BACK POWER Quick Setup TV Models Before you in understanding how to connect your television to another device, please refer to...
... 2 DIGITAL AUDIO OPTICAL OUT X688 and XM48 series INPUT X788 series MENU INPUT MENU C H CHANNEL OK VOLUME BACK POWER VOL OK BACK POWER Quick Setup TV Models Before you in understanding how to connect your television to another device, please refer to...
Instructions
Page 14
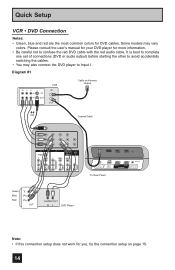
..., try the connection setup on page 15. 14 Some models may also connect the DVD player to Input 1. It is best to complete one set of connections (DVD or audio output) before starting the other to confuse the red DVD cable with the red audio cable. Diagram #1 R LV... R INPUT 4 INPUT 5 / INPUT 1 AUDIO AUDIO OUT Y VIDEO VIDEO PB L L L PR R R R 75 Ω (VHF/UHF) PHOTO VIEWER INPUT 1 SERVICE INPUT 2 DIGITAL AUDIO OPTICAL OUT TV Rear Panel Green Blue Red Y PB PR OUT AUDIO OUT R L DVD Player Note: • If this connection setup does not work for DVD cables. Please...
..., try the connection setup on page 15. 14 Some models may also connect the DVD player to Input 1. It is best to complete one set of connections (DVD or audio output) before starting the other to confuse the red DVD cable with the red audio cable. Diagram #1 R LV... R INPUT 4 INPUT 5 / INPUT 1 AUDIO AUDIO OUT Y VIDEO VIDEO PB L L L PR R R R 75 Ω (VHF/UHF) PHOTO VIEWER INPUT 1 SERVICE INPUT 2 DIGITAL AUDIO OPTICAL OUT TV Rear Panel Green Blue Red Y PB PR OUT AUDIO OUT R L DVD Player Note: • If this connection setup does not work for DVD cables. Please...
Instructions
Page 18
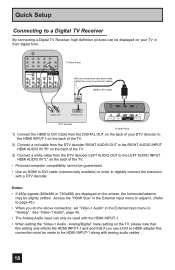
...commercially available) in the External Input menu to the HDMI INPUT-1 along with the HDMI INPUT-1. • When setting the "Video-1 Audio - Analog/Digital" menu setting on the back of the TV. • Personal computer compatibility cannot be made , tighten the screw to DVI Cable from the DTV decoder LEFT... AUDIO OUT to the LEFT AUDIO INPUT HDMI AUDIO IN "L" on the TV, please note that this setting only effects the HDMI INPUT-1 jack and that if you do the above connection, set "Video-1 Audio" in order to digitally connect the television with a DTV decoder. HDMI...
...commercially available) in the External Input menu to the HDMI INPUT-1 along with the HDMI INPUT-1. • When setting the "Video-1 Audio - Analog/Digital" menu setting on the back of the TV. • Personal computer compatibility cannot be made , tighten the screw to DVI Cable from the DTV decoder LEFT... AUDIO OUT to the LEFT AUDIO INPUT HDMI AUDIO IN "L" on the TV, please note that this setting only effects the HDMI INPUT-1 jack and that if you do the above connection, set "Video-1 Audio" in order to digitally connect the television with a DTV decoder. HDMI...
Instructions
Page 19
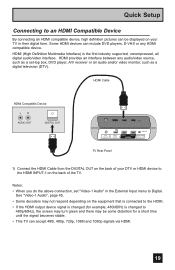
... screen may turn green and there may be displayed on the back of the TV. Some HDMI devices can accept 480i, 480p, 720p, 1080i and 1080p signals via HDMI. 19 Notes: • When you do the above connection, set -top box, DVD player, A/V receiver or an audio and/or video monitor, ...connecting an HDMI compatible device, high definition pictures can be some distortion for a short time until the signal becomes stable. • This TV can include DVD players, D-VHS or any audio/video source, such as a set "Video-1 Audio" in the External Input menu to the HDMI INPUT-1 on the back of your...
... screen may turn green and there may be displayed on the back of the TV. Some HDMI devices can accept 480i, 480p, 720p, 1080i and 1080p signals via HDMI. 19 Notes: • When you do the above connection, set -top box, DVD player, A/V receiver or an audio and/or video monitor, ...connecting an HDMI compatible device, high definition pictures can be some distortion for a short time until the signal becomes stable. • This TV can include DVD players, D-VHS or any audio/video source, such as a set "Video-1 Audio" in the External Input menu to the HDMI INPUT-1 on the back of your...
Instructions
Page 22
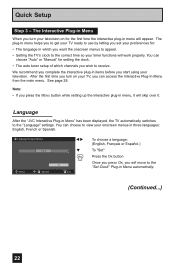
... on for setting the clock. • The auto tuner setup of which you press the MENU button while setting up the interactive plug-in menu will skip over it will appear. After the first time you turn your TV, you start using your television. Language After the "JVC Interactive Plug-...in Menu" has been displayed, the TV automatically switches to the correct time...
... on for setting the clock. • The auto tuner setup of which you press the MENU button while setting up the interactive plug-in menu will skip over it will appear. After the first time you turn your TV, you start using your television. Language After the "JVC Interactive Plug-...in Menu" has been displayed, the TV automatically switches to the correct time...
Instructions
Page 23
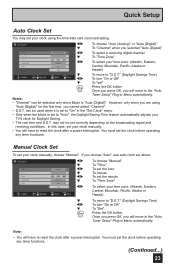
... or Off" † To "set the minute To "Time Zone" To select your TV's clock for the first time, you choose "Auto", see auto clock set above. may set your clock manually, choose "Manual". Quick Setup Auto Clock Set You may not be used when it is set to "On" in Menu automatically.... You must set the clock before operating any ...
... or Off" † To "set the minute To "Time Zone" To select your TV's clock for the first time, you choose "Auto", see auto clock set above. may set your clock manually, choose "Manual". Quick Setup Auto Clock Set You may not be used when it is set to "On" in Menu automatically.... You must set the clock before operating any ...

Instructions
Page 27
... menu you selected will appear Press the BACK button to return to the previous menu screen Initial Setup 1/2 Noise Muting Language Front Panel Lock V-Chip Set Lock Code Closed Caption On English Off Select Operate BACK Back MENU Exit Initial Setup 1/2 Initial Setup Auto Shut Off Software Version Power Indicator Optical...
... menu you selected will appear Press the BACK button to return to the previous menu screen Initial Setup 1/2 Noise Muting Language Front Panel Lock V-Chip Set Lock Code Closed Caption On English Off Select Operate BACK Back MENU Exit Initial Setup 1/2 Initial Setup Auto Shut Off Software Version Power Indicator Optical...

Instructions
Page 28
... On Volume Volume Limit Reset Current 50 Select Operate Back Back Menu Exit Sound Adjust Clock/Timers Set Clock On / Off Timer Select OK BACK MENU Operate Back Exit Clock/Timers Language/Langue/Idioma English Set Select OK BACK MENU Operate Back Exit Interactive Plug-in Menu Photo Viewer Device Multi-Screen...
... On Volume Volume Limit Reset Current 50 Select Operate Back Back Menu Exit Sound Adjust Clock/Timers Set Clock On / Off Timer Select OK BACK MENU Operate Back Exit Clock/Timers Language/Langue/Idioma English Set Select OK BACK MENU Operate Back Exit Interactive Plug-in Menu Photo Viewer Device Multi-Screen...
Instructions
Page 29
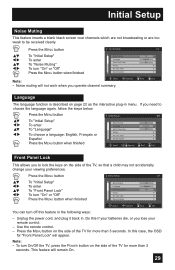
... a language: English, Français or Español Press the MENU button when finished Initial Setup 1/2 Noise Muting Language Front Panel Lock V-Chip Set Lock Code Closed Caption On English Off Select OK BACK MENU Operate Back Exit Front Panel Lock This allows you to be received clearly. Unplug... This feature inserts a blank black screen over channels which are not broadcasting or are too weak to lock the keys on the side of the TV for more than 3 seconds. Do this case, the OSD for more than 3 seconds. In this if your batteries die, or you operate channel summary. ...
... a language: English, Français or Español Press the MENU button when finished Initial Setup 1/2 Noise Muting Language Front Panel Lock V-Chip Set Lock Code Closed Caption On English Off Select OK BACK MENU Operate Back Exit Front Panel Lock This allows you to be received clearly. Unplug... This feature inserts a blank black screen over channels which are not broadcasting or are too weak to lock the keys on the side of the TV for more than 3 seconds. Do this case, the OSD for more than 3 seconds. In this if your batteries die, or you operate channel summary. ...
Instructions
Page 30
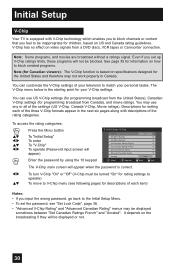
... and "Advanced Canadian Rating" menus may use US V-Chip settings (for programming broadcast from the United States), Canadian V-Chip settings (for descriptions of each of the rating categories. Initial Setup V-Chip Your TV is equipped with descriptions of the three V-Chip formats appear in...screen will appear) Enter the password by using the 10 keypad Initial Setup > V-Chip V-Chip On Set US TV Ratings Set Movie Ratings Set Canadian Ratings English Set Canadian Ratings French Advanced V-Chip Rating Advanced Canadian Rating Unrated Select Operate View BACK Back MENU Exit &#...
... and "Advanced Canadian Rating" menus may use US V-Chip settings (for programming broadcast from the United States), Canadian V-Chip settings (for descriptions of each of the rating categories. Initial Setup V-Chip Your TV is equipped with descriptions of the three V-Chip formats appear in...screen will appear) Enter the password by using the 10 keypad Initial Setup > V-Chip V-Chip On Set US TV Ratings Set Movie Ratings Set Canadian Ratings English Set Canadian Ratings French Advanced V-Chip Rating Advanced Canadian Rating Unrated Select Operate View BACK Back MENU Exit &#...
Instructions
Page 32
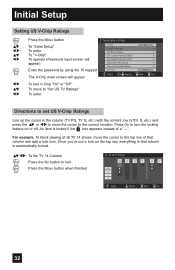
... to the correct location. Press OK to lock Press the MENU button when finished Set US TV Ratings V/FV S L D TV TV TV TV MA 14 PG G - - - - - - - - - - - - - - - For example. To block viewing of all TV 14 shows, move the cursor to the top row of a "-". Select OK Operate...OK button to turn V-Chip "On" or "Off" To move to "Set US TV Ratings" To enter Initial Setup > V-Chip V-Chip Set US TV Ratings Set Movie Ratings Set Canadian Ratings English Set Canadian Ratings French Advanced V-Chip Rating Advanced Canadian Rating Unrated Select OK Operate On...
... to the correct location. Press OK to lock Press the MENU button when finished Set US TV Ratings V/FV S L D TV TV TV TV MA 14 PG G - - - - - - - - - - - - - - - For example. To block viewing of all TV 14 shows, move the cursor to the top row of a "-". Select OK Operate...OK button to turn V-Chip "On" or "Off" To move to "Set US TV Ratings" To enter Initial Setup > V-Chip V-Chip Set US TV Ratings Set Movie Ratings Set Canadian Ratings English Set Canadian Ratings French Advanced V-Chip Rating Advanced Canadian Rating Unrated Select OK Operate On...
Instructions
Page 33
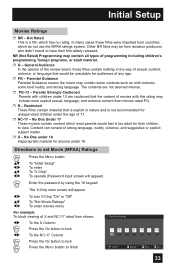
... for anyone under the age of the review board, these films were imported from amateur producers who didn't intend to have their children to finish Set Movie Ratings X NC 17 R PG 13 PG G NR - - - - - - - Other NR films may include more explicit sexual, language, and violence ...the 10 keypad √® π† √® The V-Chip main screen will appear To turn V-Chip "On" or "Off" To "Set Movie Ratings" To enter movies menu For example: To block viewing of programming including children's programming, foreign programs, or adult material. ❒ G - ...
... for anyone under the age of the review board, these films were imported from amateur producers who didn't intend to have their children to finish Set Movie Ratings X NC 17 R PG 13 PG G NR - - - - - - - Other NR films may include more explicit sexual, language, and violence ...the 10 keypad √® π† √® The V-Chip main screen will appear To turn V-Chip "On" or "Off" To "Set Movie Ratings" To enter movies menu For example: To block viewing of programming including children's programming, foreign programs, or adult material. ❒ G - ...
Instructions
Page 34
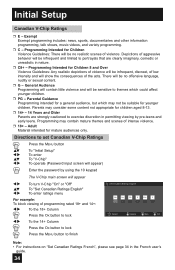
... √® Press the OK button to lock To the 14+ Column Press the OK button to lock Press the MENU button to finish Set Canadian Ratings English 18+ 14+ PG - - - Parental Guidance Programming intended for a general audience, but which could affect younger children. &#...10066; PG - Adult Material intended for younger children. Select OK Operate BACK Back MENU Exit Note: • For instructions on "Set Canadian Ratings French", please see page 34 in nature. ❒ C8+ - Programming may not be no offensive language, nudity or sexual content. &#...
... √® Press the OK button to lock To the 14+ Column Press the OK button to lock Press the MENU button to finish Set Canadian Ratings English 18+ 14+ PG - - - Parental Guidance Programming intended for a general audience, but which could affect younger children. &#...10066; PG - Adult Material intended for younger children. Select OK Operate BACK Back MENU Exit Note: • For instructions on "Set Canadian Ratings French", please see page 34 in nature. ❒ C8+ - Programming may not be no offensive language, nudity or sexual content. &#...
Instructions
Page 35
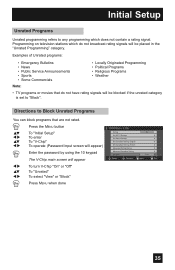
... To "Unrated" To select "View" or "Block" Press MENU when done Initial Setup > V-Chip V-Chip On Set US TV Ratings Set Movie Ratings Set Canadian Ratings English Set Canadian Ratings French Advanced V-Chip Rating Advanced Canadian Rating Unrated Select Operate View BACK Back MENU Exit 35 Directions to "...keypad √® π† √® The V-Chip main screen will be blocked if the unrated category is set to Block Unrated Programs You can block programs that are not rated. Initial Setup Unrated Programs Unrated programming refers to any ...
... To "Unrated" To select "View" or "Block" Press MENU when done Initial Setup > V-Chip V-Chip On Set US TV Ratings Set Movie Ratings Set Canadian Ratings English Set Canadian Ratings French Advanced V-Chip Rating Advanced Canadian Rating Unrated Select Operate View BACK Back MENU Exit 35 Directions to "...keypad √® π† √® The V-Chip main screen will be blocked if the unrated category is set to Block Unrated Programs You can block programs that are not rated. Initial Setup Unrated Programs Unrated programming refers to any ...
Instructions
Page 36
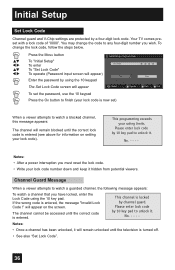
Your TV comes preset with a lock code of "0000". No. - - - - Notes: • After a power interruption you wish. The channel cannot be accessed until the correct code is turned off. • See also "Set Lock Code". 36 Notes: • Once a channel has been unlocked, it will appear) Enter the ... the steps below. π† √® π† √® Press the MENU button To "Initial Setup" To enter To "Set Lock Code" To operate (Password input screen will remain unlocked until the correct lock code is entered (see above for information on the screen. If...
Your TV comes preset with a lock code of "0000". No. - - - - Notes: • After a power interruption you wish. The channel cannot be accessed until the correct code is turned off. • See also "Set Lock Code". 36 Notes: • Once a channel has been unlocked, it will appear) Enter the ... the steps below. π† √® π† √® Press the MENU button To "Initial Setup" To enter To "Set Lock Code" To operate (Password input screen will remain unlocked until the correct lock code is entered (see above for information on the screen. If...
Instructions
Page 37
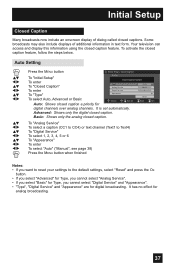
Some broadcasts may also include displays of dialog called closed caption a priority for analog broadcasting. 37 To activate the closed caption. Auto Setting π† √® π† √® π† √® π† √® π† √® π&#... enter To select "Auto" ("Manual", see page 38) Press the MENU button when finished Notes: • If you want to reset your settings to the default settings, select "Reset" and press the OK button. • If you select "Advanced" for Type, you cannot select "Analog Service". •...
Some broadcasts may also include displays of dialog called closed caption a priority for analog broadcasting. 37 To activate the closed caption. Auto Setting π† √® π† √® π† √® π† √® π† √® π&#... enter To select "Auto" ("Manual", see page 38) Press the MENU button when finished Notes: • If you want to reset your settings to the default settings, select "Reset" and press the OK button. • If you select "Advanced" for Type, you cannot select "Analog Service". •...


