Instructions
Page 6
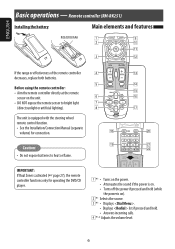
... incoming calls. 4*1,2 Adjusts the volume level. 6 The unit is equipped with the steering wheel remote control function. • See the Installation/Connection Manual (separate volume) for operating the DVD/CD player. 1*1 • Turns on the power. • Attenuates the sound if the power is on the unit. • DO NOT expose the remote...
... incoming calls. 4*1,2 Adjusts the volume level. 6 The unit is equipped with the steering wheel remote control function. • See the Installation/Connection Manual (separate volume) for operating the DVD/CD player. 1*1 • Turns on the power. • Attenuates the sound if the power is on the unit. • DO NOT expose the remote...

Instructions
Page 7
...erase . SD/USB/other discs (except VCD/CD): Selects the folders. • 4 / ¢: - player operations: • ∞: Pauses/stops or resumes playback. • 5: Enters the main menu (then ...forward search for "Bluetooth AUDIO") w TUNER/SAT: Selects the bands. DVD-VR: Selects the program/playlist. Press and hold : Manual Search For satellite tuner operations: • 5 / ∞: Selects ...DVD-VR: Shows the Play List screen. For Apple iPod/JVC D. ENGLISH 5*1,2 Selects surround mode. 6 • DVD/DivX 6: Shows the disc menu. • VCD: Resumes PBC playback. • DVD...
...erase . SD/USB/other discs (except VCD/CD): Selects the folders. • 4 / ¢: - player operations: • ∞: Pauses/stops or resumes playback. • 5: Enters the main menu (then ...forward search for "Bluetooth AUDIO") w TUNER/SAT: Selects the bands. DVD-VR: Selects the program/playlist. Press and hold : Manual Search For satellite tuner operations: • 5 / ∞: Selects ...DVD-VR: Shows the Play List screen. For Apple iPod/JVC D. ENGLISH 5*1,2 Selects surround mode. 6 • DVD/DivX 6: Shows the disc menu. • VCD: Resumes PBC playback. • DVD...
Instructions
Page 8
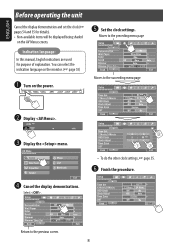
... . ! ENGLISH Before operating the unit Cancel the display demonstration and set the clock ( pages 54 and 55 for purpose of explanation. Indication language: In this manual, English indications are used for details). • Non-available items will be displayed being shaded on the power. @ Set the clock settings.
... . ! ENGLISH Before operating the unit Cancel the display demonstration and set the clock ( pages 54 and 55 for purpose of explanation. Indication language: In this manual, English indications are used for details). • Non-available items will be displayed being shaded on the power. @ Set the clock settings.

Instructions
Page 10
... indicator lights up when receiving an FM stereo broadcast with sufficient signal strength. ENGLISH Listening to search for a station-Auto Search. • Manual Search: Hold either [4]or [¢] until "Manual Search" appears on the touch panel. In the explanation, they are indicated inside [ ]. • You can also use SOURCE on the monitor...
... indicator lights up when receiving an FM stereo broadcast with sufficient signal strength. ENGLISH Listening to search for a station-Auto Search. • Manual Search: Hold either [4]or [¢] until "Manual Search" appears on the touch panel. In the explanation, they are indicated inside [ ]. • You can also use SOURCE on the monitor...

Instructions
Page 12
ENGLISH Manual presetting Ex.: Storing FM station of 92.5 MHz into preset number 4 of the FM1 band. 1 Display the Preset List. Selecting preset stations On the remote: 1 2 or On the unit: To select directly on the touch panel 2 Tune in preset number 4. 12 To select from the Preset List 1 2 The station selected in step 2 is now stored in to a station you want to preset. 3 Select a preset number.
ENGLISH Manual presetting Ex.: Storing FM station of 92.5 MHz into preset number 4 of the FM1 band. 1 Display the Preset List. Selecting preset stations On the remote: 1 2 or On the unit: To select directly on the touch panel 2 Tune in preset number 4. 12 To select from the Preset List 1 2 The station selected in step 2 is now stored in to a station you want to preset. 3 Select a preset number.

Instructions
Page 37
To read a message. ( page 63) To make a call ) Hold any button on the monitor to ... To stop ringing (canceling the outgoing call 1 • You can read the message later, press [No]. • The message is stored into = . ( page 62) When is set to inform you want to call. To read the messages on the monitor. • You cannot edit or send a message through the unit. ENGLISH When an Text Message comes in... 3 If the cellular phone is compatible with Text Message, you can also use AV MENU on the monitor panel. 2 Cancel • Redial: Shows the list of the phone ...
To read a message. ( page 63) To make a call ) Hold any button on the monitor to ... To stop ringing (canceling the outgoing call 1 • You can read the message later, press [No]. • The message is stored into = . ( page 62) When is set to inform you want to call. To read the messages on the monitor. • You cannot edit or send a message through the unit. ENGLISH When an Text Message comes in... 3 If the cellular phone is compatible with Text Message, you can also use AV MENU on the monitor panel. 2 Cancel • Redial: Shows the list of the phone ...
Instructions
Page 54
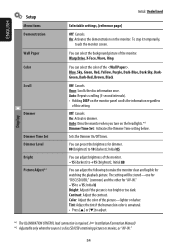
You can preset the brightness for "AV-IN." -15 to +15; Display *1 The ILLUMINATION CONTROL lead connection is required. ( Installation/Connection Manual) *2 Adjustable only when the source is too bright or too dark. You can select the color of the . Warp Drive, X-Face, Wave, Ring You can ...
You can preset the brightness for "AV-IN." -15 to +15; Display *1 The ILLUMINATION CONTROL lead connection is required. ( Installation/Connection Manual) *2 Adjustable only when the source is too bright or too dark. You can select the color of the . Warp Drive, X-Face, Wave, Ring You can ...
Instructions
Page 59
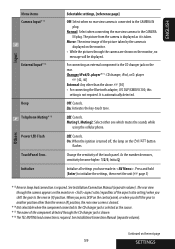
...CAMERA IN plug. Press and hold [Enter] to another position other than the above. [50] • For connecting the Bluetooth adapter, JVC DLP/XMDJVC100, this setting is displayed on the monitor. • While the pictures through the CD changer jack is shown. *16 The TEL...is automatically detected. Continued on the rear. Mirror: The mirror image of the touch panel. player*15: CD changer, iPod, or D. On: Activates the key-touch tone. See Installation/Connection Manual (separate volume). player [42, 46] External: Any other than the reverse (R) position, the rear view screen is...
...CAMERA IN plug. Press and hold [Enter] to another position other than the above. [50] • For connecting the Bluetooth adapter, JVC DLP/XMDJVC100, this setting is displayed on the monitor. • While the pictures through the CD changer jack is shown. *16 The TEL...is automatically detected. Continued on the rear. Mirror: The mirror image of the touch panel. player*15: CD changer, iPod, or D. On: Activates the key-touch tone. See Installation/Connection Manual (separate volume). player [42, 46] External: Any other than the reverse (R) position, the rear view screen is...
Instructions
Page 63
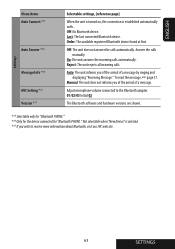
..." is established automatically with... On: The unit answers the incoming calls automatically. Off: The unit does not answer the calls automatically. Manual: The unit does not informs you of the arrival of a message by ringing and displaying "Receiving Message." Order: The available registered Bluetooth...found at first. Last: The last connected Bluetooth device. Adjust microphone volume connected to receive more information about Bluetooth, visit our JVC web site. 63 SETTINGS Auto: The unit informs you wish to the Bluetooth adapter. 01/02/03 Initial 02 The Bluetooth software...
..." is established automatically with... On: The unit answers the incoming calls automatically. Off: The unit does not answer the calls automatically. Manual: The unit does not informs you of the arrival of a message by ringing and displaying "Receiving Message." Order: The available registered Bluetooth...found at first. Last: The last connected Bluetooth device. Adjust microphone volume connected to receive more information about Bluetooth, visit our JVC web site. 63 SETTINGS Auto: The unit informs you wish to the Bluetooth adapter. 01/02/03 Initial 02 The Bluetooth software...

Instructions
Page 65
Disc General • In this manual, words "track" and "file" are interchangeably used. • This unit can also play back 8 cm (3-3/16 inch) discs. • This unit can only play this ... can be correctly displayed. ENGLISH More about this disc Check the disc" appears on the monitor. Changing the source • If you select "DISC" for DVD Speaker indicators Signal indicators FM/AM Storing stations in . If the source is over, received stations are not coming in memory • When SSM is...
Disc General • In this manual, words "track" and "file" are interchangeably used. • This unit can also play back 8 cm (3-3/16 inch) discs. • This unit can only play this ... can be correctly displayed. ENGLISH More about this disc Check the disc" appears on the monitor. Changing the source • If you select "DISC" for DVD Speaker indicators Signal indicators FM/AM Storing stations in . If the source is over, received stations are not coming in memory • When SSM is...
Instructions
Page 73
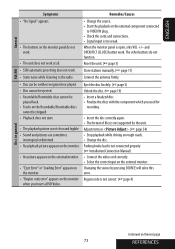
...page 19) • Insert a finalized disc. • Finalize the discs with the component which you insert a DVD Video. Parking brake lead is not connected properly. ( Installation/Connection Manual) • Connect the video cord correctly. • Select the correct input on the next page 73 REFERENCES Region...General FM/AM Symptoms Remedies/Causes • "No Signal" appears. • The buttons on the monitor panel do not function. Store stations manually. ( page 11) • Static noise while listening to VIDEO IN plug. • Check the cords and connections. • Signal ...
...page 19) • Insert a finalized disc. • Finalize the discs with the component which you insert a DVD Video. Parking brake lead is not connected properly. ( Installation/Connection Manual) • Connect the video cord correctly. • Select the correct input on the next page 73 REFERENCES Region...General FM/AM Symptoms Remedies/Causes • "No Signal" appears. • The buttons on the monitor panel do not function. Store stations manually. ( page 11) • Static noise while listening to VIDEO IN plug. • Check the cords and connections. • Signal ...
