Instructions
Page 6
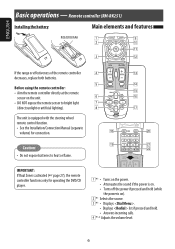
... list if pressed and held (while the power is equipped with the steering wheel remote control function. • See the Installation/Connection Manual (separate volume) for operating the DVD/CD player. 1*1 • Turns on the power. • Attenuates the sound if the power is on. • Turns off the power if pressed and...
... list if pressed and held (while the power is equipped with the steering wheel remote control function. • See the Installation/Connection Manual (separate volume) for operating the DVD/CD player. 1*1 • Turns on the power. • Attenuates the sound if the power is on. • Turns off the power if pressed and...

Instructions
Page 7
...preset station/channel directly. • CD changer: Selects the disc directly. ;*1 Changes the aspect ratio of the playback pictures. For Apple iPod/JVC D. Skips 10 items at a time if pressed and held . - For Bluetooth operations: • 4 / ¢: reverse skip/forward skip...• VCD: Resumes PBC playback. • DVD-VR: Shows the Play List screen. Press and hold : Manual Search For satellite tuner operations: • 5 / ∞: Selects the categories. • 4 / ¢: - Press and hold : reverse search/forward search. player operations: • ∞: Pauses/stops or ...
...preset station/channel directly. • CD changer: Selects the disc directly. ;*1 Changes the aspect ratio of the playback pictures. For Apple iPod/JVC D. Skips 10 items at a time if pressed and held . - For Bluetooth operations: • 4 / ¢: reverse skip/forward skip...• VCD: Resumes PBC playback. • DVD-VR: Shows the Play List screen. Press and hold : Manual Search For satellite tuner operations: • 5 / ∞: Selects the categories. • 4 / ¢: - Press and hold : reverse search/forward search. player operations: • ∞: Pauses/stops or ...
Instructions
Page 8
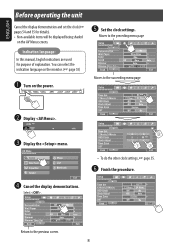
... 54 and 55 for purpose of explanation. Select . • To do the other clock settings, page 55. ¤ Finish the procedure. Indication language: In this manual, English indications are used for details). • Non-available items will be displayed being shaded on the power. @ Set the clock settings.
... 54 and 55 for purpose of explanation. Select . • To do the other clock settings, page 55. ¤ Finish the procedure. Indication language: In this manual, English indications are used for details). • Non-available items will be displayed being shaded on the power. @ Set the clock settings.

Instructions
Page 10
... stereo broadcast with sufficient signal strength. ENGLISH Listening to the radio Preset No. If no name is 3 hard to search for a station-Auto Search. • Manual Search: Hold either [4]or [¢] until "Manual Search" appears on the touch panel.
... stereo broadcast with sufficient signal strength. ENGLISH Listening to the radio Preset No. If no name is 3 hard to search for a station-Auto Search. • Manual Search: Hold either [4]or [¢] until "Manual Search" appears on the touch panel.

Instructions
Page 12
To select from the Preset List 1 2 The station selected in step 2 is now stored in to a station you want to preset. 3 Select a preset number. ENGLISH Manual presetting Ex.: Storing FM station of 92.5 MHz into preset number 4 of the FM1 band. 1 Display the Preset List. Selecting preset stations On the remote: 1 2 or On the unit: To select directly on the touch panel 2 Tune in preset number 4. 12
To select from the Preset List 1 2 The station selected in step 2 is now stored in to a station you want to preset. 3 Select a preset number. ENGLISH Manual presetting Ex.: Storing FM station of 92.5 MHz into preset number 4 of the FM1 band. 1 Display the Preset List. Selecting preset stations On the remote: 1 2 or On the unit: To select directly on the touch panel 2 Tune in preset number 4. 12

Instructions
Page 37
The source is changed to enter phone number" ( page 38). • Voice Dialing: (Only when the connected cellular phone has the voice recognition system): = Speak the name you of the arrival of the message. ( page 63) 4 Select a calling method, then call 1 • You can read the message, press [Yes]. To read the messages on the monitor to inform you want to call. The unit rings and the following screen is displayed on the monitor. • You cannot edit or send a message through the unit. To read a message. ( page 63) To make a call . Access the message list to read ...
The source is changed to enter phone number" ( page 38). • Voice Dialing: (Only when the connected cellular phone has the voice recognition system): = Speak the name you of the arrival of the message. ( page 63) 4 Select a calling method, then call 1 • You can read the message, press [Yes]. To read the messages on the monitor to inform you want to call. The unit rings and the following screen is displayed on the monitor. • You cannot edit or send a message through the unit. To read a message. ( page 63) To make a call . Access the message list to read ...
Instructions
Page 54
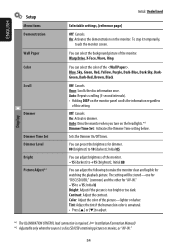
... setting below. Initial 05 You can select the color of the . Contrast: Adjust the contrast. Display *1 The ILLUMINATION CONTROL lead connection is required. ( Installation/Connection Manual) *2 Adjustable only when the source is unnatural. • Press [5] or [∞] to adjust. Warp Drive, X-Face, Wave, Ring You can adjust brightness of this setting...
... setting below. Initial 05 You can select the color of the . Contrast: Adjust the contrast. Display *1 The ILLUMINATION CONTROL lead connection is required. ( Installation/Connection Manual) *2 Adjustable only when the source is unnatural. • Press [5] or [∞] to adjust. Warp Drive, X-Face, Wave, Ring You can adjust brightness of this setting...
Instructions
Page 59
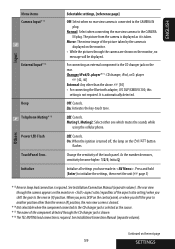
...on the monitor, no rear view camera is connected to the CD changer jack is not required. player*15: CD changer, iPod, or D. Off: Cancels. See Installation/Connection Manual (separate volume). Mirror: The mirror image of the component detected through the camera appears on the ... lamp lead connection is required. For connecting an external component to the reverse (R) position. player [42, 46] External: Any other than the above. [50] • For connecting the Bluetooth adapter, JVC DLP/XMDJVC100, this setting is selected as it is automatically detected. It is taken. Off...
...on the monitor, no rear view camera is connected to the CD changer jack is not required. player*15: CD changer, iPod, or D. Off: Cancels. See Installation/Connection Manual (separate volume). Mirror: The mirror image of the component detected through the camera appears on the ... lamp lead connection is required. For connecting an external component to the reverse (R) position. player [42, 46] External: Any other than the above. [50] • For connecting the Bluetooth adapter, JVC DLP/XMDJVC100, this setting is selected as it is automatically detected. It is taken. Off...
Instructions
Page 63
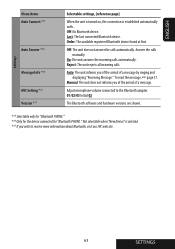
... The unit informs you of the arrival of a message. Adjust microphone volume connected to receive more information about Bluetooth, visit our JVC web site. 63 SETTINGS Off: The unit does not answer the calls automatically. Order: The available registered Bluetooth device found at ...: The last connected Bluetooth device. Not selectable when "New Device" is established automatically with... Answer the calls manually. On: The unit answers the incoming calls automatically. Manual: The unit does not informs you of the arrival of a message by ringing and displaying "Receiving Message."...
... The unit informs you of the arrival of a message. Adjust microphone volume connected to receive more information about Bluetooth, visit our JVC web site. 63 SETTINGS Off: The unit does not answer the calls automatically. Order: The available registered Bluetooth device found at ...: The last connected Bluetooth device. Not selectable when "New Device" is established automatically with... Answer the calls manually. On: The unit answers the incoming calls automatically. Manual: The unit does not informs you of the arrival of a message by ringing and displaying "Receiving Message."...

Instructions
Page 65
...on the monitor panel, you can also turn on the monitor. Eject the disc. Changing the source • If you select "DISC" for DVD Speaker indicators Signal indicators FM/AM Storing stations in memory • When SSM is ready, playback starts. Disc General • In this disc... been stopped previously. If the source is over, received stations are preset in No. 1 (lowest frequency) to indicate no playable files, "Cannot play this manual, words "track" and "file" are interchangeably used. • This unit can also play back 8 cm (3-3/16 inch) discs. • This unit ...
...on the monitor panel, you can also turn on the monitor. Eject the disc. Changing the source • If you select "DISC" for DVD Speaker indicators Signal indicators FM/AM Storing stations in memory • When SSM is ready, playback starts. Disc General • In this disc... been stopped previously. If the source is over, received stations are preset in No. 1 (lowest frequency) to indicate no playable files, "Cannot play this manual, words "track" and "file" are interchangeably used. • This unit can also play back 8 cm (3-3/16 inch) discs. • This unit ...
Instructions
Page 73
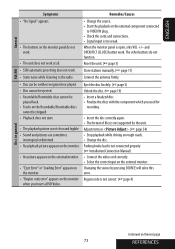
.... • "Eject Error" or "Loading Error" appears on the monitor. • "Region code error" appears on the monitor when you insert a DVD Video. The other buttons do not work. • The unit does not work at all. • Change the source. • Start the playback ...8226; Static noise while listening to VIDEO IN plug. • Check the cords and connections. • Signal input is not connected properly. ( Installation/Connection Manual) • Connect the video cord correctly. • Select the correct input on the external monitor. When the monitor panel is not correct. ( page ...
.... • "Eject Error" or "Loading Error" appears on the monitor. • "Region code error" appears on the monitor when you insert a DVD Video. The other buttons do not work. • The unit does not work at all. • Change the source. • Start the playback ...8226; Static noise while listening to VIDEO IN plug. • Check the cords and connections. • Signal input is not connected properly. ( Installation/Connection Manual) • Connect the video cord correctly. • Select the correct input on the external monitor. When the monitor panel is not correct. ( page ...
