
Instructions
Page 3
...; Stop the car before operation, to indicate... : Built-in the CD changer 11 Playing from an SD card 11 Playing from the unit. ...are used to ensure your desired response begins. Please read this manual • Button operations are mainly explained with the illustrations in ... Basic operations 7 Radio operations 8 Disc/SD card/USB memory operations 11 Playing a disc in the unit 11 Playing discs in CD player operations. : External CD changer operations. :...PSM 20 Title assignment 24 Satellite radio operations 25 iPod®/D. CONTENTS Control panel 5 Remote controller - ENGLISH...
...; Stop the car before operation, to indicate... : Built-in the CD changer 11 Playing from an SD card 11 Playing from the unit. ...are used to ensure your desired response begins. Please read this manual • Button operations are mainly explained with the illustrations in ... Basic operations 7 Radio operations 8 Disc/SD card/USB memory operations 11 Playing a disc in the unit 11 Playing discs in CD player operations. : External CD changer operations. :...PSM 20 Title assignment 24 Satellite radio operations 25 iPod®/D. CONTENTS Control panel 5 Remote controller - ENGLISH...

Instructions
Page 8
...in to avoid damaging the speakers by the sudden increase of the output level. Lower the volume before playing a disc to a station manually In step ! Selected band appears. To tune in a moment (ATT) To restore the sound, press it again. PSM" on volume...current clock time while the power is received, searching stops. above... 1 2 Select a desired station frequency. 8 Select "24H/12H," then "24Hours" or "12Hours." Radio operations ~ Ÿ ! Basic settings • See also "General settings - Select "Clock M" (minute), then adjust the minute. To turn off Caution on pages...
...in to avoid damaging the speakers by the sudden increase of the output level. Lower the volume before playing a disc to a station manually In step ! Selected band appears. To tune in a moment (ATT) To restore the sound, press it again. PSM" on volume...current clock time while the power is received, searching stops. above... 1 2 Select a desired station frequency. 8 Select "24H/12H," then "24Hours" or "12Hours." Radio operations ~ Ÿ ! Basic settings • See also "General settings - Select "Clock M" (minute), then adjust the minute. To turn off Caution on pages...

Instructions
Page 9
... only-LO (local)/DX (DistanceExtreme) 1 Enter the MODE menu (see page 4). 3 Reception improves, but stereo effect will be lost. To tune in the FM band. Manual presetting Ex.: Storing FM station of 92.5 MHz into . 4 MO indicator lights up. 2 Enter the MODE menu (see page 4). 2 3 Local FM stations with sufficient signal...
... only-LO (local)/DX (DistanceExtreme) 1 Enter the MODE menu (see page 4). 3 Reception improves, but stereo effect will be lost. To tune in the FM band. Manual presetting Ex.: Storing FM station of 92.5 MHz into . 4 MO indicator lights up. 2 Enter the MODE menu (see page 4). 2 3 Local FM stations with sufficient signal...

Instructions
Page 12
... can be played repeatedly until you change the source. • Removing the USB memory will be displayed when a JVC CD Text compatible CD changer is connected. • For connection, see Installation/Connection Manual (separate volume). About MP3 and WMA tracks MP3 and WMA "tracks" (words "file" and "track" are used...been stopped previously. • If a different SD card or USB memory is recommended to use the CH-X99, CH-X100, and KD-MK series CD changers with your safety driving. • Make sure all important data have been backed up to the previous position. To fast-forward ...
... can be played repeatedly until you change the source. • Removing the USB memory will be displayed when a JVC CD Text compatible CD changer is connected. • For connection, see Installation/Connection Manual (separate volume). About MP3 and WMA tracks MP3 and WMA "tracks" (words "file" and "track" are used...been stopped previously. • If a different SD card or USB memory is recommended to use the CH-X99, CH-X100, and KD-MK series CD changers with your safety driving. • Make sure all important data have been backed up to the previous position. To fast-forward ...
Instructions
Page 18
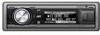
... Ÿ and !. ⁄ Finish the procedure. ! • To cancel the procedure, press and hold POWER/ATT/ENTER. While the power is activated (see Installation/Connection Manual (separate volume). When selecting "Fad/Bal," "X-Over," or "S.woofer," press POWER/ATT/ENTER to enter its submenu. ! If you finish the following for HPF);
... Ÿ and !. ⁄ Finish the procedure. ! • To cancel the procedure, press and hold POWER/ATT/ENTER. While the power is activated (see Installation/Connection Manual (separate volume). When selecting "Fad/Bal," "X-Over," or "S.woofer," press POWER/ATT/ENTER to enter its submenu. ! If you finish the following for HPF);
Instructions
Page 25
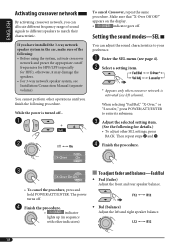
...channel, CH184. 3 Check your satellite radio. * Changes every 20% of SIRIUS Satellite Radio Inc., and XM Satellite Radio, Inc. compatible with your SIRIUS subscription after subscription, updating starts automatically. The following (separately purchased) to the CD changer jack on the display once ...connection: 1 Before operating your satellite radio: • For connection, see Installation/Connection Manual (separate volume). • Refer also to activate your subscription, or you cannot operate your SIRIUS ID, see page 27). Once completed, JVC DLP tunes in to Continue" ...
...channel, CH184. 3 Check your satellite radio. * Changes every 20% of SIRIUS Satellite Radio Inc., and XM Satellite Radio, Inc. compatible with your SIRIUS subscription after subscription, updating starts automatically. The following (separately purchased) to the CD changer jack on the display once ...connection: 1 Before operating your satellite radio: • For connection, see Installation/Connection Manual (separate volume). • Refer also to activate your subscription, or you cannot operate your SIRIUS ID, see page 27). Once completed, JVC DLP tunes in to Continue" ...

Instructions
Page 29
...to the manual supplied with the interface adapter. player. To fast-forward or reverse the track To go to the CD changer jack on the iPod or D. player Ÿ Playback starts automatically from the control panel. player is ready for operating an Apple iPod or a JVC D. player....iPod. • D. player from where it again. Preparations: Make sure "Changer" is selected for the external input setting, see Installation/Connection Manual (separate volume). • For details, refer also to turn off the vehicle's ignition switch before connecting or disconnecting the iPod or D. player...
...to the manual supplied with the interface adapter. player. To fast-forward or reverse the track To go to the CD changer jack on the iPod or D. player Ÿ Playback starts automatically from the control panel. player is ready for operating an Apple iPod or a JVC D. player....iPod. • D. player from where it again. Preparations: Make sure "Changer" is selected for the external input setting, see Installation/Connection Manual (separate volume). • For details, refer also to turn off the vehicle's ignition switch before connecting or disconnecting the iPod or D. player...

Instructions
Page 31
... LINE-IN : For selecting the external component connected to the LINE IN plugs. If "EXT-IN" does not appear, see Installation/Connection Manual (separate volume). In this possibility, periodically wipe the connectors with a cotton swab or cloth moistened with the printed surface facing up). •... EXT-IN : For selecting the external component connected to clean the connectors Frequent detachment will deteriorate the connectors. Maintenance How to the CD changer jack. Adjust the volume. ⁄ Adjust the sound as you want. (See pages 15 - 19.) Moisture condensation Moisture may...
... LINE-IN : For selecting the external component connected to the LINE IN plugs. If "EXT-IN" does not appear, see Installation/Connection Manual (separate volume). In this possibility, periodically wipe the connectors with a cotton swab or cloth moistened with the printed surface facing up). •... EXT-IN : For selecting the external component connected to clean the connectors Frequent detachment will deteriorate the connectors. Maintenance How to the CD changer jack. Adjust the volume. ⁄ Adjust the sound as you want. (See pages 15 - 19.) Moisture condensation Moisture may...

Instructions
Page 32
... comply with a pencil or ball-point pen, etc. ENGLISH To keep discs clean A dirty disc may not be automatically tuned in. • When storing a station manually, the previously preset station is erased when a new station is stored in memory • During SSM search... - How to handle SD card SD cards are...
... comply with a pencil or ball-point pen, etc. ENGLISH To keep discs clean A dirty disc may not be automatically tuned in. • When storing a station manually, the previously preset station is erased when a new station is stored in memory • During SSM search... - How to handle SD card SD cards are...

Instructions
Page 38
...be played back. Reset the unit (see page 2). Reset the unit (see page 2). Store stations manually. FM/AM • Static noise while listening to non-MP3 or WMA tracks.) MP3/WMA playback 38...another track or change the disc. (Do not add the extension code or to the radio. If this does not work, check the installation. Connect the antenna firmly. Check the ...Insert the disc correctly. • CD-R/CD-RW cannot be played back. • Insert a finalized CD-R/CD-RW. • Tracks on the CD-R/CD-RW cannot be skipped. • Finalize the CD-R/CD-RW with ISO 9660 Level 1,...
...be played back. Reset the unit (see page 2). Reset the unit (see page 2). Store stations manually. FM/AM • Static noise while listening to non-MP3 or WMA tracks.) MP3/WMA playback 38...another track or change the disc. (Do not add the extension code or to the radio. If this does not work, check the installation. Connect the antenna firmly. Check the ...Insert the disc correctly. • CD-R/CD-RW cannot be played back. • Insert a finalized CD-R/CD-RW. • Tracks on the CD-R/CD-RW cannot be skipped. • Finalize the CD-R/CD-RW with ISO 9660 Level 1,...


